Entrastamento de Forma Simples!!
•
4 gostaram•1,704 visualizações

Entrastamento de forma simples.

Recomendados
Mais conteúdo relacionado
Mais procurados
Mais procurados (20)
Destaque
Destaque (20)
Semelhante a Entrastamento de Forma Simples!!
Semelhante a Entrastamento de Forma Simples!! (20)
Mais de Gabriel Vandresen
Mais de Gabriel Vandresen (11)
Último
Último (9)
Entrastamento de Forma Simples!!
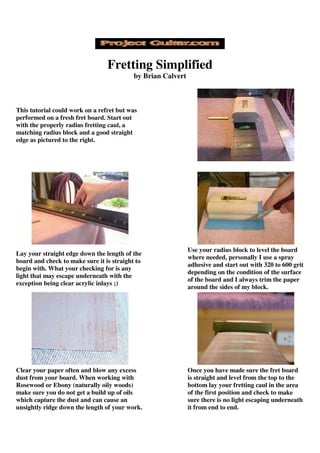
- 1. Fretting Simplified by Brian Calvert This tutorial could work on a refret but was performed on a fresh fret board. Start out with the properly radius fretting caul, a matching radius block and a good straight edge as pictured to the right. Lay your straight edge down the length of the board and check to make sure it is straight to begin with. What your checking for is any light that may escape underneath with the exception being clear acrylic inlays ;) Use your radius block to level the board where needed, personally I use a spray adhesive and start out with 320 to 600 grit depending on the condition of the surface of the board and I always trim the paper around the sides of my block. Clear your paper often and blow any excess dust from your board. When working with Rosewood or Ebony (naturally oily woods) make sure you do not get a build up of oils which capture the dust and can cause an unsightly ridge down the length of your work. Once you have made sure the fret board is straight and level from the top to the bottom lay your fretting caul in the area of the first position and check to make sure there is no light escaping underneath it from end to end.
- 2. If all is well you should have no light escaping underneath the caul no matter where it is placed on the fret board. I finished up leveling using 2000 grit paper. This is an Ebony board and look I can see my neighbors house in it without adding oil =o) Grab a business card and the fret wire you intend to use and place the edge of the card right up against the underside of the fret along the tang. Now flip it over and draw a line along the edge of the tang and your card should look like the one pictured above. Slip the card down inside each of the individual fret slots and check for depth, you need to do this because with the leveling and radius you just took a bit of depth out of the slots by removing the surface of the board. Be sure to move it side to side but do not force it down, if you see any white below the line while it is in the slot then you need to whip out your slotting saw and deepen that particular area.
- 3. Neck support cauls are a life saver and come in handy when using an arbor press to fret the first 12-14 frets as pictured above and to the right. I pre-radiused the fret wire using my wooden fret bending tool and with the neck support caul under the neck to help support and steady it start to press the frets in. I use a Dremel to trim the excess off. Grab a scrap piece of 2 x 4 about a foot long and measure the height of the base of your arbor press (A) the width of the base (B) and the distance from your work surface to the bottom of the neck heal your working on (C) then cut up the board to use as a supporting jig as pictured above. Place your two (A) blocks under your neck support caul and your odd shaped block squarely under the neck so you can continue to fret down to number 21 or 24 depending on the type of neck your working on without any hassles supporting your neck. Now grab a second piece of 2 x 4 and a double sided flat file. Make a cut the length of your piece of wood that is at a 35 degree angle then cut a slot down the edge at position (A) marked below that is just thick enough to grab your file. Insert the file with the course side towards the smaller flat area You can see what mine looks on the upper right. I added a $2.79 piece of Tandy brand suede cut in two I purchased from the crafts section of Wal-mart using contact cement. This helps your tool slide along the length of the neck without scratching the tops of your frets.
- 4. First thing you want to do is square off the fret ends against your neck, start off slow and as soon as the "Cricket chirping" has disappeared you will know your finished, then move on to the other side. After you have done both sides flip your tool around and continue with the bevel cut to your fret ends. Don't forget to listen for the cricket to stop chirping =o) For the next step if your working with a maple fret board I recommend you mask between the frets to protect the finish of the wood. Grab a course sanding sponge and run it up and down the length of your board at the same angle as your bevel cut. Do this quickly back and forth a few times, then move on to the other side and Repeat. Now grab a finer grit sanding sponge and repeat the process again. After your finished doing this simply wipe the dust off and buff out the top of your neck! You can plainly see the bevel on the sides and my tang slots are almost perfectly the same depth along the fret board so no fill is needed. Beats the heck out of me why all those professionals seem to think you need a bunch of high end expensive files to dress out the end of your frets. Mine feel factory smooth and I dressed all 48 fret ends in under 3 minutes using less than $2 worth of sponge power and a buffing wheel =o)