Class 2 handout css exercises (2)
•Transferir como DOC, PDF•
0 gostou•1,450 visualizações


Recomendados
Mais conteúdo relacionado
Mais procurados
Mais procurados (20)
Semelhante a Class 2 handout css exercises (2)
Semelhante a Class 2 handout css exercises (2) (20)
Mais de Erin M. Kidwell
Mais de Erin M. Kidwell (9)
Último
Último (20)
Class 2 handout css exercises (2)
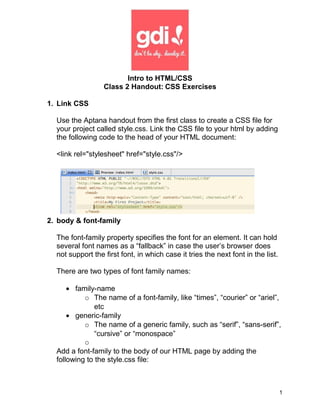
- 1. Intro to HTML/CSS Class 2 Handout: CSS Exercises 1. Link CSS Use the Aptana handout from the first class to create a CSS file for your project called style.css. Link the CSS file to your html by adding the following code to the head of your HTML document: <link rel="stylesheet" href="style.css"/> 2. body & font-family The font-family property specifies the font for an element. It can hold several font names as a “fallback” in case the user’s browser does not support the first font, in which case it tries the next font in the list. There are two types of font family names: • family-name o The name of a font-family, like “times”, “courier” or “ariel”, etc • generic-family o The name of a generic family, such as “serif”, “sans-serif”, “cursive” or “monospace” o Add a font-family to the body of our HTML page by adding the following to the style.css file: 1
- 2. body{ font-family: Helvetica; } In our Aptana preview pane, our page is now in Helvetica: That is, if you have Helvetica installed! (Mac users will probably see the change, and Windows users that don’t have Helvetica installed 2
- 3. will probably not.) To change our font for all users, we need to add some fallback fonts: body{ font-family: "Helvetica Neue", Helvetica, Arial, sans-serif; } Now even if you do not have Helvetica installed, you should at least see a sans-serif font. 3. background-color We will also add a background-color to our body selector: body{ font-family: "Helvetica Neue", Helvetica, Arial, sans-serif; background-color: #88A33E; } CSS supports 17 standard plus 130 additional color names, such as aqua, black, white, gray, lime, etc. You can find those colors at http://www.w3schools.com/cssref/css_colornames.asp. To specify additional colors, we are using hex values, such as #88A33E in the example above, which is a green color. There are other ways to specify colors, which we will learn in the fourth class. To come up with interesting color schemes, Adobe has a free product at http://kuler.adobe.com that allows you to create different color schemes based on a starting color. 4. background-image Go to the following image on your browser: http://citrusmoon.typepad.com/photos/tiles/wikid2.gif 3
- 4. Right click on the image and save as “background.gif”. In Aptana, in your FirstProject project folder, right click on the project folder and click New->Folder to make a new folder. Call this folder images. In your downloads folder, where you saved the background tile, drag the background.gif file into the “images” folder in Aptana. When Aptana prompts you, copy the file. This is what our directory should look like now: In our style.css, add the following line to our body selector: background-image: url('images/background.gif'); Our Aptana preview pane should look like this: 4
- 5. By default, a background image is placed at the top left corner of an element, and repeated both vertically and horizontally. 5. background-attachment, background-position, background- repeat To alter the default behavior, we can use the following CSS properties: background-attachment – sets whether a background image is fixed or scrolls with the rest of the page background-position – sets the starting position of a background image background-repeat – sets if/how a background image will be repeated add the following to the body selector of our style.css file: background-repeat:no-repeat; background-attachment:fixed; background-position:center; 5
- 6. Now our background tile is centered and does not repeat horizontally or vertically: But that looks awful, so we will remove those three lines. We just did that so we would see how these three CSS properties work. Our body selector should look like this again: body{ font-family: "Helvetica Neue", Helvetica, Arial, sans-serif; background-color: #88A33E; background-image: url('images/background.gif'); } 6. color The color property specifies the color of text. Black is a little hard to read on our new background, so we will add this color to our body selector: color: #F7F2B2; 6
- 7. Now our page looks like this: Let’s add some different colors for our h1 and h2 tags: h1{ color: #541E32; } h2{ color: #8E3557; } 7
- 8. 7. text-indent The text-indent property specifies the indentation of the first line ina text-bock. We will add a text indent to our <p> tags: p{ text-indent: 50px; } 8
- 9. Now we can go into our index.html and remove the indent we created with the 9
- 10. Now our indents are matching: 8. text-transform The text-transform property controls the capitalization of text. For example, you an set the text-transform property value to uppercase, capitalize, or lowercase. Let’s say we want our h1 tags in all uppercase: h1{ color: #541E32; text-transform: uppercase; } 10
- 11. Now our h1 heading is all caps, even though our source code shows otherwise: 9. Other font properties We can use other font properties such as font-size, font-weight, and font-style to style our text. font-size – sets the size of a font. Several units can be specified for font-size. You will commonly see pixels (px), but could also see em (sets the font in relation to the browser’s default font size), ex (refers to the x-height of the font, absolute sizes such as xx-small, x-small, small, medium and large, or relative sizes such as smaller or larger. W3C recommends using em’s for accessibility. font-weight – sets how thick or thin certain characters appear. Property values include normal, bold, bolder and lighter. font-style: specifies a font-style for the text such as italic or oblique Let’s change the style of the text in our p tags: p{ text-indent: 50px; font-size: 1.5em; font-weight:lighter; font-style:oblique; } 11
- 12. 10. div Let’s add some div containers around our existing html code. We wll give our first div a class name of “info”. <div class="info"> <h1>Learning New Skills</h1> <h2>With GDI Cincinnati!</h2> <p>Want to learn how to build your own website?<br> Already have your own Tumblr/Wordpress/etc site, but want to have more control over it?<br> Interested in learning to program but want to start small? This class is for you!</p> <p>We will guide you through the basics of HTML and CSS, give you some readily-applicable skills, and answer any questions you may have along the way.</p> </div> 12
- 13. If you look in the Aptana preview pane, our page shouldn’t look any different. Let’s add some declarations for our new class, and a comment: /*This is the style for our "info" class */ .info{ width: 1024px; height: 768px; text-align: center; } If you scroll down, you will notice a lot of blank space before we reach the image on our page. This is because of the div height we set in our CSS. Let’s add some classes to our lists: <ol class="roman"> <li>Do my laundry</li> <li>Pay my bills</li> <li>Go to the bank</li> </ol> 13
- 14. <h3>More Things to Do</h3> <ul class="square"> <li>Do my laundry</li> <li>Pay my bills</li> <li>Go to the bank</li> </ul> And we will add some class selectors to our CSS: ul.square { list-style-type:square; } ol.roman { list-style-type: upper-roman; } Our Aptana preview should show our lists as styled: 11. Styling tables with CSS You can use CSS properties such as border, background-color and color to style your tables. Add the following selectors and declarations to your style.css: 14
- 15. table, td, th{ border: 1px solid #88A33E; background-color: #C2BD86; color: #88A33E; } th{ background-color: #88A33E; color: #C2BD86; } Your table should look like this: 15