UIC Blackboard Learn Quick Start Guide
•
1 gostou•5,171 visualizações

Guide for instructors that use Blackboard Learn to design courses.

Recomendados
Recomendados
Mais conteúdo relacionado
Mais procurados
Mais procurados (20)
Semelhante a UIC Blackboard Learn Quick Start Guide
Semelhante a UIC Blackboard Learn Quick Start Guide (20)
Mais de Elizabeth Romero
Mais de Elizabeth Romero (9)
Último
Último (20)
UIC Blackboard Learn Quick Start Guide
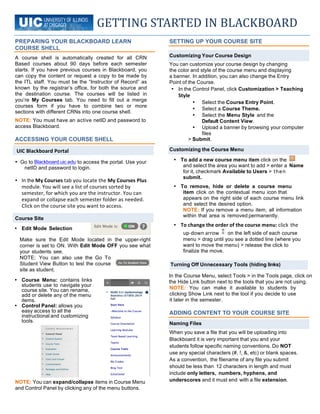
- 1. UIC Blackboard Portal GETTING STARTED IN BLACKBOARD PREPARING YOUR BLACKBOARD LEARN COURSE SHELL A course shell is automatically created for all CRN Based courses about 90 days before each semester starts. If you have previous courses in Blackboard, you can copy the content or request a copy to be made by the ITL staff. You must be the “Instructor of Record” as known by the registrar’s office, for both the source and the destination course. The courses will be listed in you’re My Courses tab. You need to fill out a merge courses form if you have to combine two or more sections with different CRNs into one course shell. NOTE: You must have an active netID and password to access Blackboard. ACCESSING YOUR COURSE SHELL • Go to Blackboard.uic.edu to access the portal. Use your netID and password to login. • In the My Courses tab you locate the My Courses Plus module. You will see a list of courses sorted by semester, for which you are the instructor. You can expand or collapse each semester folder as needed. Click on the course site you want to access. • Edit Mode Selection Make sure the Edit Mode located in the upper-right corner is set to ON. With Edit Mode OFF you see what your students see. NOTE: You can also use the Go To Student View Button to test the course site as student. SETTING UP YOUR COURSE SITE You can customize your course design by changing the color and style of the course menu and displaying a banner. In addition, you can also change the Entry Point of the Course. • In the Control Panel, click Customization > Teaching Style • Select the Course Entry Point. • Select a Course Theme. • Select the Menu Style and the Default Content View. • Upload a banner by browsing your computer files > Submit. Customizing the Course Menu • To add a new course menu item click on the and select the area you want to add > enter a Name for it, checkmark Available to Users > then submit. • To remove, hide or delete a course menu item click on the contextual menu icon that appears on the right side of each course menu link and select the desired option. NOTE: If you remove a menu item, all information within that area is removed permanently. • To change the order of the course menu: click the up-‐down arrow on the left side of each course menu > drag until you see a dotted line (where you want to move the menu) > release the click to finalize the move. • Course Menu: contains links students use to navigate your course site. You can rename, add or delete any of the menu items. • Control Panel: allows you easy access to all the instructional and customizing tools. NOTE: You can expand/collapse items in Course Menu and Control Panel by clicking any of the menu buttons. In the Course Menu, select Tools > in the Tools page, click on the Hide Link button next to the tools that you are not using. NOTE: You can make it available to students by clicking Show Link next to the tool if you decide to use it later in the semester. ADDING CONTENT TO YOUR COURSE SITE When you save a file that you will be uploading into Blackboard it is very important that you and your students follow specific naming conventions. Do NOT use any special characters (#, !, &, etc) or blank spaces. As a convention, the filename of any file you submit should be less than 12 characters in length and must include only letters, numbers, hyphens, and underscores and it must end with a file extension. Course Site Customizing Your Course Design Turning Off Unnecessary Tools (hiding links) Naming Files
- 2. If you are using a shell for the first time, Go to the Control Panel menu, select Content System > your course folder corresponds to your course ID #. Click Upload > Upload Files. NOTE: This allows you to reuse files in multiple areas within your course(s). Building Content Various types of content can be selected from the Build Content drop down menu and added to a Content Area. NOTE: Most Content added to a Content Area can be set to display on a specific date and time and to stop displaying on a specific date and time. Display restrictions do not affect content, only the availability of the content item to your students. 1. In the Course Menu, select Course Documents or Course Information > hover over Build Content and select Item. 2. Type in the Name of your Syllabus or document. Include the file type and relative information in the Text box. 3. Browse Content Collection for the file, select the radio button, provide the Link Title, select the desired Options >Submit. on the Create Contact button > complete the template > Submit. NOTE: You must select Make the Profile Available = Yes for students to see the information. WELCOMING YOUR STUDENTS In the Course Menu, select Announcements > click on the Create Announcement button > fill in the Subject and Message fields and select the appropriate Options > Submit. NOTE: Consider posting a Welcome Announcement. In this message you may want to include the date/time of class, a brief course overview, instructor’s name and contact information, any textbook information, where your students can find the syllabus, as well as how you intend to use Blackboard. In the Control Panel, click Course Tools > Send Email > in the Send Email page, select the All Users > type in a Subject and a Message > Submit. In the Control Panel, click Customization and select Properties > Set Availability, Make Course Available = Yes > Submit. NOTE: All courses are set to unavailable to students by default. Before you make your course available, go through all course content and make sure all URL’s and documents are current and reflect current semester information. ADDING GRADES TO YOUR COURSE Adding Grades in the Full Grade Center There are several ways to add grades or assessment columns in the Blackboard Grade Center. • Automatically o Created when you select items from the Create Assessment menu or grading for any of the communication tools. • Manually o Select Grade Center o Select Full Grade Center o Select Create Column • Enter the column information. • Select Score for the Primary Display and/or the optional Secondary Display. • Select the desired Category) from the drop down menu • Enter in the Points Possible. • Select the optional Due Date. (this will show on the students Bb course dashboard .) • In the Options area, select Yes to Include this Column in the Grade Center Calculations and Show this Column to Students and Show Statistics if you want the students to see these options. • Click Submit. • To enter/change grades in a spreadsheet-like way: 1) in the Full Grade Center page, click on the cell in which you would like to put a grade (you may need to scroll to the right to find the column) • type the grade directly into the cell and 2) press Enter to save the grade. The cursor will be moved one cell down by default. • To override grades in the grade details page: • From the drop down menu next to any automatically graded item select View Grade Details, 2) select the Manually Override tab. You will then be able to enter the grade, 3) click Save and Return to Grade Center. GETTING HELP WITH BLACKBOARD Email: Blackboard@uic.edu Phone: (312) 996-9824 • Blackboard Website: http://blackboard.uic.edu Adding Files to Your Content System Uploading Your Syllabus or other course documents Creating Your Contact Information In the Course Menu, select Staff Information and click Posting a Welcome Announcement Sending a Welcome Email Making Your Course Available (REQUIRED for your students to access your course site.)