Impression Techniques in Fixed partial denture
•
7 gostaram•3,215 visualizações

in prosthodontics

Recomendados
Mais conteúdo relacionado
Mais procurados
Mais procurados (20)
Semelhante a Impression Techniques in Fixed partial denture
Semelhante a Impression Techniques in Fixed partial denture (20)
Mais de Dr.Richa Sahai
Mais de Dr.Richa Sahai (14)
Último
Último (20)
Impression Techniques in Fixed partial denture
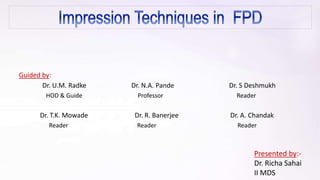
- 1. Presented by:- Dr. Richa Sahai II MDS Guided by: Dr. U.M. Radke Dr. N.A. Pande Dr. S Deshmukh HOD & Guide Professor Reader Dr. T.K. Mowade Dr. R. Banerjee Dr. A. Chandak Reader Reader Reader
- 2. Contents • Introduction • Criteria for an ideal impression • Definitions • Review of Literature • Impression making techniques • Disinfecting impressions • Summary • Conclusion • References
- 3. Introduction For a dentist it is very important to select a suitable impression technique using appropriate materials to get a model as accurate as possible. Therefore it is important to know the different impression techniques which will give the maximum benefits within the available materials.
- 4. • An acceptable impression must be an exact record of all aspects of the prepared tooth • The contour of the unprepared tooth structure cervical to the preparation margin is critical information . TOOTH RESTORATION INTERFACE
- 5. • If the impression does not reproduce this critical area where tooth and future restoration meet, fabricating the restoration with proper contours is not possible . PROERLY CONTOURED RESTORATIONS
- 6. • Particular attention is given to reproducing the lingual surfaces of anterior teeth because they influence Anterior Guidance . • Impression must be free of air bubbles, tears, & spots, and other imperfections that might produce inaccuracies. FAULTY IMPRESSION CORRECT IMPRESSION
- 7. A negative likeness or copy in reverse of the surface of an object DEFINITIONS GPT 9th ed. IMPRESSION MATERIAL: Any substance or combination of substances used for making an impression or negative reproduction CAST: A life – size likeness of some desired form. It is formed within or is a material poured into a matrix or impression of desired form GPT 9th ed. GPT 9th ed.
- 8. • Any moisture will result in voids • Consequently, saliva flow into the area must be reduced and diverted to obtain the necessary dry field of operation • When the preparation margins extend sub- gingivally, the adjacent gingival tissues must be displaced laterally to allow access and to provide adequate thickness of the impression material GINGIVAL RETRACTION
- 9. 1. Eames et al - fabricated impression trays providing 2, 4 & 6 mm spacers to determine the stability & accuracy of various elastomeric impression materials on a full crown preparation steel die. • Conclusion - space of 2mm provided the most accurate impressions for all of the materials tested. 2. Marcinak CF, Draughn (1982) conducted a study on linear dimensional changes in addition silicone impression materials. • The results showed that dies produced at 168 hours were as accurate as those produced at 10minutes. Review of Literature
- 10. 3.Nissan J et al (2000) - studied the accuracy of 3 putty wash impression techniques using the poly vinyl siloxane impression material in a laboratory model. 1) one step ,putty and wash material used simultaneously 2) two step with 2mm spacer 3) two step with polyethylene spacer. They concluded that the polyvinyl siloxane two step, 2mm spacer putty wash impression technique was the most accurate.
- 11. 4. Johnson GH and Craig RG (1986) conducted a study on three impression techniques: • a putty-wash, • single mix impression and • a double mix impression. They concluded that the same accuracy of impression was achieved for all the techniques when addition silicones were used, where as the putty-wash technique produced the most accurate dies for the condensation silicone.
- 12. Stock Tray • A metal or plastic prefabricated impression tray typically available in various sizes and used principally for preliminary impressions GPT 9 Advantages Disadvantages Eliminates time and expense of fabricating custom tray Metal stock trays are rigid and are not susceptible to distortion More impression material is required Metal trays must be sterilized
- 13. An individualized impression tray made from a cast recovered from a preliminary impression; • For PVS - 2 mm thickness of base plate wax • For more rigid materials, polyether - 3 mm is required to facilitate removal from the mouth and removal of the replica cast. Custom tray Advantages: Because the trays are used only once, sterilization is not a problem A uniform thickness of impression material is obtained Disadvantages: Construction of the custom tray is time consuming Monomer allergy
- 14. Evaluating Set Impression: Finish line should be recorded properly No tray exposure in any areas of the impression, except at tissue stops No shiny smooth areas; (suggest moisture contamination) No voids present; (suggest mixing problems or contamination)
- 15. TYPES OF IMPRESSIONS PRELIMINARY IMPRESSION • Generally made in stock or modified stock trays. • Made with irreversible hydrocolloid and poured in a type III dental stone (ADA) to produce to diagnostic cast. FINAL IMPRESSIONS • Because a definitive restoration is to be constructed final impression materials must be accurate dimensionally stable, recovery without distortion, and compatible with a variety of dental stones.
- 16. Impression making in Fixed partial dentures
- 17. Copper Band Technique Solomon E.G.R: Classification of impression procedures in fixed partial denture construction. JIDA Oct 1975. I. Individual copper band impression together with an orientation impression. a. Copper band low fusing compound impression in plaster orientation. b. Copper band low fusing compound impression in silicone orientation. c. Copper band silicone impression, in plaster orientation impression d. Copper band silicone impression in silicone orientation impression.
- 18. Technique Of Individual Impression Take a copper band and adapt it around the tooth. Cut the end of band with scissor to follow the outline of the gingival finish line. Evaluate the fit, band should extend approx 1mm beyond the finish line. An orientation hole is made on the facial surface of tube Green stick compound is heated, and the softened mass is placed into the band & filled to one-third of the tube. 18
- 19. Band is then placed onto the tooth preparation Tube should not be pushed too deep & only a part of occlusal surface should be recorded. Then remove the band from the tooth and remove the 0.2 mm of compound from impressed occlusal surface. Put 4 to 5 holes above the bottom of the copper tube. Coat the internal surface with adhesive, and inject the Elastomeric material into the copper band. Place the band onto the tooth After the final set, remove the band from the tooth and evaluate the impression. 19
- 20. I. Individual Copper Band Impression Together With An Orientation Impression Orientation Impression:- • The relationship of the individual preparation to each other as well as to the remaining teeth and dental arch is obtained with an orientation impression . Indications- 1 ] Single tooth preparation. 2] In case of multiple preparations, when the impression of one or two preparations have not been recorded properly.
- 21. ADVANTAGES DISADVANTAGES a. Impression compound can be used effectively for complete crown or simple inlays. b. In situations where the margins of the preparation are below the level of the gingival tissue. c. The material can be electroplated easily to produce copper or silver electro formed dies. a. A band must be contoured, festooned and annealed and a separate impression must be taken of each tooth. b. The band is often difficult to remove. c. The copper band usually causes some trauma to the gingival tissue. d. A die must be formed of each copper band impression, then must be seated in an inter- occlusal registration.
- 22. A. Copper Band Low Fusing Compound Impression In Plaster Orientation Impression • A plaster impression over this secures the correct relation of the preparation to the remaining teeth and dental arch. • Advantage of using plaster:- For orientation impression is its rigidity. It holds the band in place preventing its displacement. • Disadvantage of using plaster:- Is the production of heat as plaster sets & unpleasant to the patient, when a plaster impression is recorded.
- 23. Advantages of this technique: • Any defect in the preparation can be visualized in the impression can be corrected. • Gingival retraction is not necessary. Disadvantage of this technique: • The warmth from the plaster impression, may soften the compound.
- 24. • To avoid the action of heat on low fusing compound copper band impression during setting of plaster, heavy bodied silicone is used to record the orientation impression . Disadvantage of this technique- • Fixation of the band to the elastic silicone impression is inadequate. • It is possible for the band to get displaced in silicone impression resulting in series errors. B. Copper Band Low Fusing Compound Impression In Silicone Orientation Impression
- 25. • Impression plaster is used to record orientation impression. • Heat liberated during setting of plaster has no effect on the silicone individual copper band impression. • Indications- when there are unavoidable Undercuts between the preparations C. Copper Band Silicone Impression In Plaster Orientation Impression
- 26. • All the three consistencies of silicone are used for individual impression while heavy bodied silicone is used to record orientation impression. • Fixation of copper band to the orientation impression is made more effective by selecting long band with toothed edges. D. Copper Band Silicone Impression In Silicone Orientation Impression
- 27. Working & setting time
- 29. 1.Following gelation of the impression material the tray should be separated quickly from the teeth to avoid rocking and possible deformation of the fine areas of the impression. 2.Pour cast immediately & the cast should be separated from the impression after 45 to 60 minutes. Hydrocolloid Impression technique Irreversible hydrocolloid (Alginate)
- 30. • They require the special water cooled impression trays to cool the agar from a sol to gel. Reversible hydrocolloid (Agar)
- 31. Select the correct size of water-cooled impression tray. Place stops in the tray to prevent over seating. Isolate the prepared teeth & place the retraction cord. Fill the tray with material taken from the storage bath Fill the syringe with the wash hydrocolloid material taken from the storage bath. 31 Remove the cord from the sulcus. Hydrocolloid is injected around the prepared tooth Tray is removed from the tempering bath & seated in patient’s mouth. Water – cooling tubes are connected The completed impression
- 32. WET FIELD TECHNIQUE The motion displaces the syringe material as well as blood and debris throughout the sulcus. The hydraulic pressure of the viscous tray material forces the fluid syringe material down in to the areas to be recorded. Before syringe material gels tray material is seated. The syringe material is then injected in to the surface to be recorded. The oral tissues are flooded with warm water.
- 33. • Reversible hydrocolloid impression material used in a wet field produced stone dies as accurate as those produced in a dry field. • The surface quality of the dies produced from hydrocolloid impressions made in a wet field was indistinguishable from the quality of those made in a dry field. Stewart, GP, Bagley, RL, Froemling, RA. Evaluation of reversible hydrocolloid impression material in a wet field. J Prosthet Dent. 1984;51:797–800.
- 34. Laminate Technique • It was described in 1951 by Schwartz. • It combines reversible and irreversible hydrocolloid. The tray hydrocolloid is replaced with a mix of chilled alginate, that bonds with syringe agar . Advantages: Disadvantages: • Less preparation time • Less complicated when compared to the wet field technique • Bond between agar & alginate is not strong • High viscosity alginate displaces agar during seating • Dimensional inaccuracy of alginate limits the use to single units
- 35. • Fusayama developed the Laminated single impression technique where heavy & wash silicone are mixed at the same time. • The wash type is laminated in a thin layer on the surface of the heavy type & is loaded in a tray & immediately impressed upon the preparation. • The purpose of this lamination is to prevent the direct contact of the heavy type with, the preparation, which roughens the stone surface. • They concluded that the laminated single impression technique is clinically simple & is capable of producing stone models having adequate dimensional accuracy & sufficient surface reproducibility Fusayama T, Iwaku M, Daito K, Takatsu T, Kurosaki N. accuracy of the laminated single impression technique with silicone material. J Prosthet Dent. 1974; 32(3): 270 – 76
- 37. Modified Alginates - 1. Alginate in the form of sol - containing water but no source of calcium ions. (paste form) 2. Alginates modified by the incorporation of silicone polymers (paste form) Advantages - Fine detail reproduction & high tear resistance Disadvantages - Poor dimensional stability
- 38. 1. Mixing techniques Double mix Heavy-light body technique Putty wash technique One stage -- simultaneous Two stage -- relief channel -- 2 mm spacer technique Single mix or mono-phase technique 2. Tray used Custom tray impressions Stock tray impressions Based on the mixing techniques & tray used
- 39. 1. Double mix technique (Multiple mix technique)
- 40. Advantages • Overcomes the polymerization shrinkage of the light body material • Margins duplicated in light body Disadvantages • An assistant required for mixing the material - tray/syringe simultaneously • Margins duplicated in heavy body in case of excess pressure
- 41. 2. Single mix technique
- 42. Advantages • Reduced wastage of the material • Less time consumption • Avoids the time involved in fabrication of custom tray Disadvantages • Relatively high viscosity and reduced flow of the monophase materials, makes their injection onto the preparation more difficult to control -increased incidence of surface voids - Stephen M. Dunne et al 1998
- 43. Putty wash simultaneously technique (One stage)
- 44. Putty wash relief channel technique • Pre-operative putty impression is made intra orally • In the area where the teeth are to be prepared impression material is removed or channels prepared using putty cutter instrument • The impression is then relined with low viscosity material
- 45. Advantages • Impression can be captured with the wash materials Disadvantages • To confine the wash material to area of relieved impression • If entire area is washed - creates hydraulic displacement of putty impression resulting in smaller dies - Donovan TE 2004
- 46. Putty wash-2mm spacer technique • 2 mm thickness wax spacer is prepared on a diagnostic cast, occlusal stops are provided on non-functional cusps • A putty impression is made with a stock tray resulting in a putty custom tray with 2mm space for the wash material • Putty custom tray is then washed with light body material
- 47. • The polymerization reaction of condensation silicones produces the volatile by- product ethyl alcohol - dimensional change. • Advances in the formulation - have increased the silica filler in the putty to over 75% which decreases the dimensional change. • If a stock tray is available, a condensation reaction silicone impression can be made using either the one-or two step putty wash technique (two step is preferred over one step) • However, a custom tray is available, use a light body syringe wash with a medium or heavy - body tray material. Impression making with Condensation silicone
- 48. In Custom Trays • The one step impression technique • The impression material can be delivered from either tubes /cartridge systems. In Stock Trays 1. Two Step Putty Wash Techniques: Most often used • The putty can customize the stock tray and offer support and stability to the wash material. • Addition silicones are not firm enough to be used in stock trays without putty or heavy body as a tray material. 2. One Step Putty Wash Technique: • Alternative to the two-step technique when a stock tray is used. Impression making with Addition silicone
- 49. Impression making according to mixing 1. Automix technique 1. Impression material is supplied in prepackaged cartridges with a disposable mixing tip attached. 2. The cartridge is inserted in a gun like device & the base & catalyst are extruded into the mixing tip, where mixing occurs as they progress to the end of the tube. 3. The homogeneously incorporated material can be directly placed on the prepared tooth & impression tray. 4. Advantage: Elimination of hand mixing. **A study conducted by Chong et al showed that elimination of hand mixing on pad produce fewer voids in the impression.
- 50. 2. Machine mixing technique • An alternate method for improving mixing is to use a machine mixer. • Convenient & produces void-free impressions.
- 51. • Arch is broken down into segments of multiple prepared teeth • Custom tray prepared for each segment with 1mm of wax relief • Overlay trays should extend 3 mm beyond the gingival margin. • Low viscosity material is loaded into the syringe as well as the segmental tray, and then an impression made • Procedure repeated with each segment • Finally a pick up/ overlay impression is made using a stock tray Uses • When moisture control is difficult • When making simultaneously impressions of implants and prepared teeth/ multiple prepared teeth Miscellaneous Techniques 1. Segmental impression technique
- 52. Jung B-Y, Lee K-W. Alternative impression technique for multiple abutments in difficult case to control. The J Adv Prosthodontics. 2010;2(1):1-3.
- 53. 2. Dual Arch Impression Technique • This technique captures the prepared teeth, the opposing arch and the occlusal articulation in maximum intercuspation (MIP) simultaneously. Minimum conditions: 1. The articulator must have a vertical dimension holding stop such as an incisal pin or other metal to metal contact. 2. If the articulator does not provide for a stop, there must be sufficient natural teeth remaining to maintain vertical dimension. 3. There should be sufficient space distal to the terminal tooth in the arch to allow tray approximation.
- 54. Indications • Used with a maximum of two prepared teeth • Used only with patients that have existing anterior guidance Contraindications • Presence of third molars • Rapidly ascending ramus • Excess soft tissue distal to the molars Advantages 1. Accurate recording of the MIP 2. Eliminates any mandibular flexure that might be associated with opening Disadvantages 1. Complicated laboratory procedure 2. Tray is not rigid; depends on impression material for rigidity. 3. Is not a functionally generated technique, so it is limited to one casting per quadrant. 4. The distribution of the impression material is not uniform.
- 55. Technique Loaded tray seated in mouth Biting in MIP
- 56. • Gus J. Livaditis described a technique that requests a series of three impression procedures using three types and/ or viscosities of impression material. • It overcomes deficiencies in registration of subgingival margins, gingival retraction and relapse and delivery of impression material subgingivally. 3. The matrix impression technique
- 58. • While making an impression, implant copings can reduce access to the prepared teeth and interfere in recording the margins of the prepared teeth. • A useful method to precisely record the detail of the prepared teeth and the implants is to use a combination of custom impression trays (individual trays) to impress the prepared teeth and then place the implant impression copings and make an over- impression of the arch. • A heavy-bodied PVS impression material is placed in the individual custom tray and is seated over the preparation(s). 4. Tooth implant impression makingChee WWL, Alexander M. Impression technique for arches requiring both implant and natural tooth restorations. J Prosthodont 1998;7:45.
- 59. • The heavy-body impression material is allowed to set, and the impression tray is removed. • The impression and tray are perforated through the occlusal surface with a round bur. • This preliminary impression is then filled with light-body material and replaced over the prepared teeth. • The hydraulics pressure forces the light body impression material beyond the prepared sub-gingival margins. • The implant copings are then attached, and an over-impression is made. • Two different techniques are followed i.e., an indirect/closed tray technique and the direct/open tray technique. • The procedure is as follows
- 62. • The first commercially available CAD/CAM system for fabricating dental restorations was introduced in 1987 (CEREC [chairside economical restoration of esthetic ceramics], Sirona). • It uses optical scanning and requires the entire area to be captured in the impression, to be coated with a reflective powder. • There were two digital impression systems introduced in 2008 that were not connected directly to a milling machine : 1. The iTero system (Cadent) uses a laser scanner that does not require reflective powder to facilitate the impression. 2. The Lava Chairside Oral Scanner (COS) (3M ESPE) uses light powder to facilitate scanning by an optical video system. 5. Digital impressions
- 63. • A dual-cord retraction technique is recommended. • After the preparation, a thin cord is placed and an initial scan is made. • The areas on the preparation that need modification are then refined. • Thicker cord is placed & the final scan is then accomplished.
- 64. Digital impressions - Stepwise procedure
- 65. • Elastomers are strong enough to reproduce a pinhole without tearing • However to ovoid bubbles : Cement tube : the tube filled with impression material is squeezed into each pinhole, making sure no air is trapped by inserting and removing an explorer into the material Lentulospirals : rotated slowly along the sides of the pin-hole • Reversible hydrocolloid - special nylon bristles are used to register the pin hole 7. Pin related restorations
- 66. Lentulo:- - Pick up a small quantity of impression material & spiral the material into the pinholes, rotating slowly while moving the lentulo along the side of the pinhole. Prefabricated plastic pins:- - Bristles, used to register the pinholes can be modified with a scalpel to eliminate inaccuracy relating to fit. - Length should be adjusted so that they do not contact the impression tray. Place the bristle & complete impression.
- 67. • The elastomeric impression should be reinforced with a plastic pin or orthodontic wire. Direct Procedure:- 1. Lubricate the canal & notch a loose fitting plastic dowel that extends to the full depth of the prepared canal. 2. Use bead-brush technique to add resin to the dowel & place resin into the canal. 3. Do not allow the resin to harden fully within the canal. Loosen & reseat it several times while its rubbery. 4. Once polymerized, remove the pattern & build up the core 8. Impression technique for post & core
- 68. Indirect Procedure:- 1. Cut pieces of orthodontic wire to length & shape them like letter “J”. 2. The wire should fit loosely & extend to the full depth of the post space. 3. Coat the wire with tray adhesive. 4. Using lentulo spiral, fill the canal with elastomeric impression material. 5. Seat the wire reinforcement to the full depth of post space, syringe more impression material around the prepared teeth, & insert the impression tray. 6. Remove the impression & pour cast.
- 69. • Indirect dowel cores - when multiple dowel cores are required or when radicular attachments are to be used • A 25 gauge local anesthetic needles - vent to allow air to escape as the impression material is injected into the canal space • Needle is gradually removed while the low viscosity materials is injected into the canal • Plastic impression dowel coated with adhesive is inserted into the canal • Procedure is repeated with multiple dowels and finally an over impression is made
- 70. Trebilcock CE , Evans DB. A two-stage impression technique for the indirect fabrication of multiple cast dowel and cores. J Prosthet Dent. 1991 Oct;66(4):422-5.
- 71. Advantages • Increased hardness of the die • Excellent abrasion resistance • Die is so strong that wax patterns & gold castings can be burnished with little distortion or damage to the die Disadvantages • Toxicity of cyanide baths • Time required to prepare the die • Expense of labor and materials • Limited control of die accuracy 9. Electroplating It is the electro deposition of metals (silver, copper) on the surface of the impression to improve the abrasion resistance of gypsum
- 72. Disinfection • It is necessary to disinfect impressions before pouring the cast or sending to lab. • The first step is to rinse the impression in tap water – removes microbes, otherwise microbes will be protected by saliva/blood. • Disinfection reduces the number of germs by at least a factor of 105. • An alternative to disinfecting impressions is to use disinfected die stones • Spray disinfection- not preferred as complete surface wetting is not ensured..
- 73. • Alginates- cast immediately OR stored in hygrophor / in a resealable plastic bag together with a moist paper towel. • Agar- cast immediately OR wet towels, humidors, water baths, 2% K2SO4 solution. • C-silicone or polysulfide- cast in 30 mins(dimensionally unstable) • Polyether - impressions send separately from alginate impressions - transported and stored dry, cold and protected from direct sunlight can be kept for up to two weeks. • VPS - most favourable material properties for storage. - kept & transported dry; not above room temperature. Storage & transport
- 74. 1) The copper band impressions do not require gingival retraction but it traumatizes the gingiva. 2) A reversible hydrocolloid gives the most precise impression but production of accurate working dies is difficult. 3) The irreversible hydrocolloids provides the least accurate complete arch impressions. 4) Of all the elastic impressions the polyvinyls and polyethers are more stable to deformation. 5) Storing the impressions at 4°C, then allowing the impression material to reach room temperature, results in slight expansion of the impressions which partially compensates the contraction during polymerization of the material. M Curso. Effect of temperature changes on dimensional stability of polyvinyl siloxane and polyether impression materials. Int J Prosthodont. 1998;79:626–631. To summarize key points
- 75. 6) A complete dry field and latex-free gloves are essential when impressions are made with addition silicone. 7) Polyether produces the best detail reproduction under moist conditions. 8) The use of metal trays results in superior dimensional accuracy and reliability of impression making (Markus B et al), the use of custom tray produced dies that were much more accurate than the stock trays (Gilmore et al) 9) A lower-viscosity wash material produces more precise impressions. 10) A two-stage putty wash technique provides a good reproduction only when a spacer of 2mm is provided in the first stage. 11) In the matrix impression system, the matrix dispenses the impression material into the sulcus with greater precision and consistency in comparison with a syringe.
- 76. 12) The monophase technique using either polyether or vinyl polysiloxane, produces better detail when compared to the dual-viscosity technique. 13) The use of rewash impression technique to correct impressions is not recommended. 14) The one-step putty-wash technique, records and reproduces the finish line better than two step technique. 15) All-ceramic crowns fabricated from digital intraoral impressions demonstrate better marginal fit than conventional two-step impressions. ***Pradíes G., Zarauz C., Valverde A., Ferreiroa A., Martínez-Rus F. Clinical evaluation comparing the fit of all-ceramic crowns obtained from silicone and digital intraoral impressions based on wavefront sampling technology. Journal of Dentistry. 2015;43(2):201–208. doi: 10.1016 16) The precision of the digital complete-arch impression are less accurate than a conventional impression. ***Ender A, Mehl A. Accuracy of complete-arch dental impressions: a new method of measuring trueness and precision. J Prosthet Dent. 2013;109:121–128.
- 77. • An important factor that ensures long-term success in fixed dental prosthesis is a precise record and reproduction of the prepared teeth, soft tissues and adjacent structures. • Excellent impressions require accurate and stable impression materials, time and a thorough working knowledge of all the aspects of the concepts involved. • If the clinician continues to have ill-fitting restorations, it may not only be due to inadequacy of the impression materials, but rather due to unacceptable clinical procedures. Conclusion
- 78. 1. Schillingburg: Fundamentals of fixed prosthodontics, 3rd edition. 2. Stephen F. Rosenstiel - Contemporary fixed prosthodontics, 3rd edition. 3. John F.McCabe & Angus W.G Walls, Applied Dental Materials, 8th ed. 4. Skinners science of dental materials, 9thth edition. 5. Robert G Craig, Restorative dental Materials, 9th edition. 6. William J O`Brien, dental materials and their selection, 3rd edition. 7. Pod Shadley A.G.- Electrosurgical procedures in crown and bridge restorations J. Am Dent Assoc 77: 1321; 1968. 8. Charles Culbreath D.D.S - An impression technique for cast restorations J. Prosthet. Dent 1975 Apr 33 (4). 9. Leesinger: Simplified copper tube impression for full crown coverage J. Prosthet. Dent 1976 Nov. 36 (5). 10. Andrew J. Cannis Trac: A new approach to impression taking for crown and bridge Dental Clinics. North America. 11. Tylman. S.D. and Fylman S.G.: Theory and practice of crown and bridge prosthodontics 8th edition. 12. Robert E. Going. Accurate rubber-base impressions. J. Prosthet. Dent 1968 Oct 20(4). References
- 79. 13. Holland M.W: An improved method for securing the impression and die for porcelain jacket construction Dental Clinics of North America, March 1959. 14. David C. Appleby D.M.D.: The combined reversible hydrocolloid/ irreversible hydrocolloid impression. J. Prosthet. Dent 1980 July 44 (1). 15. Kirk Gardner and Gerald H. Loft: An intraoral coping techniques for making impressions of multiple preparations. J. Prosthet. Dent 1981 May 45 (5). 16. Barry Marshak and David Assit. A controlled putty – Wash impression technique. J. Prosthet. Dent 1990 Dec 64 (6). 17. Jamsludi M: Technique for accurate rubber base impression for fixed prosthodontics. J. Prosthet. Dent 1982 March 47 (3). 18. Carrotte P.V., Johnson A: The influence of the impression tray on the accuracy of impression for crown and bridge work - an investigation and review Br. Dent. J. 1998; 185: 580585. 19. Robert E. Going. Accurate rubber-base impressions. J. Prosthet. Dent 1968 Oct 20(4). 20. Anthony La Forgia. Multiple abutment impressions using vaccum adapted temporary splints. J. Prosthet. Dent 1970 Jan 23 (1). 21. Edwin H.Getz et al., A full arch interocculusal impression tray to eliminate lack of coverage and tendency to distort. J. Prosthet. Dent 1994 June 71(6).
- 80. THANKYOU !
Notas do Editor
- Start – It is neither possible nor desirable to make patterns for fixed prostheses directly in the mouth. An impression is necessary to obtain a cast. This cast is then used to make a restoration in the laboratory. To obtain the cast, an elastic impression material is placed in a tray that is inserted into the patient's mouth When the material has set, it is removed from the mouth A suitable dental stone is then poured into the "negative" impression, and a positive likeness or working cast is obtained
- After 1 -- This means it must include sufficient unprepared tooth structure immediately adjacent to the margins for the dentist and laboratory technician to identify the contour of the tooth & all prepared surfaces. Last -- The contour of the unprepared tooth structure cervical to the preparation margin is critical information that must be available when the restoration is fabricated in the dental laboratory.
- Last - All teeth in the arch and the soft tissues immediately surrounding the tooth preparation must be reproduced in the impression. They will allow the cast to be accurately articulated and will contribute to proper contouring of the planned restoration
- Particular attention is given to reproducing the lingual surfaces of anterior teeth because they influence Anterior Guidance, which determines the occlusal morphology of the posterior teeth
- Start -- The patient's mouth is a challenging environment in which to make an accurate moisture control is probably one of the most important aspects of successful impression making. End – finish lines can be exosed by – mechanical , or chemico-mechanical or surgical methods of retraction. Mechanical - ZOE cement placed on cotton twirl Strings or fibers of different types : Cotton cords, Unwaxed floss, Plain cotton threads chemicomechanical – alum, aluminium chloride, ferric subsulfate, ferric sulfate, zinc chloride (various combinations - Cocaine 10% & Epinephrine,, 0.1% Zinc Chloride & 8% Epinephrine ) surgery – rotary -- A “troughing” tech. used for limited removal of epithelial tissue in the sulcus while a chamfer finish line is being created or electrosurgery
- Prelimnary - (Diagnostic impressions)
- Start - The copper tube or band is used to salvage an impression of multiple preparations when there are only vague margins on one or two preparations that are not adequately replicated in the impression
- 3. Evaluate the fit, band should extend approx 1mm beyond the finish line and produce minimum tissue blanching
- Last - It is taken either with plaster of Paris or heavy bodied silicone over the individual copper band impression placed on the preparation.
- Advantages c end - Improved hydrocal and epoxy die material can also be used effectively to produce working dies Disadvantages a end - This is both difficult and time consuming. End – d. in an inter- occlusal registration in order to obtain the relationship of the dies to each other and adjacent teeth.
- Start - An impression of individual preparation - with copper band and low fusing compound. Advantage of using plaster:- For orientation impression is its rigidity. It holds the band in place preventing its displacement, which would lead to change in relation of the individual impression to the remaining teeth and dental arch.
- Adv : 2. Gingival retraction is not necessary (*margin of the copper band does the function of gingival retraction. ) Diadv : ***This dimensional change can be avoided by breaking the plaster soon after the initial set. ***further minimized by first breaking the plaster through the band region, then breaking the labial wall of band and finally removing the band together with lingual plaster intact.
- Start - Impression of the individual preparation - with copper band using low fusing compound. Last - ***minimized by selecting long copper band with its edges toothed to have a firm grip on the silicone impression.
- Start - Impression of the individual tooth preparation is taken with copper band using silicone impression material as a substitute for low fusing compound.
- Start -- The individual impression of the tooth preparation as well as the orientation impression is taken with silicone impression material.
- Start – The alginate material, at times, will adhere to tooth structure that is absolutely dry. An excess of saliva around the teeth will cause bubbles in the inter-proximal areas and on the occlusal surfaces of the teeth. Air bubbles can be minimized by careful application of the impression material to the teeth and into the vestibular area before placement of the filled tray. Rapid set , Minimal armamentarium, Low cost , Poor accuracy and surface detail , Poured within 10 min. , Diagnostic & primary casts
- Technique:- A liquefaction bath (100' C [212' F]) A storage bath (about 65' C [150' F]) A tempering bath (about 40' C [105' F])
- Immediate pour( 10min)
- Start -- Other techniques for impression making for hydrocolloids is wet field technique and laminate technique.
- Gelation: Alginate - gels by a chemical reaction Agar - gels in contact with the cool alginate
- Prepared tooth surfaces Injection of reversible hydrocolloid Stock tray with chilled alginate Combined alginate agar impression Master cast
- Alginate in the form of sol - containing water but no source of calcium ions. Two component system (paste form)
- The light body material is injected from the filled syringe within and around the tooth preparation. The tray filled with heavy body material is inserted in the mouth and seated over the syringe material. The two materials bond together on setting. Most commonly used with custom tray
- Also called - (Single viscosity technique, monophase technique) Medium viscosity of polyether and addition silicones used in a stock tray. Only one mix is made, part of the material placed in the tray and another portion placed in the syringe for injection in the cavity preparation or on prepared teeth. Success of this technique depends on the pseudo plastic behavior of these two materials. Pseudo plastic – sheer thinning that is – low viscosity at higher sheer strengths
- Light body material syringed on to the preparation while the putty material loaded in a stock tray is simultaneously inserted into the mouth Disadvantages Absolute lack of control in the bulk of wash material Possibility of margins duplicated in putty medium Tendency of bubbles to be formed and occluded in the set impression
- Disadvantages - Extra chair side time - Extra material
- For protection from dripping impression material, place a large plastic bib on front of the patient. Regular or heavy body material is used, as a tray material while a light body wash is delivered through a syringe polysulfide rubber should be mixed with a twin pad technique. Six-inch lines to regular body catalyst and base are placed on pad while the dentist removes the retraction cord and isolate the preparations with cotton rolls, the assistant begins mixing the light bodied polysulfide rubber. Keeping the blade of the spatula flat against the pad, the material is mixed until smooth and practically streak free bubbles will surface when using this slow, spreading, mixing technique. Transfer the mix from pad 1 to pad 2 leaving the streaked material on the first pad. Pick up a clean spatula and complete the mix on the second pad until a creamy, homogenous mixture is obtained. The light body polysulfide rubber is scooped into the end of the syringe, the plunger inserted, and the material carefully injected around the preparations. Meanwhile the assistant begins mixing the regular body tray materials on pad 3, using the same transfer technique to pad. Once the mix is completed the assistant can load the custom tray and hand it to the clinician for insertion into the mouth. Allow at least 8 to 10 minutes for the polysulfide material to polymerize completely. polysulphide rubber is also available as a monophase, single mix impression material Omniflex, (Coe laboratories). The technique is the same although regular and fast setting materials are available.
- ADDITION REACTION SILICONES IN CUSTOM TRAYS TECHNIQUE When dispensed from tubes, equal amounts of light or medium base and catalyst are extended on a mixing pad as wash material. Medium or heavy body material may be used as the tray material. After tissue retraction, the wash material may be thoroughly hand-mixed for approximately 30 seconds until the color is uniform. Load the wash material into the syringe and inject around the preparations only blow air over the initial layer of impression material to force into the sulcus and to break the surface tension. Inject a second layer of impression material over the preparations. It is not necessary to blow air over this layer mean while the assistant should mix and load the tray material to approximately two-thirds to three fourths the height of the tray after the dentist has finished dispensing the second layer of wash material, the loaded tray is inserted over the tooth preparations and carefully seated to place. The tray is lightly held in . The set of the impression material can be confirmed with a blunt instrument when completely polymerized, the tray is removed with a snap in the axial direction, rinse, inspected and poured in die stone after 30 minutes but with in 14 days. Auto mixing is fast, more convenient than hand mixing and cleanup is easier.
- Pentamix machine (3M ESPE) Polyether
- a modified method of tray fabrication using auto-polymerizing acrylic resin and impression technique for multiple prepared teeth in cases with limitations and difficulties in taking dental impressions. 1.View of a diagnostic cast model requiring impression of multiple prepared teeth. 2. Two segmental trays for both posterior teeth were positioned. Each of them had a buccal wing for a snap removal ans posterior stops. 3. Wax spacer for impression material was covered over the segmental trays and remaining teeth 4. After each individual segmental tray was seated on the cast, an overlay tray was fabricated with base plate wax relief (Fig. 3). The overlay tray was precisely positioned with the aid of an indentation around each wing with 1 mm of leeway . 6. After the impression material in the overlay tray hardened, all trays should be removed together by holding both wings of the segmental trays and a handle or margin of an overlay tray to avoid dimensional change and flexing deformation of the impression material despite the presence of segmentally different paths
- (Triple Tray Technique , Accu-bite, Closed Mouth Technique) Procedure:- 1. Evaluate the fit of the tray in patient’s mouth & position the tray’s crossbar distal to last tooth in arch. 2. Retract the gingival tissue with the help of gingival retraction cord. 3. Mix low-viscosity impression material according to manufacturer’s instructions. 4. Load the syringe by holding it at a slight angle while scrapping the pad. 5. Grasp 2 mm excess of cord with forceps & slowly tease the top cord towards the occlusal. 6. Quickly blow away seepage with short bursts of compressed air or dry with cotton pledgets. 7. Syringe inaccessible areas first e.g.., Distolingual finish line. 8. Mix high-viscosity elastomer & “overfill” bilaterally. 9. Manually seat the tray on maxillary arch. 10. For quadrant trays, position the crossbar distal to the last tooth in the arch. 11. Instruct patient to slowly close mouth. 12. Evaluate complete closure by observing the inter-digitation on the opposite arch. 13. Once the material is set, place a finger on either side of the tray & remove with equal pressure bilaterally to minimize distortion of the tray. 14. Rinse impression and dry with short, small bursts of compressed air. 15. Pour the impression with die stone.
- The patient should be instructed to close in MIP with the tray out of the mouth. The operator should visually note the nature of the contact on the contralateral side and verify the patient is in MIP using Mylar shim-stock. Once this is verified, the dual-arch impression should be placed position, and the patient should be instructed to again close in MIP. Rigid metal trays are ideal for this technique (Quad Trays; Clinician’s Choice, London, Ontario). Rigid PVS or polyether materials can be used.
- 1. Maxillary anterior teeth prepared for full crowns 2. Pre-fabricated clear plastic carrier selected. 3. Matrix is made in carrier with polyvinyl siloxane material before soft tissue is retracted 4. Facial and palatal sides 5. Enlarge interproximal embrasures to permit lateral displacement of gingiva when impression material is guided into sulcus. 6. Relieve the internal walls of each preparation. 7. The matrix is place in mouth and the relation of matrix to gingiva is checked before gingival retraction. 8. Matrix is painted with tray adhesive and is filled with high viscosity impression material. 9. Matrix impression is seated with light pressure and a pick-up impression is made with medium viscosity impression material. 10. Completed impression showing registration of preparation margins.
- End-- The scanning data from these two systems is used to create articulated casts and dies. The desired type of restoration is then completed by a dental laboratory.
- Scan the area identify the finish lines using the software software aligns the scans of the two arches in occlusion Crown milled by the software The finished crown on a mounted polyurethane cast
- Procedure:- 1. Apply separating medium, e.g. die lubricant to the pinholes & displace tissue. 2. Mix light-bodied impression material.
- Fig. 1. Initial tooth preparation and removal of all caries, bases, restorative materials, and unsupported tooth structure. Fig. 2. Completed cast dowel and core preparations with counter bevels and anti rotational grooves. Fig. 3. Fitted tapered plastic sprues for support of impression material. Fig. 4. Individual polyvinyl siloxane root canal and pulp chamber impressions organized by tooth number. Fig. 5. Accurate individual canal impressions reoriented into their respective teeth. Plastic sprues are flattened into nailheads and painted with impression adhesive. Fig. 6. Final pickup impression of multiple cast dowel and core tooth preparations. Fig. 7. Final impression boxed after trimming of excess vestibular material. Fig. 8. Master cast immediately after separation from the impression. Fig. 9. Master dies pinned, sectioned, and counterbevel finish lines marked with wax pencil. Fig. 10. Laboratory refinement of the cast dowel and cores using stent made from diagnostic wax-up. Fig. 11. Round and smooth cast dowel and cores on master cast and ready for patient's clinical try-in appointment. Fig. 12. Air-abraded cast dowel and cores cemented
- Microorganisms in the oral cavity can be transmitted from impressions to the dental laboratory. Disinfection ensures the interruption of the infection chain between dental practice and laboratory and protects the dental technician. The clinician must disinfect impressions before pouring the cast or sending the impressions to the dental laboratory. An alternative to disinfecting impressions is to use disinfected die stones. This approach avoids potential distortions related to procedures essential for disinfecting impressions. The first step of any disinfecting technique is to rinse the impression in tap water. This step removes a significant portion of the microorganisms from the impression Disinfection techniques involve spraying the impressions with disinfection agents or immersion of the impression materials in chemical agents such as sodium hypochlorite.
- Inappropriate transport and storage conditions can lead to further changes in dimension, by adsorption or release of moisture. On the way from the practice to the dental lab the impressions are best carried in a container, securely fixed in foam.