SlideShare ist ein Scribd-Unternehmen logo
1 von 2
Downloaden Sie, um offline zu lesen
RF433 BRIDGE
POPE700700
WIRLESS 433 EXTENSION
POPE700717
Smart Home
Quickstart Guide
Schnellstartanleitung
Quickstart GuideEN
Quick start
1. Connect the device to a USB port.
2. If the LED flashes purple, connect to the open Wi-Fi bridge433-XXXX.
3. Enter the IP address 192.168.4.1 in the browser bar.
4. Set in the configuration mask your Wi-Fi, the IP address and the
communication port of your gateway. (Port: 8000)
5. Save the setting and activate the bridge.
6. Install the RF433 application in the POPP Hub.
1
Configuration of the RF433
1. Wi-Fi - settings
SSID: Enter the name of your home Wi-Fi.
Password: Enter the password of your home Wi-Fi.
Scan: Scan the environ-
ment for existing Wi-Fi networks
(If the page remains empty, please check your wire-
less connection to the bridge).
DHCP: If checked, the IP address assigned by your
router is used.
IP/Netmask: Specify the IP address
and network affiliation of the bridge.
Gateway: Enter the IP address of your router.
2. SmartHome Gateway - Settings:
IP: Enter the IP address of your
Smart Home Gateway (POPP Hub).
Port: Enter the communication port to your Smart-
Home Gateway.
Advanced settings:
Code send repeats: Set the number of transmission
repetitions of a command (minimum 1; maximum
25). This may be necessary for some devices with
poor communication.
3. Save Settings: Save the settings.
4. Activate Bridge: Activate the 433Mhz bridge.
The device restarts and then connects to your Wi-Fi
and SmartHome Gateway.
Reset Settings: Resets the unit to factory settings.
LED indication
Purple pulsating..........Device starts
Flashing purple ...........Configuration mode
Blue flashing.................Establishing a connection to the Wi-Fi network
Blue light........................Wi-Fi is connected
Red light.........................A connection to the Wi-Fi is not possible
Yellow on........................No connection to SmartHome Gateway possible
Green flickering...........Reception indicator 433Mhz
White flickering ..........Transmission indicator 433Mhz
Configuration mode: To start the configuration mode, press the button on the
433 Mhz bridge for 4 seconds. The configuration mode is indicated by a purple
flashing. This mode can only be terminated via the configuration interface.
Resetting the device to the factory settings: Press the button on the 433
Mhz bridge for 4 seconds, the unit switches to configuration mode, which
is indicated by a purple flash. Press the button again for 4 seconds, the LED
changes to yellow before the unit restarts and returns to the factory settings.
2
Error LED indication Solution
IP address of the
SmartHome Gateway
is wrong.
Glowing yellow
Check the IP address of the
SmartHome Gateway within the
configuration mode.
Does not get an IP
address assigned.
Glowing yellow
Check the DHCP settings on your
router and in the configuration
mode of the gateway. Specify a
static IP address.
Port settings do
not match between
433Mhz Gateway and
SmartHome system.
Glowing yellow
Check the transfer port within
the configuration mode of the
433Mhz bridge and in your
SmartHome Gateway. This is
8000 by default.
Wi-Fi connection
could not be esta-
blished.
Blue flashing
(min. 10s)
Within configuration mode, check
the SSID and password.
A connection to the
Wi-Fi is not possible.
Glowing red
Within configuration mode, check
the SSID and password.
Sources of error:
Support
If you encounter a problem, please use the international community at www.z-wave.info
(English) or www.zwave.de (German), our website at www.popp.eu/support or contact us
by e-mail: info@popp.eu
Declaration of Conformity
Popp hereby declares that this device complies with the es-
sential requirements and other relevant provisions of Directi-
ve RED 2014/53/EU. The complete declaration of conformity
can be found at the following address: www.popp.eu/ce
Questions regarding the declaration of conformity should be
addressed to the following address:
Popp & Co, Große Johannisstr. 7, 20148 Hamburg, Germany
Disposal guidelines
Electronic devices may not be thrown away in domestic waste, but must be disposed
of separately. Please inform yourself about your local legal regulations and the disposal
system available to you. Disposing of electronic equipment in landfills or dumps can cause
hazardous substances to enter groundwater and above into food and ultimately endanger
your health.
Quickstart GuideDE
Schnellstart
1. Schließen Sie das Gerät an einen USB-Anschluss an.
2. Wenn die LED lila blinkt, verbinden Sie sich
mit dem offenen WLAN: bridge433-xxxx
3. Geben Sie in die Browserleiste die IP-Adresse 192.168.4.1 ein.
4. Stellen Sie in der Konfigurationsmaske Ihr WLAN, die IP Adresse
und den Kommunikationsport Ihres Gateways ein. (Port: 8000)
5. Speichern Sie die Einstellung und aktivieren Sie die Bridge.
6. Installieren Sie im POPP Hub die Anwendung RF433.
1
1. WLAN-Einstellung
SSID: Tragen Sie die Bezeichnung Ihres Heim-
WLANs ein.
Passwort: Tragen Sie das Passwort Ihres Heim-
WLANs ein.
Scan: Scannen Sie die Umgebung nach vorhandenen
WLAN-Netzwerken (Wenn die Seite leer bleibt,
überprüfen Sie bitte Ihre WLAN-Verbindung zur
Bridge).
DHCP: Ist der Haken gesetzt, wird die IP Adresse
verwendet, welche von Ihrem Router zugewiesen
wurde.
IP/Netmask: Legen Sie die IP Adresse und
Netzwerkzugehörigkeit der Bridge fest.
Gateway: Geben Sie die IP Adresse Ihres Routers
ein.
2. SmartHome Gateway - Einstellung
IP: Geben Sie die IP-Adresse Ihres Smart Home
Gateway (POPP Hub) ein.
Port: Geben Sie den Kommunikationsport zu Ihrem
SmartHome Gateway ein.
Erweiterte Einstellungen
Code send repeats: Stellen Sie die Anzahl der
Sendewiederholungen eines Befehls ein (minimal
1; maximal 25). Dies kann bei einigen Geräten mit
schlechter Kommunikation erforderlich sein.
3. Save Settings: Speichern Sie die Einstellungen.
4. Activate Bridge: Aktivieren Sie die 433Mhz Bridge. Das Gerät startet neu und
verbindet sich danach mit Ihrem WLAN und SmartHome Gateway.
Reset Settings: Setzt das Gerät auf Werkseinstellung zurück.
LED Anzeige
Lila pulsierend.............Gerät startet
Lila blinkend.................Konfigurationsmodus
Blau blinkend ...............Verbindungsaufbau zum WLAN
Blau leuchtend.............WLAN ist verbunden
Rot leuchtend ..............Eine Verbindung zum WLAN ist nicht möglich
Gelb leuchtend............Keine Verbindung zum SmartHome Gateway möglich
Grünes flackern ...........Empfangsanzeige 433Mhz
Weißes flackern...........Sendeanzeige 433Mhz
Konfigurationsmodus: Um den Konfigurationsmodus zu starten, drücken Sie
den Knopf, auf der 433 Mhz Bridge, für 4 Sekunden. Der Konfigurationsmodus
wird durch ein lila Blinken angezeigt. Dieser Modus lässt sich nur über die
Konfigurationsoberfläche beenden.
Zurücksetzen des Gerätes in den werkseitigen Zustand: Drücken Sie den
Knopf , auf der 433 Mhz Bridge, für 4 Sekunde, das Gerät wechselt in den
Konfigurationsmodus, welches durch ein lila Blinken angezeigt wird. Drücken Sie
die Taste erneut für 4 Sekunden, die LED wechselt zu gelb, bevor das Gerät neu
startet und wieder in den Werkszustand zurückversetzt wird.
2
Fehler LED Anzeige Lösung
IP Adresse des Smart-
Home Gateways ist
falsch.
Gelb leuchtend
Prüfen Sie innerhalb des Konfigu-
rationsmodus die IP Adresse des
SmartHome Gateways.
Bekommt keine IP
Adresse zugewiesen.
Gelb leuchtend
Prüfen Sie die DHCP-Einstel-
lungen an Ihrem Router und im
Konfigurationsmodus des Gate-
ways. Legen Sie eine statische IP
Adresse fest.
Porteinstellungen
stimmen zwischen
433Mhz Gateway und
SmartHome System
nicht überein.
Gelb leuchtend
Prüfen Sie innerhalb des Kon-
figurationsmodus der 433Mhz-
Bridge und in Ihrem SmartHome
Gateway den Übertragungsport.
Dieser ist standardmäßig 8000.
WLAN-Verbindung
konnte nicht aufge-
baut werden
Blau blinkend
(mind. 10s)
Prüfen Sie innerhalb des Konfigu-
rationsmodus die SSID und das
Passwort.
Eine Verbindung
zum WLAN ist nicht
möglich.
Rot leuchtend
Prüfen Sie innerhalb des Konfigu-
rationsmodus die SSID und das
Passwort.
Konfiguration der RF433 Bridge
Support
Sollten Sie auf ein Problem stoßen, nutzen Sie bitte die internationale Community auf
www.z-wave.info (englisch) bzw. www.zwave.de (deutsch), unsere Website unter www.
popp.eu/support oder kontaktieren Sie uns per E-Mail: info@popp.eu
Konformitätserklärung
Hiermit erklärt Popp, dass sich dieses Gerät in Übereinstim-
mung mit den grundlegenden Anforderungen und den übri-
gen einschlägigen Bestimmungen der Richtlinie RED 2014/53/
EU befindet. Die vollständige Konformitätserklärung kann
unter folgender Adresse gefunden werden: www.popp.eu/ce
Fragen zur Konformitätserklärung sind an folgende Adresse zu richten:
Popp & Co, Große Johannisstr. 7, 20148 Hamburg, Germany
Entsorgungsrichtlinien
Elektronische Geräte dürfen nicht in den Hausmüll geworfen werden, sondern müssen ge-
sondert entsorgt werden. Bitte informieren Sie sich über die bei Ihnen lokal geltenden ge-
setzlichen Regelungen und das Ihnen zur Verfügung stehende Entsorgungssystem. Durch
die Entsorgung elektronischer Geräte auf Müllhalden oder Deponien können gefährliche
Substanzen in das Grundwasser und darüber in Nahrungsmittel gelangen und damit letzt-
endlich Ihre Gesundheit gefährden.
Fehlerquellen
2

Weitere ähnliche Inhalte

Mehr von Domotica daVinci

Cherubini Meta Z-Wave Smart Plug Manual A510068
Cherubini Meta Z-Wave Smart Plug Manual A510068Cherubini Meta Z-Wave Smart Plug Manual A510068
Cherubini Meta Z-Wave Smart Plug Manual A510068Domotica daVinci
 
Wave_Shutter_user_guide_multilang_print_V3.pdf
Wave_Shutter_user_guide_multilang_print_V3.pdfWave_Shutter_user_guide_multilang_print_V3.pdf
Wave_Shutter_user_guide_multilang_print_V3.pdfDomotica daVinci
 
Quinto Z-Wave Heltun_HE-RS01_User_Manual_B9AH.pdf
Quinto Z-Wave Heltun_HE-RS01_User_Manual_B9AH.pdfQuinto Z-Wave Heltun_HE-RS01_User_Manual_B9AH.pdf
Quinto Z-Wave Heltun_HE-RS01_User_Manual_B9AH.pdfDomotica daVinci
 
Z-Wave Fan coil Thermostat Heltun_HE-HT01_User_Manual.pdf
Z-Wave Fan coil Thermostat Heltun_HE-HT01_User_Manual.pdfZ-Wave Fan coil Thermostat Heltun_HE-HT01_User_Manual.pdf
Z-Wave Fan coil Thermostat Heltun_HE-HT01_User_Manual.pdfDomotica daVinci
 
Manual Eurotronic Thermostatic Valve Comry Z-Wave
Manual Eurotronic Thermostatic Valve Comry Z-WaveManual Eurotronic Thermostatic Valve Comry Z-Wave
Manual Eurotronic Thermostatic Valve Comry Z-WaveDomotica daVinci
 
Manual sensor Zigbee 3.0 MOES ZSS-X-PIRL-C
Manual  sensor Zigbee 3.0 MOES ZSS-X-PIRL-CManual  sensor Zigbee 3.0 MOES ZSS-X-PIRL-C
Manual sensor Zigbee 3.0 MOES ZSS-X-PIRL-CDomotica daVinci
 
zigbee motion sensor user manual NAS-PD07B2.pdf
zigbee motion sensor user manual NAS-PD07B2.pdfzigbee motion sensor user manual NAS-PD07B2.pdf
zigbee motion sensor user manual NAS-PD07B2.pdfDomotica daVinci
 
Range extender 7 - Aeotec - Manual
Range extender 7 - Aeotec - Manual   Range extender 7 - Aeotec - Manual
Range extender 7 - Aeotec - Manual Domotica daVinci
 
Aeotec Multisensor 7 Manual
Aeotec Multisensor 7 ManualAeotec Multisensor 7 Manual
Aeotec Multisensor 7 ManualDomotica daVinci
 
wiDom Smart Roller Shutter Z-Wave Plus Module Manual
wiDom Smart Roller Shutter Z-Wave Plus Module ManualwiDom Smart Roller Shutter Z-Wave Plus Module Manual
wiDom Smart Roller Shutter Z-Wave Plus Module ManualDomotica daVinci
 
wiDom Smart dry contact module Z-Wave Plus Manual
wiDom Smart dry contact module Z-Wave Plus ManualwiDom Smart dry contact module Z-Wave Plus Manual
wiDom Smart dry contact module Z-Wave Plus ManualDomotica daVinci
 
wiDom Energy Driven Switch C version and L version manual
wiDom Energy Driven Switch C version and L version manualwiDom Energy Driven Switch C version and L version manual
wiDom Energy Driven Switch C version and L version manualDomotica daVinci
 
wiDom Double Smart Switch Z-Wave Module
wiDom Double Smart Switch Z-Wave ModulewiDom Double Smart Switch Z-Wave Module
wiDom Double Smart Switch Z-Wave ModuleDomotica daVinci
 
wiDom Smart Plug Manual EN
wiDom Smart Plug Manual ENwiDom Smart Plug Manual EN
wiDom Smart Plug Manual ENDomotica daVinci
 
wiDom Multi Sensor Room Controller MSRC Manual EN
wiDom Multi Sensor Room Controller MSRC Manual ENwiDom Multi Sensor Room Controller MSRC Manual EN
wiDom Multi Sensor Room Controller MSRC Manual ENDomotica daVinci
 
Super Slim Connected Plug - Zigbee 3.0 - Innr
Super Slim Connected Plug - Zigbee 3.0 - InnrSuper Slim Connected Plug - Zigbee 3.0 - Innr
Super Slim Connected Plug - Zigbee 3.0 - InnrDomotica daVinci
 
Aqara Motion Detector - Zigbee -Xiaomi
Aqara Motion Detector - Zigbee -XiaomiAqara Motion Detector - Zigbee -Xiaomi
Aqara Motion Detector - Zigbee -XiaomiDomotica daVinci
 
Aqara Wireless Simple Wall Switch - Zigbee -Xiaomi
Aqara Wireless Simple Wall Switch - Zigbee -XiaomiAqara Wireless Simple Wall Switch - Zigbee -Xiaomi
Aqara Wireless Simple Wall Switch - Zigbee -XiaomiDomotica daVinci
 

Mehr von Domotica daVinci (20)

Cherubini Meta Z-Wave Smart Plug Manual A510068
Cherubini Meta Z-Wave Smart Plug Manual A510068Cherubini Meta Z-Wave Smart Plug Manual A510068
Cherubini Meta Z-Wave Smart Plug Manual A510068
 
Wave_Shutter_user_guide_multilang_print_V3.pdf
Wave_Shutter_user_guide_multilang_print_V3.pdfWave_Shutter_user_guide_multilang_print_V3.pdf
Wave_Shutter_user_guide_multilang_print_V3.pdf
 
Quinto Z-Wave Heltun_HE-RS01_User_Manual_B9AH.pdf
Quinto Z-Wave Heltun_HE-RS01_User_Manual_B9AH.pdfQuinto Z-Wave Heltun_HE-RS01_User_Manual_B9AH.pdf
Quinto Z-Wave Heltun_HE-RS01_User_Manual_B9AH.pdf
 
Z-Wave Fan coil Thermostat Heltun_HE-HT01_User_Manual.pdf
Z-Wave Fan coil Thermostat Heltun_HE-HT01_User_Manual.pdfZ-Wave Fan coil Thermostat Heltun_HE-HT01_User_Manual.pdf
Z-Wave Fan coil Thermostat Heltun_HE-HT01_User_Manual.pdf
 
Manual Eurotronic Thermostatic Valve Comry Z-Wave
Manual Eurotronic Thermostatic Valve Comry Z-WaveManual Eurotronic Thermostatic Valve Comry Z-Wave
Manual Eurotronic Thermostatic Valve Comry Z-Wave
 
Manual sensor Zigbee 3.0 MOES ZSS-X-PIRL-C
Manual  sensor Zigbee 3.0 MOES ZSS-X-PIRL-CManual  sensor Zigbee 3.0 MOES ZSS-X-PIRL-C
Manual sensor Zigbee 3.0 MOES ZSS-X-PIRL-C
 
zigbee motion sensor user manual NAS-PD07B2.pdf
zigbee motion sensor user manual NAS-PD07B2.pdfzigbee motion sensor user manual NAS-PD07B2.pdf
zigbee motion sensor user manual NAS-PD07B2.pdf
 
Range extender 7 - Aeotec - Manual
Range extender 7 - Aeotec - Manual   Range extender 7 - Aeotec - Manual
Range extender 7 - Aeotec - Manual
 
Aeotec Multisensor 7 Manual
Aeotec Multisensor 7 ManualAeotec Multisensor 7 Manual
Aeotec Multisensor 7 Manual
 
Z stick 7 user guide
Z stick 7 user guideZ stick 7 user guide
Z stick 7 user guide
 
ESB 200 H-Tronic Manual
ESB 200 H-Tronic ManualESB 200 H-Tronic Manual
ESB 200 H-Tronic Manual
 
wiDom Smart Roller Shutter Z-Wave Plus Module Manual
wiDom Smart Roller Shutter Z-Wave Plus Module ManualwiDom Smart Roller Shutter Z-Wave Plus Module Manual
wiDom Smart Roller Shutter Z-Wave Plus Module Manual
 
wiDom Smart dry contact module Z-Wave Plus Manual
wiDom Smart dry contact module Z-Wave Plus ManualwiDom Smart dry contact module Z-Wave Plus Manual
wiDom Smart dry contact module Z-Wave Plus Manual
 
wiDom Energy Driven Switch C version and L version manual
wiDom Energy Driven Switch C version and L version manualwiDom Energy Driven Switch C version and L version manual
wiDom Energy Driven Switch C version and L version manual
 
wiDom Double Smart Switch Z-Wave Module
wiDom Double Smart Switch Z-Wave ModulewiDom Double Smart Switch Z-Wave Module
wiDom Double Smart Switch Z-Wave Module
 
wiDom Smart Plug Manual EN
wiDom Smart Plug Manual ENwiDom Smart Plug Manual EN
wiDom Smart Plug Manual EN
 
wiDom Multi Sensor Room Controller MSRC Manual EN
wiDom Multi Sensor Room Controller MSRC Manual ENwiDom Multi Sensor Room Controller MSRC Manual EN
wiDom Multi Sensor Room Controller MSRC Manual EN
 
Super Slim Connected Plug - Zigbee 3.0 - Innr
Super Slim Connected Plug - Zigbee 3.0 - InnrSuper Slim Connected Plug - Zigbee 3.0 - Innr
Super Slim Connected Plug - Zigbee 3.0 - Innr
 
Aqara Motion Detector - Zigbee -Xiaomi
Aqara Motion Detector - Zigbee -XiaomiAqara Motion Detector - Zigbee -Xiaomi
Aqara Motion Detector - Zigbee -Xiaomi
 
Aqara Wireless Simple Wall Switch - Zigbee -Xiaomi
Aqara Wireless Simple Wall Switch - Zigbee -XiaomiAqara Wireless Simple Wall Switch - Zigbee -Xiaomi
Aqara Wireless Simple Wall Switch - Zigbee -Xiaomi
 

Manual Bridge - POPP 433 - POPP

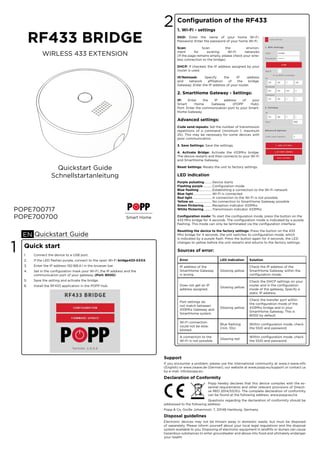
  • 1. RF433 BRIDGE POPE700700 WIRLESS 433 EXTENSION POPE700717 Smart Home Quickstart Guide Schnellstartanleitung Quickstart GuideEN Quick start 1. Connect the device to a USB port. 2. If the LED flashes purple, connect to the open Wi-Fi bridge433-XXXX. 3. Enter the IP address 192.168.4.1 in the browser bar. 4. Set in the configuration mask your Wi-Fi, the IP address and the communication port of your gateway. (Port: 8000) 5. Save the setting and activate the bridge. 6. Install the RF433 application in the POPP Hub. 1 Configuration of the RF433 1. Wi-Fi - settings SSID: Enter the name of your home Wi-Fi. Password: Enter the password of your home Wi-Fi. Scan: Scan the environ- ment for existing Wi-Fi networks (If the page remains empty, please check your wire- less connection to the bridge). DHCP: If checked, the IP address assigned by your router is used. IP/Netmask: Specify the IP address and network affiliation of the bridge. Gateway: Enter the IP address of your router. 2. SmartHome Gateway - Settings: IP: Enter the IP address of your Smart Home Gateway (POPP Hub). Port: Enter the communication port to your Smart- Home Gateway. Advanced settings: Code send repeats: Set the number of transmission repetitions of a command (minimum 1; maximum 25). This may be necessary for some devices with poor communication. 3. Save Settings: Save the settings. 4. Activate Bridge: Activate the 433Mhz bridge. The device restarts and then connects to your Wi-Fi and SmartHome Gateway. Reset Settings: Resets the unit to factory settings. LED indication Purple pulsating..........Device starts Flashing purple ...........Configuration mode Blue flashing.................Establishing a connection to the Wi-Fi network Blue light........................Wi-Fi is connected Red light.........................A connection to the Wi-Fi is not possible Yellow on........................No connection to SmartHome Gateway possible Green flickering...........Reception indicator 433Mhz White flickering ..........Transmission indicator 433Mhz Configuration mode: To start the configuration mode, press the button on the 433 Mhz bridge for 4 seconds. The configuration mode is indicated by a purple flashing. This mode can only be terminated via the configuration interface. Resetting the device to the factory settings: Press the button on the 433 Mhz bridge for 4 seconds, the unit switches to configuration mode, which is indicated by a purple flash. Press the button again for 4 seconds, the LED changes to yellow before the unit restarts and returns to the factory settings. 2 Error LED indication Solution IP address of the SmartHome Gateway is wrong. Glowing yellow Check the IP address of the SmartHome Gateway within the configuration mode. Does not get an IP address assigned. Glowing yellow Check the DHCP settings on your router and in the configuration mode of the gateway. Specify a static IP address. Port settings do not match between 433Mhz Gateway and SmartHome system. Glowing yellow Check the transfer port within the configuration mode of the 433Mhz bridge and in your SmartHome Gateway. This is 8000 by default. Wi-Fi connection could not be esta- blished. Blue flashing (min. 10s) Within configuration mode, check the SSID and password. A connection to the Wi-Fi is not possible. Glowing red Within configuration mode, check the SSID and password. Sources of error: Support If you encounter a problem, please use the international community at www.z-wave.info (English) or www.zwave.de (German), our website at www.popp.eu/support or contact us by e-mail: info@popp.eu Declaration of Conformity Popp hereby declares that this device complies with the es- sential requirements and other relevant provisions of Directi- ve RED 2014/53/EU. The complete declaration of conformity can be found at the following address: www.popp.eu/ce Questions regarding the declaration of conformity should be addressed to the following address: Popp & Co, Große Johannisstr. 7, 20148 Hamburg, Germany Disposal guidelines Electronic devices may not be thrown away in domestic waste, but must be disposed of separately. Please inform yourself about your local legal regulations and the disposal system available to you. Disposing of electronic equipment in landfills or dumps can cause hazardous substances to enter groundwater and above into food and ultimately endanger your health.
  • 2. Quickstart GuideDE Schnellstart 1. Schließen Sie das Gerät an einen USB-Anschluss an. 2. Wenn die LED lila blinkt, verbinden Sie sich mit dem offenen WLAN: bridge433-xxxx 3. Geben Sie in die Browserleiste die IP-Adresse 192.168.4.1 ein. 4. Stellen Sie in der Konfigurationsmaske Ihr WLAN, die IP Adresse und den Kommunikationsport Ihres Gateways ein. (Port: 8000) 5. Speichern Sie die Einstellung und aktivieren Sie die Bridge. 6. Installieren Sie im POPP Hub die Anwendung RF433. 1 1. WLAN-Einstellung SSID: Tragen Sie die Bezeichnung Ihres Heim- WLANs ein. Passwort: Tragen Sie das Passwort Ihres Heim- WLANs ein. Scan: Scannen Sie die Umgebung nach vorhandenen WLAN-Netzwerken (Wenn die Seite leer bleibt, überprüfen Sie bitte Ihre WLAN-Verbindung zur Bridge). DHCP: Ist der Haken gesetzt, wird die IP Adresse verwendet, welche von Ihrem Router zugewiesen wurde. IP/Netmask: Legen Sie die IP Adresse und Netzwerkzugehörigkeit der Bridge fest. Gateway: Geben Sie die IP Adresse Ihres Routers ein. 2. SmartHome Gateway - Einstellung IP: Geben Sie die IP-Adresse Ihres Smart Home Gateway (POPP Hub) ein. Port: Geben Sie den Kommunikationsport zu Ihrem SmartHome Gateway ein. Erweiterte Einstellungen Code send repeats: Stellen Sie die Anzahl der Sendewiederholungen eines Befehls ein (minimal 1; maximal 25). Dies kann bei einigen Geräten mit schlechter Kommunikation erforderlich sein. 3. Save Settings: Speichern Sie die Einstellungen. 4. Activate Bridge: Aktivieren Sie die 433Mhz Bridge. Das Gerät startet neu und verbindet sich danach mit Ihrem WLAN und SmartHome Gateway. Reset Settings: Setzt das Gerät auf Werkseinstellung zurück. LED Anzeige Lila pulsierend.............Gerät startet Lila blinkend.................Konfigurationsmodus Blau blinkend ...............Verbindungsaufbau zum WLAN Blau leuchtend.............WLAN ist verbunden Rot leuchtend ..............Eine Verbindung zum WLAN ist nicht möglich Gelb leuchtend............Keine Verbindung zum SmartHome Gateway möglich Grünes flackern ...........Empfangsanzeige 433Mhz Weißes flackern...........Sendeanzeige 433Mhz Konfigurationsmodus: Um den Konfigurationsmodus zu starten, drücken Sie den Knopf, auf der 433 Mhz Bridge, für 4 Sekunden. Der Konfigurationsmodus wird durch ein lila Blinken angezeigt. Dieser Modus lässt sich nur über die Konfigurationsoberfläche beenden. Zurücksetzen des Gerätes in den werkseitigen Zustand: Drücken Sie den Knopf , auf der 433 Mhz Bridge, für 4 Sekunde, das Gerät wechselt in den Konfigurationsmodus, welches durch ein lila Blinken angezeigt wird. Drücken Sie die Taste erneut für 4 Sekunden, die LED wechselt zu gelb, bevor das Gerät neu startet und wieder in den Werkszustand zurückversetzt wird. 2 Fehler LED Anzeige Lösung IP Adresse des Smart- Home Gateways ist falsch. Gelb leuchtend Prüfen Sie innerhalb des Konfigu- rationsmodus die IP Adresse des SmartHome Gateways. Bekommt keine IP Adresse zugewiesen. Gelb leuchtend Prüfen Sie die DHCP-Einstel- lungen an Ihrem Router und im Konfigurationsmodus des Gate- ways. Legen Sie eine statische IP Adresse fest. Porteinstellungen stimmen zwischen 433Mhz Gateway und SmartHome System nicht überein. Gelb leuchtend Prüfen Sie innerhalb des Kon- figurationsmodus der 433Mhz- Bridge und in Ihrem SmartHome Gateway den Übertragungsport. Dieser ist standardmäßig 8000. WLAN-Verbindung konnte nicht aufge- baut werden Blau blinkend (mind. 10s) Prüfen Sie innerhalb des Konfigu- rationsmodus die SSID und das Passwort. Eine Verbindung zum WLAN ist nicht möglich. Rot leuchtend Prüfen Sie innerhalb des Konfigu- rationsmodus die SSID und das Passwort. Konfiguration der RF433 Bridge Support Sollten Sie auf ein Problem stoßen, nutzen Sie bitte die internationale Community auf www.z-wave.info (englisch) bzw. www.zwave.de (deutsch), unsere Website unter www. popp.eu/support oder kontaktieren Sie uns per E-Mail: info@popp.eu Konformitätserklärung Hiermit erklärt Popp, dass sich dieses Gerät in Übereinstim- mung mit den grundlegenden Anforderungen und den übri- gen einschlägigen Bestimmungen der Richtlinie RED 2014/53/ EU befindet. Die vollständige Konformitätserklärung kann unter folgender Adresse gefunden werden: www.popp.eu/ce Fragen zur Konformitätserklärung sind an folgende Adresse zu richten: Popp & Co, Große Johannisstr. 7, 20148 Hamburg, Germany Entsorgungsrichtlinien Elektronische Geräte dürfen nicht in den Hausmüll geworfen werden, sondern müssen ge- sondert entsorgt werden. Bitte informieren Sie sich über die bei Ihnen lokal geltenden ge- setzlichen Regelungen und das Ihnen zur Verfügung stehende Entsorgungssystem. Durch die Entsorgung elektronischer Geräte auf Müllhalden oder Deponien können gefährliche Substanzen in das Grundwasser und darüber in Nahrungsmittel gelangen und damit letzt- endlich Ihre Gesundheit gefährden. Fehlerquellen 2