Call Girls In Dwarka Sub City ☎️7838079806 ✅ 💯Call Girls In Delhi
How to manage your files and create bins
1. How to manage your files and create bins
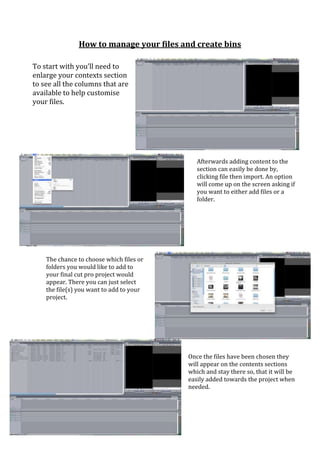
To start with you’ll need to
enlarge your contexts section
to see all the columns that are
available to help customise
your files.
Afterwards adding content to the
section can easily be done by,
clicking file then import. An option
will come up on the screen asking if
you want to either add files or a
folder.
The chance to choose which files or
folders you would like to add to
your final cut pro project would
appear. There you can just select
the file(s) you want to add to your
project.
Once the files have been chosen they
will appear on the contents sections
which and stay there so, that it will be
easily added towards the project when
needed.
2. When you want to create a bin to store certain files
together manage them easier you just have to right
click on the content section and, then the menu to the
right should appear then you just click new bin like
how I’ve highlighted it. On the left
After you’ve click new bin it will appear straight away on
the contents section highlighted ready for you to name it. As
you can see to the right I’ve made three folders and labeled
them; Images, Music and Videos.
I then add the following files to the bins which I
wanted them to be placed by dragging them
into, the folders I wanted them to be placed in
order to manage my project easier.
Even when the files are
placed in the bins they are
still easily customisable and
easy to edit. As you can see
the first file is opened up
ready to be renamed and, the
columns beside the files are
helpful in letting you know
how the file is useful for you
example; Good bar to let you
now if that is a good copy of
your footage which you can
use for your project.