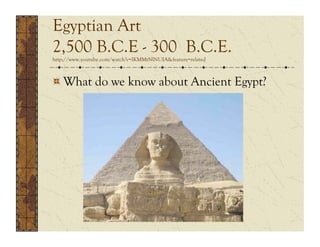
1. Egyptian Art
2,500 B.C.E - 300 B.C.E.
http://www.youtube.com/watch?v=IKMMtNlNUIA&feature=related
What do we know about Ancient Egypt?
2. Egyptian Art
2,500 B.C.E - 300 B.C.E.
http://www.youtube.com/watch?v=IKMMtNlNUIA&feature=related
First civilization to develop literature,
medical science and mathematics
World’s first large-scale, unified government
ruling many people in organized manner
Led by pharaoh: the Egyptian version of a
king
All art created for making the pharaoh
comfortable and preparing him for the
afterlife
3. Egyptian Art
2,500 B.C.E - 300 B.C.E.
http://www.youtube.com/watch?v=IKMMtNlNUIA&feature=related
Egyptian Afterlife:
Not an end, but a temporary
interruption in the cycle of life
Focus in death was preparing the
deceased for the next stage of life:
the afterlife
Believed that preserving the body
through mummification and
burying the dead with their
possessions ensures the dead
person could continue their
occupations after they die.
6. Egyptian Art
2,500 B.C.E - 300 B.C.E.
http://www.youtube.com/watch?v=IKMMtNlNUIA&feature=related
Egyptian Afterlife:
Believed humans composed of different elements that
at death would become separate entities. These entities
needed to be preserved for the afterlife
• Ka: the life force: symbol is hands pointing upwards.
With you from birth, often shown as a smaller
version of a person standing behind them
• Ba: personality traits or what makes someone
unique. Symbol is a stork
• Akh: fully resurrected form of deceased in the
afterlife. Symbol is a crested ibis
7. Egyptian Art
2,500 B.C.E - 300 B.C.E.
http://www.youtube.com/watch?v=IKMMtNlNUIA&feature=related
• Ka:
• Ba:
• Akh:
8. Egyptian Art
2,500 B.C.E - 300 B.C.E.
SCULPTURE: Stone figures of
pharaoh and his family
Size of figure indicates
importance
Law of Frontality:
Head, eyes, shoulders, torso, hips
all face forward
Figure stands or sits straight and
stiff
Left foot forward, feet flat
Not natural or realistic looking
9.
10. Egyptian Art
2,500 B.C.E - 400 B.C.E.
ARCHITECTURE: pyramids made of cut
stone blocks
Used as burial monuments for pharaoh
Filled with beautiful art and everyday objects
to keep pharoah company in after-life
Designed to last forever
Ex: Great Pyramid at Giza, Egypt, 2600
B.C.E., limestone
11.
12.
13.
14.
15.
16. Egyptian Art
2,500 B.C.E - 300 B.C.E.
Created inside pyramid
tombs
Show scenes of life and daily
activities.
Rules of Egyptian Painting:
Hierarchic Proportions
Most important person is
the largest
Size of others determined
by rank in society
17. Egyptian Art
2,500 B.C.E - 300 B.C.E.
Rules of Egyptian Art:
Descriptive Perspective
Side view of head
Front view of eye (not
looking straight ahead)
Front view of shoulders and
torso
Side view of hip
Side views of: arms, legs, feet
Hands and feet are large
compared to the rest of the
body
20. Egyptian Art
2,500 B.C.E - 300 B.C.E.
Cartouches:: an oblong enclosure
with hieroglyphs on the inside,
used on mummies to denote their
name
Hieroglyph’s: Egyptian writing
system that was a combination of
symbols
Carved out of stone, worn around
the neck of the mummy to show
who he/she was
Cartouches are written vertically
and are read from top to bottom
22. Egyptian Art
2,500 B.C.E - 300 B.C.E.
A sarcophagus is a
container used to
hold the deceased
body– most often
someone wealthy
or noble.
23. Egyptian Art
2,500 B.C.E - 300 B.C.E.
Purpose of sarcophagus: protect
the mummy in the tomb
Often shaped to that of the
deceased body and highly
decorated with hieroglyphics and
designs
In English: sarcophagus means
‘flesh eater’ In Ancient Egyptian,
it meant possessor of life
27. HANDS ON: Egyptian
Sarcophagus (copy what is italicized)
Using yourself as a model, create an Egyptian
inspired sarcophagus
Includes at least 5 different objects symbols about yourself
(cannot be cliches!)
At least three Egyptian symbols that are relevant to you
Egyptian style arms, face and headpiece
Cartouche of your name written in hieroglyphics
Drawing reflects that of a traditional Egyptian
sarcophagus: filled with patterns, colors, intricate designs
Colored with combination of markers and colored pencils
28. HANDS ON: Egyptian
Sarcophagus
Take it to the next
level: think about
how you might
incorporate a story/
scene in an Egyptian
painting style onto
your sarcophagus.
Use the blog and
google for help
29. HANDS ON: Egyptian
Sarcophagus
Step 1: Create a practice cartouche of your
first or last name in your sketchbook.
Remember to write it vertically!!!!
30. HANDS ON: Egyptian
Sarcophagus
Step 2: In your sketchbook develop your 5
different personal symbols.
Step 3: Select your 3 different Egyptian
symbols – use the blog or the in-class
packet as a reference starting point. Draw
them in your sketchbook and write down
what they mean. Choose something
relevant to you b/c you’ll be writing a
sentence about WHY you chose them.
31. HANDS ON: Egyptian
Sarcophagus
Step 4: Trace the sarcophagus template
onto a sheet of drawing paper.
Step 5: IN PENCIL begin to draw in a
space for your face, arms and hands. Look
at the Egyptian references for help with
Egyptian eyes, hand and arm placement
and headpieces.
DON’T DRAW ANYTHING ELSE YET!
32. On a piece of notebook paper please copy
down and answer the following questions
What are 4 different things that have changed or
contributed to the development of art from
Prehistoric times to now? (remember our cave art
discussion from 2 classes ago?)
How is the ancient Egyptian idea of death
different from our society’s view of death?
33. Describe the scene that is being represented in this
ancient Egyptian painting. Name the title as well
Put this sheet in your binder under your
NOTES tab
34. HANDS ON: Egyptian
Sarcophagus
Step 4: Trace the
sarcophagus template onto a
sheet of drawing paper.
Step 5: IN PENCIL begin to
draw in a space for your
face, arms and hands. Look
at the Egyptian references
for help with Egyptian eyes,
hand and arm placement
and headpieces.!
35. HANDS ON: Egyptian
Sarcophagus
Step 6: Incorporate your 5
personal symbols and 3
Egyptian symbols in an
interesting, balanced artistic
way
THINK ABOUT
COMPOSITION (how the
things you’re putting in your
artwork are arranged)
37. HANDS ON: Egyptian
Sarcophagus
Take it to the next
level: think about
how you might
incorporate a story/
scene in an Egyptian
painting style onto
your sarcophagus.
Use the blog and
google for help
38. HANDS ON: Egyptian
Sarcophagus
Step 8: Double check with me before
going on
Step 9: Trace your draft version onto a
new sheet of paper for your final
version
Step 10: Use the window or a light
table to trace over ALL your lines onto
your final version
39. HANDS ON: Egyptian
Sarcophagus
Step 9: Use a thin Sharpie
marker to go over ALL your
lines on your new final
version – don’t color with
Sharpie though!
Step 10: Color with colored
pencils, using heavy
pressure to make it look
like paint – very opaque!
40. HANDS ON: Egyptian
Sarcophagus
Step 11: On the back of your
sarcophagus answer the following 2
questions in complete sentences:
What Egyptian symbols did you choose?
Why are they relevant to you? (why do they
reflect you as a person?)
Step 12: Assess yourself with the rubric
and put in the Inbox.
41. Materials Workshop: Colored
Pencils
Please write down Materials
Workshop: Colored Pencils in
your sketchbook
Light Value
Medium Value
Dark Value
Gradation: Light to
Medium to Dark
43. Materials Workshop: Colored
Pencils
Layered Color: Shade a square of one
color using light pressure
Shade a second square of color, slightly
overlapping the first square to see the
differences in color when you later
47. Illuminated Letter was due last class – did
you turn yours in? Check the missing work
section
End of 5 weeks is tomorrow – are you
missing anything – check the back wall?
Quiz today followed by work-time on
sarcophagus
Sarcophagus due next class?
Art Club meeting next Wed and Thurs –
bring your old clothes for scarecrow
making!
48. Quiz
Silently on your own
NO NOTES
Write answers on a SEPARATE SHEET OF
PAPER
DO NOT WRITE ON TEST BOOKLET –
except to cross out question 13.
When finished, hand in both parts to me
and begin to work on sarcophagus
49. HANDS ON: Egyptian Time
Warp Drawing
Draw a modern scene that follows the
rules of traditional Egyptian painting:
Hierarchic Proportions
Egyptian ‘style’ and hieryoglyphics
Descriptive Perspective:
• Head in profile
• Eyes facing front
• Torso facing front
• Hips, legs, feet from the side
• Large feet and hands
50. HANDS ON: Egyptian Time
Warp Drawing
Egyptian Prom
Prom Queen is
largest
Egyptian crown
Sash is in
hieroglyphics
Prom dresses
with Egyptian
style jewelry
51. HANDS ON: Egyptian Time
Warp Drawing
Begin by brainstorming with your table
partner some ideas for ‘modern scenes
Write your ideas in your sketchbook
52. HANDS ON: Egyptian Time Warp
Drawing
Step 1: Select your modern scene. Make it
different and original from those around you
Step 2: Use the small cut paper to begin your
drawing. This will be your final copy .
Drafting first in your sktchbk is a good idea!
Step 3: Get out your Egyptian art notes and
follow the rules for painting to begin drawing
Remember: Egyptian style, modern elements!
53. Outline with Sharpie, then color with
colored pencils, using an Egyptian color
palette: golds, yellows, browns, turquoises