SlideShare uma empresa Scribd logo
1 de 8
Baixar para ler offline
Designer Hooks
Judy Larson
Findings can make or break
a design and most tutorials
for them are usually for
simple hooks and eyes. This
designer-style hook can be
made to match and enhance
any project, from bracelets
to necklaces. In fact, if you
turn the hook portion into
an eye loop, this would
make a great earring
finding! Just add a dangle!
The hook on this 5/8” wide and 1-3/16” long finding bends to the back so is hidden. You can turn the hook
and the connecting ring one half turn to use when the loops you connect to must be flat and visually part of
the design, as in the hook to the right.
Materials:
4” of 18 gauge round wire
up to 36” of 28 gauge round wire
Variety of beads from 2mm-5mm or one 1011mm flat coin bead

Tools:
Flat, chain and round nose pliers
6-Step barrel pliers
Flush cutter
½” mandrel
Ultra fine point Sharpie marker
Ruler

Directions: It is important to read through the directions before starting.
Step 1: Straighten
and cut a 4” piece of
18 gauge round
wire. Mark the wire
1½” in from one
end.

Step 2: Centering the mark between the two smallest steps on the 6-step barrel
pliers, bend the two wire ends down on either side of Step 2 of the pliers.

1
Step 3: Cross the wire ends, using your fingers to push the crossed portion of the wires up to the barrel of the
pliers. This creates an eye that can be used as an attachment point to any project.

Step 4: Place the eye on a ½” mandrel. Bend the wire ends around the mandrel. Make sure that the wire that
comes from below the eye goes above the other wire on the opposite side of the mandrel.

Step 5: Use the tip of your round nose pliers to make a small loop on the end of the shorter wire. This loop
should end up exactly opposite the larger loop created in Steps 2 and 3. A line drawn from the center of one
loop to the center of the other loop should create two equal halves. Notice that it does not make any
difference which way the wires are crossed. Just make sure that your bent wire looks like one of those below
at this point. The small upper loop is on what will be the front of the hook.

Step 6:
Grasp the long wire tail
between Step 3 and 4 of the 6-Step
barrel pliers. Make sure that Step 4 is
on top and large wire loop is pushed up
to Step 3 of the pliers. Use your fingers
to push the long wire tail up and over
Step 4 of the pliers until the wire tip
almost touches the large circle.

2
Step 7: At this point, you need to decide how you will fill the interior of the large circle.

Single Bead:
If you would like to use a single flat 10-11mm bead, you will need a 3” piece of 28 gauge
wire to attach it on either end of the hook. This is straightforward so the directions for
this are not shown here.

Bent Wire Design:
A: Sketch out the
size of the interior
of the large circle.
Draw out a few
designs. Decide on
one. Initials are a fabulous way to add
your mark to your designs. This tutorial
gives directions for the heart.

B: Straighten and cut a 2” piece of 18 gauge wire. Mark the center.
Make a 90 degree bend on that mark. Both sides MUST be of equal
length.

C: Use Step 4 of the 6-step barrel
pliers to make a curl on each
wire end. You will have to bend
the first side out of the way to do
the second side.

D: Use the tips of your round nose pliers to curl
the ends of the wires into loose spirals.

3
E: Straighten and cut a 30” piece of 28 gauge round wire. Bend it in
half. Center the lower point of the heart just above the small lower loop
of the hook frame. Slide one 28 gauge wire end through the loop and
the other wire end through the heart.
F: Wrap each wire end once around the
heart and the lower loop, ending on the
back.
This should create three wraps
showing on the front of the hook.

G: Continue wrapping up the side of the large circle, pushing the
wraps together as you progress. When you reach the point where
the side of the heart touches the edge of the large circle, make
three wraps to secure the heart. Continue up the outer edge of the
large circle.

H: Continue wrapping the outer circle
until the wrapping is below the center of
the small upper loop. Pull the wrap wire
through the loop and back down into the
center of the large circle. Do this three
times. Trim the wrap wire off and press
the end into the space where the two 18
gauge wires cross.

I: Repeat Steps G and H to wrap the
other side. When you reach the end,
pull the wrap wire to the back and
around the hook, wrapping the hook 6
times. Trim the wrap wire off and press
the cut end into the 18 gauge hook wire.

4
J: Use the tips of your round nose pliers to make a small loop
at the end of the hook. Bend the hook to the back side as
shown. You will want to lift the hook end slightly away from
the circle and heart to make it easier to slide onto a ring or
loop on the other end of the project you will be using it on.
You can be done now, or add a decorative bead as shown in
the next few steps.

K: Center a 3mm bead on a 6” piece of 28 gauge wire. Bend the wire down
on either side of the bead.

L: Slide the wire ends into the loops on either side of the top of the heart.

M: Cross the 28 gauge wires and pull the ends back up through the small
heart loops. Pull one wire end through the bead and back down through
the small loop to the back of the hook. Pull it back to the front.

N: Use the tips of your round nose pliers to gently press the 28 gauge wires
together below the bead.

O: Wrap the each wire 4-5 times tightly
around the pressed in wires at the base of the
bead, creating a “nest.” Trim the wires off and
tuck the ends under the base of the wire
wraps.

5
Bead Filled Circle Hook:

A: Bend the hook wire down
into its final position behind
the circle. This will help you
decide where to position the
smaller beads. If you put
larger beads behind the hook,
you will have to bend it
farther away from the back of
the hook, which is less
streamlined.
B: Use the tips of your round nose pliers to
make a small loop at the end of the hook. Bend
the hook slightly away from the back of the
circle. This will make it easier to wrap the
beads into place. You can press it back down
later, if needed.

C: Choose the bead you would like to use to fill your circle.
Notice that the hook end and small bottom loop on the
gemstone filled circle are twisted ¼ turn so they can be
connected to loops that need to lay flat.

D: Cut an 18” piece of 28 gauge wire. Secure the end of the wire by wrapping it
10-12 times around one side of the frame at the bottom of the hook.

E: Pull the wrap wire through the lower loop, then
through the large loop. Repeat this three to four
times.

6
F: Continue to wrap down the other side 10-12 times. From here on, work
from the back but continually check the front. Slide beads onto the wrap wire.
In this case, the bead sizes are 2.5mm, 4mm and 2.5mm. Pull the wrap wire to
the opposite side of the large circle. Add or
subtract beads as needed.

G: Wrap large circle 6-8 times, going toward the top of the hook. Find beads
to fit the space and slide them onto the wrap wire. In this case the beads
sizes are 5mm, 3mm, 4mm and 2.5mm. Pull the wire to the opposite side of
the circle. Note: Because a domed effect was desired with these beads, the
length of strung beads for this step was just a bit long. This was not the case
with the gemstone bead hook.

H: Wrap the outer frame up toward the hook. When you reach the small loop,
secure the front and back 18 gauge wires together by wrapping 3 times through the
loop.

I: Wrap 5-6 times down the side of the outer circle
frame. Pull the wire to the left. Find a bead to fit the
space to the left and slide it onto the wrap wire. In
this case, the bead size is 3mm.

J: Wrap the wire around the beaded wire to the left of the bead
you just put on. You will be wrapping between two beads to hold
the wrap wire in place. Find a bead to fit the space to the left and
slide it onto the wrap wire. In this case, the bead size is 3mm.

7
K: Wrap the frame 6-10 times down toward the bottom of the circle. Pull
the wire to the right. Find beads to fit the space and slide them onto the
wrap wire. In this case, the bead sizes are 5mm and 2.5mm. Wrap the wire
around the beaded wire to the right of the beads you just put on. You will
be wrapping between two beads to hold the wrap wire in place.

L: Pull the wrap wire to the right. Find a bead to fit the space slide it
onto the wrap wire. In this case, the bead size is 4mm. Wrap the outer
frame 6-8 times up toward the hook.

M: Pull the wire toward the center of the circle. Find beads to fit the
space and slide them onto the wrap wire. In this case, the bead sizes are
4mm and 2.5mm. Secure the wrap wire end by wrapping it several times
on a wire between two beads. Trim the wire tail and tuck the end
between two beads.

N: Gently push the beads
toward the outside of the
hook to create a slight dome
effect. For the gemstone
version you will not do this.

O: Adjust the hook so that it is almost flush with the back of the
beaded section. It only needs to be pulled out far enough that
you will be able to hook it to the eye end of the project you use
it on.

8

Mais conteúdo relacionado

Mais procurados

Easy Wire and Bead Braided Bracelet Tutorial
Easy Wire and Bead Braided Bracelet TutorialEasy Wire and Bead Braided Bracelet Tutorial
Easy Wire and Bead Braided Bracelet TutorialThe Beading Gem's Journal
 
Wire jewelry-free-ebook
Wire jewelry-free-ebookWire jewelry-free-ebook
Wire jewelry-free-ebookLUISA BLANES
 
Arcadian Legends Pendant Woven Wire Tutorial
Arcadian Legends Pendant Woven Wire TutorialArcadian Legends Pendant Woven Wire Tutorial
Arcadian Legends Pendant Woven Wire TutorialHouseofGems.com
 
Wire Wrapped Sweetheart Round Cabochon Pendant
Wire Wrapped Sweetheart Round Cabochon PendantWire Wrapped Sweetheart Round Cabochon Pendant
Wire Wrapped Sweetheart Round Cabochon PendantThe Beading Gem's Journal
 
Imaginative Spring Butterfly Pendant Tutorial
Imaginative Spring Butterfly Pendant Tutorial Imaginative Spring Butterfly Pendant Tutorial
Imaginative Spring Butterfly Pendant Tutorial HouseofGems.com
 
How to Make Wire Wrapped Ammonite Jewelry DIY Jewelry Making Tutorial
How to Make Wire Wrapped Ammonite Jewelry DIY Jewelry Making TutorialHow to Make Wire Wrapped Ammonite Jewelry DIY Jewelry Making Tutorial
How to Make Wire Wrapped Ammonite Jewelry DIY Jewelry Making TutorialHouseofGems.com
 
Gorgeous Spring Rain Earring Tutorial
Gorgeous Spring Rain Earring TutorialGorgeous Spring Rain Earring Tutorial
Gorgeous Spring Rain Earring TutorialHouseofGems.com
 
Clever Blossom Earrings with Gold and Black Glass Pearls
Clever Blossom Earrings with Gold and Black Glass PearlsClever Blossom Earrings with Gold and Black Glass Pearls
Clever Blossom Earrings with Gold and Black Glass PearlsHouseofGems.com
 
Exquisite Copper Wire Earrings With Crystal Beads
Exquisite Copper Wire Earrings With Crystal BeadsExquisite Copper Wire Earrings With Crystal Beads
Exquisite Copper Wire Earrings With Crystal BeadsHouseofGems.com
 

Mais procurados (20)

Easy Wire and Bead Braided Bracelet Tutorial
Easy Wire and Bead Braided Bracelet TutorialEasy Wire and Bead Braided Bracelet Tutorial
Easy Wire and Bead Braided Bracelet Tutorial
 
Egyptian Coil Earrings Tutorial
Egyptian Coil Earrings TutorialEgyptian Coil Earrings Tutorial
Egyptian Coil Earrings Tutorial
 
Wire jewelry-free-ebook
Wire jewelry-free-ebookWire jewelry-free-ebook
Wire jewelry-free-ebook
 
Viking Knit Tutorial
Viking Knit TutorialViking Knit Tutorial
Viking Knit Tutorial
 
Arcadian Legends Pendant Woven Wire Tutorial
Arcadian Legends Pendant Woven Wire TutorialArcadian Legends Pendant Woven Wire Tutorial
Arcadian Legends Pendant Woven Wire Tutorial
 
Gemstone Tassel Earrings tutorial
Gemstone Tassel Earrings tutorialGemstone Tassel Earrings tutorial
Gemstone Tassel Earrings tutorial
 
How to Wire Wrap a Coin Pendant
How to Wire Wrap a Coin PendantHow to Wire Wrap a Coin Pendant
How to Wire Wrap a Coin Pendant
 
Summer Fun Earrings Tutorial
Summer Fun Earrings TutorialSummer Fun Earrings Tutorial
Summer Fun Earrings Tutorial
 
Wire Work Seahorse Pendant Tutorial
Wire Work Seahorse Pendant TutorialWire Work Seahorse Pendant Tutorial
Wire Work Seahorse Pendant Tutorial
 
Wire Wrapped Sweetheart Round Cabochon Pendant
Wire Wrapped Sweetheart Round Cabochon PendantWire Wrapped Sweetheart Round Cabochon Pendant
Wire Wrapped Sweetheart Round Cabochon Pendant
 
Beaded Snowflake Necklace Tutorial
Beaded Snowflake Necklace Tutorial Beaded Snowflake Necklace Tutorial
Beaded Snowflake Necklace Tutorial
 
Twisted Wire Wrapped Cross Pendant Tutorial
Twisted Wire Wrapped Cross Pendant TutorialTwisted Wire Wrapped Cross Pendant Tutorial
Twisted Wire Wrapped Cross Pendant Tutorial
 
Double Wrap Wire Bangle Bracelet Tutorial
Double Wrap Wire Bangle Bracelet TutorialDouble Wrap Wire Bangle Bracelet Tutorial
Double Wrap Wire Bangle Bracelet Tutorial
 
Sea Grass Woven Wire Pendant
Sea Grass Woven Wire PendantSea Grass Woven Wire Pendant
Sea Grass Woven Wire Pendant
 
Imaginative Spring Butterfly Pendant Tutorial
Imaginative Spring Butterfly Pendant Tutorial Imaginative Spring Butterfly Pendant Tutorial
Imaginative Spring Butterfly Pendant Tutorial
 
How to Wire Wrap a Multi Gemstone Necklace
How to Wire Wrap a Multi Gemstone NecklaceHow to Wire Wrap a Multi Gemstone Necklace
How to Wire Wrap a Multi Gemstone Necklace
 
How to Make Wire Wrapped Ammonite Jewelry DIY Jewelry Making Tutorial
How to Make Wire Wrapped Ammonite Jewelry DIY Jewelry Making TutorialHow to Make Wire Wrapped Ammonite Jewelry DIY Jewelry Making Tutorial
How to Make Wire Wrapped Ammonite Jewelry DIY Jewelry Making Tutorial
 
Gorgeous Spring Rain Earring Tutorial
Gorgeous Spring Rain Earring TutorialGorgeous Spring Rain Earring Tutorial
Gorgeous Spring Rain Earring Tutorial
 
Clever Blossom Earrings with Gold and Black Glass Pearls
Clever Blossom Earrings with Gold and Black Glass PearlsClever Blossom Earrings with Gold and Black Glass Pearls
Clever Blossom Earrings with Gold and Black Glass Pearls
 
Exquisite Copper Wire Earrings With Crystal Beads
Exquisite Copper Wire Earrings With Crystal BeadsExquisite Copper Wire Earrings With Crystal Beads
Exquisite Copper Wire Earrings With Crystal Beads
 

Destaque

How to Make Beaded Pearl Earrings DIY Jewelry Making Tutorial
How to Make Beaded Pearl Earrings DIY Jewelry Making TutorialHow to Make Beaded Pearl Earrings DIY Jewelry Making Tutorial
How to Make Beaded Pearl Earrings DIY Jewelry Making TutorialHouseofGems.com
 
Night Sky Ring: Simple Wire Wrapping Diy
Night Sky Ring: Simple Wire Wrapping DiyNight Sky Ring: Simple Wire Wrapping Diy
Night Sky Ring: Simple Wire Wrapping DiyHouseofGems.com
 

Destaque (6)

Tree of life Neckpiece Pictorial
Tree of life Neckpiece PictorialTree of life Neckpiece Pictorial
Tree of life Neckpiece Pictorial
 
Beading daily-wire-wrapping
Beading daily-wire-wrappingBeading daily-wire-wrapping
Beading daily-wire-wrapping
 
April 2013 classes
April 2013 classes  April 2013 classes
April 2013 classes
 
How to Make Beaded Pearl Earrings DIY Jewelry Making Tutorial
How to Make Beaded Pearl Earrings DIY Jewelry Making TutorialHow to Make Beaded Pearl Earrings DIY Jewelry Making Tutorial
How to Make Beaded Pearl Earrings DIY Jewelry Making Tutorial
 
Night Sky Ring: Simple Wire Wrapping Diy
Night Sky Ring: Simple Wire Wrapping DiyNight Sky Ring: Simple Wire Wrapping Diy
Night Sky Ring: Simple Wire Wrapping Diy
 
Digital jewellery ppt
Digital jewellery pptDigital jewellery ppt
Digital jewellery ppt
 

Semelhante a Designer Wire Wrapped Clasp Hooks

Rough Draft Lanyard Instructions
Rough Draft Lanyard InstructionsRough Draft Lanyard Instructions
Rough Draft Lanyard InstructionsVickie Buenger
 
How to-make-beaded-clasp
How to-make-beaded-claspHow to-make-beaded-clasp
How to-make-beaded-claspcrazyleo74
 
How to Make Glamorous Grape Earrings DIY Jewelry Making Tutorial
How to Make Glamorous Grape Earrings DIY Jewelry Making TutorialHow to Make Glamorous Grape Earrings DIY Jewelry Making Tutorial
How to Make Glamorous Grape Earrings DIY Jewelry Making TutorialHouseofGems.com
 
16 free crochet hat patterns scarves gloves
16 free crochet hat patterns scarves  gloves16 free crochet hat patterns scarves  gloves
16 free crochet hat patterns scarves glovesSNSPA, Bucharest
 
Rustic Romance Heart Pendant Wire Jewelry Tutorial
Rustic Romance Heart Pendant Wire Jewelry TutorialRustic Romance Heart Pendant Wire Jewelry Tutorial
Rustic Romance Heart Pendant Wire Jewelry TutorialHouseofGems.com
 
How to Make Vintage Copper Pendant DIY Jewelry Making Tutorial
How to Make Vintage Copper Pendant DIY Jewelry Making TutorialHow to Make Vintage Copper Pendant DIY Jewelry Making Tutorial
How to Make Vintage Copper Pendant DIY Jewelry Making TutorialHouseofGems.com
 
Knitting_and_Crocheting.ppt
Knitting_and_Crocheting.pptKnitting_and_Crocheting.ppt
Knitting_and_Crocheting.pptMarkEdwardOlango
 
20 bracelet patterns macram bracelets friendship bracelets hemp bracelets and...
20 bracelet patterns macram bracelets friendship bracelets hemp bracelets and...20 bracelet patterns macram bracelets friendship bracelets hemp bracelets and...
20 bracelet patterns macram bracelets friendship bracelets hemp bracelets and...SNSPA, Bucharest
 
SIMPLE MACRAME KNOTTING TECHNIQUES.pptx
SIMPLE MACRAME KNOTTING TECHNIQUES.pptxSIMPLE MACRAME KNOTTING TECHNIQUES.pptx
SIMPLE MACRAME KNOTTING TECHNIQUES.pptxBernard Richardson
 
How to Make a Green Bead Bracelet DIY Jewelry Making Tutorial
How to Make a Green Bead Bracelet DIY Jewelry Making TutorialHow to Make a Green Bead Bracelet DIY Jewelry Making Tutorial
How to Make a Green Bead Bracelet DIY Jewelry Making TutorialHouseofGems.com
 
소형베틀도면
소형베틀도면소형베틀도면
소형베틀도면Seongwon Kim
 
LO:2 Threading a Needle
LO:2  Threading a NeedleLO:2  Threading a Needle
LO:2 Threading a Needleshar6223
 
How to Make Sweet Spiral Ring DIY Jewelry Making Tutorial
How to Make Sweet Spiral Ring DIY Jewelry Making TutorialHow to Make Sweet Spiral Ring DIY Jewelry Making Tutorial
How to Make Sweet Spiral Ring DIY Jewelry Making TutorialHouseofGems.com
 
How to Make Wavy Washer Earrings
How to Make Wavy Washer EarringsHow to Make Wavy Washer Earrings
How to Make Wavy Washer EarringsHouseofGems.com
 
Decorative-Articles technology and livelihood educationMARCH15.pptx
Decorative-Articles technology and livelihood educationMARCH15.pptxDecorative-Articles technology and livelihood educationMARCH15.pptx
Decorative-Articles technology and livelihood educationMARCH15.pptxJoyLedda3
 

Semelhante a Designer Wire Wrapped Clasp Hooks (19)

Rough Draft Lanyard Instructions
Rough Draft Lanyard InstructionsRough Draft Lanyard Instructions
Rough Draft Lanyard Instructions
 
Measuring device
Measuring deviceMeasuring device
Measuring device
 
How to-make-beaded-clasp
How to-make-beaded-claspHow to-make-beaded-clasp
How to-make-beaded-clasp
 
How to Make Glamorous Grape Earrings DIY Jewelry Making Tutorial
How to Make Glamorous Grape Earrings DIY Jewelry Making TutorialHow to Make Glamorous Grape Earrings DIY Jewelry Making Tutorial
How to Make Glamorous Grape Earrings DIY Jewelry Making Tutorial
 
16 free crochet hat patterns scarves gloves
16 free crochet hat patterns scarves  gloves16 free crochet hat patterns scarves  gloves
16 free crochet hat patterns scarves gloves
 
Rustic Romance Heart Pendant Wire Jewelry Tutorial
Rustic Romance Heart Pendant Wire Jewelry TutorialRustic Romance Heart Pendant Wire Jewelry Tutorial
Rustic Romance Heart Pendant Wire Jewelry Tutorial
 
Bbpdf0404106
Bbpdf0404106Bbpdf0404106
Bbpdf0404106
 
Hollow ring final
Hollow ring finalHollow ring final
Hollow ring final
 
How to Make Vintage Copper Pendant DIY Jewelry Making Tutorial
How to Make Vintage Copper Pendant DIY Jewelry Making TutorialHow to Make Vintage Copper Pendant DIY Jewelry Making Tutorial
How to Make Vintage Copper Pendant DIY Jewelry Making Tutorial
 
Vintage Crochet
Vintage CrochetVintage Crochet
Vintage Crochet
 
Knitting_and_Crocheting.ppt
Knitting_and_Crocheting.pptKnitting_and_Crocheting.ppt
Knitting_and_Crocheting.ppt
 
20 bracelet patterns macram bracelets friendship bracelets hemp bracelets and...
20 bracelet patterns macram bracelets friendship bracelets hemp bracelets and...20 bracelet patterns macram bracelets friendship bracelets hemp bracelets and...
20 bracelet patterns macram bracelets friendship bracelets hemp bracelets and...
 
SIMPLE MACRAME KNOTTING TECHNIQUES.pptx
SIMPLE MACRAME KNOTTING TECHNIQUES.pptxSIMPLE MACRAME KNOTTING TECHNIQUES.pptx
SIMPLE MACRAME KNOTTING TECHNIQUES.pptx
 
How to Make a Green Bead Bracelet DIY Jewelry Making Tutorial
How to Make a Green Bead Bracelet DIY Jewelry Making TutorialHow to Make a Green Bead Bracelet DIY Jewelry Making Tutorial
How to Make a Green Bead Bracelet DIY Jewelry Making Tutorial
 
소형베틀도면
소형베틀도면소형베틀도면
소형베틀도면
 
LO:2 Threading a Needle
LO:2  Threading a NeedleLO:2  Threading a Needle
LO:2 Threading a Needle
 
How to Make Sweet Spiral Ring DIY Jewelry Making Tutorial
How to Make Sweet Spiral Ring DIY Jewelry Making TutorialHow to Make Sweet Spiral Ring DIY Jewelry Making Tutorial
How to Make Sweet Spiral Ring DIY Jewelry Making Tutorial
 
How to Make Wavy Washer Earrings
How to Make Wavy Washer EarringsHow to Make Wavy Washer Earrings
How to Make Wavy Washer Earrings
 
Decorative-Articles technology and livelihood educationMARCH15.pptx
Decorative-Articles technology and livelihood educationMARCH15.pptxDecorative-Articles technology and livelihood educationMARCH15.pptx
Decorative-Articles technology and livelihood educationMARCH15.pptx
 

Último

Call Girls In Karkardooma 83770 87607 Just-Dial Escorts Service 24X7 Avilable
Call Girls In Karkardooma 83770 87607 Just-Dial Escorts Service 24X7 AvilableCall Girls In Karkardooma 83770 87607 Just-Dial Escorts Service 24X7 Avilable
Call Girls In Karkardooma 83770 87607 Just-Dial Escorts Service 24X7 Avilabledollysharma2066
 
南新罕布什尔大学毕业证学位证成绩单-学历认证
南新罕布什尔大学毕业证学位证成绩单-学历认证南新罕布什尔大学毕业证学位证成绩单-学历认证
南新罕布什尔大学毕业证学位证成绩单-学历认证kbdhl05e
 
西伦敦大学毕业证学位证成绩单-怎么样做
西伦敦大学毕业证学位证成绩单-怎么样做西伦敦大学毕业证学位证成绩单-怎么样做
西伦敦大学毕业证学位证成绩单-怎么样做j5bzwet6
 
E J Waggoner against Kellogg's Pantheism 8.pptx
E J Waggoner against Kellogg's Pantheism 8.pptxE J Waggoner against Kellogg's Pantheism 8.pptx
E J Waggoner against Kellogg's Pantheism 8.pptxJackieSparrow3
 
Inspiring Through Words Power of Inspiration.pptx
Inspiring Through Words Power of Inspiration.pptxInspiring Through Words Power of Inspiration.pptx
Inspiring Through Words Power of Inspiration.pptxShubham Rawat
 
Authentic No 1 Amil Baba In Pakistan Amil Baba In Faisalabad Amil Baba In Kar...
Authentic No 1 Amil Baba In Pakistan Amil Baba In Faisalabad Amil Baba In Kar...Authentic No 1 Amil Baba In Pakistan Amil Baba In Faisalabad Amil Baba In Kar...
Authentic No 1 Amil Baba In Pakistan Amil Baba In Faisalabad Amil Baba In Kar...Authentic No 1 Amil Baba In Pakistan
 
(南达科他州立大学毕业证学位证成绩单-永久存档)
(南达科他州立大学毕业证学位证成绩单-永久存档)(南达科他州立大学毕业证学位证成绩单-永久存档)
(南达科他州立大学毕业证学位证成绩单-永久存档)oannq
 
(No.1)↠Young Call Girls in Sikanderpur (Gurgaon) ꧁❤ 9711911712 ❤꧂ Escorts
(No.1)↠Young Call Girls in Sikanderpur (Gurgaon) ꧁❤ 9711911712 ❤꧂ Escorts(No.1)↠Young Call Girls in Sikanderpur (Gurgaon) ꧁❤ 9711911712 ❤꧂ Escorts
(No.1)↠Young Call Girls in Sikanderpur (Gurgaon) ꧁❤ 9711911712 ❤꧂ EscortsDelhi Escorts Service
 

Último (9)

Call Girls In Karkardooma 83770 87607 Just-Dial Escorts Service 24X7 Avilable
Call Girls In Karkardooma 83770 87607 Just-Dial Escorts Service 24X7 AvilableCall Girls In Karkardooma 83770 87607 Just-Dial Escorts Service 24X7 Avilable
Call Girls In Karkardooma 83770 87607 Just-Dial Escorts Service 24X7 Avilable
 
南新罕布什尔大学毕业证学位证成绩单-学历认证
南新罕布什尔大学毕业证学位证成绩单-学历认证南新罕布什尔大学毕业证学位证成绩单-学历认证
南新罕布什尔大学毕业证学位证成绩单-学历认证
 
西伦敦大学毕业证学位证成绩单-怎么样做
西伦敦大学毕业证学位证成绩单-怎么样做西伦敦大学毕业证学位证成绩单-怎么样做
西伦敦大学毕业证学位证成绩单-怎么样做
 
E J Waggoner against Kellogg's Pantheism 8.pptx
E J Waggoner against Kellogg's Pantheism 8.pptxE J Waggoner against Kellogg's Pantheism 8.pptx
E J Waggoner against Kellogg's Pantheism 8.pptx
 
Inspiring Through Words Power of Inspiration.pptx
Inspiring Through Words Power of Inspiration.pptxInspiring Through Words Power of Inspiration.pptx
Inspiring Through Words Power of Inspiration.pptx
 
Authentic No 1 Amil Baba In Pakistan Amil Baba In Faisalabad Amil Baba In Kar...
Authentic No 1 Amil Baba In Pakistan Amil Baba In Faisalabad Amil Baba In Kar...Authentic No 1 Amil Baba In Pakistan Amil Baba In Faisalabad Amil Baba In Kar...
Authentic No 1 Amil Baba In Pakistan Amil Baba In Faisalabad Amil Baba In Kar...
 
Model Call Girl in Lado Sarai Delhi reach out to us at 🔝9953056974🔝
Model Call Girl in Lado Sarai Delhi reach out to us at 🔝9953056974🔝Model Call Girl in Lado Sarai Delhi reach out to us at 🔝9953056974🔝
Model Call Girl in Lado Sarai Delhi reach out to us at 🔝9953056974🔝
 
(南达科他州立大学毕业证学位证成绩单-永久存档)
(南达科他州立大学毕业证学位证成绩单-永久存档)(南达科他州立大学毕业证学位证成绩单-永久存档)
(南达科他州立大学毕业证学位证成绩单-永久存档)
 
(No.1)↠Young Call Girls in Sikanderpur (Gurgaon) ꧁❤ 9711911712 ❤꧂ Escorts
(No.1)↠Young Call Girls in Sikanderpur (Gurgaon) ꧁❤ 9711911712 ❤꧂ Escorts(No.1)↠Young Call Girls in Sikanderpur (Gurgaon) ꧁❤ 9711911712 ❤꧂ Escorts
(No.1)↠Young Call Girls in Sikanderpur (Gurgaon) ꧁❤ 9711911712 ❤꧂ Escorts
 

Designer Wire Wrapped Clasp Hooks

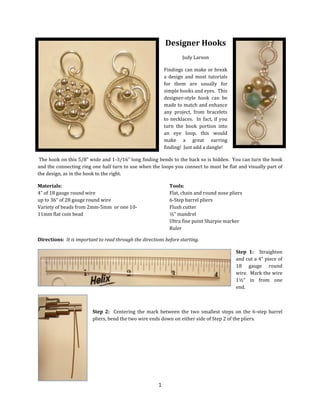
  • 1. Designer Hooks Judy Larson Findings can make or break a design and most tutorials for them are usually for simple hooks and eyes. This designer-style hook can be made to match and enhance any project, from bracelets to necklaces. In fact, if you turn the hook portion into an eye loop, this would make a great earring finding! Just add a dangle! The hook on this 5/8” wide and 1-3/16” long finding bends to the back so is hidden. You can turn the hook and the connecting ring one half turn to use when the loops you connect to must be flat and visually part of the design, as in the hook to the right. Materials: 4” of 18 gauge round wire up to 36” of 28 gauge round wire Variety of beads from 2mm-5mm or one 1011mm flat coin bead Tools: Flat, chain and round nose pliers 6-Step barrel pliers Flush cutter ½” mandrel Ultra fine point Sharpie marker Ruler Directions: It is important to read through the directions before starting. Step 1: Straighten and cut a 4” piece of 18 gauge round wire. Mark the wire 1½” in from one end. Step 2: Centering the mark between the two smallest steps on the 6-step barrel pliers, bend the two wire ends down on either side of Step 2 of the pliers. 1
  • 2. Step 3: Cross the wire ends, using your fingers to push the crossed portion of the wires up to the barrel of the pliers. This creates an eye that can be used as an attachment point to any project. Step 4: Place the eye on a ½” mandrel. Bend the wire ends around the mandrel. Make sure that the wire that comes from below the eye goes above the other wire on the opposite side of the mandrel. Step 5: Use the tip of your round nose pliers to make a small loop on the end of the shorter wire. This loop should end up exactly opposite the larger loop created in Steps 2 and 3. A line drawn from the center of one loop to the center of the other loop should create two equal halves. Notice that it does not make any difference which way the wires are crossed. Just make sure that your bent wire looks like one of those below at this point. The small upper loop is on what will be the front of the hook. Step 6: Grasp the long wire tail between Step 3 and 4 of the 6-Step barrel pliers. Make sure that Step 4 is on top and large wire loop is pushed up to Step 3 of the pliers. Use your fingers to push the long wire tail up and over Step 4 of the pliers until the wire tip almost touches the large circle. 2
  • 3. Step 7: At this point, you need to decide how you will fill the interior of the large circle. Single Bead: If you would like to use a single flat 10-11mm bead, you will need a 3” piece of 28 gauge wire to attach it on either end of the hook. This is straightforward so the directions for this are not shown here. Bent Wire Design: A: Sketch out the size of the interior of the large circle. Draw out a few designs. Decide on one. Initials are a fabulous way to add your mark to your designs. This tutorial gives directions for the heart. B: Straighten and cut a 2” piece of 18 gauge wire. Mark the center. Make a 90 degree bend on that mark. Both sides MUST be of equal length. C: Use Step 4 of the 6-step barrel pliers to make a curl on each wire end. You will have to bend the first side out of the way to do the second side. D: Use the tips of your round nose pliers to curl the ends of the wires into loose spirals. 3
  • 4. E: Straighten and cut a 30” piece of 28 gauge round wire. Bend it in half. Center the lower point of the heart just above the small lower loop of the hook frame. Slide one 28 gauge wire end through the loop and the other wire end through the heart. F: Wrap each wire end once around the heart and the lower loop, ending on the back. This should create three wraps showing on the front of the hook. G: Continue wrapping up the side of the large circle, pushing the wraps together as you progress. When you reach the point where the side of the heart touches the edge of the large circle, make three wraps to secure the heart. Continue up the outer edge of the large circle. H: Continue wrapping the outer circle until the wrapping is below the center of the small upper loop. Pull the wrap wire through the loop and back down into the center of the large circle. Do this three times. Trim the wrap wire off and press the end into the space where the two 18 gauge wires cross. I: Repeat Steps G and H to wrap the other side. When you reach the end, pull the wrap wire to the back and around the hook, wrapping the hook 6 times. Trim the wrap wire off and press the cut end into the 18 gauge hook wire. 4
  • 5. J: Use the tips of your round nose pliers to make a small loop at the end of the hook. Bend the hook to the back side as shown. You will want to lift the hook end slightly away from the circle and heart to make it easier to slide onto a ring or loop on the other end of the project you will be using it on. You can be done now, or add a decorative bead as shown in the next few steps. K: Center a 3mm bead on a 6” piece of 28 gauge wire. Bend the wire down on either side of the bead. L: Slide the wire ends into the loops on either side of the top of the heart. M: Cross the 28 gauge wires and pull the ends back up through the small heart loops. Pull one wire end through the bead and back down through the small loop to the back of the hook. Pull it back to the front. N: Use the tips of your round nose pliers to gently press the 28 gauge wires together below the bead. O: Wrap the each wire 4-5 times tightly around the pressed in wires at the base of the bead, creating a “nest.” Trim the wires off and tuck the ends under the base of the wire wraps. 5
  • 6. Bead Filled Circle Hook: A: Bend the hook wire down into its final position behind the circle. This will help you decide where to position the smaller beads. If you put larger beads behind the hook, you will have to bend it farther away from the back of the hook, which is less streamlined. B: Use the tips of your round nose pliers to make a small loop at the end of the hook. Bend the hook slightly away from the back of the circle. This will make it easier to wrap the beads into place. You can press it back down later, if needed. C: Choose the bead you would like to use to fill your circle. Notice that the hook end and small bottom loop on the gemstone filled circle are twisted ¼ turn so they can be connected to loops that need to lay flat. D: Cut an 18” piece of 28 gauge wire. Secure the end of the wire by wrapping it 10-12 times around one side of the frame at the bottom of the hook. E: Pull the wrap wire through the lower loop, then through the large loop. Repeat this three to four times. 6
  • 7. F: Continue to wrap down the other side 10-12 times. From here on, work from the back but continually check the front. Slide beads onto the wrap wire. In this case, the bead sizes are 2.5mm, 4mm and 2.5mm. Pull the wrap wire to the opposite side of the large circle. Add or subtract beads as needed. G: Wrap large circle 6-8 times, going toward the top of the hook. Find beads to fit the space and slide them onto the wrap wire. In this case the beads sizes are 5mm, 3mm, 4mm and 2.5mm. Pull the wire to the opposite side of the circle. Note: Because a domed effect was desired with these beads, the length of strung beads for this step was just a bit long. This was not the case with the gemstone bead hook. H: Wrap the outer frame up toward the hook. When you reach the small loop, secure the front and back 18 gauge wires together by wrapping 3 times through the loop. I: Wrap 5-6 times down the side of the outer circle frame. Pull the wire to the left. Find a bead to fit the space to the left and slide it onto the wrap wire. In this case, the bead size is 3mm. J: Wrap the wire around the beaded wire to the left of the bead you just put on. You will be wrapping between two beads to hold the wrap wire in place. Find a bead to fit the space to the left and slide it onto the wrap wire. In this case, the bead size is 3mm. 7
  • 8. K: Wrap the frame 6-10 times down toward the bottom of the circle. Pull the wire to the right. Find beads to fit the space and slide them onto the wrap wire. In this case, the bead sizes are 5mm and 2.5mm. Wrap the wire around the beaded wire to the right of the beads you just put on. You will be wrapping between two beads to hold the wrap wire in place. L: Pull the wrap wire to the right. Find a bead to fit the space slide it onto the wrap wire. In this case, the bead size is 4mm. Wrap the outer frame 6-8 times up toward the hook. M: Pull the wire toward the center of the circle. Find beads to fit the space and slide them onto the wrap wire. In this case, the bead sizes are 4mm and 2.5mm. Secure the wrap wire end by wrapping it several times on a wire between two beads. Trim the wire tail and tuck the end between two beads. N: Gently push the beads toward the outside of the hook to create a slight dome effect. For the gemstone version you will not do this. O: Adjust the hook so that it is almost flush with the back of the beaded section. It only needs to be pulled out far enough that you will be able to hook it to the eye end of the project you use it on. 8