SlideShare a Scribd company logo
1 of 20
Download to read offline
The Android platform
With Android's breadth of capabilities, it would be easy to confuse it with a desktop operating
system. Android is a layered environment built upon a foundation of the Linux kernel, and it includes
rich functions. The UI subsystem includes:
     Windows
     Views
     Widgets for displaying common elements such as edit boxes, lists, and drop-down lists
Android includes an embeddable browser built upon WebKit, the same open source browser engine
powering the iPhone's Mobile Safari browser.
Android boasts a healthy array of connectivity options, including WiFi, Bluetooth, and wireless data
over a cellular connection (for example, GPRS, EDGE, and 3G). A popular technique in Android
applications is to link to Google Maps to display an address directly within an application. Support for
location-based services (such as GPS) and accelerometers is also available in the Android software
stack, though not all Android devices are equipped with the required hardware. There is also camera
support.
Historically, two areas where mobile applications have struggled to keep pace with their desktop
counterparts are graphics/media, and data storage methods. Android addresses the graphics
challenge with built-in support for 2-D and 3-D graphics, including the OpenGL library. The data-
storage burden is eased because the Android platform includes the popular open source SQLite
database. Figure 1 shows a simplified view of the Android software layers.

Figure 1. Android software layers


                                                                                           Back to top
Application architecture
As mentioned, Android runs atop a Linux kernel. Android applications are written in the Java
programming language, and they run within a virtual machine (VM). It's important to note that the VM
is not a JVM as you might expect, but is the Dalvik Virtual Machine, an open source technology.
Each Android application runs within an instance of the Dalvik VM, which in turn resides within a
Linux-kernel managed process, as shown below.

Figure 2.Dalvik VM


An Android application consists of one or more of the following classifications:
  Activities
        An application that has a visible UI is implemented with an activity. When a user selects an
        application from the home screen or application launcher, an activity is started.
  Services
        A service should be used for any application that needs to persist for a long time, such as a
        network monitor or update-checking application.
  Content providers
        You can think of content providers as a database server. A content provider's job is to
        manage access to persisted data, such as a SQLite database. If your application is very
        simple, you might not necessarily create a content provider. If you're building a larger
        application, or one that makes data available to multiple activities or applications, a content
        provider is the means of accessing your data.
  Intent/Broadcast receivers
        An Android application may be launched to process an element of data or respond to an
        event, such as the receipt of a text message.
An Android application, along with a file called AndroidManifest.xml, is deployed to a device.
AndroidManifest.xml contains the necessary configuration information to properly install it to the
device. It includes the required class names and types of events the application is able to process,
and the required permissions the application needs to run. For example, if an application requires
access to the network — to download a file, for example — this permission must be explicitly stated
in the manifest file. Many applications may have this specific permission enabled. Such declarative
security helps reduce the likelihood that a rogue application can cause damage on your device.


First Android Project
Go to File Menu and select New Project. Following dialog box will appear select Android Project and
press Next
Fill in the following detail i.e. Project Name, Package Name, Activity Name, Application Name and select
the Build Target (Android SDK Version) and press “Finish”
Following structure tree will appear in Package Explorer window.


In above structure following things are noticeable.
   Src
            o    Package that will contain source code for project
       Gen
            o    Package that will contain automatic generated code like R.java
       Assets
            o    Folder that will contain the assets of application like DB, data storage files etc.
       Res
            o    Folder that will contain all the resources like, layouts, graphics and constant values,
                 animations etc.
       AndroidManifest.xml
           o A Configuration file for android application.


Now make a Virtual Device by clicking on the mobile icon on you eclipse IDE or select from Window
menu “Android SDK and AVD Manager” a Dialog box like below will appear. Press New.


Create new AVD dialog will appear fill in the fields like given in the image.
Press Create AVD after filling in the information.
Select the AVD you’ve just created and Press Start.


Now right click on your project and select Run As->Android Application
You application will appear on the Emulator


Now Open main.xml from layout folder.


Select main.xml tab it will show the XML .
Now replace the XML code with following Code.

<?xmlversion="1.0"encoding="utf-8"?>
<LinearLayoutxmlns:android="http://schemas.android.com/apk/res/android"
android:orientation="vertical"
android:layout_width="fill_parent"
android:layout_height="fill_parent"
>
<TextView
android:layout_width="fill_parent"
android:layout_height="wrap_content"
android:text="Student System"
/>

<TextViewandroid:text="First Name: "
android:id="@+id/TextView01"
android:layout_width="wrap_content"
android:layout_height="wrap_content"
android:layout_marginLeft="10dip"/>
<EditTextandroid:text=""
android:id="@+id/txtFName"
android:layout_width="200dip"
android:layout_height="wrap_content"
android:layout_marginLeft="10dip"/>
<TextViewandroid:text="Last Name: "
android:id="@+id/TextView01"
android:layout_width="wrap_content"
android:layout_height="wrap_content"
android:layout_marginLeft="10dip"/>
<EditTextandroid:text=""
android:id="@+id/txtLastName"
android:layout_width="200dip"
android:layout_height="wrap_content"
android:layout_marginLeft="10dip"/>
<TextViewandroid:text="Student ID: "
android:id="@+id/TextView01"
android:layout_width="wrap_content"
android:layout_height="wrap_content"
android:layout_marginLeft="10dip"/>
<EditTextandroid:text=""
android:id="@+id/txtId"
android:layout_width="200dip"
android:layout_height="wrap_content"
android:layout_marginLeft="10dip"/>
<TextViewandroid:text="Course:"
android:id="@+id/TextView01"
android:layout_width="wrap_content"
android:layout_height="wrap_content"
android:layout_marginLeft="10dip"/>
<EditTextandroid:text=""
android:id="@+id/txtCourse"
android:layout_width="200dip"
android:layout_height="wrap_content"
android:layout_marginLeft="10dip"/>
<Buttonandroid:text="Submit"
android:id="@+id/btn1"
android:layout_width="75dip"
android:layout_height="wrap_content"/>

<Buttonandroid:text="Clear"
android:id="@+id/btn2"
android:layout_width="75dip"
android:layout_height="wrap_content"/>
</LinearLayout>


Now select the Layout tab, following design will appear.
Now Add the Following Code in start of class

//Private Controls
      EditTexttxtFname,txtLastName,txtId,txtCourse;
      Button btnSubmit,btnClear;


Add the following code after setContentView(R.layout.main);

//Getting layout's Controls
txtFname=(EditText)findViewById(R.id.txtFName);
txtLastName=(EditText)findViewById(R.id.txtLastName);
txtId=(EditText)findViewById(R.id.txtId);
txtCourse=(EditText)findViewById(R.id.txtCourse);
btnSubmit=(Button)findViewById(R.id.btn1);
btnClear=(Button)findViewById(R.id.btn2);


Now implement the OnClickListener Interface but add

Implements OnClickListener to Class definition i.e.

publicclassMainActivityextends Activity implementsOnClickListener

Now Implement the OnClick Method of OnClickListener Interface

@Override
      publicvoidonClick(View v) {
            // TODO Auto-generated method stub


       }


Add the following code for Button Clicks in onClick Method

switch(v.getId())
            {
            case R.id.btn1:

                     break;
               case R.id.btn2:
                     //Clear Controls
                     this.txtFname.setText("");
                     this.txtLastName.setText("");
                     this.txtId.setText("");
                     this.txtCourse.setText("");
                     break;
               }


Now Register Buttons with Click Handler
//Setting Button Clicks
btnClear.setOnClickListener(this);
btnSubmit.setOnClickListener(this);


Now Add a New Layout by right clicking on Layout folder and select New->File
following dialog will appear.
Click “Finish” after entering File name

Now open the XML and Add following Code

<?xmlversion="1.0"encoding="UTF-8"?>
<LinearLayoutandroid:id="@+id/LinearLayout01"
android:layout_width="fill_parent"
android:layout_height="fill_parent"
xmlns:android="http://schemas.android.com/apk/res/android"
android:orientation="vertical">
      <LinearLayoutandroid:id="@+id/LinearLayout01"
      android:layout_width="fill_parent"
      android:layout_height="wrap_content"
      android:orientation="horizontal"
      android:layout_marginTop="20dip">
            <TextViewandroid:text="FName:         "
            android:id="@+id/TextView01"
            android:layout_width="wrap_content"
            android:layout_height="wrap_content"/>

            <TextViewandroid:text="Name"
            android:id="@+id/lblName"
            android:layout_width="wrap_content"
            android:layout_height="wrap_content"/>
      </LinearLayout>
<LinearLayoutandroid:id="@+id/LinearLayout01"
      android:layout_width="fill_parent"
      android:layout_height="wrap_content"
      android:orientation="horizontal"
      android:layout_marginTop="20dip">
            <TextViewandroid:text="LastName:    "
            android:id="@+id/TextView07"
            android:layout_width="wrap_content"
android:layout_height="wrap_content"/>
<TextViewandroid:text="Last Name"
android:id="@+id/lblLName"
android:layout_width="wrap_content"
android:layout_height="wrap_content"/>
</LinearLayout>

<LinearLayoutandroid:id="@+id/LinearLayout01"
android:layout_width="fill_parent"
android:layout_height="wrap_content"
android:orientation="horizontal"
android:layout_marginTop="20dip"
>
<TextViewandroid:text="Student Id:   "
android:id="@+id/TextView05"
android:layout_width="wrap_content"
android:layout_height="wrap_content"/>
<TextViewandroid:text="Student ID"
android:id="@+id/lblId"
android:layout_width="wrap_content"
android:layout_height="wrap_content"/>
</LinearLayout>

<LinearLayoutandroid:id="@+id/LinearLayout01"
android:layout_width="fill_parent"
android:layout_height="wrap_content"
android:orientation="horizontal"
android:layout_marginTop="20dip">
<TextViewandroid:text="Course:         "
android:id="@+id/TextView03"
android:layout_width="wrap_content"
android:layout_height="wrap_content"/>
<TextViewandroid:text="Course"
android:id="@+id/lblCourse"
android:layout_width="wrap_content"
android:layout_height="wrap_content"/>

</LinearLayout>
<Button
android:text="Back "
android:id="@+id/btnBack"
android:layout_width="wrap_content"
android:layout_height="wrap_content"
android:layout_marginTop="20dip"
/>


</LinearLayout>
Now Add a New class in Source Package and name it as StudentDetail. Extend it from Activity.

Add Following Code to OnClick method of MainActivity in first Case of switch statement now you onClick
Method should look like this

@Override
      publicvoidonClick(View v) {
            // TODO Auto-generated method stub

               switch(v.getId())
               {
               case R.id.btn1:
                     //Code to submit data to next activity
                     Intent i=newIntent(this,StudentDetail.class);
                     i.putExtra("FName", txtFname.getText().toString());
                     i.putExtra("LName", txtLastName.getText().toString());
                     i.putExtra("Id", txtId.getText().toString());
                     i.putExtra("Course",txtCourse.getText().toString());
                     startActivity(i);

                     break;
               case R.id.btn2:
                     this.txtFname.setText("");
                     this.txtLastName.setText("");
                     this.txtId.setText("");
                     this.txtCourse.setText("");
                     break;
               }
       }


Add the Following code in StudentDetail Class

TextViewlblFname, lblLastName,lblID,lblCourse;
      Button btnBack;

       @Override
       protectedvoidonCreate(Bundle savedInstanceState) {
             // TODO Auto-generated method stub
             super.onCreate(savedInstanceState);
             //Setting the Layout
             setContentView(R.layout.studentdetail);

               lblFname=(TextView)findViewById(R.id.lblName);
               lblLastName=(TextView)findViewById(R.id.lblLName);
               lblID=(TextView)findViewById(R.id.lblId);
               lblCourse=(TextView)findViewById(R.id.lblCourse);
               btnBack=(Button)findViewById(R.id.btnBack);


               //Setting on Click of Back Button
               btnBack.setOnClickListener(this);

               //Getting Student Detail from Intent and populating the controls
               Bundle extras=getIntent().getExtras();
lblFname.setText(extras.getString("FName"));
                lblLastName.setText(extras.getString("LName"));
                lblID.setText(extras.getString("Id"));
                lblCourse.setText(extras.getString("Course"));
        }

        @Override
        publicvoidonClick(View v) {
              // TODO Auto-generated method stub

                this.finish();

        }


Now Add you NewActivity(StudentDetail) in the AndroidManifest File

<activityandroid:name=".StudentDetail"android:label="Student Detail"/>

Add above line in AndroidManifest file right below the </Activity> Tag


Now Run you Application.


Using Database in Android Applications
Now we will extend our previous project to a database driven application.

Android Uses SQLite as Database Engine for its Application it is an embeded library that works with
general SQL and is generally use with mobile platforms .

Add a new class to your source package name it asDBHelper

Add a Constructor with one parameter Context.

Context ctx;
//Database Object
SQLiteDatabasedb;
//Create Table Statement
final String CREATE_TABLE_STUDENT =
      "CREATE TABLE tbl_student ("
      + "id INTEGER PRIMARY KEY AUTOINCREMENT,"
      + "f_nameTEXT,l_nameTEXT,courseTEXT,std_id TEXT);";


      //one argument Constructor
publicDBHandler(Context mContext){
            ctx=mContext;
      }

Now Add Following Function to Create new Database
privatevoidcreateOpenDB(){

try{db = ctx.openOrCreateDatabase(
                                            "StudentData.db"
                                            ,
SQLiteDatabase.CREATE_IF_NECESSARY
                                            , null
                                            );

db.setVersion(1);
db.setLocale(Locale.getDefault());
db.setLockingEnabled(true);

db.execSQL(CREATE_TABLE_STUDENT);
}catch(Exception ex){

db=ctx.openOrCreateDatabase("StudentData.db",SQLiteDatabase.OPEN_READWRITE,nu
ll);
db.setVersion(2);
db.setLocale(Locale.getDefault());
db.setLockingEnabled(true);

                    }

      }


      Add Code of Record Insertion

publicvoidinsertDate(String fName,StringlName,String course, String stdId){
            createDB();
            ContentValues values = newContentValues();
values.put("f_name", fName);
values.put("l_name",lName);
values.put("course", course);
values.put("std_id",stdId);
db.insert("tbl_student", null, values);
Toast.makeText(ctx, "Record Saved",Toast.LENGTH_LONG).show();

      }


Add an object of DBHandler Class in Main Activity first

DBHandlerobjDB;

Now initialize this object in OnCreate Method

objDB=new DBHandler(this);

Now Add the Code to insert record

      //Code to submit data to next activity
                  Intent i=newIntent(this,StudentDetail.class);
                  i.putExtra("FName", txtFname.getText().toString());
i.putExtra("LName", txtLastName.getText().toString());
                   i.putExtra("Id", txtId.getText().toString());
                   i.putExtra("Course",txtCourse.getText().toString());
            //
      objDB.insertDate(txtFname.getText().toString(),txtLastName.getText().to
String(),txtCourse.getText().toString(), txtId.getText().toString());
                  startActivity(i);


Run your Application now on Submit button click it will save the record in
the database and show the current record on next screen.

Now Add Code to Fetch Record in DBHandler class

public Cursor fetchTableData(String sql) {

             returndb.rawQuery(sql,null);

         }

This method will fetch the data into a cursor

Now we will have to write a method to store retrieved data into a list so we
can use it on other places.

publicArrayList<String>getData(){
            createDB();
            ArrayListstudentList=newArrayList<String>();
             Cursor cur =fetchTableData("select * from tbl_student");
            cur.moveToFirst();
            while (cur.isAfterLast() == false) {
            studentList.add(cur.getString(1));
                  cur.moveToNext();
                    }
            cur.close();

             returnstudentList;
                 }


Now Add a New XML in layout folder name it as student_list.xml

Add following code in this newly created xml file.

<?xmlversion="1.0"encoding="UTF-8"?>
<LinearLayout
android:layout_width="fill_parent"
android:layout_height="fill_parent"
xmlns:android="http://schemas.android.com/apk/res/android">
<ListViewandroid:id="@+id/listStudent"
android:layout_width="wrap_content"
android:layout_height="wrap_content"/>
</LinearLayout>
Above design contains a ListView which will show a list in your Activity.

Now Create another XML file in layout folder as which will represent each
cell of ListView given in above design.

Name this new XML file as student_row.xml and paste the following code into
it.

<?xmlversion="1.0"encoding="UTF-8"?>
<TextViewandroid:id="@+id/text1"
xmlns:android="http://schemas.android.com/apk/res/android"
android:layout_width="wrap_content"
android:layout_height="wrap_content"
android:textSize="15dip"/>


Now Add another class named StudentList.Java in you source package.

Extend it from Activity to make it an Activity. Implement OnCreate Method.

Define private controls and objects

//List of Students

ListViewlistStudents;

//DB Object

DBHandlerobjDB;

Now paste the following code in the OnCreate Method.

//initialization of DB Object

objDB=newDBHandler(this);

                 //Set Design of Activity
                 setContentView(R.layout.student_list);

                 //Controls to be populated in List
                 int[] to = newint[]{R.id.text1};


            //List of student which will be populated as a result of fetch
operation on DB
            ListstdList=newArrayList<String>();

                 //List Population
                 stdList=objDB.getData();

                 //Get Reference of the ListView from the Design
                 listStudent=(ListView)findViewById(R.id.listStudent);
//Prepare a list of Key Value Pair Hash to populate the ListView

            List<Map<String,Object>> list=newArrayList<
Map<String,Object>>(stdList.size());

            //For loop to get each instance from student list and put it into
Hash list which will be used to populate ListView

            for(int i=0; i<stdList.size(); i++){
                  Map<String,Object> map = newHashMap<String,Object>();
                  map.put("Name", stdList.get(i));
                  list.add(map);
            }

            //Set adapter to the ListView with control to be populated , Cell
Layout and list of data

      listStudent.setAdapter(newSimpleAdapter(this,list,R.layout.student_row,
new String[] { "Name"}, to));


Now Add this Activity to your AndroidManifest.xml file.

Add Code to start this activity in the OnClick Method for Back Button in
Student Detail Activity.

Intent i=newIntent(this,StudentList.class);
            startActivity(i);

Now Run your Application.

More Related Content

What's hot

What Is BuildContext In Flutter And It's Importance
What Is BuildContext In Flutter And It's ImportanceWhat Is BuildContext In Flutter And It's Importance
What Is BuildContext In Flutter And It's ImportanceAndolasoft Inc
 
Introduction to android
Introduction to androidIntroduction to android
Introduction to androidbantyder
 
Day1 before getting_started
Day1 before getting_startedDay1 before getting_started
Day1 before getting_startedAhsanul Karim
 
Android Application Development Using Java
Android Application Development Using JavaAndroid Application Development Using Java
Android Application Development Using Javaamaankhan
 
Multiple Activity and Navigation Primer
Multiple Activity and Navigation PrimerMultiple Activity and Navigation Primer
Multiple Activity and Navigation PrimerAhsanul Karim
 
Introduction to Android Development: Before Getting Started
Introduction to Android Development: Before Getting StartedIntroduction to Android Development: Before Getting Started
Introduction to Android Development: Before Getting StartedAhsanul Karim
 
15 android libraries for app development
15 android libraries for app development15 android libraries for app development
15 android libraries for app developmentConcetto Labs
 
What’s new in aNdroid [Google I/O Extended Bangkok 2016]
What’s new in aNdroid [Google I/O Extended Bangkok 2016]What’s new in aNdroid [Google I/O Extended Bangkok 2016]
What’s new in aNdroid [Google I/O Extended Bangkok 2016]Sittiphol Phanvilai
 
Android Development Training
Android Development TrainingAndroid Development Training
Android Development Trainingchandutata
 
Day 1 Android: Before Getting Started
Day 1 Android: Before Getting StartedDay 1 Android: Before Getting Started
Day 1 Android: Before Getting StartedAhsanul Karim
 
Jaipur Bus Finder - An Android-based Application
Jaipur Bus Finder - An Android-based ApplicationJaipur Bus Finder - An Android-based Application
Jaipur Bus Finder - An Android-based ApplicationAI Publications
 
Day 2 android internals a quick overview
Day 2 android internals a quick overviewDay 2 android internals a quick overview
Day 2 android internals a quick overviewAhsanul Karim
 
Android Workshop Day 1 Part 2
Android Workshop Day 1 Part 2Android Workshop Day 1 Part 2
Android Workshop Day 1 Part 2Ahsanul Karim
 
Android developer interview questions with answers pdf
Android developer interview questions with answers pdfAndroid developer interview questions with answers pdf
Android developer interview questions with answers pdfazlist247
 

What's hot (19)

What Is BuildContext In Flutter And It's Importance
What Is BuildContext In Flutter And It's ImportanceWhat Is BuildContext In Flutter And It's Importance
What Is BuildContext In Flutter And It's Importance
 
Introduction to android
Introduction to androidIntroduction to android
Introduction to android
 
AndroidManifest
AndroidManifestAndroidManifest
AndroidManifest
 
Android Applications Development
Android Applications DevelopmentAndroid Applications Development
Android Applications Development
 
Day1 before getting_started
Day1 before getting_startedDay1 before getting_started
Day1 before getting_started
 
Android Application Development Using Java
Android Application Development Using JavaAndroid Application Development Using Java
Android Application Development Using Java
 
Multiple Activity and Navigation Primer
Multiple Activity and Navigation PrimerMultiple Activity and Navigation Primer
Multiple Activity and Navigation Primer
 
Introduction to Android Development: Before Getting Started
Introduction to Android Development: Before Getting StartedIntroduction to Android Development: Before Getting Started
Introduction to Android Development: Before Getting Started
 
15 android libraries for app development
15 android libraries for app development15 android libraries for app development
15 android libraries for app development
 
What’s new in aNdroid [Google I/O Extended Bangkok 2016]
What’s new in aNdroid [Google I/O Extended Bangkok 2016]What’s new in aNdroid [Google I/O Extended Bangkok 2016]
What’s new in aNdroid [Google I/O Extended Bangkok 2016]
 
Training android
Training androidTraining android
Training android
 
Android Development Training
Android Development TrainingAndroid Development Training
Android Development Training
 
Day 1 Android: Before Getting Started
Day 1 Android: Before Getting StartedDay 1 Android: Before Getting Started
Day 1 Android: Before Getting Started
 
Jaipur Bus Finder - An Android-based Application
Jaipur Bus Finder - An Android-based ApplicationJaipur Bus Finder - An Android-based Application
Jaipur Bus Finder - An Android-based Application
 
Google Android
Google AndroidGoogle Android
Google Android
 
Day 2 android internals a quick overview
Day 2 android internals a quick overviewDay 2 android internals a quick overview
Day 2 android internals a quick overview
 
Android interview questions
Android interview questionsAndroid interview questions
Android interview questions
 
Android Workshop Day 1 Part 2
Android Workshop Day 1 Part 2Android Workshop Day 1 Part 2
Android Workshop Day 1 Part 2
 
Android developer interview questions with answers pdf
Android developer interview questions with answers pdfAndroid developer interview questions with answers pdf
Android developer interview questions with answers pdf
 

Similar to Android tutorial

Android interview questions and answers
Android interview questions and answersAndroid interview questions and answers
Android interview questions and answerskavinilavuG
 
Getting started with android dev and test perspective
Getting started with android   dev and test perspectiveGetting started with android   dev and test perspective
Getting started with android dev and test perspectiveGunjan Kumar
 
Android studio
Android studioAndroid studio
Android studioAndri Yabu
 
Android Bootcamp Tanzania:understanding ui in_android
Android Bootcamp Tanzania:understanding ui in_androidAndroid Bootcamp Tanzania:understanding ui in_android
Android Bootcamp Tanzania:understanding ui in_androidDenis Minja
 
Technology and Android.pptx
Technology and Android.pptxTechnology and Android.pptx
Technology and Android.pptxmuthulakshmi cse
 
Creating the first app with android studio
Creating the first app with android studioCreating the first app with android studio
Creating the first app with android studioParinita03
 
Android installation guide
Android installation guideAndroid installation guide
Android installation guidemagicshui
 
Android Tutorial
Android TutorialAndroid Tutorial
Android TutorialFun2Do Labs
 
Part 2 android application development 101
Part 2 android application development 101Part 2 android application development 101
Part 2 android application development 101Michael Angelo Rivera
 
android training_material ravy ramio
android training_material ravy ramioandroid training_material ravy ramio
android training_material ravy ramioslesulvy
 
Android deep dive
Android deep diveAndroid deep dive
Android deep diveAnuSahniNCI
 
Android presentation
Android presentationAndroid presentation
Android presentationImam Raza
 

Similar to Android tutorial (20)

Android interview questions and answers
Android interview questions and answersAndroid interview questions and answers
Android interview questions and answers
 
Getting started with android dev and test perspective
Getting started with android   dev and test perspectiveGetting started with android   dev and test perspective
Getting started with android dev and test perspective
 
Android
Android Android
Android
 
Android Basic
Android BasicAndroid Basic
Android Basic
 
PPT Companion to Android
PPT Companion to AndroidPPT Companion to Android
PPT Companion to Android
 
Android studio
Android studioAndroid studio
Android studio
 
Android Bootcamp Tanzania:understanding ui in_android
Android Bootcamp Tanzania:understanding ui in_androidAndroid Bootcamp Tanzania:understanding ui in_android
Android Bootcamp Tanzania:understanding ui in_android
 
Technology and Android.pptx
Technology and Android.pptxTechnology and Android.pptx
Technology and Android.pptx
 
Creating the first app with android studio
Creating the first app with android studioCreating the first app with android studio
Creating the first app with android studio
 
Intro to Android Programming
Intro to Android ProgrammingIntro to Android Programming
Intro to Android Programming
 
Android Basic- CMC
Android Basic- CMCAndroid Basic- CMC
Android Basic- CMC
 
Android installation guide
Android installation guideAndroid installation guide
Android installation guide
 
Android Tutorial
Android TutorialAndroid Tutorial
Android Tutorial
 
Android Intro
Android IntroAndroid Intro
Android Intro
 
Android Minnebar
Android MinnebarAndroid Minnebar
Android Minnebar
 
Part 2 android application development 101
Part 2 android application development 101Part 2 android application development 101
Part 2 android application development 101
 
android training_material ravy ramio
android training_material ravy ramioandroid training_material ravy ramio
android training_material ravy ramio
 
Android
AndroidAndroid
Android
 
Android deep dive
Android deep diveAndroid deep dive
Android deep dive
 
Android presentation
Android presentationAndroid presentation
Android presentation
 

Recently uploaded

2024: Domino Containers - The Next Step. News from the Domino Container commu...
2024: Domino Containers - The Next Step. News from the Domino Container commu...2024: Domino Containers - The Next Step. News from the Domino Container commu...
2024: Domino Containers - The Next Step. News from the Domino Container commu...Martijn de Jong
 
[2024]Digital Global Overview Report 2024 Meltwater.pdf
[2024]Digital Global Overview Report 2024 Meltwater.pdf[2024]Digital Global Overview Report 2024 Meltwater.pdf
[2024]Digital Global Overview Report 2024 Meltwater.pdfhans926745
 
Neo4j - How KGs are shaping the future of Generative AI at AWS Summit London ...
Neo4j - How KGs are shaping the future of Generative AI at AWS Summit London ...Neo4j - How KGs are shaping the future of Generative AI at AWS Summit London ...
Neo4j - How KGs are shaping the future of Generative AI at AWS Summit London ...Neo4j
 
08448380779 Call Girls In Friends Colony Women Seeking Men
08448380779 Call Girls In Friends Colony Women Seeking Men08448380779 Call Girls In Friends Colony Women Seeking Men
08448380779 Call Girls In Friends Colony Women Seeking MenDelhi Call girls
 
Kalyanpur ) Call Girls in Lucknow Finest Escorts Service 🍸 8923113531 🎰 Avail...
Kalyanpur ) Call Girls in Lucknow Finest Escorts Service 🍸 8923113531 🎰 Avail...Kalyanpur ) Call Girls in Lucknow Finest Escorts Service 🍸 8923113531 🎰 Avail...
Kalyanpur ) Call Girls in Lucknow Finest Escorts Service 🍸 8923113531 🎰 Avail...gurkirankumar98700
 
Finology Group – Insurtech Innovation Award 2024
Finology Group – Insurtech Innovation Award 2024Finology Group – Insurtech Innovation Award 2024
Finology Group – Insurtech Innovation Award 2024The Digital Insurer
 
Injustice - Developers Among Us (SciFiDevCon 2024)
Injustice - Developers Among Us (SciFiDevCon 2024)Injustice - Developers Among Us (SciFiDevCon 2024)
Injustice - Developers Among Us (SciFiDevCon 2024)Allon Mureinik
 
Breaking the Kubernetes Kill Chain: Host Path Mount
Breaking the Kubernetes Kill Chain: Host Path MountBreaking the Kubernetes Kill Chain: Host Path Mount
Breaking the Kubernetes Kill Chain: Host Path MountPuma Security, LLC
 
Handwritten Text Recognition for manuscripts and early printed texts
Handwritten Text Recognition for manuscripts and early printed textsHandwritten Text Recognition for manuscripts and early printed texts
Handwritten Text Recognition for manuscripts and early printed textsMaria Levchenko
 
The Role of Taxonomy and Ontology in Semantic Layers - Heather Hedden.pdf
The Role of Taxonomy and Ontology in Semantic Layers - Heather Hedden.pdfThe Role of Taxonomy and Ontology in Semantic Layers - Heather Hedden.pdf
The Role of Taxonomy and Ontology in Semantic Layers - Heather Hedden.pdfEnterprise Knowledge
 
WhatsApp 9892124323 ✓Call Girls In Kalyan ( Mumbai ) secure service
WhatsApp 9892124323 ✓Call Girls In Kalyan ( Mumbai ) secure serviceWhatsApp 9892124323 ✓Call Girls In Kalyan ( Mumbai ) secure service
WhatsApp 9892124323 ✓Call Girls In Kalyan ( Mumbai ) secure servicePooja Nehwal
 
Exploring the Future Potential of AI-Enabled Smartphone Processors
Exploring the Future Potential of AI-Enabled Smartphone ProcessorsExploring the Future Potential of AI-Enabled Smartphone Processors
Exploring the Future Potential of AI-Enabled Smartphone Processorsdebabhi2
 
Unblocking The Main Thread Solving ANRs and Frozen Frames
Unblocking The Main Thread Solving ANRs and Frozen FramesUnblocking The Main Thread Solving ANRs and Frozen Frames
Unblocking The Main Thread Solving ANRs and Frozen FramesSinan KOZAK
 
08448380779 Call Girls In Diplomatic Enclave Women Seeking Men
08448380779 Call Girls In Diplomatic Enclave Women Seeking Men08448380779 Call Girls In Diplomatic Enclave Women Seeking Men
08448380779 Call Girls In Diplomatic Enclave Women Seeking MenDelhi Call girls
 
Apidays Singapore 2024 - Building Digital Trust in a Digital Economy by Veron...
Apidays Singapore 2024 - Building Digital Trust in a Digital Economy by Veron...Apidays Singapore 2024 - Building Digital Trust in a Digital Economy by Veron...
Apidays Singapore 2024 - Building Digital Trust in a Digital Economy by Veron...apidays
 
08448380779 Call Girls In Civil Lines Women Seeking Men
08448380779 Call Girls In Civil Lines Women Seeking Men08448380779 Call Girls In Civil Lines Women Seeking Men
08448380779 Call Girls In Civil Lines Women Seeking MenDelhi Call girls
 
Scaling API-first – The story of a global engineering organization
Scaling API-first – The story of a global engineering organizationScaling API-first – The story of a global engineering organization
Scaling API-first – The story of a global engineering organizationRadu Cotescu
 
How to convert PDF to text with Nanonets
How to convert PDF to text with NanonetsHow to convert PDF to text with Nanonets
How to convert PDF to text with Nanonetsnaman860154
 
Histor y of HAM Radio presentation slide
Histor y of HAM Radio presentation slideHistor y of HAM Radio presentation slide
Histor y of HAM Radio presentation slidevu2urc
 
EIS-Webinar-Prompt-Knowledge-Eng-2024-04-08.pptx
EIS-Webinar-Prompt-Knowledge-Eng-2024-04-08.pptxEIS-Webinar-Prompt-Knowledge-Eng-2024-04-08.pptx
EIS-Webinar-Prompt-Knowledge-Eng-2024-04-08.pptxEarley Information Science
 

Recently uploaded (20)

2024: Domino Containers - The Next Step. News from the Domino Container commu...
2024: Domino Containers - The Next Step. News from the Domino Container commu...2024: Domino Containers - The Next Step. News from the Domino Container commu...
2024: Domino Containers - The Next Step. News from the Domino Container commu...
 
[2024]Digital Global Overview Report 2024 Meltwater.pdf
[2024]Digital Global Overview Report 2024 Meltwater.pdf[2024]Digital Global Overview Report 2024 Meltwater.pdf
[2024]Digital Global Overview Report 2024 Meltwater.pdf
 
Neo4j - How KGs are shaping the future of Generative AI at AWS Summit London ...
Neo4j - How KGs are shaping the future of Generative AI at AWS Summit London ...Neo4j - How KGs are shaping the future of Generative AI at AWS Summit London ...
Neo4j - How KGs are shaping the future of Generative AI at AWS Summit London ...
 
08448380779 Call Girls In Friends Colony Women Seeking Men
08448380779 Call Girls In Friends Colony Women Seeking Men08448380779 Call Girls In Friends Colony Women Seeking Men
08448380779 Call Girls In Friends Colony Women Seeking Men
 
Kalyanpur ) Call Girls in Lucknow Finest Escorts Service 🍸 8923113531 🎰 Avail...
Kalyanpur ) Call Girls in Lucknow Finest Escorts Service 🍸 8923113531 🎰 Avail...Kalyanpur ) Call Girls in Lucknow Finest Escorts Service 🍸 8923113531 🎰 Avail...
Kalyanpur ) Call Girls in Lucknow Finest Escorts Service 🍸 8923113531 🎰 Avail...
 
Finology Group – Insurtech Innovation Award 2024
Finology Group – Insurtech Innovation Award 2024Finology Group – Insurtech Innovation Award 2024
Finology Group – Insurtech Innovation Award 2024
 
Injustice - Developers Among Us (SciFiDevCon 2024)
Injustice - Developers Among Us (SciFiDevCon 2024)Injustice - Developers Among Us (SciFiDevCon 2024)
Injustice - Developers Among Us (SciFiDevCon 2024)
 
Breaking the Kubernetes Kill Chain: Host Path Mount
Breaking the Kubernetes Kill Chain: Host Path MountBreaking the Kubernetes Kill Chain: Host Path Mount
Breaking the Kubernetes Kill Chain: Host Path Mount
 
Handwritten Text Recognition for manuscripts and early printed texts
Handwritten Text Recognition for manuscripts and early printed textsHandwritten Text Recognition for manuscripts and early printed texts
Handwritten Text Recognition for manuscripts and early printed texts
 
The Role of Taxonomy and Ontology in Semantic Layers - Heather Hedden.pdf
The Role of Taxonomy and Ontology in Semantic Layers - Heather Hedden.pdfThe Role of Taxonomy and Ontology in Semantic Layers - Heather Hedden.pdf
The Role of Taxonomy and Ontology in Semantic Layers - Heather Hedden.pdf
 
WhatsApp 9892124323 ✓Call Girls In Kalyan ( Mumbai ) secure service
WhatsApp 9892124323 ✓Call Girls In Kalyan ( Mumbai ) secure serviceWhatsApp 9892124323 ✓Call Girls In Kalyan ( Mumbai ) secure service
WhatsApp 9892124323 ✓Call Girls In Kalyan ( Mumbai ) secure service
 
Exploring the Future Potential of AI-Enabled Smartphone Processors
Exploring the Future Potential of AI-Enabled Smartphone ProcessorsExploring the Future Potential of AI-Enabled Smartphone Processors
Exploring the Future Potential of AI-Enabled Smartphone Processors
 
Unblocking The Main Thread Solving ANRs and Frozen Frames
Unblocking The Main Thread Solving ANRs and Frozen FramesUnblocking The Main Thread Solving ANRs and Frozen Frames
Unblocking The Main Thread Solving ANRs and Frozen Frames
 
08448380779 Call Girls In Diplomatic Enclave Women Seeking Men
08448380779 Call Girls In Diplomatic Enclave Women Seeking Men08448380779 Call Girls In Diplomatic Enclave Women Seeking Men
08448380779 Call Girls In Diplomatic Enclave Women Seeking Men
 
Apidays Singapore 2024 - Building Digital Trust in a Digital Economy by Veron...
Apidays Singapore 2024 - Building Digital Trust in a Digital Economy by Veron...Apidays Singapore 2024 - Building Digital Trust in a Digital Economy by Veron...
Apidays Singapore 2024 - Building Digital Trust in a Digital Economy by Veron...
 
08448380779 Call Girls In Civil Lines Women Seeking Men
08448380779 Call Girls In Civil Lines Women Seeking Men08448380779 Call Girls In Civil Lines Women Seeking Men
08448380779 Call Girls In Civil Lines Women Seeking Men
 
Scaling API-first – The story of a global engineering organization
Scaling API-first – The story of a global engineering organizationScaling API-first – The story of a global engineering organization
Scaling API-first – The story of a global engineering organization
 
How to convert PDF to text with Nanonets
How to convert PDF to text with NanonetsHow to convert PDF to text with Nanonets
How to convert PDF to text with Nanonets
 
Histor y of HAM Radio presentation slide
Histor y of HAM Radio presentation slideHistor y of HAM Radio presentation slide
Histor y of HAM Radio presentation slide
 
EIS-Webinar-Prompt-Knowledge-Eng-2024-04-08.pptx
EIS-Webinar-Prompt-Knowledge-Eng-2024-04-08.pptxEIS-Webinar-Prompt-Knowledge-Eng-2024-04-08.pptx
EIS-Webinar-Prompt-Knowledge-Eng-2024-04-08.pptx
 

Android tutorial

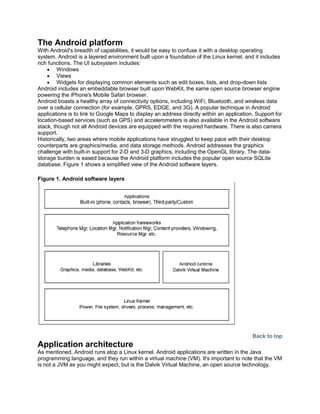
  • 1. The Android platform With Android's breadth of capabilities, it would be easy to confuse it with a desktop operating system. Android is a layered environment built upon a foundation of the Linux kernel, and it includes rich functions. The UI subsystem includes:  Windows  Views  Widgets for displaying common elements such as edit boxes, lists, and drop-down lists Android includes an embeddable browser built upon WebKit, the same open source browser engine powering the iPhone's Mobile Safari browser. Android boasts a healthy array of connectivity options, including WiFi, Bluetooth, and wireless data over a cellular connection (for example, GPRS, EDGE, and 3G). A popular technique in Android applications is to link to Google Maps to display an address directly within an application. Support for location-based services (such as GPS) and accelerometers is also available in the Android software stack, though not all Android devices are equipped with the required hardware. There is also camera support. Historically, two areas where mobile applications have struggled to keep pace with their desktop counterparts are graphics/media, and data storage methods. Android addresses the graphics challenge with built-in support for 2-D and 3-D graphics, including the OpenGL library. The data- storage burden is eased because the Android platform includes the popular open source SQLite database. Figure 1 shows a simplified view of the Android software layers. Figure 1. Android software layers Back to top Application architecture As mentioned, Android runs atop a Linux kernel. Android applications are written in the Java programming language, and they run within a virtual machine (VM). It's important to note that the VM is not a JVM as you might expect, but is the Dalvik Virtual Machine, an open source technology.
  • 2. Each Android application runs within an instance of the Dalvik VM, which in turn resides within a Linux-kernel managed process, as shown below. Figure 2.Dalvik VM An Android application consists of one or more of the following classifications: Activities An application that has a visible UI is implemented with an activity. When a user selects an application from the home screen or application launcher, an activity is started. Services A service should be used for any application that needs to persist for a long time, such as a network monitor or update-checking application. Content providers You can think of content providers as a database server. A content provider's job is to manage access to persisted data, such as a SQLite database. If your application is very simple, you might not necessarily create a content provider. If you're building a larger application, or one that makes data available to multiple activities or applications, a content provider is the means of accessing your data. Intent/Broadcast receivers An Android application may be launched to process an element of data or respond to an event, such as the receipt of a text message. An Android application, along with a file called AndroidManifest.xml, is deployed to a device. AndroidManifest.xml contains the necessary configuration information to properly install it to the device. It includes the required class names and types of events the application is able to process, and the required permissions the application needs to run. For example, if an application requires access to the network — to download a file, for example — this permission must be explicitly stated in the manifest file. Many applications may have this specific permission enabled. Such declarative security helps reduce the likelihood that a rogue application can cause damage on your device. First Android Project Go to File Menu and select New Project. Following dialog box will appear select Android Project and press Next
  • 3. Fill in the following detail i.e. Project Name, Package Name, Activity Name, Application Name and select the Build Target (Android SDK Version) and press “Finish”
  • 4. Following structure tree will appear in Package Explorer window. In above structure following things are noticeable.
  • 5. Src o Package that will contain source code for project  Gen o Package that will contain automatic generated code like R.java  Assets o Folder that will contain the assets of application like DB, data storage files etc.  Res o Folder that will contain all the resources like, layouts, graphics and constant values, animations etc.  AndroidManifest.xml o A Configuration file for android application. Now make a Virtual Device by clicking on the mobile icon on you eclipse IDE or select from Window menu “Android SDK and AVD Manager” a Dialog box like below will appear. Press New. Create new AVD dialog will appear fill in the fields like given in the image.
  • 6. Press Create AVD after filling in the information.
  • 7. Select the AVD you’ve just created and Press Start. Now right click on your project and select Run As->Android Application
  • 8. You application will appear on the Emulator Now Open main.xml from layout folder. Select main.xml tab it will show the XML .
  • 9. Now replace the XML code with following Code. <?xmlversion="1.0"encoding="utf-8"?> <LinearLayoutxmlns:android="http://schemas.android.com/apk/res/android" android:orientation="vertical" android:layout_width="fill_parent" android:layout_height="fill_parent" > <TextView android:layout_width="fill_parent" android:layout_height="wrap_content" android:text="Student System" /> <TextViewandroid:text="First Name: " android:id="@+id/TextView01" android:layout_width="wrap_content" android:layout_height="wrap_content" android:layout_marginLeft="10dip"/> <EditTextandroid:text="" android:id="@+id/txtFName" android:layout_width="200dip" android:layout_height="wrap_content" android:layout_marginLeft="10dip"/> <TextViewandroid:text="Last Name: " android:id="@+id/TextView01" android:layout_width="wrap_content" android:layout_height="wrap_content" android:layout_marginLeft="10dip"/> <EditTextandroid:text=""
  • 10. android:id="@+id/txtLastName" android:layout_width="200dip" android:layout_height="wrap_content" android:layout_marginLeft="10dip"/> <TextViewandroid:text="Student ID: " android:id="@+id/TextView01" android:layout_width="wrap_content" android:layout_height="wrap_content" android:layout_marginLeft="10dip"/> <EditTextandroid:text="" android:id="@+id/txtId" android:layout_width="200dip" android:layout_height="wrap_content" android:layout_marginLeft="10dip"/> <TextViewandroid:text="Course:" android:id="@+id/TextView01" android:layout_width="wrap_content" android:layout_height="wrap_content" android:layout_marginLeft="10dip"/> <EditTextandroid:text="" android:id="@+id/txtCourse" android:layout_width="200dip" android:layout_height="wrap_content" android:layout_marginLeft="10dip"/> <Buttonandroid:text="Submit" android:id="@+id/btn1" android:layout_width="75dip" android:layout_height="wrap_content"/> <Buttonandroid:text="Clear" android:id="@+id/btn2" android:layout_width="75dip" android:layout_height="wrap_content"/> </LinearLayout> Now select the Layout tab, following design will appear.
  • 11. Now Add the Following Code in start of class //Private Controls EditTexttxtFname,txtLastName,txtId,txtCourse; Button btnSubmit,btnClear; Add the following code after setContentView(R.layout.main); //Getting layout's Controls txtFname=(EditText)findViewById(R.id.txtFName); txtLastName=(EditText)findViewById(R.id.txtLastName); txtId=(EditText)findViewById(R.id.txtId); txtCourse=(EditText)findViewById(R.id.txtCourse); btnSubmit=(Button)findViewById(R.id.btn1); btnClear=(Button)findViewById(R.id.btn2); Now implement the OnClickListener Interface but add Implements OnClickListener to Class definition i.e. publicclassMainActivityextends Activity implementsOnClickListener Now Implement the OnClick Method of OnClickListener Interface @Override publicvoidonClick(View v) { // TODO Auto-generated method stub } Add the following code for Button Clicks in onClick Method switch(v.getId()) { case R.id.btn1: break; case R.id.btn2: //Clear Controls this.txtFname.setText(""); this.txtLastName.setText(""); this.txtId.setText(""); this.txtCourse.setText(""); break; } Now Register Buttons with Click Handler
  • 12. //Setting Button Clicks btnClear.setOnClickListener(this); btnSubmit.setOnClickListener(this); Now Add a New Layout by right clicking on Layout folder and select New->File following dialog will appear.
  • 13. Click “Finish” after entering File name Now open the XML and Add following Code <?xmlversion="1.0"encoding="UTF-8"?> <LinearLayoutandroid:id="@+id/LinearLayout01" android:layout_width="fill_parent" android:layout_height="fill_parent" xmlns:android="http://schemas.android.com/apk/res/android" android:orientation="vertical"> <LinearLayoutandroid:id="@+id/LinearLayout01" android:layout_width="fill_parent" android:layout_height="wrap_content" android:orientation="horizontal" android:layout_marginTop="20dip"> <TextViewandroid:text="FName: " android:id="@+id/TextView01" android:layout_width="wrap_content" android:layout_height="wrap_content"/> <TextViewandroid:text="Name" android:id="@+id/lblName" android:layout_width="wrap_content" android:layout_height="wrap_content"/> </LinearLayout>
  • 14. <LinearLayoutandroid:id="@+id/LinearLayout01" android:layout_width="fill_parent" android:layout_height="wrap_content" android:orientation="horizontal" android:layout_marginTop="20dip"> <TextViewandroid:text="LastName: " android:id="@+id/TextView07" android:layout_width="wrap_content" android:layout_height="wrap_content"/> <TextViewandroid:text="Last Name" android:id="@+id/lblLName" android:layout_width="wrap_content" android:layout_height="wrap_content"/> </LinearLayout> <LinearLayoutandroid:id="@+id/LinearLayout01" android:layout_width="fill_parent" android:layout_height="wrap_content" android:orientation="horizontal" android:layout_marginTop="20dip" > <TextViewandroid:text="Student Id: " android:id="@+id/TextView05" android:layout_width="wrap_content" android:layout_height="wrap_content"/> <TextViewandroid:text="Student ID" android:id="@+id/lblId" android:layout_width="wrap_content" android:layout_height="wrap_content"/> </LinearLayout> <LinearLayoutandroid:id="@+id/LinearLayout01" android:layout_width="fill_parent" android:layout_height="wrap_content" android:orientation="horizontal" android:layout_marginTop="20dip"> <TextViewandroid:text="Course: " android:id="@+id/TextView03" android:layout_width="wrap_content" android:layout_height="wrap_content"/> <TextViewandroid:text="Course" android:id="@+id/lblCourse" android:layout_width="wrap_content" android:layout_height="wrap_content"/> </LinearLayout> <Button android:text="Back " android:id="@+id/btnBack" android:layout_width="wrap_content" android:layout_height="wrap_content" android:layout_marginTop="20dip" /> </LinearLayout>
  • 15. Now Add a New class in Source Package and name it as StudentDetail. Extend it from Activity. Add Following Code to OnClick method of MainActivity in first Case of switch statement now you onClick Method should look like this @Override publicvoidonClick(View v) { // TODO Auto-generated method stub switch(v.getId()) { case R.id.btn1: //Code to submit data to next activity Intent i=newIntent(this,StudentDetail.class); i.putExtra("FName", txtFname.getText().toString()); i.putExtra("LName", txtLastName.getText().toString()); i.putExtra("Id", txtId.getText().toString()); i.putExtra("Course",txtCourse.getText().toString()); startActivity(i); break; case R.id.btn2: this.txtFname.setText(""); this.txtLastName.setText(""); this.txtId.setText(""); this.txtCourse.setText(""); break; } } Add the Following code in StudentDetail Class TextViewlblFname, lblLastName,lblID,lblCourse; Button btnBack; @Override protectedvoidonCreate(Bundle savedInstanceState) { // TODO Auto-generated method stub super.onCreate(savedInstanceState); //Setting the Layout setContentView(R.layout.studentdetail); lblFname=(TextView)findViewById(R.id.lblName); lblLastName=(TextView)findViewById(R.id.lblLName); lblID=(TextView)findViewById(R.id.lblId); lblCourse=(TextView)findViewById(R.id.lblCourse); btnBack=(Button)findViewById(R.id.btnBack); //Setting on Click of Back Button btnBack.setOnClickListener(this); //Getting Student Detail from Intent and populating the controls Bundle extras=getIntent().getExtras();
  • 16. lblFname.setText(extras.getString("FName")); lblLastName.setText(extras.getString("LName")); lblID.setText(extras.getString("Id")); lblCourse.setText(extras.getString("Course")); } @Override publicvoidonClick(View v) { // TODO Auto-generated method stub this.finish(); } Now Add you NewActivity(StudentDetail) in the AndroidManifest File <activityandroid:name=".StudentDetail"android:label="Student Detail"/> Add above line in AndroidManifest file right below the </Activity> Tag Now Run you Application. Using Database in Android Applications Now we will extend our previous project to a database driven application. Android Uses SQLite as Database Engine for its Application it is an embeded library that works with general SQL and is generally use with mobile platforms . Add a new class to your source package name it asDBHelper Add a Constructor with one parameter Context. Context ctx; //Database Object SQLiteDatabasedb; //Create Table Statement final String CREATE_TABLE_STUDENT = "CREATE TABLE tbl_student (" + "id INTEGER PRIMARY KEY AUTOINCREMENT," + "f_nameTEXT,l_nameTEXT,courseTEXT,std_id TEXT);"; //one argument Constructor publicDBHandler(Context mContext){ ctx=mContext; } Now Add Following Function to Create new Database
  • 17. privatevoidcreateOpenDB(){ try{db = ctx.openOrCreateDatabase( "StudentData.db" , SQLiteDatabase.CREATE_IF_NECESSARY , null ); db.setVersion(1); db.setLocale(Locale.getDefault()); db.setLockingEnabled(true); db.execSQL(CREATE_TABLE_STUDENT); }catch(Exception ex){ db=ctx.openOrCreateDatabase("StudentData.db",SQLiteDatabase.OPEN_READWRITE,nu ll); db.setVersion(2); db.setLocale(Locale.getDefault()); db.setLockingEnabled(true); } } Add Code of Record Insertion publicvoidinsertDate(String fName,StringlName,String course, String stdId){ createDB(); ContentValues values = newContentValues(); values.put("f_name", fName); values.put("l_name",lName); values.put("course", course); values.put("std_id",stdId); db.insert("tbl_student", null, values); Toast.makeText(ctx, "Record Saved",Toast.LENGTH_LONG).show(); } Add an object of DBHandler Class in Main Activity first DBHandlerobjDB; Now initialize this object in OnCreate Method objDB=new DBHandler(this); Now Add the Code to insert record //Code to submit data to next activity Intent i=newIntent(this,StudentDetail.class); i.putExtra("FName", txtFname.getText().toString());
  • 18. i.putExtra("LName", txtLastName.getText().toString()); i.putExtra("Id", txtId.getText().toString()); i.putExtra("Course",txtCourse.getText().toString()); // objDB.insertDate(txtFname.getText().toString(),txtLastName.getText().to String(),txtCourse.getText().toString(), txtId.getText().toString()); startActivity(i); Run your Application now on Submit button click it will save the record in the database and show the current record on next screen. Now Add Code to Fetch Record in DBHandler class public Cursor fetchTableData(String sql) { returndb.rawQuery(sql,null); } This method will fetch the data into a cursor Now we will have to write a method to store retrieved data into a list so we can use it on other places. publicArrayList<String>getData(){ createDB(); ArrayListstudentList=newArrayList<String>(); Cursor cur =fetchTableData("select * from tbl_student"); cur.moveToFirst(); while (cur.isAfterLast() == false) { studentList.add(cur.getString(1)); cur.moveToNext(); } cur.close(); returnstudentList; } Now Add a New XML in layout folder name it as student_list.xml Add following code in this newly created xml file. <?xmlversion="1.0"encoding="UTF-8"?> <LinearLayout android:layout_width="fill_parent" android:layout_height="fill_parent" xmlns:android="http://schemas.android.com/apk/res/android"> <ListViewandroid:id="@+id/listStudent" android:layout_width="wrap_content" android:layout_height="wrap_content"/> </LinearLayout>
  • 19. Above design contains a ListView which will show a list in your Activity. Now Create another XML file in layout folder as which will represent each cell of ListView given in above design. Name this new XML file as student_row.xml and paste the following code into it. <?xmlversion="1.0"encoding="UTF-8"?> <TextViewandroid:id="@+id/text1" xmlns:android="http://schemas.android.com/apk/res/android" android:layout_width="wrap_content" android:layout_height="wrap_content" android:textSize="15dip"/> Now Add another class named StudentList.Java in you source package. Extend it from Activity to make it an Activity. Implement OnCreate Method. Define private controls and objects //List of Students ListViewlistStudents; //DB Object DBHandlerobjDB; Now paste the following code in the OnCreate Method. //initialization of DB Object objDB=newDBHandler(this); //Set Design of Activity setContentView(R.layout.student_list); //Controls to be populated in List int[] to = newint[]{R.id.text1}; //List of student which will be populated as a result of fetch operation on DB ListstdList=newArrayList<String>(); //List Population stdList=objDB.getData(); //Get Reference of the ListView from the Design listStudent=(ListView)findViewById(R.id.listStudent);
  • 20. //Prepare a list of Key Value Pair Hash to populate the ListView List<Map<String,Object>> list=newArrayList< Map<String,Object>>(stdList.size()); //For loop to get each instance from student list and put it into Hash list which will be used to populate ListView for(int i=0; i<stdList.size(); i++){ Map<String,Object> map = newHashMap<String,Object>(); map.put("Name", stdList.get(i)); list.add(map); } //Set adapter to the ListView with control to be populated , Cell Layout and list of data listStudent.setAdapter(newSimpleAdapter(this,list,R.layout.student_row, new String[] { "Name"}, to)); Now Add this Activity to your AndroidManifest.xml file. Add Code to start this activity in the OnClick Method for Back Button in Student Detail Activity. Intent i=newIntent(this,StudentList.class); startActivity(i); Now Run your Application.