SlideShare uma empresa Scribd logo
1 de 1
Baixar para ler offline
Blender 2.47 QuickStart

1. Blender's Interface                                    4. Managing 3D Objects                                     6. Mesh Modelling                                            9. Rendering
Blender’s interface consists of an arbitrary number of    The default scene is composed of a cube, a lamp and        To model a mesh object, you need to enter Edit Mode.         To render the view of a camera, you must first check
workspaces with multiple window each. Each window         a camera, You can select any of these objects with         In Edit Mode, you can select three kind of items:            that the desired camera is activated. To activate a
displays a part of your scene’s data. The type of data    RMB, select multiple objects with Shift·RMB and se-        Vertices, Edges and Faces. To switch between                 camera, select it and press Ctrl-Numpad 0.
that a window displays is indicated in the header.        lect/deselect all with A.                                  different selection modes, use the buttons placed in
                                                                                                                     the 3D View header or with Ctrl·Tab.                         To change the camera settings, select it and go to the
Blender's default interface                               To move these objects, click with LMB on the 3D Wid-
                                                                                                                                                                                  Edit buttons.
                                      3D window           get. You can change the widget mode to Ro-                 Once you have selected different elements, you can:
                    Header                                tate/Scale/Grab by activating the corresponding            Grab, Rotate, Scale;
         Window type switch                                                                                                                                                       If you want to change the background of your scene,
                                                          icons in the 3D View header. Note that you can do the      Extrude any selection; Knife any selection
                                                                                                                                                                                  go to the Material buttons and then to the World sub-
                                                          same thing with the bolded hotkeys.                        Delete the selection with X or Delete;
                                   Buttons window                                                                                                                                 section.
                                                                                                                     Apply various tools from the W and Ctrl·E menus;
                                                          Each object has a little dot that represents its center.
You can change the type of a window at any time by                                                                   Subdivide loops with Ctrl·R;
                                                          You can change the center position in Buttons                                                                           To change the render settings, go to the Render but-
clicking the header.                                                                                                 SeParate selection; Duplicate selections with Shift·D.
                                                          Window/Editing/Mesh while in the Object Mode.                                                                           tons. You can then select the size of your render, the
To add or delete windows, right-click on edge of a                                                                   Note that if you duplicate your object in the Edit           anti-aliasing settings (OSA) and the output format.
                                                          The red and white cross is the 3D cursor. Its position
window.                                                                                                              Mode, the result will still count as one object, even if
                                                          can be set with a simple LMB click in the viewport.
                                                                                                                     it looks like two duplicated objects. In the Edit Mode       To render your scene, press Render or F12.
Resize windows by grabbing a window edge.                 This cursor is used as a reference point.
                                                                                                                     you can modify the object geometry as you like and it
You can access the preferences by pulling down the        You can add new objects by pressing Space and then         will still remain a unique object. If you want to            If your scene renders as black, check that there is
top header or by opening an User Preferences window.      go to the Add menu.                                        duplicate your object and have two different objects         light in your scene and all needed layers are activated.
                                                                                                                     as a result, do so in the Object Mode. (See §4)
To set (and save) the current layout as the default,      Objects can be duplicated with Shift·D and link-du-
                                                                                                                                                                                  Save rendered image with F3. Remember to add the
press Ctrl·U. It will override previous default layout.   plicated with Alt·D.                                       LMB on the colored parts of a widget will tranform on
                                                                                                                                                                                  file extension to the filename.
                                                                                                                                         this axis.
Tools and actions relative to a window are always                                                                              Global
available in the window’s header.                                                                                                        The middle circle transforms on
                                                             Object Center         Mesh              Armature/
                                                                                                                                         the view axis.
Hotkeys and actions are context sensitive meaning
                                                             3D Cursor             Curve
                                                                                                     Bone                                                                         10. Final Words
that they work based on the location of mouse cursor.                                                                                  Shift·LMB     will   perform           a
                                                             Lamp                  Camera                            Move Rotate Scale
                                                                                                                                       planar transform (e.g. X,Y).
                                                                                                                                                                                  The QuickStart covers only the most basic features. To
                                                                                                                     MMB during transform also allows you to constraint           find out more information about modifier stack, fluid
2. Navigating in the 3D View                                                                                         transform without using widgets.                             simulator, particle engine, animation features, video
                                                          4. Managing 3D Objects                                                                                                  sequencer, node editor, game engine etc. we very
You can rotate the 3D View with the Middle Mouse                                                                                                                                  strongly recommend that you read the complete docu-
Button (MMB).                                             In Blender, editing the object position, and editing the                                                                mentation. You can find it on:
                                                          object shape and properties are two different and
Panning is accomplished with Shift·MMB.                   separated tasks. For each type of modification, there      7. Lamps and Materials                                       http://wiki.blender.org.
To zoom, use the mouse wheel or Ctrl·MMB. If you          is an associated "Mode". You are always in a certain
don't have an MMB, you can use Alt·LMB instead            mode. The current mode is indicated in the header.         To tweak lamps settings, select a lamp and go to the         As you may have noticed, Blender is mostly hotkey ori-
                                                                                                                     Materials buttons. You can tweak all the lamp settings       ented. Once you get the hang of these, you will find
The numpad allows to navigate in the3D View as well:                           Object Mode                           in the Lamp subsection. There you can also change            your experience on Blender much more enjoyable and
7, 1, 3 set the view to Top, Front, Right; use Ctrl-7,                                                               between light types.                                         productive.
Ctrl-1, Ctrl-3 to view Bottom, Back, Left                 The default is Object Mode. It allows to select
8, 2 rotate Up, Down; Shift-8, Shift-2 pan                different objects and to manipulate them.                  To change the color and look of an object, select it         If you have difficulties to find the hotkey of a specific
4, 6 rotate Left, Right; Shift-4, Shift-6 pan                                                                        and go to the Material buttons. Check the official           function, you can check if it is listed in the Space
5 flips between Orthogonal and Perspective view           The Edit Mode allows you to model the selected             documentation for details.                                   menu or in the window headers menus. They are also
                                                          object. You can modify only one object at a time. If                                                                    in the Help menu.
All those controls and more are also available in the     you want to select or modify other objects, you must
view menu located in the 3D View header.                  escape Edit Mode and go back to Object mode. You                                                                        Finally, you can find a Hotkey Map available in the
                                                          cycle between Object and Edit modes with Tab.
                                                                                                                     8. Layers                                                    Blender wiki.

                                                                                                                     Layers are used to easily show, hide and group
3. The Buttons Window                                                                                                different objects. Each object belongs to a layer or
                                                                                                                                                                                  If you have further questions, ask them on the forum
                                                                                                                                                                                  at http://www.blenderartists.org, or on the
                                                                                                                     layers. To change the layer of an object, select it and      #blenderchat channel at the freenode IRC network.
You can access different button categories with the                                                                  press Move.
icons along the Button window's header. Each category       (Game) Logic               Scriptlinks
                                                                                                                                                                                  Check http://www.blendernation.com for daily
regroups buttons that share the same use.                                                                            You can then show different layers with the layers
                                                            Materials/Lamp/World Editor                                                                                           Blender news and http://www.blenderart.org to
Each button category also has subcategories.                                                                         buttons available in the 3D Window header. To show           find a free Blender magazine.
                                                            Object Properties/Physics/Particles                      multiple layers at the same time, use Shift·LMB on
You can scroll panels with Shift·Mousewheel, zoom                                                                    these layers.                                                Good luck and Blend on!          -The Blender Team
panels with Ctrl·Mousewheel, organise panels with           (Game) Logic               Scriptlinks                                   Active layer
drag & drop and align panels vertically with RMB.                                                                                    Unactive layer

Mais conteúdo relacionado

Mais procurados

GARMIN - GPSMAP 420
GARMIN - GPSMAP 420 GARMIN - GPSMAP 420
GARMIN - GPSMAP 420 Kurnia Marina
 
2 working with layers and adjusting the image quality
2 working with layers and adjusting the image quality2 working with layers and adjusting the image quality
2 working with layers and adjusting the image qualityMarty Sison
 
Packmage CAD: carton packaging box template design software
Packmage CAD: carton packaging box template design softwarePackmage CAD: carton packaging box template design software
Packmage CAD: carton packaging box template design softwareAlex Xiao
 
CAS Instructions
CAS InstructionsCAS Instructions
CAS Instructionscoburgmaths
 
Ansys workbench11 bracket
Ansys workbench11 bracketAnsys workbench11 bracket
Ansys workbench11 brackethattake
 
XMeeting Graphical User Interface
XMeeting Graphical User InterfaceXMeeting Graphical User Interface
XMeeting Graphical User InterfaceVideoguy
 
Pcb design using proteus
Pcb design using proteusPcb design using proteus
Pcb design using proteusMashood
 
Displaying Points
Displaying PointsDisplaying Points
Displaying PointsEsri
 
Autocad3dtutorial2016
Autocad3dtutorial2016Autocad3dtutorial2016
Autocad3dtutorial2016PRABIR DATTA
 

Mais procurados (12)

GARMIN - GPSMAP 420
GARMIN - GPSMAP 420 GARMIN - GPSMAP 420
GARMIN - GPSMAP 420
 
Maya
MayaMaya
Maya
 
2 working with layers and adjusting the image quality
2 working with layers and adjusting the image quality2 working with layers and adjusting the image quality
2 working with layers and adjusting the image quality
 
Packmage CAD: carton packaging box template design software
Packmage CAD: carton packaging box template design softwarePackmage CAD: carton packaging box template design software
Packmage CAD: carton packaging box template design software
 
CAS Instructions
CAS InstructionsCAS Instructions
CAS Instructions
 
Ansys workbench11 bracket
Ansys workbench11 bracketAnsys workbench11 bracket
Ansys workbench11 bracket
 
XMeeting Graphical User Interface
XMeeting Graphical User InterfaceXMeeting Graphical User Interface
XMeeting Graphical User Interface
 
Pcb design using proteus
Pcb design using proteusPcb design using proteus
Pcb design using proteus
 
Displaying Points
Displaying PointsDisplaying Points
Displaying Points
 
2 d autocad_2009
2 d autocad_20092 d autocad_2009
2 d autocad_2009
 
Gui in java
Gui in javaGui in java
Gui in java
 
Autocad3dtutorial2016
Autocad3dtutorial2016Autocad3dtutorial2016
Autocad3dtutorial2016
 

Semelhante a Blender quickstart

DrTAD Blender Tutorial Animation Basics - Morphing 2 objects with Shrinkwrap ...
DrTAD Blender Tutorial Animation Basics - Morphing 2 objects with Shrinkwrap ...DrTAD Blender Tutorial Animation Basics - Morphing 2 objects with Shrinkwrap ...
DrTAD Blender Tutorial Animation Basics - Morphing 2 objects with Shrinkwrap ...FIDE Master Tihomir Dovramadjiev PhD
 
Presentation 10 secrets
Presentation 10 secretsPresentation 10 secrets
Presentation 10 secretsnahidturjo
 
Presentation 10 secrets
Presentation 10 secretsPresentation 10 secrets
Presentation 10 secretsnahidturjo
 
Rhino Crash Course
Rhino Crash CourseRhino Crash Course
Rhino Crash CourseDUSPviz
 
OKMindmap English tutorial
OKMindmap English tutorialOKMindmap English tutorial
OKMindmap English tutorialwon ho
 
VGEGIS%20Training%20Tutorial
VGEGIS%20Training%20TutorialVGEGIS%20Training%20Tutorial
VGEGIS%20Training%20Tutorialtutorialsruby
 
VGEGIS%20Training%20Tutorial
VGEGIS%20Training%20TutorialVGEGIS%20Training%20Tutorial
VGEGIS%20Training%20Tutorialtutorialsruby
 
Blender and Bezier Curves for 3D Printing
Blender and Bezier Curves for 3D PrintingBlender and Bezier Curves for 3D Printing
Blender and Bezier Curves for 3D PrintingVickyTGAW
 
Ppt
PptPpt
Pptlkpd
 
Omnigraffle tutorial
Omnigraffle tutorialOmnigraffle tutorial
Omnigraffle tutorialBillie DeMott
 
Modul 2: Menggunakan drawing tool
Modul 2: Menggunakan drawing toolModul 2: Menggunakan drawing tool
Modul 2: Menggunakan drawing toolIzatul Akma
 
Resizing images
Resizing imagesResizing images
Resizing imagesDean Kiley
 
32 Killer PhotoShop Tips & Tricks that Make You an Expert.
32 Killer PhotoShop Tips & Tricks that Make You an Expert.32 Killer PhotoShop Tips & Tricks that Make You an Expert.
32 Killer PhotoShop Tips & Tricks that Make You an Expert.CPZ Media
 
Creating wall type details using parts and assemblies
Creating wall type details using parts and assembliesCreating wall type details using parts and assemblies
Creating wall type details using parts and assembliesmclark4959
 

Semelhante a Blender quickstart (20)

Poser presentation1
Poser presentation1Poser presentation1
Poser presentation1
 
DrTAD Blender Tutorial Animation Basics - Morphing 2 objects with Shrinkwrap ...
DrTAD Blender Tutorial Animation Basics - Morphing 2 objects with Shrinkwrap ...DrTAD Blender Tutorial Animation Basics - Morphing 2 objects with Shrinkwrap ...
DrTAD Blender Tutorial Animation Basics - Morphing 2 objects with Shrinkwrap ...
 
Presentation 10 secrets
Presentation 10 secretsPresentation 10 secrets
Presentation 10 secrets
 
Presentation 10 secrets
Presentation 10 secretsPresentation 10 secrets
Presentation 10 secrets
 
Rhino Crash Course
Rhino Crash CourseRhino Crash Course
Rhino Crash Course
 
OKMindmap English tutorial
OKMindmap English tutorialOKMindmap English tutorial
OKMindmap English tutorial
 
VGEGIS%20Training%20Tutorial
VGEGIS%20Training%20TutorialVGEGIS%20Training%20Tutorial
VGEGIS%20Training%20Tutorial
 
VGEGIS%20Training%20Tutorial
VGEGIS%20Training%20TutorialVGEGIS%20Training%20Tutorial
VGEGIS%20Training%20Tutorial
 
Blender and Bezier Curves for 3D Printing
Blender and Bezier Curves for 3D PrintingBlender and Bezier Curves for 3D Printing
Blender and Bezier Curves for 3D Printing
 
Clo3D Manual.pdf
Clo3D Manual.pdfClo3D Manual.pdf
Clo3D Manual.pdf
 
Ppt
PptPpt
Ppt
 
d_vbp_print
d_vbp_printd_vbp_print
d_vbp_print
 
Omnigraffle tutorial
Omnigraffle tutorialOmnigraffle tutorial
Omnigraffle tutorial
 
Modul 2: Menggunakan drawing tool
Modul 2: Menggunakan drawing toolModul 2: Menggunakan drawing tool
Modul 2: Menggunakan drawing tool
 
Resizing images
Resizing imagesResizing images
Resizing images
 
02 unity 3_d_part_1
02 unity 3_d_part_102 unity 3_d_part_1
02 unity 3_d_part_1
 
Maya
MayaMaya
Maya
 
32 Killer PhotoShop Tips & Tricks that Make You an Expert.
32 Killer PhotoShop Tips & Tricks that Make You an Expert.32 Killer PhotoShop Tips & Tricks that Make You an Expert.
32 Killer PhotoShop Tips & Tricks that Make You an Expert.
 
Creating wall type details using parts and assemblies
Creating wall type details using parts and assembliesCreating wall type details using parts and assemblies
Creating wall type details using parts and assemblies
 
Windows phone and azure
Windows phone and azureWindows phone and azure
Windows phone and azure
 

Blender quickstart

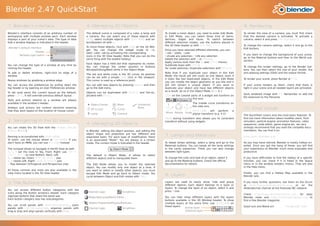
  • 1. Blender 2.47 QuickStart 1. Blender's Interface 4. Managing 3D Objects 6. Mesh Modelling 9. Rendering Blender’s interface consists of an arbitrary number of The default scene is composed of a cube, a lamp and To model a mesh object, you need to enter Edit Mode. To render the view of a camera, you must first check workspaces with multiple window each. Each window a camera, You can select any of these objects with In Edit Mode, you can select three kind of items: that the desired camera is activated. To activate a displays a part of your scene’s data. The type of data RMB, select multiple objects with Shift·RMB and se- Vertices, Edges and Faces. To switch between camera, select it and press Ctrl-Numpad 0. that a window displays is indicated in the header. lect/deselect all with A. different selection modes, use the buttons placed in the 3D View header or with Ctrl·Tab. To change the camera settings, select it and go to the Blender's default interface To move these objects, click with LMB on the 3D Wid- Edit buttons. 3D window get. You can change the widget mode to Ro- Once you have selected different elements, you can: Header tate/Scale/Grab by activating the corresponding Grab, Rotate, Scale; Window type switch If you want to change the background of your scene, icons in the 3D View header. Note that you can do the Extrude any selection; Knife any selection go to the Material buttons and then to the World sub- same thing with the bolded hotkeys. Delete the selection with X or Delete; Buttons window section. Apply various tools from the W and Ctrl·E menus; Each object has a little dot that represents its center. You can change the type of a window at any time by Subdivide loops with Ctrl·R; You can change the center position in Buttons To change the render settings, go to the Render but- clicking the header. SeParate selection; Duplicate selections with Shift·D. Window/Editing/Mesh while in the Object Mode. tons. You can then select the size of your render, the To add or delete windows, right-click on edge of a Note that if you duplicate your object in the Edit anti-aliasing settings (OSA) and the output format. The red and white cross is the 3D cursor. Its position window. Mode, the result will still count as one object, even if can be set with a simple LMB click in the viewport. it looks like two duplicated objects. In the Edit Mode To render your scene, press Render or F12. Resize windows by grabbing a window edge. This cursor is used as a reference point. you can modify the object geometry as you like and it You can access the preferences by pulling down the You can add new objects by pressing Space and then will still remain a unique object. If you want to If your scene renders as black, check that there is top header or by opening an User Preferences window. go to the Add menu. duplicate your object and have two different objects light in your scene and all needed layers are activated. as a result, do so in the Object Mode. (See §4) To set (and save) the current layout as the default, Objects can be duplicated with Shift·D and link-du- Save rendered image with F3. Remember to add the press Ctrl·U. It will override previous default layout. plicated with Alt·D. LMB on the colored parts of a widget will tranform on file extension to the filename. this axis. Tools and actions relative to a window are always Global available in the window’s header. The middle circle transforms on Object Center Mesh Armature/ the view axis. Hotkeys and actions are context sensitive meaning 3D Cursor Curve Bone 10. Final Words that they work based on the location of mouse cursor. Shift·LMB will perform a Lamp Camera Move Rotate Scale planar transform (e.g. X,Y). The QuickStart covers only the most basic features. To MMB during transform also allows you to constraint find out more information about modifier stack, fluid 2. Navigating in the 3D View transform without using widgets. simulator, particle engine, animation features, video 4. Managing 3D Objects sequencer, node editor, game engine etc. we very You can rotate the 3D View with the Middle Mouse strongly recommend that you read the complete docu- Button (MMB). In Blender, editing the object position, and editing the mentation. You can find it on: object shape and properties are two different and Panning is accomplished with Shift·MMB. separated tasks. For each type of modification, there 7. Lamps and Materials http://wiki.blender.org. To zoom, use the mouse wheel or Ctrl·MMB. If you is an associated "Mode". You are always in a certain don't have an MMB, you can use Alt·LMB instead mode. The current mode is indicated in the header. To tweak lamps settings, select a lamp and go to the As you may have noticed, Blender is mostly hotkey ori- Materials buttons. You can tweak all the lamp settings ented. Once you get the hang of these, you will find The numpad allows to navigate in the3D View as well: Object Mode in the Lamp subsection. There you can also change your experience on Blender much more enjoyable and 7, 1, 3 set the view to Top, Front, Right; use Ctrl-7, between light types. productive. Ctrl-1, Ctrl-3 to view Bottom, Back, Left The default is Object Mode. It allows to select 8, 2 rotate Up, Down; Shift-8, Shift-2 pan different objects and to manipulate them. To change the color and look of an object, select it If you have difficulties to find the hotkey of a specific 4, 6 rotate Left, Right; Shift-4, Shift-6 pan and go to the Material buttons. Check the official function, you can check if it is listed in the Space 5 flips between Orthogonal and Perspective view The Edit Mode allows you to model the selected documentation for details. menu or in the window headers menus. They are also object. You can modify only one object at a time. If in the Help menu. All those controls and more are also available in the you want to select or modify other objects, you must view menu located in the 3D View header. escape Edit Mode and go back to Object mode. You Finally, you can find a Hotkey Map available in the cycle between Object and Edit modes with Tab. 8. Layers Blender wiki. Layers are used to easily show, hide and group 3. The Buttons Window different objects. Each object belongs to a layer or If you have further questions, ask them on the forum at http://www.blenderartists.org, or on the layers. To change the layer of an object, select it and #blenderchat channel at the freenode IRC network. You can access different button categories with the press Move. icons along the Button window's header. Each category (Game) Logic Scriptlinks Check http://www.blendernation.com for daily regroups buttons that share the same use. You can then show different layers with the layers Materials/Lamp/World Editor Blender news and http://www.blenderart.org to Each button category also has subcategories. buttons available in the 3D Window header. To show find a free Blender magazine. Object Properties/Physics/Particles multiple layers at the same time, use Shift·LMB on You can scroll panels with Shift·Mousewheel, zoom these layers. Good luck and Blend on! -The Blender Team panels with Ctrl·Mousewheel, organise panels with (Game) Logic Scriptlinks Active layer drag & drop and align panels vertically with RMB. Unactive layer