Install Apache Hadoop on Mac OS Sierra
•Transferir como PPTX, PDF•
10 gostaram•16,861 visualizações

Installation of Hadoop2.x on MacOs(10.12.x) Sierra. This presentation contains all the necessary steps to install and configure Hadoop 2.x distribution on MacOs(10.12.x) Sierra. It can be also be referenced for installing hadoop on OSX(10.11.X) EL Captain. Building Hadoop native library from github and setting it up got covered as well.

Recomendados
Recomendados
Mais conteúdo relacionado
Último
Último (20)
Destaque
Destaque (20)
Install Apache Hadoop on Mac OS Sierra
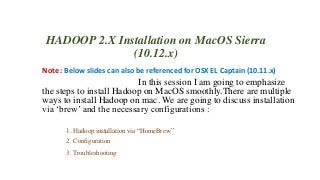
- 1. HADOOP 2.X Installation on MacOS Sierra (10.12.x) Note : Below slides can also be referenced for OSX EL Captain (10.11.x) In this session I am going to emphasize the steps to install Hadoop on MacOS smoothly.There are multiple ways to install Hadoop on mac. We are going to discuss installation via ‘brew’ and the necessary configurations : 1. Hadoop installation via “HomeBrew” 2. Configuration 3. Troubleshooting
- 2. Hadoop Installation : To install Hadoop with ‘brew’ we supposed to have HomeBrew installed on MAC. STEP 1 – Check if home brew installed or not by running the below command. $brew -v If it is not installed then install HomeBrew by downloading it from ‘http://brew.sh’ Or run the below command to install with ruby utility. $ ruby -e "$(curl –fsSL https://raw.githubusercontent.com/Homebrew/install/master/install)"
- 3. STEP 2: Now install hadoop with brew command : $ brew search hadoop $ brew install hadoop The installation location of hadoop will be “/usr/local/Celler/hadoop”
- 4. Configuration : The most important thing is configuration of hadoop . We have to edit the existing settings of the below files along with some additional changes. • Hadoop-env.sh • Core-site.xml • Mapred-site.xml • Hdfs-site.xml These files are present under this location – “/usr/local/Cellar/hadoop/2.8.0/libexec/etc/hadoop/” Note : - In my case the installation is 2.8.0 . Change it according to your installation version
- 5. hadoop-env.sh Configurations – Edit “/usr/local/Cellar/hadoop/2.8.0/libexec/etc/hadoop/hadoop-env.sh” The existing value of “HADOOP_OPTS” in hadoop-env.sh is • "$HADOOP_OPTS -Djava.net.preferIPv4Stack=true" Change it to : • "$HADOOP_OPTS -Djava.net.preferIPv4Stack=true - Djava.security.krb5.realm= -Djava.security.krb5.kdc=" $export HADOOP_OPTS="$HADOOP_OPTS -Djava.net.preferIPv4Stack=true - Djava.security.krb5.realm= -Djava.security.krb5.kdc="
- 6. Core-sites.xml Configurations – Edit /usr/local/Cellar/hadoop/2.8.0/libexec/etc/hadoop/Core-sites.xml Add the below properties to Core-sites.xml - <property> <name>hadoop.tmp.dir</name> <value>/usr/local/Cellar/hadoop/hdfs/tmp</value> <description>A base for other temporary directories.</description> </property> <property> <name>fs.default.name</name> <value>hdfs://localhost:9000</value> </property>
- 7. mapred-sites.xml Configurations – Edit /usr/local/Cellar/hadoop/2.8.0/libexec/etc/hadoop/mapred-sites.xml Add the below property to mapred-sites.xml - <configuration> <property> <name>mapred.job.tracker</name> <value>localhost:9010</value> </property> </configuration>
- 8. hdfs-sites.xml Configurations – Edit /usr/local/Cellar/hadoop/2.8.0/libexec/etc/hadoop/hdfs-sites.xml Add the following property to hdfs-sites.xml - <configuration> <property> <name>dfs.replication</name> <value></value> </property> </configuration>
- 9. Enable SSH – Check for files ~/.ssh/id_rsa & ~/.ssh/id_rsa.pub to verify the SSH localhost is enabled or not. If these files does not exists then use ssh-keygen to generate these files $ssh-keygen -t rsa Enable Remote login [System Preferences -> Sharing then check “Remote login” ] Authorise the just generated SSH keys $cat ~/.ssh/id_rsa.pub >> ~/.ssh/authorized_keys Test ssh at localhost $ssh localhost
- 10. Alias to start and stop Hadoop Daemons – We can find script files under “/usr/local/Cellar/hadoop/2.8.0/sbin/” to start and stop hadoop services. Also to make it easier we can create alias Edit the ~./profile and add alias hstart=<”/usr/local/Cellar/hadoop/2.8.0/sbin/start-all.sh”> alias hstart=<”/usr/local/Cellar/hadoop/2.8.0/sbin/stop-all.sh”> Then $source ~/.profile
- 11. Format the hdfs - Format the distributed file system with the below command before starting the hadoop daemons. So that we can put our data sources into the hdfs file system while preforming the map-reduce job. $hdfs namenode -format
- 12. Start Hadoop Daemons – Start hadoop with the alias $hstart We can see the outputs something like below in the the terminal - $ hstart This script is Deprecated. Instead use start-dfs.sh and start-yarn.sh Starting namenodes on [localhost] localhost: starting namenode, logging to /usr/local/Cellar/hadoop/2.8.0/libexec/logs/hadoop-sunilmohanty- namenode-Sunils-MacBook-Air.local.out localhost: starting datanode, logging to /usr/local/Cellar/hadoop/2.8.0/libexec/logs/hadoop-sunilmohanty- datanode-Sunils-MacBook-Air.local.out Starting secondary namenodes [0.0.0.0] 0.0.0.0: starting secondarynamenode, logging to /usr/local/Cellar/hadoop/2.8.0/libexec/logs/hadoop- sunilmohanty-secondarynamenode-Sunils-MacBook-Air.local.out starting resourcemanager, logging to /usr/local/Cellar/hadoop/2.8.0/libexec/logs/yarn-sunilmohanty- resourcemanager-Sunils-MacBook-Air.local.out localhost: starting nodemanager, logging to /usr/local/Cellar/hadoop/2.8.0/libexec/logs/yarn-sunilmohanty- nodemanager-Sunils-MacBook-Air.local.out
- 13. Then run the “jps” command to check all the hadoop daemons . $ jps 35936 SecondaryNameNode 36051 ResourceManager 36196 Jps 35752 NameNode 35834 DataNode 36143 NodeManager For NameNode web UI use http://localhost:50070 For Yarn web UI use http://localhost:8088 Stop Hadoop Daemons – Stop hadoop with the alias $hstop
- 14. Troubleshooting- The most common issue one can face is the native library support. While starting hadoop daemons (running the command “$hstart”), if you are getting the warning “Unable to load native-hadoop library for your platform… using builtin- java classes where applicable” indicates you don’t have native library support with your hadoop installation. With this warning we can start all the hadoop daemons but it will trouble while putting the data files to the hadoop file system with “hdfs” command [hdfs dfs -put data.txt /data]. We gain speed with native libraries. Some specific compression codec only support in native libraries. We will discuss about the “hdfs” command latter on. In the next slides we will discuss how to build native libraries from github distribution.
- 15. Install Hadoop native libraries on MacOS : Pre-Requisites - Install the below tools before proceeding further. $ brew install cmake $ brew install zlib $ brew install protobuf [Note : hadoop compiles only with 2.5.0 .so use homebrew/versions/protobuf250. $brew install homebrew/versions/protobuf250 Unless follow the below steps for manual installation : Download latest version of procbuffer. [https://code.google.com/p/protobuf/downloads/list]. e.g "wget https://protobuf.googlecode.com/files/protobuf-2.5.0.tar.bz2" $Untar the tar.bz2 file [tar xfvj protobuf-2.5.0.tar.bz2]
- 16. Configure the protobuf. $cd protobuf-2.5.0 $./configure CC=clang CXX=clang++ CXXFLAGS='-std=c++11 -stdlib=libc++ -O3 –g’LDFLAGS='-stdlib=libc++' LIBS="-lc++ -lc++abi" Make the source $make -j 4 Install $sudo make install If you have already installed protobuf using Homebrew then uninstall to avoid conflict. ] $ brew install snappy
- 17. Install bzip2 & gzip by downloading the tar ball. Install OpenSSL with the following steps - $brew update $brew install openssl If brew says openssl is already installed. Then we only need to create the symlink as follows. $ln -s /usr/local/opt/openssl/lib/libcrypto.1.0.0.dylib /usr/local/lib/ $ln -s /usr/local/opt/openssl/lib/libssl.1.0.0.dylib /usr/local/lib/ $ln -s /usr/local/Cellar/openssl/1.0.2j/bin/openssl /usr/local/bin/openssl Install maven [maven is required to build github hadoop source] $ brew install maven
- 18. Once maven installation is done, We can compile and build the github distribution as follows. Compile & Build- $cd <any local folder> $git clone https://github.com/apache/hadoop.git $cd hadoop $git checkout branch-2.8.0 (Checkout the version according to your local installation. In my case the version is 2.8.0) $mvn package -Pdist,native -DskipTests -Dtar -e The maven building process may take some time. Once it is completed we need to copy the generated library from “hadoop-dist/target/hadoop-2.8.0” to your installation folder. ” $cp -R hadoop-dist/target/hadoop-2.8.0/lib /usr/local/Cellar/hadoop/2.8.0.
- 19. Now we need to restart the hadoop cluster and to check the native library support run the below command. $hadoop checknative -a The console output should be like below : $hadoop checknative -a Native library checking: hadoop: true /usr/local/Cellar/hadoop/2.8.0/lib/native/libhadoop.dylib zlib: true /usr/lib/libz.1.dylib snappy: true /usr/local/lib/libsnappy.1.dylib lz4: true revision:10301 We are done with the native library setup and Hadoop installation.
- 20. Closure The entire session is all about installing Hadoop 2.x on MacOs Sierra and the common issue people used face while installing and starting Hadoop. I hope all the above slides will remain helpful. We will discuss more on big-data and Hadoop in my upcoming slides. Thanks Sunil