Ideas for how to use kidpix in the akomanga
•Transferir como DOC, PDF•
1 gostou•471 visualizações


Recomendados
Recomendados
Mais conteúdo relacionado
Destaque
Destaque (20)
Semelhante a Ideas for how to use kidpix in the akomanga
Semelhante a Ideas for how to use kidpix in the akomanga (20)
Mais de Ruth Lemon
Mais de Ruth Lemon (20)
Ideas for how to use kidpix in the akomanga
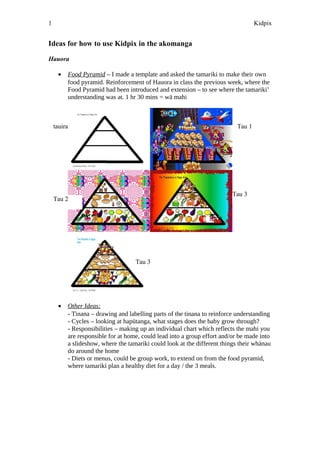
- 1. 1 Kidpix Ideas for how to use Kidpix in the akomanga Hauora · Food Pyramid – I made a template and asked the tamariki to make their own food pyramid. Reinforcement of Hauora in class the previous week, where the Food Pyramid had been introduced and extension – to see where the tamariki’ understanding was at. 1 hr 30 mins = wä mahi tauira Tau 1 Tau 2 · Other Ideas: Tau 3 Tau 3 - Tinana – drawing and labelling parts of the tinana to reinforce understanding - Cycles – looking at hapütanga, what stages does the baby grow through? - Responsibilities – making up an individual chart which reflects the mahi you are responsible for at home, could lead into a group effort and/or be made into a slideshow, where the tamariki could look at the different things their whänau do around the home - Diets or menus, could be group work, to extend on from the food pyramid, where tamariki plan a healthy diet for a day / the 3 meals.
- 2. 2 Kidpix Tikanga-ä-iwi · Inia – A series of mahi. Step 1 was to reinforce the takotoranga whenua. The tamariki had spent classroom time exploring this and started making a mural also. Step 2 was to introduce some of the languages and get the tamariki to write their name using Hindi characters (an Internet download). No w or wh characters in Hindi, so tamariki problem-solved to choose the closest equivalent – B or V... Step 3 was to bring in a picture of themselves and dress themselves up in the clothes of India, sari, bindi etc. Reinforce cultural differences and probe for some of the thoughts that the tamariki have about where the differences come from / why? 45 mins = wä mahi for each step. Tau 3 Tau 1 Tau 2 Tau 1 When we were preparing for a marae haerenga to Taranaki, we started to look at what we thought the whenua was like. In class, the tamariki explored some of the history and stories – they also started working on a whakaari, to retell the stories ä-tinana. Te mahi tuatahi = what would Parihaka Pä have looked like, with Taranaki maunga behind? Te mahi tuarua = after the tamariki learnt the story of the maunga, they drew what they thought the fighting would have looked like. 45 minute sessions in the ruma rorohiko. Tau 2 Tau 1
- 3. 3 Kidpix Tau 1 Tau 1 · Other Ideas - To storyboard the whakaari at the same time as it is being written in the classroom – to work on choreography and awareness of performance for an audience – maybe to record some of the korero, go into the Powerpoint side of Kidpix and make a video of their planning. - To make a booklet, maybe for tourists, about a new whenua, including a mahere whenua, some of the reo, some of the famous places... -Map skills – to make a map of the ruma rorohiko with key, to look at maps of home, of kura.... always with keys. Tau 2 me 3 Tau 3 Tau 1 Tau 2 Tau 3 Tau 2
- 4. 4 Kidpix Pütaiao · Oro – We had just started the unit in the classroom and the tamariki had been introduced to soundwaves and done a couple of experiments about how sound travels. In ruma rorohiko, we aimed at finding out what the tamariki’ whakaaro was about how different sounds would look, as the soundwaves travelled to the ear. Tau 3 Tau 1 · When we were looking at Poraka as a kaupapa, it carried over into momo tuhi, where the tamariki wrote a report on frogs. We used wä rorohiko to look at publishing this work as a booklet. · When the tamariki were studying Ngä Parekura-ä-Taiao, an integrated 10 week unit, the tamariki produced a video in Kidpix that incorporated their tuhinga for momo tuhi, their reo, the photos taken of their mahi building the shelter and weaving the plates, making the cups and gathering the manuka for bedding, and we aimed at readability and relevance. · Other Ideas - Designing experiments, making a ‘Powerpoint’ that contains the design, the steps taken and the results - Looking at life cycles – showing each stage of the cycle and labelling - Looking at habitats Tau 1 Tau 2
- 5. 5 Kidpix Momo Tuhi · Rotarota – the tamariki wrote a series of poems in class. Together, we wanted to find ways of presenting these using Kidpix. 3 sessions used, mainly due to keyboard familiarity. Tau 2 Tau 3 · Narrative writing – Designing a cover for a narrative piece written in class. Aiming at having the artwork be relevant and not just ‘pretty’. · Käri Poroporoaki – done with seniors and juniors – one session. With nohinohi, usually supported by written message in the final poroporoaki book, but seniors write their message in Kidpix. 1 session. Tau 1 Tau 3 Tau 3 Tau 1 Tau 2
- 6. 6 Kidpix Tau 1 Tau 2 · Other Ideas: – Storyboarding – could support playwriting or scripting. - Cartoons – could be used to strengthen concepts, or as a ngohe pänui Tau 3 Tau 4 Tau 5 Tau 6
- 7. 7 Kidpix Toi · Ngä Kanohi Whaiaro – could have been used to support just about any kaupapa for mahi toi, but when the tamariki were looking at self-portraits in class, we looked at this also in Kidpix. Tau 1 Tau 3 · Photography – we are looking at photography at the moment and using Kidpix to frame / showoff the work that we are doing. Aiming at progressing to a stage where there is an understanding of the focus, which you want to be the actual photo, so trying not to distract the viewer’s attention. Also looking at titles for the photo. Tau 2 Tau 3 Tau 1 Tau 2 Tau 1
- 8. 8 Kidpix Hängarau · Designing an obstacle course (started off as a mainstream senior students’ project) – The nohinohi got excited one day when they came in and saw the models that the senior students had built from their Kidpix designs, so we decided to look briefly at the kaupapa. First, are the mainstream examples. Tau 5 · Pae Tukutuku – after the tamariki had finished their rangahau, they went into Kidpix as individuals, to lay down their whakaaro about what the website page layout could be. This was then taken back to the röpü, where ideas were incorporated from each member to create a collective design, this is in the process of being revised / polished before starting work on making the actual webpages – to focus the thoughts, so that I can see which tamariki might need more support / time to explore websites. Below, there is a sample of the individual work, how the group’s first draft looked and a revised draft for some – to show some of the process. Tau 1 Tau 2
- 9. 9 Kidpix 1st group draft Tau 6 Tau 5 2nd group draft Tau 4 Tau 4 Tau 4 1st group draft 1st group draft Tau 5 Tau 5
- 10. 10 Kidpix When I first started in the classroom, Kidpix was something the kids were used to and that I had never seen before. At first, I stressed and spent a long time tutuing and trying to figure out what stamps were where etc. But then, I noticed that the tuakana teina system was strongly in place. I encouraged tamariki to answer each other’s questions and learnt a lot from them. In the beginning, the focus in Kidpix was really on how to publish some writing or to make an illustration for something being done in momo tuhi. Over time, this whakaaro has changed. Kidpix is a strong and useful tool for visualising, for designing, to use as part of a larger process. Over the last couple of weeks, I have tried for the first time with the juniors to use the tool itself as part of the aromatawai whaiaro process. I wanted the tamariki to share how they thought they were doing, on one side, with photography and, on the other, how comfortable they felt with their pukenga-ä-Kidpix. Tau 2 Tau 3 Tau 2 Tau 1