
Recommended
More Related Content
What's hot
What's hot (19)
Similar to E-mail Basics Guide: Gmail, Outlook Setup & Messaging
Similar to E-mail Basics Guide: Gmail, Outlook Setup & Messaging (20)
More from PranaviVerma
More from PranaviVerma (20)
Recently uploaded
Recently uploaded (20)
E-mail Basics Guide: Gmail, Outlook Setup & Messaging
- 2. This Unit Covers: Basics of E-mail Creating an E-mail Account with Gmail.com Creating an E-mail Account with Outlook. com Linking E-mail Account to E-mail Application Writing an E-mail Message Receiving and Responding to E-mail Messages Using Ribbon in Outlook Formatting and Performing Spell Check on an E-mail Message Attaching a File to an E-mail Message Using Help Printing an E-mail Message Adding and Modifying a Contact Learning Objectives
- 3. E-mail or electronic mail is the exchange of computer-stored messages by telecommunication. It represents a mode of communication in which a user can send electronic messages to other users through the Internet. The electronic message is delivered to the user in his or her e-mail account. You can send and receive e-mail messages by either using a web browser or e-mail systems, such as Mozilla Thunderbird and Microsoft Outlook. In order to send an e-mail, you need to specify the e-mail address of the receiver. The format of the e-mail address is username@hostname. Introduction
- 4. E-mail represents a system of sending and receiving the messages between two or more users through electronic media. It uses computer networks such as the Internet for exchanging the mails. It not only provides an opportunity for sending text messages, but also for multimedia messages, such as image files, audio files, video files, etc. in the form of attachments. In order to send e-mails to one another, there is a requirement of e-mail account both at the sender’s end as well as at the receiver’s end. Some of the advantages of an e-mail are as follows: No cost delivery: It requires only an active Internet connection for sending or receiving the messages. Worldwide delivery: One can send the message anywhere and anytime, irrespective of the location of the receiver. Session 1: Basics of E-mail
- 5. Instant delivery: An e-mail does not take much time to reach the sender. Multiple delivery: One can send an e-mail message to more than one recipient at a time without spending any extra time or money. File attachment: An e-mail enables a user to send a file along with the e-mail message by just attaching the file with that message. Long-term storage: There is no need to carry or store the messages manually as the e- mail account stores all the sent or received messages unless they are deleted by the user. Environment-friendly: An e-mail saves the usage of paper as it uses only the electronic media like computer and the Internet. Therefore, an e-mail does not involve any kind of wastage of paper. Convenient: It allows the user to send and receive the messages as per his comfort level and convenience and provides the mailbox where he can store his e-mail messages and delete them, if required, at his will. Session 1: Basics of E-mail
- 6. An e-mail address is used just like a mailing address of your house. It must be unique, that is, no two individuals in the world can have the same e-mail address. Various components of an e-mail address are shown in given figure: The description of these components are as follows: User Name: It is the username or e-mail ID, say, any nickname, alias, group or department of any organization. Here ‘ryan.sharma’ is the username. It is used to identify the user at the e-mail service provider. Divider: The @ (pronounced as ‘at’ or ‘at the rate of ’) symbol is used as the divider in the e-mail address which divides the username with that of the domain name. It is compulsorily required in all the e-mail addresses. Domain Name: A domain name shows the website name in which the e-mail account has been created. Here ‘gmail.com’ is the domain name. E-mail Address
- 7. E-mail services represent the e-mail service providers which allow their users to send and receive the e-mails from their Web browsers. E-mail services can be divided into two categories – application-based e-mail services and Web-based e-mail services. Application-based e-mail: It includes the e-mail services that use the application to access the private in-house e-mails. It is an application software which depends on the operating system. Therefore, just like any other software, it needs to be installed on the system so as to access the mails. Some commonly used application-based e-mail software are: Microsoft Outlook Mozilla Thunderbird Opera Mail Web-based e-mail: It includes the e-mail services that can be accessed from anywhere and from any system connected to the Internet. Here e-mails are not stored on the user’s system, but on the service provider’s server. Some commonly used web-based e- mail services are: Gmail.com Hotmail.com Outlook.com E-mail Services
- 8. While sending an e-mail to others, a specific format needs to be followed. This message format is generally same for both application-based e-mail services as well as for Web-based e-mail services. The interface might be different but the fields will remain the same. The following table describes the common message fields: E-mail Message Format Term Meaning From Sender’s e-mail address. To Recipient’s e-mail address. Date When the message was sent. Subject The topic or heading of the message. cc Cc stands for Carbon Copy. This field must have the e-mail addresses of all other users to whom the copies of the e-mail are to be sent. Bcc Bcc stands for Blind Carbon Copy. This field must have the e-mail addresses of all the other users to whom the copies of the mail are to be sent. The recipients who are marked here are not visible to the other recipients. Message body It consists of the text of the message as well as the files or attachments that have to be sent.
- 9. Some examples of the message format for the commonly used e-mail services are shown in following figures: E-mail Message Format
- 10. To create an e-mail account in Gmail.com, you need to open the Gmail website by typing www.gmail.com in the address bar of the Web browser. The homepage for Gmail gets opened. Now, click the Create account link at the bottom of the Web page, as shown in the following figure: Session 2: Creating an E-mail Account with Gmail.com
- 11. By clicking on this link, a Create your Google Account Web page on will open, as shown in the given figures. Now, enter the required details in the web page to create an e-mail account and then click the Next Step button. Session 2: Creating an E-mail Account with Gmail.com
- 12. On clicking the Next Step button, the Privacy and Terms page will appear. Click the I AGREE button to accept the terms. After this, a Web page will open up to verify the account. Enter the same number that you have entered while filling up the registration form. Click the Continue button. A verification code is received on the entered mobile number, as shown in the following figure: Session 2: Creating an E-mail Account with Gmail.com
- 13. Now, type the OTP or the verification code in the Enter verification code text box that is received on your mobile and then click the Continue button, s shown in in the following figure: The e-mail account gets created on Gmail and the Welcome page appears, as shown in the following figure: Session 2: Creating an E-mail Account with Gmail.com
- 14. Click the Continue to Gmail button in the Welcome page to access your free e-mail account. It will open the inbox, which can be used to send and receive e-mails, as shown in the following figure: Session 2: Creating an E-mail Account with Gmail.com
- 15. Outlook is used to send and receive the e-mail messages between the users. To create an e-mail account in Outlook, you need to type www.outlook.com on the address bar of the Web browser. By default, the Microsoft Sign in page will open. Now, click the Create one! link to create a new e-mail account, as shown in the following figure: Session 3: Creating an E-mail Account with Outlook.com
- 16. It will open the registration form, which requires all the personal details of the user. Type all the required details like first name, last name, user name, password, country, postal code, birthdate, gender and more. It will also ask to enter the characters given so as to prove that you are not a robot but a human being. Now, click the Create account button, as shown in the following figure: Session 3: Creating an E-mail Account with Outlook.com
- 17. Select the language and time zone and then click the Save button, as shown in the given figure: This will create your free e-mail account in Outlook and will open the mailbox, as shown in the following figure: Session 3: Creating an E-mail Account with Outlook.com
- 18. In the Web-based e-mail systems, all the mails are stored on the service provider’s server. In order to access any of the previous mails, users will need the Internet connection. On the other hand, in case of application based e-mail systems, all the e- mails are available offline as well as online. These e-mail applications are also known as e-mail software. In the present time, we have many e-mail software such as Mozilla Thunderbird, Microsoft Outlook, Foxmail and Opera Mail. Session 4: Linking E-mail Account to E-mail Application
- 19. To link your e-mail account to the e-mail application (Microsoft Outlook 2010), you need to first open the Microsoft Outlook 2010 application by using one of the following ways: Double-click on the MS Outlook 2010 Shortcut icon on the desktop. Click the Start button and then select All Programs Microsoft Office 2010 Microsoft Outlook 2010 on the Start menu. Now, click the File tab and then click the Add Account button, to add the e- mail account in the application, as shown in the following figure: Session 4: Linking E-mail Account to E-mail Application
- 20. Enter all the details here, such as name, e-mail address and password in the Add New Account wizard and then click the Next button, as shown in the following figure: Session 4: Linking E-mail Account to E-mail Application
- 21. Now, a configuring screen appears on the screen, which will configure the e- mail server settings of that e-mail address with the Outlook application. Click the Next button on the configuring screen. Now, your e-mail account will get linked to the e-mail application and you will be directed to the Inbox, as shown in the following figure: Session 4: Linking E-mail Account to E-mail Application
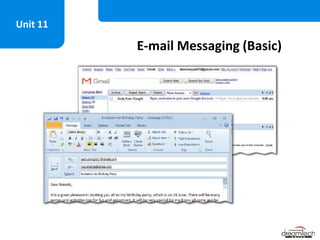
- 22. To write an e-mail message using the Outlook application, you need to first start the Microsoft Outlook application and then click the New E-mail button Session 5: Writing an E-mail Message under the New group of the Home tab. Now, enter the e-mail components, such as To, Cc, Subject, and Message in the message window and then click the Send button, as shown in the given figure: Now, the e-mail message is sent to the specified recipients.
- 23. Some important tips for writing a good e-mail message: Avoid sending your message to the Spam folder, make sure you use a good subject for your message. Avoid using a single word like Hi, Thanks, etc. and write the complete sentence. Avoid writing lengthy messages. Never use the informal writing style as you use for your family members and friends on social media accounts like Facebook and WhatsApp, that is, avoid using short forms and write the complete words. You need to take care of the casing also. It should be in the sentence case only. For formal e-mails, follow the style of formal letters as you do for the manual letters. Always start with Sir/Madam or the first name in the greeting. On the other hand, with informal e-mails or for the casual ones like if you are sending an e-mail to your friend, you can use the casual writing style with emoticons. Always provide your full name in the e-mail so that a new person can easily recognise you. This is necessary if your e-mail address is not telling about your identity. Make it a habit of reading your typed e-mail before clicking on the Send button. Always use polite expressions for the e-mail like Please, Thank you, May I please, Regards, etc. Put the recipients in Cc only if you want the main recipient to know whom you have sent the copy of the e-mail; otherwise, use the Bcc field to share the copies of the e- mail. Session 5: Writing an E-mail Message
- 24. When you receive an e-mail in the inbox, you can just read the message and close it. Other than this, you can select the multiple options also (as shown in the given figure): Reply: Send a reply to the sender using this option. Reply All: Send a reply to all the e-mail addresses present in the To field as well as in the Cc field at once. Forward: Resend or forward the message to a new person. In this case, you will have to write the receiver’s e-mail address in the To and Cc fields. But, the message subject will appear automatically in the Subject field. Delete: Delete the e-mail from the inbox. As you delete the e-mail, it is sent to the Deleted Items folder (where all the deleted e-mails are kept). Session 6: Receiving and Responding to E-mail Messages
- 25. A Ribbon has many options in different tabs in the outlook. some of the options are as follows: Home tab: It has different groups such as New, Delete, Respond, Quick Steps, Move, Tags, Find and Send/Receive. The following figure shows the Home tab: The most commonly used options of Home tab are: New E-mail: New e-mails can be written using this option. New Items: Using this option, new contacts, appointments, meetings, tasks, etc. can be added into the e-mail application. Unread/Read: This option converts the e-mail from read to unread and unread to read. Send/Receive All Folders: This option performs the task of downloading all the e-mails from the server. Session 7: Using Ribbon in Outlook
- 26. Send/Receive tab: This tab contains all the options required for downloading e-mails and related tasks such as Send/Receive All Folders, Send All, Show Progress, Work Offline, etc. The following figure shows the Send/Receive tab: Folder Tab: This tab has all the options related to the folders of the e-mail application. You can organise the folders such as Inbox, Outbox, Sent Items and more using this tab. The following figure shows a Folder tab: Some of the commonly used options are as follows: New Folder: This option can be used to create a new folder like Important, Work and more. Copy Folder: It creates a copy of the selected folder. Session 7: Using Ribbon in Outlook
- 27. Clean Up Folder: It cleans up the selected folder. Delete All: This option is used to delete the folder. Folder Properties: It shows the properties of the selected folder. View Tab: View Tab refers to the mode of viewing the e-mail. You can change the view of the e-mail using this tab. For example, you can change the settings for navigation pane, add new columns in the e-mail application, expand or collapse any section, etc. The following figure shows a View tab: Session 7: Using Ribbon in Outlook
- 28. While writing the e-mail message, you may want to apply some formatting on it like increasing the font size, changing the font color or background color, bold, italic, underline, etc. All this formatting can be applied using the Basic Text group of the Message tab. Session 8: Formatting and Performing Spell Check on an E-mail Message The Basic Text group has many options that you can use to change formatting of the e-mail message, such as Font, Font Size, Bold, Italic and Underline, Text Highlight Colour, Font Colour, Bullets and Numbering, Alignment, Indentation, Clear Formatting, Grow Font and Shrink Font. The given figure shows a formatted e-mail message.
- 29. To spell check your e-mail you need to click the Spelling & Grammar button located in the Proofing group of the Review tab. Spell Check of an E-mail Message The Spelling and Grammar dialog box will appear on the screen and it will show you the spelling or grammatical mistakes one by one. Make sure you check the Check grammar checkbox if you want to check for the usage of grammar also. You can either ignore the mistake if it is done deliberately or you can select one of the suggestions from the list. Click the Change button. It will replace the word with the suggested one.
- 30. You can attach a file to the e-mail message by using the Insert File dialog box. In this dialog box, you need to select the desired file(s) that you want to attach and then click the Insert button, as shown in the given figure. You can access this dialog box by clicking the Attach File button in the Include group of the Message tab. Session 9: Attaching a File to an E-mail Message
- 31. Now, you can see the attached file with your e-mail. Click the Send button to send the message, as shown in the following figure:. When the receiver will get the e-mail message in the inbox, he/she can view the attachment also along with that message. Session 9: Attaching a File to an E-mail Message
- 32. The Help feature is used by the user to view the application’s help file to understand its capabilities and features. Session 10: Using Help It allows you to search for the required information just by typing the keywords in the search box. You can use the Help option by performing the following steps: Click on the question mark symbol on the e- mail application’s ribbon. The Outlook Help window will open up with the categories of the Help options. Click on any of the given options or type the keywords in the Search box. Click the Search button. The contents that are available online with the matching keywords will appear on the window, as shown in the given figure.
- 33. To print an e-mail message, you need to first open the message that you want to print and then click on the File tab. Now, select the Print option from the Backstage view. The options related to the printer appear. Session 11: Printing an E-mail Message Now, select the printer and then click the Print button, as shown in the given figure. After giving the above commands, the e-mail will be printed on the selected printer.
- 34. It is not an easy task to remember all the contacts every time along with their e-mail addresses. Therefore, the e-mail software provides an option of creating an address book. Here you can save all the contacts along with their details. At the time of sending an e-mail, you can just select the contact from the drop-down list. The address book can store the details, such as name, contact number, e- mail address, company, photo, birthday, anniversary and more. Its name might differ from software to software. In some software, it is referred to as Address Book while in some, it is referred to as Contacts. Session 12: Adding and Modifying a Contact
- 35. To add a contact in the e-mail account, you need first click the New Items button in the New group of the Home tab and then select the Contact option from the drop-down list. Adding a Contact Now, enter the details of the contact and then click the Save & Close button, as shown in the given figure. The contact will get saved on the e-mail account.
- 36. To modify a contact, you need to type the name of the contact whose details you want to modify in the search box under the Find group and then press the Enter key from the keyboard as shown in the following figure: The contact form with all the entered details will appear on the screen. Now, edit the details you want to change and then click the Save & Close button. Modifying a Contact
- 37. Thank You