
Recomendados
Mais conteúdo relacionado
Destaque
Mais de MrLawler
Mais de MrLawler (20)
Unit 5 Tutorials - Sepia Toning
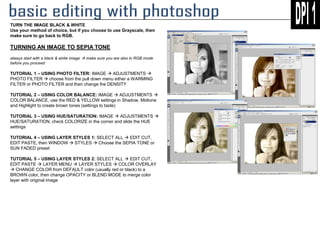
- 1. TURN THE IMAGE BLACK & WHITE Use your method of choice, but if you choose to use Grayscale, then make sure to go back to RGB. TURNING AN IMAGE TO SEPIA TONE always start with a black & white image make sure you are also in RGB mode before you proceed TUTORIAL 1 – USING PHOTO FILTER: IMAGE ADJUSTMENTS PHOTO FILTER choose from the pull down menu either a WARMING FILTER or PHOTO FILTER and then change the DENSITY TUTORIAL 2 – USING COLOR BALANCE: IMAGE ADJUSTMENTS COLOR BALANCE, use the RED & YELLOW settings in Shadow, Midtone and Highlight to create brown tones (settings to taste) TUTORIAL 3 – USING HUE/SATURATION: IMAGE ADJUSTMENTS HUE/SATURATION, check COLORIZE in the corner and slide the HUE settings TUTORIAL 4 – USING LAYER STYLES 1: SELECT ALL EDIT CUT, EDIT PASTE, then WINDOW STYLES Choose the SEPIA TONE or SUN FADED preset TUTORIAL 5 – USING LAYER STYLES 2: SELECT ALL EDIT CUT, EDIT PASTE LAYER MENU LAYER STYLES COLOR OVERLAY CHANGE COLOR from DEFAULT color (usually red or black) to a BROWN color, then change OPACITY or BLEND MODE to merge color layer with original image