SlideShare uma empresa Scribd logo
1 de 3
“Adjustment Layers”
The Problem With Photoshop’s Image Adjustments
Unfortunately, as powerful as these image adjustments
are, they all suffer from one serious problem – they all
cause permanent damage to our images. By that, I don’t
mean you’ll get error messages telling you that your
files are suddenly corrupt and won’t open. I mean that
image adjustments make permanent changes to the
pixels and level of detail in our photos.
 damage caused by using the
IMAGE ADJUSTMENTS
commands

Adjustment Layers Correct This:
1.
2.
3.
4.
5.
6.
7.
8.

9.

Open a Photo in Photoshop
Choose a NEW ADJUSTMENT LAYER
Choose BLACK AND WHITE
Edit using BLACK AND WHITE
Choose a NEW ADJUSTMENT LAYER
Choose LEVELS
Edit using LEVELS
Repeat  Choose a NEW ADJUSTMENT LAYER
•
Choose CURVES
•
Choose BRIGHTNESS AND CONTRAST
•
Choose CHANNEL MIXER
•
Choose GRADIENT MAP
•
Choose EXPOSURE
Experiment by turning ADJUSTMENT LAYERS ON/OFF
using the 
BEFORE

AFTER
“Adjustment Layers + Masking”
1.
2.
3.

Open a photo in Photoshop
Use only ADJUSTMENT LAYERS
Complete the following:
1.
2.
3.
4.
5.

Adjustment layers
create a “layer
mask” similar to
quick mask

Edit the image BLACK AND WHITE
Edit for CONTRAST, LEVELS, EXPOSURE, CURVES
Hit “D” on your keyboard
Using the BRUSH TOOL, “erase” areas on the
ADJUSTMENT LAYER
If you paint Black on the Layer Mask, it will mask
the effect of the adjustment in the Adjustment
Layer. Likewise if you paint White on the Layer
Mask it will cause the adjustment to take full
effect. Grays in between will cause the
adjustment to be only partially applied in that
area.

Note: the BRUSH will only affect the AD LAYER, not the
original image/Background

BEFORE

AFTER
“Adjustment Layers + Masking + Blending Modes”
Combine the first tutorials in this packet
1.
Edit an image using LAYER ADJUSMENTS
•
Choose BLACK AND WHITE
•
Choose LEVELS
•
Choose CURVES
•
Choose BRIGHTNESS AND CONTRAST
•
Choose CHANNEL MIXER
•
Choose GRADIENT MAP
•
Choose EXPOSURE
2.

Edit each of the LAYER ADJUSMENT MASKS
•
Hit “D” on your keyboard
•
If you paint Black on the Layer Mask, it will mask
the effect of the adjustment in the Adjustment
Layer. Likewise if you paint White on the Layer
Mask it will cause the adjustment to take full
effect. Grays in between will cause the
adjustment to be only partially applied in that
area.

3.

Change the LAYERS by using the LAYER BLENDING
MODES
•
Darken Modes (see the chart to the right)
•
Lighten Modes (see the chart to the right)
•
Contrast Modes (see the chart to the right)
•
Comparative Modes (see the chart to the right)
•
Composite Modes (see the chart to the right)

Adjustment layers
create a “layer
mask” similar to
quick mask

Mais conteúdo relacionado

Mais de MrLawler

Hum 201 microlesson mod 2
Hum 201 microlesson mod 2Hum 201 microlesson mod 2
Hum 201 microlesson mod 2MrLawler
 
Hum 201 microlesson mod 1
Hum 201 microlesson mod 1Hum 201 microlesson mod 1
Hum 201 microlesson mod 1MrLawler
 
Cultural study
Cultural studyCultural study
Cultural studyMrLawler
 
Tips on taking good photos
Tips on taking good photosTips on taking good photos
Tips on taking good photosMrLawler
 
Alyson Martinez
Alyson MartinezAlyson Martinez
Alyson MartinezMrLawler
 
DID/COMM: URBAN TOY
DID/COMM: URBAN TOYDID/COMM: URBAN TOY
DID/COMM: URBAN TOYMrLawler
 
DID/COMM: URBAN TOY
DID/COMM: URBAN TOYDID/COMM: URBAN TOY
DID/COMM: URBAN TOYMrLawler
 
You Pick-Three Part 2
You Pick-Three Part 2You Pick-Three Part 2
You Pick-Three Part 2MrLawler
 
YOU PICK THREE
YOU PICK THREEYOU PICK THREE
YOU PICK THREEMrLawler
 
DPI 1 and DPI 2 Texture Mapping
DPI 1 and DPI 2 Texture MappingDPI 1 and DPI 2 Texture Mapping
DPI 1 and DPI 2 Texture MappingMrLawler
 
DID Children's Book
DID Children's BookDID Children's Book
DID Children's BookMrLawler
 
Case Study and Tutorials
Case Study and TutorialsCase Study and Tutorials
Case Study and TutorialsMrLawler
 
Origins of photography
Origins of photographyOrigins of photography
Origins of photographyMrLawler
 
DPI 2: Final
DPI 2: FinalDPI 2: Final
DPI 2: FinalMrLawler
 
DPI Final Instructions
DPI Final InstructionsDPI Final Instructions
DPI Final InstructionsMrLawler
 
Digital illustration final
Digital illustration finalDigital illustration final
Digital illustration finalMrLawler
 
Case Studies - Masters
Case Studies - MastersCase Studies - Masters
Case Studies - MastersMrLawler
 
Masters search requirements
Masters search requirementsMasters search requirements
Masters search requirementsMrLawler
 
Unit 4 Photo Check
Unit 4 Photo CheckUnit 4 Photo Check
Unit 4 Photo CheckMrLawler
 
DID Unit 2: Exercises
DID Unit 2: Exercises DID Unit 2: Exercises
DID Unit 2: Exercises MrLawler
 

Mais de MrLawler (20)

Hum 201 microlesson mod 2
Hum 201 microlesson mod 2Hum 201 microlesson mod 2
Hum 201 microlesson mod 2
 
Hum 201 microlesson mod 1
Hum 201 microlesson mod 1Hum 201 microlesson mod 1
Hum 201 microlesson mod 1
 
Cultural study
Cultural studyCultural study
Cultural study
 
Tips on taking good photos
Tips on taking good photosTips on taking good photos
Tips on taking good photos
 
Alyson Martinez
Alyson MartinezAlyson Martinez
Alyson Martinez
 
DID/COMM: URBAN TOY
DID/COMM: URBAN TOYDID/COMM: URBAN TOY
DID/COMM: URBAN TOY
 
DID/COMM: URBAN TOY
DID/COMM: URBAN TOYDID/COMM: URBAN TOY
DID/COMM: URBAN TOY
 
You Pick-Three Part 2
You Pick-Three Part 2You Pick-Three Part 2
You Pick-Three Part 2
 
YOU PICK THREE
YOU PICK THREEYOU PICK THREE
YOU PICK THREE
 
DPI 1 and DPI 2 Texture Mapping
DPI 1 and DPI 2 Texture MappingDPI 1 and DPI 2 Texture Mapping
DPI 1 and DPI 2 Texture Mapping
 
DID Children's Book
DID Children's BookDID Children's Book
DID Children's Book
 
Case Study and Tutorials
Case Study and TutorialsCase Study and Tutorials
Case Study and Tutorials
 
Origins of photography
Origins of photographyOrigins of photography
Origins of photography
 
DPI 2: Final
DPI 2: FinalDPI 2: Final
DPI 2: Final
 
DPI Final Instructions
DPI Final InstructionsDPI Final Instructions
DPI Final Instructions
 
Digital illustration final
Digital illustration finalDigital illustration final
Digital illustration final
 
Case Studies - Masters
Case Studies - MastersCase Studies - Masters
Case Studies - Masters
 
Masters search requirements
Masters search requirementsMasters search requirements
Masters search requirements
 
Unit 4 Photo Check
Unit 4 Photo CheckUnit 4 Photo Check
Unit 4 Photo Check
 
DID Unit 2: Exercises
DID Unit 2: Exercises DID Unit 2: Exercises
DID Unit 2: Exercises
 

Unit 4 - Advanced Tutorials (3)

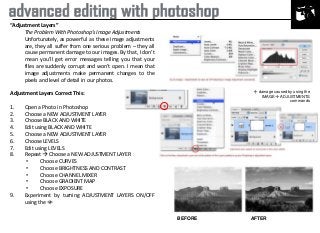
  • 1. “Adjustment Layers” The Problem With Photoshop’s Image Adjustments Unfortunately, as powerful as these image adjustments are, they all suffer from one serious problem – they all cause permanent damage to our images. By that, I don’t mean you’ll get error messages telling you that your files are suddenly corrupt and won’t open. I mean that image adjustments make permanent changes to the pixels and level of detail in our photos.  damage caused by using the IMAGE ADJUSTMENTS commands Adjustment Layers Correct This: 1. 2. 3. 4. 5. 6. 7. 8. 9. Open a Photo in Photoshop Choose a NEW ADJUSTMENT LAYER Choose BLACK AND WHITE Edit using BLACK AND WHITE Choose a NEW ADJUSTMENT LAYER Choose LEVELS Edit using LEVELS Repeat  Choose a NEW ADJUSTMENT LAYER • Choose CURVES • Choose BRIGHTNESS AND CONTRAST • Choose CHANNEL MIXER • Choose GRADIENT MAP • Choose EXPOSURE Experiment by turning ADJUSTMENT LAYERS ON/OFF using the  BEFORE AFTER
  • 2. “Adjustment Layers + Masking” 1. 2. 3. Open a photo in Photoshop Use only ADJUSTMENT LAYERS Complete the following: 1. 2. 3. 4. 5. Adjustment layers create a “layer mask” similar to quick mask Edit the image BLACK AND WHITE Edit for CONTRAST, LEVELS, EXPOSURE, CURVES Hit “D” on your keyboard Using the BRUSH TOOL, “erase” areas on the ADJUSTMENT LAYER If you paint Black on the Layer Mask, it will mask the effect of the adjustment in the Adjustment Layer. Likewise if you paint White on the Layer Mask it will cause the adjustment to take full effect. Grays in between will cause the adjustment to be only partially applied in that area. Note: the BRUSH will only affect the AD LAYER, not the original image/Background BEFORE AFTER
  • 3. “Adjustment Layers + Masking + Blending Modes” Combine the first tutorials in this packet 1. Edit an image using LAYER ADJUSMENTS • Choose BLACK AND WHITE • Choose LEVELS • Choose CURVES • Choose BRIGHTNESS AND CONTRAST • Choose CHANNEL MIXER • Choose GRADIENT MAP • Choose EXPOSURE 2. Edit each of the LAYER ADJUSMENT MASKS • Hit “D” on your keyboard • If you paint Black on the Layer Mask, it will mask the effect of the adjustment in the Adjustment Layer. Likewise if you paint White on the Layer Mask it will cause the adjustment to take full effect. Grays in between will cause the adjustment to be only partially applied in that area. 3. Change the LAYERS by using the LAYER BLENDING MODES • Darken Modes (see the chart to the right) • Lighten Modes (see the chart to the right) • Contrast Modes (see the chart to the right) • Comparative Modes (see the chart to the right) • Composite Modes (see the chart to the right) Adjustment layers create a “layer mask” similar to quick mask