
Recomendados
Recomendados
Mais conteúdo relacionado
Mais procurados
Mais procurados (18)
Semelhante a Web technologies part-2
Semelhante a Web technologies part-2 (20)
Último
Último (20)
Web technologies part-2
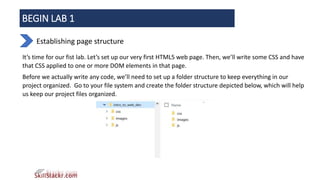
- 1. BEGIN LAB 1 Establishing page structure It’s time for our fist lab. Let’s set up our very first HTML5 web page. Then, we’ll write some CSS and have that CSS applied to one or more DOM elements in that page. Before we actually write any code, we’ll need to set up a folder structure to keep everything in our project organized. Go to your file system and create the folder structure depicted below, which will help us keep our project files organized.
- 2. As a convenience, the images below will demonstrate how to create folders both on a PC and on a Mac.
- 3. Once the folders have been created as shown above, open up your instance of the notepad++ code editor and enter the following code (without the line numbers). 1 <!DOCTYPE html> 2 <html> 3 <head> 4 <title>My First Page</title> 5 </head> 6 <body> 7 <h1>My First Heading</h1> 8 <p>My first paragraph.</p> 9 </body> 10 </html> Save the file as index_v1.html, inside your intro_to_web_dev folder. Your folder and file structure should now look like the image shown below.
- 4. Now, double-click on the newly-created index_v1.html file. It should open in your default browser and appear as shown below.
- 6. We’ll explain each line, one-by-one Line number 1 Every HTML page should begin with a DOCTYPE. What is a DOCTYPE? “A document type declaration, or DOCTYPE, is an instruction that associates a particular SGML (Standard Generalized Markup Language) or XML (Extensible Markup Language) document (for example, a webpage) with a document type definition (DTD). DOCTYPEs from earlier versions of HTML were longer (see the examples below) because the HTML language was SGML-based (a sub-set of SGML) and therefore required a reference to a DTD. With HTML5 this is no longer the case and the DOCTYPE is only needed to enable (trigger in the browser) “standards mode” for documents written using the HTML syntax.
- 7. A few DOCTYPE examples ------------------- The DOCTYPE for HTML 4.01 Strict <!DOCTYPE HTML PUBLIC "-//W3C//DTD HTML 4.01//EN" "http://www.w3.org/TR/html4/strict.dtd"> The DOCTYPE for HTML 4.01 Transitional ------------------------- <!DOCTYPE HTML PUBLIC "-//W3C//DTD HTML 4.01 Transitional//EN" "http://www.w3.org/TR/html4/loose.dtd"> All that you really need to know is that there are different kinds of DOCTYPEs and that the only one required for use by HTML5 (thankfully) is the very simple one shown on line 1 above: <!DOCTYPE html>
- 8. Lines number 2 and 10 As mentioned earlier, HTML tags usually come in pairs (there are a few exceptions – we’ll talk about them later), with a start tag and an end tag. What you see, on lines number 2 and 10, are the opening and closing HTML <html></html>tags. Your web browser will interpret everything between these two tags as HTML markup. These are the opening and closing HTML <head></head> tags. These tags should always be at the top (or the “head”) of your HTML document, just inside of the opening <html> tag. There are a few different ways to incorporate things such as CSS and JavaScript into your page. The best way (for the sake of organization) is to have your CSS and JavaScript in stand-alone files and brought into your page by means of either a <link rel="stylesheet" href="…”> statement as in the case of CSS or, in the case of JavaScript, opening and closing script tags, as shown below . . . Lines number 3 and 5 How to add CSS and JavaScript to your project
- 9. <script src=”…”></script> For the purposes of this course, this is the method that we will use. The CSS rule set in your centrally-located file might look like this: .boldBlue { color:blue; font-weight:bold; } These are your <title></title> HTML tags along with the actual title information inside them. They control what the browser will show as your page’s title as well as what Google will see as your document’s title. Title tags are also important for usability (think screen readers) and Search Engine Optimization (SEO). These are the opening and closing HTML <body></body> tags. Your page’s main content – that is, your copy (textual content), forms, buttons, images, multimedia, etc. These elements should always be nested between your opening and closing body tags. Line number 4 Lines number 6 and 9
- 10. These are examples of actual web page DOM elements created using the heading 1 (<h1>) and paragraph (<p>) html tags – we’ll talk more about these as well as other HTML tags as we go along in the course. Lines number 6 and 9 END LAB 1 - BEGIN LAB 2 The <head> tags and scripts Ok – with those reminders firmly in place, it’s time for our second lab. Go back to our index_v1.html file in your code editor and very carefully change the code so that it looks like the lines shown below in blue. Then save the file as “index_v2.html”.
- 11. 1. <!DOCTYPE html> 2. <html> 3. <head> 4. <meta charset="utf-8"> 5. <meta name="viewport" content="width=device-width, initial-scale=1"> 6. <meta name="description" content="The Tuscany Cooking School"> 7. <title>Tuscany Cooking School</title> 8. <link rel="stylesheet" href="https://maxcdn.bootstrapcdn.com/bootstrap/3.3.7/css/bootstrap.min.css" integrity="sha384-BVYiiSIFeK1dGmJRAkycuHAHRg32OmUcww7on3RYdg4Va+PmSTsz/K68vbdEjh4u" crossorigin="anonymous"> 9. </head> 10. <body> 11. <h1>My First Heading</h1> 12. <p>My first paragraph.</p> 13. <script src="https://ajax.googleapis.com/ajax/libs/jquery/1.12.4/jquery.min.js"></script> 14. <script src="https://maxcdn.bootstrapcdn.com/bootstrap/3.3.7/js/bootstrap.min.js" integrity="sha384-Tc5IQib027qvyjSMfHjOMaLkfuWVxZxUPnCJA7l2mCWNIpG9mGCD8wGNIcPD7Txa" crossorigin="anonymous"></script> 15. <!-- IE10 viewport hack for Surface/desktop Windows 8 bug --> 16. <script src="js/ie10-viewport-bug-workaround.js"></script> 17. <script src="js/cooking.js"></script> 18. </body> 19. </html>
- 12. You should now have two files inside your intro_to_web_dev folder as depicted below.
- 13. Let’s walk through the new code, line-by-line: <meta charset="utf-8"> From https://www.quora.com/What-is-UTF8: “UTF-8 is a compromise character encoding that can be as compact as ASCII (if the file is just plain English text) but can also contain any unicode characters (with some increase in file size). UTF stands for Unicode Transformation Format. The '8' means it uses 8-bit blocks to represent a character.” <meta name="viewport" content="width=device-width, initial-scale=1"> The “viewport” is merely the viewable portion of the browser – where we see the content of the site (take a look at the image below). The “width=device-width” part sets the width of the page to equal the screen- width of the device its’ being viewed on and “initial-scale=1” defines the scale of the website. This parameter sets the initial zoom level, which means 1 CSS pixel is equal to 1 viewport pixel. Line number 4 Line number 5
- 15. <meta name="description" content="The Tuscany Cooking School"> Just as the name suggests, the description meta tag (see the image below) tells search engines and screen readers what your site is about. Line number 6
- 16. <title>Tuscany Cooking School</title> The information in meta <title> tags is usually shown in SERP (Search Engine Results Pages - See the image below) and in the tabs of browsers. Line number 7
- 17. Next, we pull in a CSS resource by use of the <link> tag. This will be a stand-alone CSS file. The <link> tag can be complex looking, but it has a very simple function. Technical writer Clair Broadley, has provided a great explanation of what the tag does at https://html.com/attributes/link-rel/: “The <link> element creates a link between your HTML document and an external resource. The rel attribute specifies the relationship between the two documents”. In our case, we’ll be linking in two external resources. Link tags are one of a handful of HTML tags that are self- closing, that is, they do not require something like </link>. Line number 8 <link rel="stylesheet" href="https://maxcdn.bootstrapcdn.com/bootstrap/3.3.7/css/bootstrap.min.css" integrity="sha384- BVYiiSIFeK1dGmJRAkycuHAHRg32OmUcww7on3RYdg4Va+PmSTsz/K68vbdEjh4u" crossorigin="anonymous">
- 18. If you look closely at the path information in the link tag’s href attribute, you’ll notice that this resource, Bootstrap’s CSS file, is being pulled from a CDN (Content Delivery Network) named maxcdn. CDN’s have very powerful servers that are optimized for pure speed and security, so the use of CDN’s is a common practice, for obvious reasons. The integrity and crossorigin attributes in our link tag are used for Subresource Integrity (SRI) checking. This is a security measure that lets browsers ensure that resources hosted on third-party servers (like CDN’s) have not been tampered with. Use of SRI is recommended as a best-practice, whenever libraries are loaded from a third-party source. You can read more at srihash.org. Cross-Origin Resource Sharing (CORS) is a W3C (World Wide Web Consortium) specification.
- 19. Lines no. 13, 14, 16 & 17 Next, we have four <script> tags used to pull in some JavaScript, as well as some commented information: <script src="https://ajax.googleapis.com/ajax/libs/jquery/1.12.4/jquery.min.js"></script> <script src="https://maxcdn.bootstrapcdn.com/bootstrap/3.3.7/js/bootstrap.min.js" integrity="sha384- Tc5IQib027qvyjSMfHjOMaLkfuWVxZxUPnCJA7l2mCWNIpG9mGCD8wGNIcPD7Txa" crossorigin="anonymous"></script> <!-- IE10 viewport hack for Surface/desktop Windows 8 bug --> <script src="js/ie10-viewport-bug-workaround.js"></script> <script src="js/cooking.js"></script> The first <script> tag (line no. 13) is pulling in the JavaScript library jQuery from a Google CDN – both Microsoft and Google host jQuery. The second <script> tag (line no. 14) is pulling in a minified version of Bootstrap’s JavaScript file – we’ll talk a lot more about what Bootstrap is and what is does a bit later.
- 20. Before we get to the last two <script> tags, we see some information provided between opening and closing HTML comment delimiters like these: <!-- --> Put simply, comment tags allow developers to insert information that the browser’s parsing engine knows to ignore (these tags aren’t used to create or manipulate the page content such as text, images, buttons or input fields), but that would be helpful or instructive to human readers. Comment tags are not only used in HTML markup, but also in CSS, JavaScript and many other programming languages. In this case, the commented information is just telling us that the next (3rd) <script> tag (line no. 16), will pull in some JavaScript used to get around a bug found in the way IE 10 handles the viewport. The 4th and final <script> tag (line no. 17) will incorporate a stand-alone script that we will generate ourselves. Notice that the src (source) attribute of the last two <script> tags does not start with a web URL (Uniform Resource Locator) such as https://www. … -- but rather simply with “js”. This syntax tells the browser to simply look in the same folder that the file it is currently displaying is in, for another folder named “js”. Inside of that folder, it will expect to find the resource named, “cooking.js”.
- 21. If you double-click on our newly-created index_v2.html file, it should open in your default web browser and look pretty close to the depiction below: END OF LABS 1 and 2 – RETURN TO MAIN TEXT