1. Step by Step Instructions - Workaround of the Share a Folder/Send a File Features
Workaround of the Share a Folder
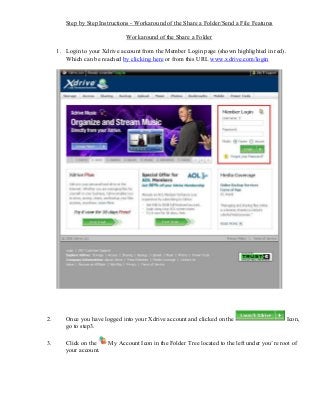
1. Login to your Xdrive account from the Member Login page (shown highlighted in red).
Which can be reached by clicking here or from this URL www.xdrive.com/login
2. Once you have logged into your Xdrive account and clicked on the Icon,
go to step3.
3. Click on the My Account Icon in the Folder Tree located to the left under you’re root of
your account.
2. 4. It will default to the My Profile Icon. To change the Email Preferences click
on the green Button located on the right hand side of the Display Area.
5. Now Locate the below option.
Sending Email As: By default, messages sent to others on your behalf will appear to come from your
notification e-mail address. Some e-mail servers are setup to recognize this form of e-mail as spam. This
setting will be used when you send files or share folders.
Send messages from sharing@xdrive.com instead
6. Put a check mark in the box before the Send messages from sharing@xdrive.com instead
option.
3. 7. Then click on the green button to temporarily1
save the setting.
1
The settings are saved only during this session, if you log out and log back in the settings will have not been saved.
You will have to reset that setting when you log back in the next time. At this time the Send a File feature is not
working but the Share a Folder feature is. Just use the Share a Folder feature to send recipients a file by creating a
folder and placing the file or files into that newly created folder, then Share the Folder as you would normally.
4. Workaround of the Send a File
1. Login to your Xdrive account from the Member Login page (shown highlighted in red). Which
can be reached by clicking here or from this URL www.xdrive.com/login
2. Once you have logged into your Xdrive account and clicked on the Icon,
go to step3.
5. 3. Click on the Folder where the file is located under you’re root of your account. Put a check mark
next to the file that you want to send. Navigate up to the Send a File button.
4. Now, click the left mouse button and hold it down. This will produce a small pop up next to the
Send a File button. The pop up will provide you with two options (email and fax). To send a file to
a recipient via email click on the email option.
6. 5. Now, select the recipients from your address book and click the add button or you can add
them individually.
6. Scroll down and select your Security Options, Signature, add your notes and then click Send
Now.
7. 7. Once you have clicked the Send Now button this will produce a new pop up page that
contains a Hyperlink that you will be able to copy and paste into your own email client and
send the email to your recipients.
8. Once you have copy the Hyperlink you can click on the Continue button to close this pop up
window.
Please Note: Each file can be downloaded by anyone a maximum of 5 times during a 24 hour
period. After the fifth download, recipients will need to setup their own free account. If you
delete the file or upload a new copy of the file, it will no longer be accessible to those you have
shared it with.