1. How to build a high tunnel
Amanda Ferguson
Department of Horticulture
University of Kentucky
High tunnels are used primarily as season-extenders. The sunny days in March
and April in Kentucky can warm tunnels, allowing production of warm-season crops such
as tomatoes and cucumbers. In the fall when the days are shorter and frost threatens,
tunnels can capture heat from the sun and protect plants at night. We hope to extend
cold-season vegetable production through the winter by utilizing the warmth of the
tunnels in an economically desirable way. Tables 1 and 2 show the construction costs of
University of Kentucky High Tunnels.
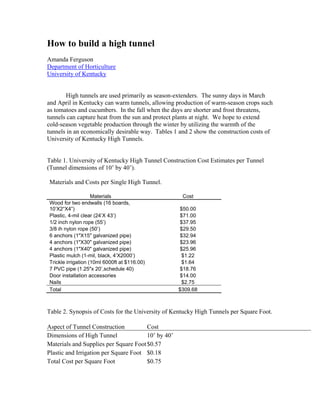
Table 1. University of Kentucky High Tunnel Construction Cost Estimates per Tunnel
(Tunnel dimensions of 10’ by 40’).
Materials and Costs per Single High Tunnel.
Materials Cost
Wood for two endwalls (16 boards,
10’X2“X4”) $50.00
Plastic, 4-mil clear (24’X 43’) $71.00
1/2 inch nylon rope (55’) $37.95
3/8 ih nylon rope (50’) $29.50
6 anchors (1"X15" galvanized pipe) $32.94
4 anchors (1"X30" galvanized pipe) $23.96
4 anchors (1"X40" galvanized pipe) $25.96
Plastic mulch (1-mil, black, 4’X2000’) $1.22
Trickle irrigation (10ml 6000ft at $116.00) $1.64
7 PVC pipe (1.25"x 20’,schedule 40) $18.76
Door installation accessories $14.00
Nails $2.75
Total $309.68
Table 2. Synopsis of Costs for the University of Kentucky High Tunnels per Square Foot.
Aspect of Tunnel Construction Cost
Dimensions of High Tunnel 10’ by 40’
Materials and Supplies per Square Foot $0.57
Plastic and Irrigation per Square Foot $0.18
Total Cost per Square Foot $0.75
2. High Tunnel Construction:
1. Prepare the field to your own specifications. The planting can either be done from
seed or with transplants where the tunnel will be placed, preferably before the tunnels go
up, since it will be more labor intensive after construction.
2. Construct end walls. Although we used a very basic design, this can vary according to
the materials at hand and what is best for you. The basic plan for the endwall is shown in
Figures 1,2, and 3. A wiggle wire groove should be attached at the length of 43 inches,
and the slants of 36½ inches.
Figure 1. Attaching plastic to the endwalls using wood, hammer, and nails.
3. Figure 2. Diagram of the endwall of the University of Kentucky High Tunnel, 2003 and
2004.
4. Figure 3. Diagram of the door within the endwall of the University of Kentucky High
Tunnels, 2003 and 2004.
3. Attach plastic to end walls using hammer, nails, and wooden slats to secure the plastic
to the wood of the endwall. Use wiggle wire to attach to a wiggle wire groove.
4. Anchors need to be used to help secure the PVC pipes to the ground. Sink anchors
(1”x18” galvanized pipe) at four-foot intervals, driving them halfway down with a
sledgehammer. At the corners, use a longer anchor (1”x 24”) to provide additional
support.
5. Place PVC (1½” painted, schedule 40) pipe over one anchor.
5. Figure 4. Placing the PVC pipes over the anchors and bending them to the adjacent side
6. Bend the PVC over and slip the end over the opposite anchor (Figure 4).
7. Run a rope, wrapped around each PVC hoop, along the length of the house, just off
center from the top. This adds stability to the tunnel by connecting all the hoops together
(Figure 5).
Figure 5. The Rope is Being Run Off Center Throughout the House For Added Stability.
8. Place end walls at each end of the tunnel, directly under the PVC (Figure 6). The beds
may have to be cut short to allow the endwall to fit the end of bed under the last hoop.
6. Figure 6. The Endwall is Placed Under the Last Hoop of the Tunnel.
9. Attach the rope that is running the length of the house to the top of this end wall.
10. Place an anchor that screws in the ground a few feet from the house and attach the
rope to this, securing the rope.
11. Repeat procedure for the other end wall. Once again, the bed may have to be cut to
keep a square end in line with the PVC already in place.
12. The rope, which has been anchored at the other end, should be run through this side
as well and pulled tight in order to keep the tunnel stable.
13. Now that each endwall is in place, an additional anchor that screws into the ground is
placed at each end and attached only to the end walls.
14. A length of four-millimeter plastic should be cut to the appropriate length of the
tunnel with a few feet extra for attachments.
15. The plastic should be stretched out parallel to the house (Figure 6).
7. Figure 7. The Plastic As It Is Thrown Over the House.
16. Once the plastic has been successfully thrown over the house, attach the excess length
to the end with wiggle wire in the wiggle wire groove on the end wall.
Attach each corner individually, keeping it tight. The plastic may need to be pulled.
Make sure to leave enough plastic for the other end to be attached; this may mean leaving
approximately two extra feet of plastic.
17. The sides should be pulled tightly and soil added on the sides to keep the plastic tight.
Figure 8. The Finished Product: A High Tunnel.