
Recomendados
Mais conteúdo relacionado
Semelhante a Record Presentation.potx
Semelhante a Record Presentation.potx (20)
Último
Último (20)
Record Presentation.potx
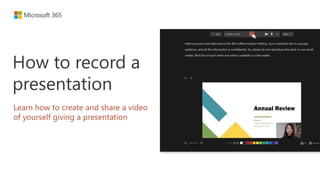
- 1. How to record a presentation Learn how to create and share a video of yourself giving a presentation
- 2. Why you might want to record a presentation When you record your presentation, you give your audience the option to watch on-demand, at their own pace. And when you record your presentation with PowerPoint, you can capture voice, ink gestures, and your video presence. This gives your audience a more engaging experience. In this tutorial, you’ll get a step-by-step walk-through of the recording process. Note: This feature is only available to Microsoft 365 subscribers on Windows who are using the latest version of Office (learn more). See for yourself: the video on the next slide is an example of a video recorded with PowerPoint.
- 3. Select the play button to see what a recorded presentation is like
- 4. Tip: Before recording, add your talking points in the notes pane With notes, you can give yourself prompts on what to cover on each slide. Notes only appear for you—they’re not recorded in the video, and your audience won’t see them.
- 5. Get ready to record your presentation 1 Open your presentation. 2 Select the Record button, located in the top-right corner of the app bar.
- 6. Choose the view that works best for you When recording a presentation, your PowerPoint deck can look 3 different ways. Select Views in the lower-right corner, and then select one of these options: Teleprompter: see speaker notes at the top of the screen. Presenter view: see the current slide in the center with speaker notes on the right. Slide view: see the presentation the way your audience does. Note: This only affects what you see—your audience will only see your slides and video of you.
- 7. Blur your background to eliminate distractions 1 2 3 Turn on your camera by selecting Turn Camera On at the top of the screen. Select the Camera Modes button in the lower-right corner. Select Blur Background.
- 8. Record your video 1 Press the Record button at the top of the screen. 2 When you’re done talking about that slide, press the arrow to advance to the next slide. PowerPoint will count down from 3 and then begin recording. When you’re done with your presentation, press the Stop button.
- 9. Tip: Review your presentation after recording It's a good idea to watch your presentation after you finish recording to check for errors. Review the recording by pressing the Play button at the bottom left.
- 10. How to re-record your presentation If you're unhappy with your recording and want to redo your presentation, follow these steps: 1 Select the ⟳ Retake Video button at the top of the screen. 2 Select On Current Slide to retake the video for the current slide only or select On All Slides to re-record all your videos.
- 11. Export the video when you’re done 1 Select the Export button in the top right. 2 Type a file name for your video and select Export Video to save it to your desired location. If you want to change the location, select the Browse button, and navigate to the folder where you want the recording to go.
- 12. Want to present live? Try presenting with cameo Want to present live instead of pre-recording your presentation? With cameo, you can insert your live camera feed directly onto a PowerPoint slide. Since this feature allows you to present live, it gives your audience an in- person-like experience. Editing and formatting your live camera feed is easy. Simply select your frame and apply the same effects to your camera feed as you would to any picture or other object. Want to learn more? Check out Presenting with cameo for a detailed tutorial. Note: Cameo is currently rolling out and will be available in the coming months to all Microsoft 365 subscribers.