SlideShare a Scribd company logo
1 of 27
Download to read offline
STAKING OUT BUILDING
LINES
Module in Carpentry 11
First Quarter
MACWIN A. KIAT
Developer
Department of Education Cordillera Administrative Region
2
What I Need to Know
INTRODUCTION
To the facilitator
Good day to you. This module is designed so that the students will be able to
continue learning even while staying at home. Your role in the facilitation of learning
is very much appreciated especially so that the teacher will not be there to guide the
students. As much as possible, spend more time in guiding the students in doing the
activities but avoid doing the activities for them. There is a part where you can find the
answers to all the activities given. You can use this to check if the learner is on the
right track. If you have any queries, you may contact me at 09466909003.
To the student
Welcome learners of CARPENTRY NC II! This module contains information
and activities for you to complete in order achieve the required competencies in
Staking out Building Lines. This will also serve as an alternative source of information
and help you acquire knowledge and skills independently with minimum supervision
or help from your teacher. You are required to go through a series of learning activities
in order to complete each of the learning outcomes in this module. In each learning
outcome there are Information Sheets, Activity Sheets. Follow these activities on your
own and answer the Self-Check at the end of each learning. For answer sheet, use
clean bond papers and compile it at the end of the module.
At the end of the module, you are expected to have mastered the following
competency:
LO 1. Prepare tools, equipment and materials for staking out building lines
 Identify tools and materials for stakeout building lines.
 Prepare tools and materials for stakeout building lines.
 Select appropriate Personal Protective Equipment (PPE)
LO 2. Stake out and set batter boards
 Set out stakes from pre-determined building lines
 Measure, lay out and cut batter board according to specifications
 Set stakes at 0.75-1.00 meter away from the pre-determined building lines
 Secure batter boards with tolerance for dimensions at +/- 5 mm, and levelness
of +/- 3 mm
 Use PPE according to job requirements
Let’s begin.
3
What I Know
Pretest L.O. 1
Let us determine how much you already know about identifying materials and
tools applicable to a specific construction job. Take this test.
Instruction: Match column A with column B. Write your answers on a separate
sheet of paper.
Column A
______1. Flexible tape that slides into a material case
and is used to measure distances.
______2. Tool used to establish a straight line on a
surface.
______3. Tool used in squaring, measuring and testing
the squareness of a wood.
______4. Tool used to trim and shape wood.
______5. Hand saw used to cut the wood across the
grain.
______6. Requirement in constructing a building.
______7. Tool used to make hole in woods.
______8. Tool used to drive and pull out nails.
______9. Tool used to apply paint or varnish on wood
surfaces.
_____10. Power tool used primarily for cutting wood for
faster speed
_____11. Must be worn at all times in the workplace.
This includes safety goggles and full -faced
mask.
_____12. Used to protect your head while working.
_____13. Used to protect your hands during work.
_____14. Used protect your feet during work.
_____15. Used to protect your ears from excessive
noise.
A. Column B
B. Face and eye
protection
C. Pull-push rule/
tape rule
D. Try- square
E. Chisel
F. Chalk line
G. Cross-cut saw
H. Circular saw
I. Building permit
J. Drill bits
K. Paint brush
L. Helmet
M. Working gloves
N. Claw hammer
O. Ear muff
P. Working boots
4
LESSON PROPER
What’s New
Instruction. Take a look at the picture of some carpentry tools below. Try to identify
these tools by writing the names and their uses at the right column.
Name:
Use:
Name:
Use:
Name:
Use:
Name:
Use:
Name:
Use:
Now check your answer using the Answer Key. If you got 100 % of the items
correctly, proceed to the next Learning Outcome. If not, do the next activities
to gain knowledge and skills required for mastery.
5
What’s In It?
Do you think you have correctly identified all the materials above? Don’t worry,
we there are information and activities provided in the following parts of the module to
help you understand more.
Guide questions
1. What are the tools and materials needed in staking out building lines?
2. What are the uses of each tools?
3. What are the proper PPE to be used during working?
Read Information Sheet 1.1-2 very well then find out how much have
you learned by doing the Self-check 1.1-2
Staking out a building is the process of transferring architectural proposals from
drawings into the ground. It stablishes the location points for site boundaries,
foundations, columns, center lines of walls and other necessary structural parts. Also,
it establishes the building’s correct extent, angle and level. The whole structure will be
located and erected according to the initial setting out.
Layout of a building shows the plan of its foundation on the ground surface
according to its drawing, so that excavation can be carried out exactly where required
position and orientation of the building is specified.
Accurate setting out is therefore a fundamental part of the construction works,
and errors can be very expensive and time consuming to correct. It should be
undertaken by competent carpenters and work should be thoroughly checked.
In order to understand layout or setting out of a building, we must understand
some of the technical terms and information related to this job.
INFORMATION SHEET 1.1
TOOLS AND MATERIALS USED FOR STAKING OUT BUILDING LINES
There are a lot of tools when doing staking out building lines. It is very important
to know that the name and proper use of each of the various tools we need in our
works. In addition, application on their proper care and maintenance will give you the
following advantages: efficiency of the work, quality speed and accomplishment and
accuracy. Along with these tools, workers should practice safety precaution to avoid
accident.
Tools
1. Pencil
Carpenters use this to mark lines and end points before cutting plywood and lumber.
6
2. Tool Holster
This is a tool holder worn on the hip or shoulder. It is usually made of leather.
3. Crow Bar
This is a straight iron or steel bar, with the point flattened and sometimes set at an
angle, used for wrecking and pulling out large nails.
4. Claw hammer
This is an essential tool of a carpenter used to drive and pull out nails.
5. Sledge hammer
Sledge hammer is used when the ground is hard and contains rocky layers. Also used to
drive pegs during staking
.
7
6. Pull-push Rule or Measuring Tape
This tool is made of flexible steel rolled in a case. It is available in 3m to 7.5m in
length. Used for taking and laying out dimensions.
7. Nylon String
This tool is needed to ensure horizontality and verticality in installation. It is also used
to indicate the sides of the building.
8. Cross-cut Saw
This tool is a tooth-cutting tool used in cutting plywood or wood.
9. Chalk Line
This is a lining tool used to establish straight lines on a surface. The chord or string
is tied to a nail and pulled out on a surface and snapped to make straight lines.
8
10. Plumb Bob
This is a testing tool used to check the vertical alignment of the work during
installation.
.
11. Spirit Level
This is a testing tool used to check the horizontal alignment of parts of a building.
12. Water level hose
This is used to establish a horizontal plane of reference; used to determine the
apparent inclination of a surface and for matching elevations of locations that are too
far apart for a spirit level to span.
13. Digging bar
This is a solid metal rod with pin shape at the bottom. It is used to dig the hard
surfaces of ground.
9
14. Pick axe
This is used to excavate the soil. It is more suitable for hard soil which is quite
difficult to dig with spade or hoe.
15. Hoe
Hoe is also used to excavate the soil. This is a metal plate provided with a wooden
handle.
16. Chisel
Generally used in wood works. It is used primarily to shape or trim wood.
17. Float
Made of wood or plastic to smoothen concrete surface.
10
18. Steel square
Steel square is a L-shaped with one arm forming a perfect right angle to the other. It
used to check the squareness of corner of a particular object.
19. Bolo.
Used to cut pegs for stake.
20. Spade
Spade is used to dig the soil for foundation trenches etc. It contains metal plate of
long wooden handle.
21. Wheel barrow
Used to transport bulk weights of materials like sand, concrete mix, soil etc.
11
Materials
1. Working Plan or Detailed Drawing
Working Plan is a detailed scale drawing of something, used as a guide in building or
manufacturing. It shows the specific measurements of a specific work.
Foundation plan Column detailed drawing
2. Lumber
Are pieces of wood sliced or milled into board, plank, flitch, commonly used in
making a building, woodworks, etc.
3. Common wire nails
Nail is a strong metal pin with a flat round head and a pointed end that is hammered
into wood or masonry and used to fasten objects together or hang something on.
12
4. Plywood
Types
 Ordinary plywood is commonly used as form, limited to two or three times of
its use.
 Marine plywood is a waterproof type of board which is more suitable to use
in concrete as form and it could be used multiple times.
SELF- CHECK 1.1
TOOLS AND MATERIALS IN STAKING OUT BUILDING LINES
Instruction: Identify the tool and material that is being defined. Write it on your
notebook.
1. _________. Used for driving and pulling out nails.
2. _________. A strong metal pin used for fastening wood or plywood.
3. _________. This is a testing tool used to check the vertical alignment of the
work during installation.
4. _________. This is a lining tool used to establish straight lines on a surface.
5. _________. It is used to indicate the sides of the building.
6. _________. It shows the specific measurements of a specific work.
7. _________. It is used for wrecking and pulling out large nails.
8. _________. Are pieces of wood sliced or milled into board, plank, flitch,
commonly used in making a building, woodworks.
9. _________. Used to check the squareness of corner of a particular object.
10._________. This is a tool holder worn on the hip or shoulder.
11._________. Used to transport bulk weights of materials like sand, concrete
mix, soil, etc.
12._________. Used to cut pegs for stake.
13._________. It is used to dig the hard surfaces of ground.
14._________. It is used to drive pegs during staking
15._________. Used to mark lines and end points before cutting.
13
INFORMATION SHEET 1.2
TYPES AND USES OF PERSONAL PROTECTIVE EQUIPMENT (PPE)
The use of protective clothing and equipment is not the solution for preventing
accident. It is most important that the primary protection against accidents is to identify
possible hazards and take the necessary safety measure to eliminate the hazard.
When necessary, workers should be provided with protective clothing and other
personal protective equipment.
Types of Personal Protective Equipment (PPE)
1. Eye and face protection. Goggles and face protection must be worn to
protect workers from flying particles, liquid chemicals, acids, chemical gases or
vapors. Workers must also be protected from radiation during welding, touching,
soldering, brazing and other operations that emit light.
Googles
2. Head protection. Hard hats must be worn where there is danger of falling
objects. Specialized hard hats are required to reduce electrical shock hazards.
Hard hats
3. Foot protection. Safety shoes with impact protection are required in work
areas where heavy objects or tool could be accidentally dropped on the feet. Safety
shoes with puncture protection are required when working around nails, wires, tacks,
scrap metal and other objects that could pierce the feet.
14
Safety shoes
5. Hand protection. Gloves are required to protect workers from cuts, scrapes,
punctures, burns, chemical absorption or extreme temperature.
Working Gloves
6. Hearing Protection. Appropriate ear muffs or ear plugs must be made
available as a last resort if it is not possible to make the workplace less noisy.
The requirement is a small part of the occupational noise exposure standard
which requires employers to ensure that workers are exposed to less than 90
decibels of noise over 8-hour period.
7. Respirators. Protective mask through which to breathe: a device placed over
the nose and mouth to filter out noxious particles and fumes from inhaled air or
to warm chilled air before it is inhaled.
15
SELF-CHECK 1.2
TYPES AND USES OF PERSONAL PROTECTIVE EQUIPMENT (PPE)
Instruction: Match column A with column B. Write your answers on your notebook.
Coulmn A
___1. Falling object
___2. Objects that could roll over the
worker’s feet
___4. Radiation
___5. Toxic chemicals
___6. Excessive noise
Column B
a. Safety shoes
b. Hard hats
c. Respirator
d. Gloves
e. Ear muff
f. Googles
INFORMATION SHEET 1.3
CONSTRUCTION COMPANY RULES AND REGULATIONS
To avoid headaches and unnecessary expenses, make sure that all necessary
permits are secured from local authorities concerned before conducting activities in
the construction site.
1. A type of authorization that must be granted by a government or other
regulatory body before the construction of a new or existing building can legally
occur.
2. Relocate the boundaries of the construction, especially lots without existing
reference point or adjoining structures. This job is to be given to a geodetic
engineer.
3. Clear all sites of any existing structures, trees and elements that will obstruct
the construction activities. Cutting of trees requires permit from the Department
of Energy and Natural Resources.
4. Allocate space for warehousing, workers’ quarter and construction office which
are usually requirements in the construction embodied in the specification
contract.
5. Apply and secure temporary electric power connections and water
supply.
6. The site of the construction must be securely fenced to protect the
construction activities from onlookers and passersby and to also protect the
materials from pilferage both from the outside and the inside.
7. Determine the building set back from the road line. Install the stake on the
ground at a reasonable spacing that will fit into the length of the batter board
available.
16
SELF-CHECK 1.3
CONSTRUCTION COMPANY RULES AND REGULATIONS
Write TRUE if the statement is correct and FALSE if the statement is not correct on
the space provided. Copy it on your notebook.
__________1. A type of authorization that must be granted by a government or other
regulatory body before the construction of a new or existing building can legally occur.
__________2. Relocate the boundaries of the construction, especially lots without
existing reference point or adjoining structures.
__________3. Clear all sites of any existing structures, trees and elements that will
obstruct the construction activities.
__________4. Allocate space for warehousing, workers’ quarter and construction
office which are usually requirements in the construction embodied in the specification
contract.
__________5. Apply and secure temporary electric power connections and water
supply.
__________6. The site of the construction must be securely fenced to protect the
construction activities from onlookers and passersby and to also protect the materials
from pilferage both from the outside and the inside.
___________ 7. Determine the building set back from the road line. Install the stake
on the ground at a reasonable spacing that will fit into the length of the batter board
available.
____________8. The person who have the authority to relocate the boundaries of the
construction when there is no existing reference point is the geodetic engineer.
____________9. The permit to cut the trees is given by the Department of
Environment and Natural Resources.
__________10. Determining the building set back from the road line is not necessary.
Congratulations for a job well done. You may now proceed to the next competency.
Good luck!
17
LEARNING COMPETENCY2: STAKE OUT AND SET BATTER BOARDS.
TLE_IACP9-12BLIi-IIb-2
Learning Objectives:
 Set out stakes from pre-determined building lines.
 Measure, lay-out and cut batter board according to specification.
 Set stakes at 0.75 – 1.00 meter away from the pre-determined building
lines
 Secure batter boards with tolerance for dimensions at +/- 5mm,
 and levelness of +/- 3mm.
 Use PPE according to job requirements.
PRE/DIAGNOSTIC ASSESSMENT
Direction: Multiple choice: Incircle the letter of the correct answer.
1. A horizontal board placed when laying out a building.
a) Facia board
b) Batter board
c) Panel board
d) None of the above
2. What is the distance between the stakes in laying out a building?
a) 2 feet
b) 3 feet
c) 4 feet
d) 5 feet
3. When constructing a different height of foundation, how do you set the
height of the batter board?
a) regarding the height of shortest foundation
b) regarding the average height of the foundation.
c) regarding the height of the tallest foundation.
d) both A and C
4. What do you call marking stakes for the batter board?
a. grade stake b. level stake c. stake d. All of these
5. Where do you start leveling for the batter boards?
a) center stake
b) Between the corner and center stake
c) corner stake
d) Both A and C
18
INFORMATION SHEET 2.1
TYPES OF BATTER BOARDS
Batter boards are the horizontal boards placed at the corner and at the
sides of the projected building when final layout takes place. The reference for
the foundation is marked on these boards.
Two Types of Batter Boards
1. Batter boards for foundation posts may be either joined by continuous
pieces surrounding the site of foundation or by individual piece for each foundation.
2. Batter boards for the foundation walls are either single or double batter
boards which are placed at corner.
The batter boards should be set as high as the desired height of the
foundation. In constructing with different heights of foundation, the tallest foundation
is set as the height of batter boards.
19
SELF CHECK 2.1
TYPES OF BATTER BOARDS
Multiple choice: Write the letter of the correct answer on the space provided.
____1. A horizontal boards that placed when laying out a building.
a) Facia board
b) Batter board
c) Panel board
d) None of the above
____2. What is the distance between the stakes in laying out a building?
a) 2 feet
b) 3 feet
c) 4 feet
d) 5 feet
____3. When constructing a different height of foundation, how do you set the
height of the batter board?
a) regarding the height of shortest foundation
b) regarding the average height of the foundation.
c) regarding the height of the tallest foundation.
d) both A and C
____4. What do you call to mark stake for the batter board?
a. grade stake b. level stake c. stake d. All of these
____5. Where do you start leveling for the batter boards?
a) center stake
b) Between the corner and center stake
c) corner stake
d) Both A and C
20
What’s More?
Let’s do it
ACTIVITY 1
See the construction of a batter board for a 10 feet x 10 feet single span
building following the procedure in setting batter boards below.
1. Determine the height of the foundation at any of the four corners of the
proposed building. Set the stakes at 0.75 to 1m away from the pre-
determined building lines, preferably where the grade stake is.
Fig.1 Determiningthe heightof the foundation.
2. In this corner, drive a stake as high as the desired height of the
foundation.
Fig.2 Putting up the stake for foundation.
21
3. Drive in set of posts for the batter boards 3 feet away from the corners
and along the sides. Drive in the posts firmly. Align these posts with a string.
Fig.3. Set of post for the batter boards and the distance of the string on it.
4. Move the height of the foundation from the stakes to the corner post of
the batter board. This is done by stretching a string leveled with spirit level or
level bar from the stake to the post.
Fig.4. Transferring the height of the foundation from the stake to the corner post.
5. From the mark of this post, stretch out a string going around the corners of the
building and passing at the side of the batter board posts.
6. Level this string with a spirit level or level bar. Stretch the string tight. Start
leveling from the corner stake where the height of the foundation is
established. Recheck the levelness.
22
Fig.5. Transferring the height of the foundation from the corner post to all batter board post
around the building layout.
7. Mark batter board posts along the line just leveled. These marks are places for
the top of the batter boards.
8. Nail the batter boards in place.
Fig. 6. A sample of batter board.
23
ASSESSMENT 1
PROCEDURE IN SETTING BATTER BOARDS
1. Determine the ___________at any of the four corners of the proposed building.
Set the stakes at 0.75 to 1m away from the pre-determined building lines,
preferably where the grade stake is.
2. In this corner, drive a ___________as a high as the desired height of
the foundation.
3. Drive in set of posts for the_________________3 feet away from the corners
and along the sides. Drive in the posts firmly.
4. Align these posts with a ______________.
5. Move the height of the foundation from the stakes to the ______of the batter
board.
6. This is done by stretching a string, leveled with spirit level or ______from the
stake to the post.
7. From the mark of this post,_______________ a string going around the corners
of the building and passing at the side of the batter board posts.
8. Level this string with a bar level. Stretch the string _____. Start leveling from
the corner stake where the height of the foundation is established. Re-check
the levelness.
9. ___________ batter board posts along the line just leveled. These marks are
places for the top of the batter boards.
10.___________the batter boards in place, the straight side up and at the marks
of the posts.
24
PERFORMANCE ACTIVITY
You are encouraged to perform setting batter boards of a proposed 12 ft by 12 ft
building. Find a flat ground for you to work on. You provide the necessary tools and
materials needed before starting your work as indicated in the list below.
Note: Use a separate sheet of paper for your score. Honestly fill out the
performance criteria checklist and score your performance output. Refer to the given
Rubrics below for your reference in scoring.
ACTIVITY 2
Title: Return Demonstration on Setting Batter Boards
Performance Objective: Given the materials, tools and equipment, you should be
able to set batter boards following the procedure on setting batter boards.
Supplies and Materials:
• 8 pcs- 2x2x8 Lumber
• Plywood
• Fasteners
Tools and Equipment
1. Hammer 7. Try-square
2. Marking Tools 8. Steel Square
3. Measuring Tools 9. Chalk Line
4. Nylon String 10. Hand Saw
5. Water Hose Level 11. Plumb Bob
6. PPE 12. Circular Saw
Equipment:
 Gloves
 Safety Boots
 Hard Hat
 Dust Mask
 Over All Clothes
 Goggles
Steps/Procedure:
1. Read and interpret plan/specification
2. Prepare all tools and materials required.
3. Determine the height at any of the four corners of the proposed building. Set
the stakes at 0.75 to 1m away from the pre-determined building lines,
preferably where the grade stake is.
4. In this corner, drive a stake as a high as the desired height of
the foundation.
25
PERFORMANCE CRITERIA CHECKLIST
Name of learner:_________________________________ Date: __________________
RUBRICS IN ASSESSING THE PERFORMANCE OUTPUT
5. Drive in set of posts for the batter boards 3 feet away from the corners and
along the sides. Drive in the posts firmly.
6. Align these posts with a string.
7. Move the height of the foundation from the stakes to the corner of the batter
board.
8. This is done by stretching a string, leveled with spirit level or bar level from the
stake to the post.
9. From the mark of this post stretch out a string going around the corners of the
building and passing at the side of the batter board posts.
10.Level this string with a bar level. Stretch the string tight. Start leveling from
the corner stake where the height of the foundation is established. Re-check
the levelness.
11.Mark batter board posts along the line just leveled. These marks are places
for the top of the batter boards.
12.Nail the batter boards in place, the straight side up and at the marks of the
posts.
Note: Corners of the batter boards should be in 90 degrees angles.
13.Let the trainer check your work
Assessment Method: Observation of demonstration and performance criteria.
CRITERIA YES NO
1. Are the stakes set out from the pre-determined building
lines?
2. Did I measure, laid out and cut batter board materials
according to specifications?
3. Are the stakes set 0.75-1.00 meter away from the pre-
determined building lines?
4. Did I secure all the batter boards properly with tolerance
for dimensions at ± 5 mm, and levelness of ± 3 mm?
26
CRITERIA PERCENTAGE 5 4 3 2 1 AVERAGE
Proper handling of tools and
equipment
20%
Accuracy of measurements 25%
Skills and knowledge on
work
25%
Safety 15%
Work ethics 15%
TOTAL 100
Criteria 5 4 3 2 1
Proper
handling of
tools and
equipment
All tools are
properly
handled and
used
1-2 tools are
improperly
handled and
not properly
used
3-4 tools are
improperly
handled and
not properly
used
Most of the
tools are
improperly
handled and
not properly
used
No attempt
to work or
Incomplete
work
performance
Accuracy of
measurements
100% of batter
boards are
properly set
with tolerance
for dimension
of +5mm, and
levelness of +
3mm
75% of batter
boards are
properly set
with tolerance
for dimension
of +5mm, and
levelness of
+ 3mm
50% of batter
boards are
properly set
with
tolerance for
dimension of
+5mm, and
levelness of
+ 3mm
25% of batter
boards are
properly set
with tolerance
for dimension
of +5mm, and
levelness of +
3mm
No attempt
to work or
Incomplete
work
performance
Skills and
knowledge on
work
Learner
perform the
procedure
completely and
independently
Learner
perform the
procedure
completely
and
independently
with minimal
help of the
teacher
Learner
perform the
procedure
completely
and
independentl
y with more
help of the
teacher
Learner tried
to work but
not able to
finish the job.
Learner has
no attempt
to do the job
Safety Learner use
complete PPE
according to
job
requirements
1 of the
required
PPE is not
used during
work
2 of the
required
PPE is not
used during
work
3 of the
required
PPE are not
used during
work
All of the
required
PPE are
not used
during work
Work ethics Learner
finished the
job
completely
without
destruction/
damage
Learner
finished the
job
completely
with 1-3
destruction/
damage
Learner
finished the
job
completely
with 4-6
destruction/
damage
Learner
finished the
job
completely
with 7-9
destruction/
damage
Learner
has no
attempt to
do the job
REFERENCE SHEET
27
1. Technology & Livelihood Education– Grade 9 Learner’s Material. First Edition,
2013.
2. Max Fajardo. Simplified Methods on Building Construction, 2000 Edition.
3. Carpentry NCII Curriculum Guide
4. Kiat, Macwin. Carpentry NCII Trainers Methodology Portfolio. 2017.
5. https://engineeringbasics.com/steps-in-setting-out-a-building/
6. https://millworkguide.com/carpentry-tools-and-their-uses/
7. https://healthyhandyman.com/essential-carpentry-tools-list/
8. https://inpectapedia.com/decs/Batterboards&String.
9. https://www.garagetips-101.com/foundation-layout.html/
10.https://theconstructor.org/construction/construction-tools-list-images-
building/20238/

More Related Content

What's hot

TLE 8 - TECHNICAL DRAFTING (ANALYZE SIGNS, SYMBOLS AND DATA)
TLE 8 - TECHNICAL DRAFTING (ANALYZE SIGNS, SYMBOLS AND DATA) TLE 8 - TECHNICAL DRAFTING (ANALYZE SIGNS, SYMBOLS AND DATA)
TLE 8 - TECHNICAL DRAFTING (ANALYZE SIGNS, SYMBOLS AND DATA) MichaellaApale
 
EIM 7/8 Lesson 2: Perform Mensuration and Calculation
EIM 7/8 Lesson 2: Perform Mensuration and CalculationEIM 7/8 Lesson 2: Perform Mensuration and Calculation
EIM 7/8 Lesson 2: Perform Mensuration and CalculationBenandro Palor
 
Technical Drafting Module 4
Technical Drafting Module 4Technical Drafting Module 4
Technical Drafting Module 4DepEd
 
Electrical Supplies and Materials
Electrical Supplies and MaterialsElectrical Supplies and Materials
Electrical Supplies and MaterialsJhunalvin Santos
 
DRAFTING MATERIALS AND TOOLS ITS USES/FUNCTIONS
DRAFTING MATERIALS  AND TOOLS ITS USES/FUNCTIONSDRAFTING MATERIALS  AND TOOLS ITS USES/FUNCTIONS
DRAFTING MATERIALS AND TOOLS ITS USES/FUNCTIONSteppxcrown98
 
MODULE 1-PLUMBING NC I BY DALEON
MODULE 1-PLUMBING NC I BY DALEONMODULE 1-PLUMBING NC I BY DALEON
MODULE 1-PLUMBING NC I BY DALEONMannyDaleon1
 
TLE 9 (Technical Drafting) - Layout Drawing
TLE 9 (Technical Drafting) - Layout DrawingTLE 9 (Technical Drafting) - Layout Drawing
TLE 9 (Technical Drafting) - Layout DrawingJuan Miguel Palero
 
SLK Carpentry 9 Quarter 1
SLK Carpentry 9 Quarter 1SLK Carpentry 9 Quarter 1
SLK Carpentry 9 Quarter 1Nhatz Marticio
 
K to 12 animal production learning module
K to 12 animal production learning moduleK to 12 animal production learning module
K to 12 animal production learning moduleNoel Tan
 
Module 4 module 2 structural layout & details
Module 4   module 2 structural layout & detailsModule 4   module 2 structural layout & details
Module 4 module 2 structural layout & detailsGilbert Bautista
 
Drafting Tools and Materials
Drafting Tools and MaterialsDrafting Tools and Materials
Drafting Tools and MaterialsMary Jane Ocampo
 
TLE 9 (Technical Drafting) - Alphabet of Lines
TLE 9 (Technical Drafting) - Alphabet of LinesTLE 9 (Technical Drafting) - Alphabet of Lines
TLE 9 (Technical Drafting) - Alphabet of LinesJuan Miguel Palero
 
Grade 7 TLE Detailed Lesson Plan 3
Grade 7 TLE Detailed Lesson Plan 3Grade 7 TLE Detailed Lesson Plan 3
Grade 7 TLE Detailed Lesson Plan 3Jurix Cabuyao
 

What's hot (20)

TLE 8 - TECHNICAL DRAFTING (ANALYZE SIGNS, SYMBOLS AND DATA)
TLE 8 - TECHNICAL DRAFTING (ANALYZE SIGNS, SYMBOLS AND DATA) TLE 8 - TECHNICAL DRAFTING (ANALYZE SIGNS, SYMBOLS AND DATA)
TLE 8 - TECHNICAL DRAFTING (ANALYZE SIGNS, SYMBOLS AND DATA)
 
K to 12 Electrical Learning Module
K to 12 Electrical Learning ModuleK to 12 Electrical Learning Module
K to 12 Electrical Learning Module
 
Basic Hand Tools for Carpentry Work
Basic Hand Tools for Carpentry WorkBasic Hand Tools for Carpentry Work
Basic Hand Tools for Carpentry Work
 
EIM 7/8 Lesson 2: Perform Mensuration and Calculation
EIM 7/8 Lesson 2: Perform Mensuration and CalculationEIM 7/8 Lesson 2: Perform Mensuration and Calculation
EIM 7/8 Lesson 2: Perform Mensuration and Calculation
 
Carpentry
CarpentryCarpentry
Carpentry
 
Technical Drafting Module 4
Technical Drafting Module 4Technical Drafting Module 4
Technical Drafting Module 4
 
Electrical Supplies and Materials
Electrical Supplies and MaterialsElectrical Supplies and Materials
Electrical Supplies and Materials
 
DRAFTING MATERIALS AND TOOLS ITS USES/FUNCTIONS
DRAFTING MATERIALS  AND TOOLS ITS USES/FUNCTIONSDRAFTING MATERIALS  AND TOOLS ITS USES/FUNCTIONS
DRAFTING MATERIALS AND TOOLS ITS USES/FUNCTIONS
 
MODULE 1-PLUMBING NC I BY DALEON
MODULE 1-PLUMBING NC I BY DALEONMODULE 1-PLUMBING NC I BY DALEON
MODULE 1-PLUMBING NC I BY DALEON
 
TLE 9 (Technical Drafting) - Layout Drawing
TLE 9 (Technical Drafting) - Layout DrawingTLE 9 (Technical Drafting) - Layout Drawing
TLE 9 (Technical Drafting) - Layout Drawing
 
PLUMBING NC II - CBLM
PLUMBING NC II - CBLMPLUMBING NC II - CBLM
PLUMBING NC II - CBLM
 
SLK Carpentry 9 Quarter 1
SLK Carpentry 9 Quarter 1SLK Carpentry 9 Quarter 1
SLK Carpentry 9 Quarter 1
 
K to 12 animal production learning module
K to 12 animal production learning moduleK to 12 animal production learning module
K to 12 animal production learning module
 
Module 4 module 2 structural layout & details
Module 4   module 2 structural layout & detailsModule 4   module 2 structural layout & details
Module 4 module 2 structural layout & details
 
Drafting Tools and Materials
Drafting Tools and MaterialsDrafting Tools and Materials
Drafting Tools and Materials
 
K to 12 Welding Learning Module
K to 12 Welding Learning ModuleK to 12 Welding Learning Module
K to 12 Welding Learning Module
 
K to 12 electronics learning module
K to 12 electronics learning moduleK to 12 electronics learning module
K to 12 electronics learning module
 
K to 12 Mechanical Drafting Learning Module
K to 12 Mechanical Drafting Learning ModuleK to 12 Mechanical Drafting Learning Module
K to 12 Mechanical Drafting Learning Module
 
TLE 9 (Technical Drafting) - Alphabet of Lines
TLE 9 (Technical Drafting) - Alphabet of LinesTLE 9 (Technical Drafting) - Alphabet of Lines
TLE 9 (Technical Drafting) - Alphabet of Lines
 
Grade 7 TLE Detailed Lesson Plan 3
Grade 7 TLE Detailed Lesson Plan 3Grade 7 TLE Detailed Lesson Plan 3
Grade 7 TLE Detailed Lesson Plan 3
 

Similar to Staking out building lines

module 3 tools and materials carpentry.docx
module 3 tools and materials carpentry.docxmodule 3 tools and materials carpentry.docx
module 3 tools and materials carpentry.docxmarkorapa1
 
Wall and floor tiling tools and equipment
Wall and floor tiling tools and equipmentWall and floor tiling tools and equipment
Wall and floor tiling tools and equipmentdeaftc232
 
Use wall and floor tiling tools and equipment
Use  wall and floor tiling tools and equipmentUse  wall and floor tiling tools and equipment
Use wall and floor tiling tools and equipmentdeaftc232
 
K to 12 smaw welding learning module
K to 12 smaw welding learning moduleK to 12 smaw welding learning module
K to 12 smaw welding learning moduleNimsonDangel
 
k to 12 smaw welding learning module
k to 12 smaw welding learning modulek to 12 smaw welding learning module
k to 12 smaw welding learning moduleEmmanuel Maxim Juan
 
Carpentry 7-8 explorartory (Week 3).pptx
Carpentry 7-8 explorartory (Week 3).pptxCarpentry 7-8 explorartory (Week 3).pptx
Carpentry 7-8 explorartory (Week 3).pptxMonroewellFajardo
 
Lesson 1 Industrial Arts.pptx
Lesson 1 Industrial Arts.pptxLesson 1 Industrial Arts.pptx
Lesson 1 Industrial Arts.pptxJavar Longcop
 
Basic Hand Tools v3
Basic Hand Tools v3Basic Hand Tools v3
Basic Hand Tools v3Andrew Moore
 
Sample-Detailed-Lesson-in-TLE.pdf
Sample-Detailed-Lesson-in-TLE.pdfSample-Detailed-Lesson-in-TLE.pdf
Sample-Detailed-Lesson-in-TLE.pdfJohnBrylleMitra
 
Sample-Detailed-Lesson-in-TLE.pdf
Sample-Detailed-Lesson-in-TLE.pdfSample-Detailed-Lesson-in-TLE.pdf
Sample-Detailed-Lesson-in-TLE.pdfJohnBrylleMitra
 
Manual carpentry & fitting shop 1st yr
Manual carpentry & fitting shop 1st yrManual carpentry & fitting shop 1st yr
Manual carpentry & fitting shop 1st yrSubhasritam Behera
 
SLK Carpentry 9 Quarter 2
SLK Carpentry 9 Quarter 2SLK Carpentry 9 Quarter 2
SLK Carpentry 9 Quarter 2Nhatz Marticio
 

Similar to Staking out building lines (20)

module 3 tools and materials carpentry.docx
module 3 tools and materials carpentry.docxmodule 3 tools and materials carpentry.docx
module 3 tools and materials carpentry.docx
 
Metal working
Metal workingMetal working
Metal working
 
Module 7 Carpentry
Module 7 CarpentryModule 7 Carpentry
Module 7 Carpentry
 
K to 12 smaw welding learning module
K to 12 smaw welding learning moduleK to 12 smaw welding learning module
K to 12 smaw welding learning module
 
Wall and floor tiling tools and equipment
Wall and floor tiling tools and equipmentWall and floor tiling tools and equipment
Wall and floor tiling tools and equipment
 
Use wall and floor tiling tools and equipment
Use  wall and floor tiling tools and equipmentUse  wall and floor tiling tools and equipment
Use wall and floor tiling tools and equipment
 
K to 12 smaw welding learning module
K to 12 smaw welding learning moduleK to 12 smaw welding learning module
K to 12 smaw welding learning module
 
k to 12 smaw welding learning module
k to 12 smaw welding learning modulek to 12 smaw welding learning module
k to 12 smaw welding learning module
 
Carpentry 7-8 explorartory (Week 3).pptx
Carpentry 7-8 explorartory (Week 3).pptxCarpentry 7-8 explorartory (Week 3).pptx
Carpentry 7-8 explorartory (Week 3).pptx
 
METAL WORKS - GRADE 7 & 8
METAL WORKS - GRADE 7 & 8METAL WORKS - GRADE 7 & 8
METAL WORKS - GRADE 7 & 8
 
Lesson 1 Industrial Arts.pptx
Lesson 1 Industrial Arts.pptxLesson 1 Industrial Arts.pptx
Lesson 1 Industrial Arts.pptx
 
Laying out reference line.docx
Laying out reference line.docxLaying out reference line.docx
Laying out reference line.docx
 
week 2.docx
week 2.docxweek 2.docx
week 2.docx
 
Basic Hand Tools v3
Basic Hand Tools v3Basic Hand Tools v3
Basic Hand Tools v3
 
Sample-Detailed-Lesson-in-TLE.pdf
Sample-Detailed-Lesson-in-TLE.pdfSample-Detailed-Lesson-in-TLE.pdf
Sample-Detailed-Lesson-in-TLE.pdf
 
Sample-Detailed-Lesson-in-TLE.pdf
Sample-Detailed-Lesson-in-TLE.pdfSample-Detailed-Lesson-in-TLE.pdf
Sample-Detailed-Lesson-in-TLE.pdf
 
Report kayu
Report kayuReport kayu
Report kayu
 
1st electricity
1st electricity1st electricity
1st electricity
 
Manual carpentry & fitting shop 1st yr
Manual carpentry & fitting shop 1st yrManual carpentry & fitting shop 1st yr
Manual carpentry & fitting shop 1st yr
 
SLK Carpentry 9 Quarter 2
SLK Carpentry 9 Quarter 2SLK Carpentry 9 Quarter 2
SLK Carpentry 9 Quarter 2
 

Recently uploaded

How to Manage Buy 3 Get 1 Free in Odoo 17
How to Manage Buy 3 Get 1 Free in Odoo 17How to Manage Buy 3 Get 1 Free in Odoo 17
How to Manage Buy 3 Get 1 Free in Odoo 17Celine George
 
Indexing Structures in Database Management system.pdf
Indexing Structures in Database Management system.pdfIndexing Structures in Database Management system.pdf
Indexing Structures in Database Management system.pdfChristalin Nelson
 
MS4 level being good citizen -imperative- (1) (1).pdf
MS4 level   being good citizen -imperative- (1) (1).pdfMS4 level   being good citizen -imperative- (1) (1).pdf
MS4 level being good citizen -imperative- (1) (1).pdfMr Bounab Samir
 
4.9.24 School Desegregation in Boston.pptx
4.9.24 School Desegregation in Boston.pptx4.9.24 School Desegregation in Boston.pptx
4.9.24 School Desegregation in Boston.pptxmary850239
 
BIOCHEMISTRY-CARBOHYDRATE METABOLISM CHAPTER 2.pptx
BIOCHEMISTRY-CARBOHYDRATE METABOLISM CHAPTER 2.pptxBIOCHEMISTRY-CARBOHYDRATE METABOLISM CHAPTER 2.pptx
BIOCHEMISTRY-CARBOHYDRATE METABOLISM CHAPTER 2.pptxSayali Powar
 
Congestive Cardiac Failure..presentation
Congestive Cardiac Failure..presentationCongestive Cardiac Failure..presentation
Congestive Cardiac Failure..presentationdeepaannamalai16
 
6 ways Samsung’s Interactive Display powered by Android changes the classroom
6 ways Samsung’s Interactive Display powered by Android changes the classroom6 ways Samsung’s Interactive Display powered by Android changes the classroom
6 ways Samsung’s Interactive Display powered by Android changes the classroomSamsung Business USA
 
4.11.24 Poverty and Inequality in America.pptx
4.11.24 Poverty and Inequality in America.pptx4.11.24 Poverty and Inequality in America.pptx
4.11.24 Poverty and Inequality in America.pptxmary850239
 
PART 1 - CHAPTER 1 - CELL THE FUNDAMENTAL UNIT OF LIFE
PART 1 - CHAPTER 1 - CELL THE FUNDAMENTAL UNIT OF LIFEPART 1 - CHAPTER 1 - CELL THE FUNDAMENTAL UNIT OF LIFE
PART 1 - CHAPTER 1 - CELL THE FUNDAMENTAL UNIT OF LIFEMISSRITIMABIOLOGYEXP
 
Comparative Literature in India by Amiya dev.pptx
Comparative Literature in India by Amiya dev.pptxComparative Literature in India by Amiya dev.pptx
Comparative Literature in India by Amiya dev.pptxAvaniJani1
 
DiskStorage_BasicFileStructuresandHashing.pdf
DiskStorage_BasicFileStructuresandHashing.pdfDiskStorage_BasicFileStructuresandHashing.pdf
DiskStorage_BasicFileStructuresandHashing.pdfChristalin Nelson
 
Q-Factor General Quiz-7th April 2024, Quiz Club NITW
Q-Factor General Quiz-7th April 2024, Quiz Club NITWQ-Factor General Quiz-7th April 2024, Quiz Club NITW
Q-Factor General Quiz-7th April 2024, Quiz Club NITWQuiz Club NITW
 
An Overview of the Calendar App in Odoo 17 ERP
An Overview of the Calendar App in Odoo 17 ERPAn Overview of the Calendar App in Odoo 17 ERP
An Overview of the Calendar App in Odoo 17 ERPCeline George
 
CLASSIFICATION OF ANTI - CANCER DRUGS.pptx
CLASSIFICATION OF ANTI - CANCER DRUGS.pptxCLASSIFICATION OF ANTI - CANCER DRUGS.pptx
CLASSIFICATION OF ANTI - CANCER DRUGS.pptxAnupam32727
 
Shark introduction Morphology and its behaviour characteristics
Shark introduction Morphology and its behaviour characteristicsShark introduction Morphology and its behaviour characteristics
Shark introduction Morphology and its behaviour characteristicsArubSultan
 

Recently uploaded (20)

How to Manage Buy 3 Get 1 Free in Odoo 17
How to Manage Buy 3 Get 1 Free in Odoo 17How to Manage Buy 3 Get 1 Free in Odoo 17
How to Manage Buy 3 Get 1 Free in Odoo 17
 
Indexing Structures in Database Management system.pdf
Indexing Structures in Database Management system.pdfIndexing Structures in Database Management system.pdf
Indexing Structures in Database Management system.pdf
 
MS4 level being good citizen -imperative- (1) (1).pdf
MS4 level   being good citizen -imperative- (1) (1).pdfMS4 level   being good citizen -imperative- (1) (1).pdf
MS4 level being good citizen -imperative- (1) (1).pdf
 
4.9.24 School Desegregation in Boston.pptx
4.9.24 School Desegregation in Boston.pptx4.9.24 School Desegregation in Boston.pptx
4.9.24 School Desegregation in Boston.pptx
 
BIOCHEMISTRY-CARBOHYDRATE METABOLISM CHAPTER 2.pptx
BIOCHEMISTRY-CARBOHYDRATE METABOLISM CHAPTER 2.pptxBIOCHEMISTRY-CARBOHYDRATE METABOLISM CHAPTER 2.pptx
BIOCHEMISTRY-CARBOHYDRATE METABOLISM CHAPTER 2.pptx
 
Congestive Cardiac Failure..presentation
Congestive Cardiac Failure..presentationCongestive Cardiac Failure..presentation
Congestive Cardiac Failure..presentation
 
6 ways Samsung’s Interactive Display powered by Android changes the classroom
6 ways Samsung’s Interactive Display powered by Android changes the classroom6 ways Samsung’s Interactive Display powered by Android changes the classroom
6 ways Samsung’s Interactive Display powered by Android changes the classroom
 
4.11.24 Poverty and Inequality in America.pptx
4.11.24 Poverty and Inequality in America.pptx4.11.24 Poverty and Inequality in America.pptx
4.11.24 Poverty and Inequality in America.pptx
 
PART 1 - CHAPTER 1 - CELL THE FUNDAMENTAL UNIT OF LIFE
PART 1 - CHAPTER 1 - CELL THE FUNDAMENTAL UNIT OF LIFEPART 1 - CHAPTER 1 - CELL THE FUNDAMENTAL UNIT OF LIFE
PART 1 - CHAPTER 1 - CELL THE FUNDAMENTAL UNIT OF LIFE
 
Comparative Literature in India by Amiya dev.pptx
Comparative Literature in India by Amiya dev.pptxComparative Literature in India by Amiya dev.pptx
Comparative Literature in India by Amiya dev.pptx
 
Paradigm shift in nursing research by RS MEHTA
Paradigm shift in nursing research by RS MEHTAParadigm shift in nursing research by RS MEHTA
Paradigm shift in nursing research by RS MEHTA
 
DiskStorage_BasicFileStructuresandHashing.pdf
DiskStorage_BasicFileStructuresandHashing.pdfDiskStorage_BasicFileStructuresandHashing.pdf
DiskStorage_BasicFileStructuresandHashing.pdf
 
Q-Factor General Quiz-7th April 2024, Quiz Club NITW
Q-Factor General Quiz-7th April 2024, Quiz Club NITWQ-Factor General Quiz-7th April 2024, Quiz Club NITW
Q-Factor General Quiz-7th April 2024, Quiz Club NITW
 
Plagiarism,forms,understand about plagiarism,avoid plagiarism,key significanc...
Plagiarism,forms,understand about plagiarism,avoid plagiarism,key significanc...Plagiarism,forms,understand about plagiarism,avoid plagiarism,key significanc...
Plagiarism,forms,understand about plagiarism,avoid plagiarism,key significanc...
 
An Overview of the Calendar App in Odoo 17 ERP
An Overview of the Calendar App in Odoo 17 ERPAn Overview of the Calendar App in Odoo 17 ERP
An Overview of the Calendar App in Odoo 17 ERP
 
CLASSIFICATION OF ANTI - CANCER DRUGS.pptx
CLASSIFICATION OF ANTI - CANCER DRUGS.pptxCLASSIFICATION OF ANTI - CANCER DRUGS.pptx
CLASSIFICATION OF ANTI - CANCER DRUGS.pptx
 
Chi-Square Test Non Parametric Test Categorical Variable
Chi-Square Test Non Parametric Test Categorical VariableChi-Square Test Non Parametric Test Categorical Variable
Chi-Square Test Non Parametric Test Categorical Variable
 
Faculty Profile prashantha K EEE dept Sri Sairam college of Engineering
Faculty Profile prashantha K EEE dept Sri Sairam college of EngineeringFaculty Profile prashantha K EEE dept Sri Sairam college of Engineering
Faculty Profile prashantha K EEE dept Sri Sairam college of Engineering
 
Shark introduction Morphology and its behaviour characteristics
Shark introduction Morphology and its behaviour characteristicsShark introduction Morphology and its behaviour characteristics
Shark introduction Morphology and its behaviour characteristics
 
Spearman's correlation,Formula,Advantages,
Spearman's correlation,Formula,Advantages,Spearman's correlation,Formula,Advantages,
Spearman's correlation,Formula,Advantages,
 

Staking out building lines

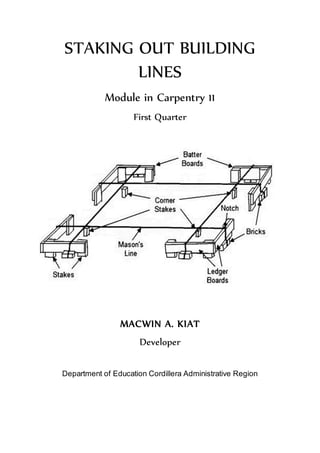
  • 1. STAKING OUT BUILDING LINES Module in Carpentry 11 First Quarter MACWIN A. KIAT Developer Department of Education Cordillera Administrative Region
  • 2. 2 What I Need to Know INTRODUCTION To the facilitator Good day to you. This module is designed so that the students will be able to continue learning even while staying at home. Your role in the facilitation of learning is very much appreciated especially so that the teacher will not be there to guide the students. As much as possible, spend more time in guiding the students in doing the activities but avoid doing the activities for them. There is a part where you can find the answers to all the activities given. You can use this to check if the learner is on the right track. If you have any queries, you may contact me at 09466909003. To the student Welcome learners of CARPENTRY NC II! This module contains information and activities for you to complete in order achieve the required competencies in Staking out Building Lines. This will also serve as an alternative source of information and help you acquire knowledge and skills independently with minimum supervision or help from your teacher. You are required to go through a series of learning activities in order to complete each of the learning outcomes in this module. In each learning outcome there are Information Sheets, Activity Sheets. Follow these activities on your own and answer the Self-Check at the end of each learning. For answer sheet, use clean bond papers and compile it at the end of the module. At the end of the module, you are expected to have mastered the following competency: LO 1. Prepare tools, equipment and materials for staking out building lines  Identify tools and materials for stakeout building lines.  Prepare tools and materials for stakeout building lines.  Select appropriate Personal Protective Equipment (PPE) LO 2. Stake out and set batter boards  Set out stakes from pre-determined building lines  Measure, lay out and cut batter board according to specifications  Set stakes at 0.75-1.00 meter away from the pre-determined building lines  Secure batter boards with tolerance for dimensions at +/- 5 mm, and levelness of +/- 3 mm  Use PPE according to job requirements Let’s begin.
  • 3. 3 What I Know Pretest L.O. 1 Let us determine how much you already know about identifying materials and tools applicable to a specific construction job. Take this test. Instruction: Match column A with column B. Write your answers on a separate sheet of paper. Column A ______1. Flexible tape that slides into a material case and is used to measure distances. ______2. Tool used to establish a straight line on a surface. ______3. Tool used in squaring, measuring and testing the squareness of a wood. ______4. Tool used to trim and shape wood. ______5. Hand saw used to cut the wood across the grain. ______6. Requirement in constructing a building. ______7. Tool used to make hole in woods. ______8. Tool used to drive and pull out nails. ______9. Tool used to apply paint or varnish on wood surfaces. _____10. Power tool used primarily for cutting wood for faster speed _____11. Must be worn at all times in the workplace. This includes safety goggles and full -faced mask. _____12. Used to protect your head while working. _____13. Used to protect your hands during work. _____14. Used protect your feet during work. _____15. Used to protect your ears from excessive noise. A. Column B B. Face and eye protection C. Pull-push rule/ tape rule D. Try- square E. Chisel F. Chalk line G. Cross-cut saw H. Circular saw I. Building permit J. Drill bits K. Paint brush L. Helmet M. Working gloves N. Claw hammer O. Ear muff P. Working boots
  • 4. 4 LESSON PROPER What’s New Instruction. Take a look at the picture of some carpentry tools below. Try to identify these tools by writing the names and their uses at the right column. Name: Use: Name: Use: Name: Use: Name: Use: Name: Use: Now check your answer using the Answer Key. If you got 100 % of the items correctly, proceed to the next Learning Outcome. If not, do the next activities to gain knowledge and skills required for mastery.
  • 5. 5 What’s In It? Do you think you have correctly identified all the materials above? Don’t worry, we there are information and activities provided in the following parts of the module to help you understand more. Guide questions 1. What are the tools and materials needed in staking out building lines? 2. What are the uses of each tools? 3. What are the proper PPE to be used during working? Read Information Sheet 1.1-2 very well then find out how much have you learned by doing the Self-check 1.1-2 Staking out a building is the process of transferring architectural proposals from drawings into the ground. It stablishes the location points for site boundaries, foundations, columns, center lines of walls and other necessary structural parts. Also, it establishes the building’s correct extent, angle and level. The whole structure will be located and erected according to the initial setting out. Layout of a building shows the plan of its foundation on the ground surface according to its drawing, so that excavation can be carried out exactly where required position and orientation of the building is specified. Accurate setting out is therefore a fundamental part of the construction works, and errors can be very expensive and time consuming to correct. It should be undertaken by competent carpenters and work should be thoroughly checked. In order to understand layout or setting out of a building, we must understand some of the technical terms and information related to this job. INFORMATION SHEET 1.1 TOOLS AND MATERIALS USED FOR STAKING OUT BUILDING LINES There are a lot of tools when doing staking out building lines. It is very important to know that the name and proper use of each of the various tools we need in our works. In addition, application on their proper care and maintenance will give you the following advantages: efficiency of the work, quality speed and accomplishment and accuracy. Along with these tools, workers should practice safety precaution to avoid accident. Tools 1. Pencil Carpenters use this to mark lines and end points before cutting plywood and lumber.
  • 6. 6 2. Tool Holster This is a tool holder worn on the hip or shoulder. It is usually made of leather. 3. Crow Bar This is a straight iron or steel bar, with the point flattened and sometimes set at an angle, used for wrecking and pulling out large nails. 4. Claw hammer This is an essential tool of a carpenter used to drive and pull out nails. 5. Sledge hammer Sledge hammer is used when the ground is hard and contains rocky layers. Also used to drive pegs during staking .
  • 7. 7 6. Pull-push Rule or Measuring Tape This tool is made of flexible steel rolled in a case. It is available in 3m to 7.5m in length. Used for taking and laying out dimensions. 7. Nylon String This tool is needed to ensure horizontality and verticality in installation. It is also used to indicate the sides of the building. 8. Cross-cut Saw This tool is a tooth-cutting tool used in cutting plywood or wood. 9. Chalk Line This is a lining tool used to establish straight lines on a surface. The chord or string is tied to a nail and pulled out on a surface and snapped to make straight lines.
  • 8. 8 10. Plumb Bob This is a testing tool used to check the vertical alignment of the work during installation. . 11. Spirit Level This is a testing tool used to check the horizontal alignment of parts of a building. 12. Water level hose This is used to establish a horizontal plane of reference; used to determine the apparent inclination of a surface and for matching elevations of locations that are too far apart for a spirit level to span. 13. Digging bar This is a solid metal rod with pin shape at the bottom. It is used to dig the hard surfaces of ground.
  • 9. 9 14. Pick axe This is used to excavate the soil. It is more suitable for hard soil which is quite difficult to dig with spade or hoe. 15. Hoe Hoe is also used to excavate the soil. This is a metal plate provided with a wooden handle. 16. Chisel Generally used in wood works. It is used primarily to shape or trim wood. 17. Float Made of wood or plastic to smoothen concrete surface.
  • 10. 10 18. Steel square Steel square is a L-shaped with one arm forming a perfect right angle to the other. It used to check the squareness of corner of a particular object. 19. Bolo. Used to cut pegs for stake. 20. Spade Spade is used to dig the soil for foundation trenches etc. It contains metal plate of long wooden handle. 21. Wheel barrow Used to transport bulk weights of materials like sand, concrete mix, soil etc.
  • 11. 11 Materials 1. Working Plan or Detailed Drawing Working Plan is a detailed scale drawing of something, used as a guide in building or manufacturing. It shows the specific measurements of a specific work. Foundation plan Column detailed drawing 2. Lumber Are pieces of wood sliced or milled into board, plank, flitch, commonly used in making a building, woodworks, etc. 3. Common wire nails Nail is a strong metal pin with a flat round head and a pointed end that is hammered into wood or masonry and used to fasten objects together or hang something on.
  • 12. 12 4. Plywood Types  Ordinary plywood is commonly used as form, limited to two or three times of its use.  Marine plywood is a waterproof type of board which is more suitable to use in concrete as form and it could be used multiple times. SELF- CHECK 1.1 TOOLS AND MATERIALS IN STAKING OUT BUILDING LINES Instruction: Identify the tool and material that is being defined. Write it on your notebook. 1. _________. Used for driving and pulling out nails. 2. _________. A strong metal pin used for fastening wood or plywood. 3. _________. This is a testing tool used to check the vertical alignment of the work during installation. 4. _________. This is a lining tool used to establish straight lines on a surface. 5. _________. It is used to indicate the sides of the building. 6. _________. It shows the specific measurements of a specific work. 7. _________. It is used for wrecking and pulling out large nails. 8. _________. Are pieces of wood sliced or milled into board, plank, flitch, commonly used in making a building, woodworks. 9. _________. Used to check the squareness of corner of a particular object. 10._________. This is a tool holder worn on the hip or shoulder. 11._________. Used to transport bulk weights of materials like sand, concrete mix, soil, etc. 12._________. Used to cut pegs for stake. 13._________. It is used to dig the hard surfaces of ground. 14._________. It is used to drive pegs during staking 15._________. Used to mark lines and end points before cutting.
  • 13. 13 INFORMATION SHEET 1.2 TYPES AND USES OF PERSONAL PROTECTIVE EQUIPMENT (PPE) The use of protective clothing and equipment is not the solution for preventing accident. It is most important that the primary protection against accidents is to identify possible hazards and take the necessary safety measure to eliminate the hazard. When necessary, workers should be provided with protective clothing and other personal protective equipment. Types of Personal Protective Equipment (PPE) 1. Eye and face protection. Goggles and face protection must be worn to protect workers from flying particles, liquid chemicals, acids, chemical gases or vapors. Workers must also be protected from radiation during welding, touching, soldering, brazing and other operations that emit light. Googles 2. Head protection. Hard hats must be worn where there is danger of falling objects. Specialized hard hats are required to reduce electrical shock hazards. Hard hats 3. Foot protection. Safety shoes with impact protection are required in work areas where heavy objects or tool could be accidentally dropped on the feet. Safety shoes with puncture protection are required when working around nails, wires, tacks, scrap metal and other objects that could pierce the feet.
  • 14. 14 Safety shoes 5. Hand protection. Gloves are required to protect workers from cuts, scrapes, punctures, burns, chemical absorption or extreme temperature. Working Gloves 6. Hearing Protection. Appropriate ear muffs or ear plugs must be made available as a last resort if it is not possible to make the workplace less noisy. The requirement is a small part of the occupational noise exposure standard which requires employers to ensure that workers are exposed to less than 90 decibels of noise over 8-hour period. 7. Respirators. Protective mask through which to breathe: a device placed over the nose and mouth to filter out noxious particles and fumes from inhaled air or to warm chilled air before it is inhaled.
  • 15. 15 SELF-CHECK 1.2 TYPES AND USES OF PERSONAL PROTECTIVE EQUIPMENT (PPE) Instruction: Match column A with column B. Write your answers on your notebook. Coulmn A ___1. Falling object ___2. Objects that could roll over the worker’s feet ___4. Radiation ___5. Toxic chemicals ___6. Excessive noise Column B a. Safety shoes b. Hard hats c. Respirator d. Gloves e. Ear muff f. Googles INFORMATION SHEET 1.3 CONSTRUCTION COMPANY RULES AND REGULATIONS To avoid headaches and unnecessary expenses, make sure that all necessary permits are secured from local authorities concerned before conducting activities in the construction site. 1. A type of authorization that must be granted by a government or other regulatory body before the construction of a new or existing building can legally occur. 2. Relocate the boundaries of the construction, especially lots without existing reference point or adjoining structures. This job is to be given to a geodetic engineer. 3. Clear all sites of any existing structures, trees and elements that will obstruct the construction activities. Cutting of trees requires permit from the Department of Energy and Natural Resources. 4. Allocate space for warehousing, workers’ quarter and construction office which are usually requirements in the construction embodied in the specification contract. 5. Apply and secure temporary electric power connections and water supply. 6. The site of the construction must be securely fenced to protect the construction activities from onlookers and passersby and to also protect the materials from pilferage both from the outside and the inside. 7. Determine the building set back from the road line. Install the stake on the ground at a reasonable spacing that will fit into the length of the batter board available.
  • 16. 16 SELF-CHECK 1.3 CONSTRUCTION COMPANY RULES AND REGULATIONS Write TRUE if the statement is correct and FALSE if the statement is not correct on the space provided. Copy it on your notebook. __________1. A type of authorization that must be granted by a government or other regulatory body before the construction of a new or existing building can legally occur. __________2. Relocate the boundaries of the construction, especially lots without existing reference point or adjoining structures. __________3. Clear all sites of any existing structures, trees and elements that will obstruct the construction activities. __________4. Allocate space for warehousing, workers’ quarter and construction office which are usually requirements in the construction embodied in the specification contract. __________5. Apply and secure temporary electric power connections and water supply. __________6. The site of the construction must be securely fenced to protect the construction activities from onlookers and passersby and to also protect the materials from pilferage both from the outside and the inside. ___________ 7. Determine the building set back from the road line. Install the stake on the ground at a reasonable spacing that will fit into the length of the batter board available. ____________8. The person who have the authority to relocate the boundaries of the construction when there is no existing reference point is the geodetic engineer. ____________9. The permit to cut the trees is given by the Department of Environment and Natural Resources. __________10. Determining the building set back from the road line is not necessary. Congratulations for a job well done. You may now proceed to the next competency. Good luck!
  • 17. 17 LEARNING COMPETENCY2: STAKE OUT AND SET BATTER BOARDS. TLE_IACP9-12BLIi-IIb-2 Learning Objectives:  Set out stakes from pre-determined building lines.  Measure, lay-out and cut batter board according to specification.  Set stakes at 0.75 – 1.00 meter away from the pre-determined building lines  Secure batter boards with tolerance for dimensions at +/- 5mm,  and levelness of +/- 3mm.  Use PPE according to job requirements. PRE/DIAGNOSTIC ASSESSMENT Direction: Multiple choice: Incircle the letter of the correct answer. 1. A horizontal board placed when laying out a building. a) Facia board b) Batter board c) Panel board d) None of the above 2. What is the distance between the stakes in laying out a building? a) 2 feet b) 3 feet c) 4 feet d) 5 feet 3. When constructing a different height of foundation, how do you set the height of the batter board? a) regarding the height of shortest foundation b) regarding the average height of the foundation. c) regarding the height of the tallest foundation. d) both A and C 4. What do you call marking stakes for the batter board? a. grade stake b. level stake c. stake d. All of these 5. Where do you start leveling for the batter boards? a) center stake b) Between the corner and center stake c) corner stake d) Both A and C
  • 18. 18 INFORMATION SHEET 2.1 TYPES OF BATTER BOARDS Batter boards are the horizontal boards placed at the corner and at the sides of the projected building when final layout takes place. The reference for the foundation is marked on these boards. Two Types of Batter Boards 1. Batter boards for foundation posts may be either joined by continuous pieces surrounding the site of foundation or by individual piece for each foundation. 2. Batter boards for the foundation walls are either single or double batter boards which are placed at corner. The batter boards should be set as high as the desired height of the foundation. In constructing with different heights of foundation, the tallest foundation is set as the height of batter boards.
  • 19. 19 SELF CHECK 2.1 TYPES OF BATTER BOARDS Multiple choice: Write the letter of the correct answer on the space provided. ____1. A horizontal boards that placed when laying out a building. a) Facia board b) Batter board c) Panel board d) None of the above ____2. What is the distance between the stakes in laying out a building? a) 2 feet b) 3 feet c) 4 feet d) 5 feet ____3. When constructing a different height of foundation, how do you set the height of the batter board? a) regarding the height of shortest foundation b) regarding the average height of the foundation. c) regarding the height of the tallest foundation. d) both A and C ____4. What do you call to mark stake for the batter board? a. grade stake b. level stake c. stake d. All of these ____5. Where do you start leveling for the batter boards? a) center stake b) Between the corner and center stake c) corner stake d) Both A and C
  • 20. 20 What’s More? Let’s do it ACTIVITY 1 See the construction of a batter board for a 10 feet x 10 feet single span building following the procedure in setting batter boards below. 1. Determine the height of the foundation at any of the four corners of the proposed building. Set the stakes at 0.75 to 1m away from the pre- determined building lines, preferably where the grade stake is. Fig.1 Determiningthe heightof the foundation. 2. In this corner, drive a stake as high as the desired height of the foundation. Fig.2 Putting up the stake for foundation.
  • 21. 21 3. Drive in set of posts for the batter boards 3 feet away from the corners and along the sides. Drive in the posts firmly. Align these posts with a string. Fig.3. Set of post for the batter boards and the distance of the string on it. 4. Move the height of the foundation from the stakes to the corner post of the batter board. This is done by stretching a string leveled with spirit level or level bar from the stake to the post. Fig.4. Transferring the height of the foundation from the stake to the corner post. 5. From the mark of this post, stretch out a string going around the corners of the building and passing at the side of the batter board posts. 6. Level this string with a spirit level or level bar. Stretch the string tight. Start leveling from the corner stake where the height of the foundation is established. Recheck the levelness.
  • 22. 22 Fig.5. Transferring the height of the foundation from the corner post to all batter board post around the building layout. 7. Mark batter board posts along the line just leveled. These marks are places for the top of the batter boards. 8. Nail the batter boards in place. Fig. 6. A sample of batter board.
  • 23. 23 ASSESSMENT 1 PROCEDURE IN SETTING BATTER BOARDS 1. Determine the ___________at any of the four corners of the proposed building. Set the stakes at 0.75 to 1m away from the pre-determined building lines, preferably where the grade stake is. 2. In this corner, drive a ___________as a high as the desired height of the foundation. 3. Drive in set of posts for the_________________3 feet away from the corners and along the sides. Drive in the posts firmly. 4. Align these posts with a ______________. 5. Move the height of the foundation from the stakes to the ______of the batter board. 6. This is done by stretching a string, leveled with spirit level or ______from the stake to the post. 7. From the mark of this post,_______________ a string going around the corners of the building and passing at the side of the batter board posts. 8. Level this string with a bar level. Stretch the string _____. Start leveling from the corner stake where the height of the foundation is established. Re-check the levelness. 9. ___________ batter board posts along the line just leveled. These marks are places for the top of the batter boards. 10.___________the batter boards in place, the straight side up and at the marks of the posts.
  • 24. 24 PERFORMANCE ACTIVITY You are encouraged to perform setting batter boards of a proposed 12 ft by 12 ft building. Find a flat ground for you to work on. You provide the necessary tools and materials needed before starting your work as indicated in the list below. Note: Use a separate sheet of paper for your score. Honestly fill out the performance criteria checklist and score your performance output. Refer to the given Rubrics below for your reference in scoring. ACTIVITY 2 Title: Return Demonstration on Setting Batter Boards Performance Objective: Given the materials, tools and equipment, you should be able to set batter boards following the procedure on setting batter boards. Supplies and Materials: • 8 pcs- 2x2x8 Lumber • Plywood • Fasteners Tools and Equipment 1. Hammer 7. Try-square 2. Marking Tools 8. Steel Square 3. Measuring Tools 9. Chalk Line 4. Nylon String 10. Hand Saw 5. Water Hose Level 11. Plumb Bob 6. PPE 12. Circular Saw Equipment:  Gloves  Safety Boots  Hard Hat  Dust Mask  Over All Clothes  Goggles Steps/Procedure: 1. Read and interpret plan/specification 2. Prepare all tools and materials required. 3. Determine the height at any of the four corners of the proposed building. Set the stakes at 0.75 to 1m away from the pre-determined building lines, preferably where the grade stake is. 4. In this corner, drive a stake as a high as the desired height of the foundation.
  • 25. 25 PERFORMANCE CRITERIA CHECKLIST Name of learner:_________________________________ Date: __________________ RUBRICS IN ASSESSING THE PERFORMANCE OUTPUT 5. Drive in set of posts for the batter boards 3 feet away from the corners and along the sides. Drive in the posts firmly. 6. Align these posts with a string. 7. Move the height of the foundation from the stakes to the corner of the batter board. 8. This is done by stretching a string, leveled with spirit level or bar level from the stake to the post. 9. From the mark of this post stretch out a string going around the corners of the building and passing at the side of the batter board posts. 10.Level this string with a bar level. Stretch the string tight. Start leveling from the corner stake where the height of the foundation is established. Re-check the levelness. 11.Mark batter board posts along the line just leveled. These marks are places for the top of the batter boards. 12.Nail the batter boards in place, the straight side up and at the marks of the posts. Note: Corners of the batter boards should be in 90 degrees angles. 13.Let the trainer check your work Assessment Method: Observation of demonstration and performance criteria. CRITERIA YES NO 1. Are the stakes set out from the pre-determined building lines? 2. Did I measure, laid out and cut batter board materials according to specifications? 3. Are the stakes set 0.75-1.00 meter away from the pre- determined building lines? 4. Did I secure all the batter boards properly with tolerance for dimensions at ± 5 mm, and levelness of ± 3 mm?
  • 26. 26 CRITERIA PERCENTAGE 5 4 3 2 1 AVERAGE Proper handling of tools and equipment 20% Accuracy of measurements 25% Skills and knowledge on work 25% Safety 15% Work ethics 15% TOTAL 100 Criteria 5 4 3 2 1 Proper handling of tools and equipment All tools are properly handled and used 1-2 tools are improperly handled and not properly used 3-4 tools are improperly handled and not properly used Most of the tools are improperly handled and not properly used No attempt to work or Incomplete work performance Accuracy of measurements 100% of batter boards are properly set with tolerance for dimension of +5mm, and levelness of + 3mm 75% of batter boards are properly set with tolerance for dimension of +5mm, and levelness of + 3mm 50% of batter boards are properly set with tolerance for dimension of +5mm, and levelness of + 3mm 25% of batter boards are properly set with tolerance for dimension of +5mm, and levelness of + 3mm No attempt to work or Incomplete work performance Skills and knowledge on work Learner perform the procedure completely and independently Learner perform the procedure completely and independently with minimal help of the teacher Learner perform the procedure completely and independentl y with more help of the teacher Learner tried to work but not able to finish the job. Learner has no attempt to do the job Safety Learner use complete PPE according to job requirements 1 of the required PPE is not used during work 2 of the required PPE is not used during work 3 of the required PPE are not used during work All of the required PPE are not used during work Work ethics Learner finished the job completely without destruction/ damage Learner finished the job completely with 1-3 destruction/ damage Learner finished the job completely with 4-6 destruction/ damage Learner finished the job completely with 7-9 destruction/ damage Learner has no attempt to do the job REFERENCE SHEET
  • 27. 27 1. Technology & Livelihood Education– Grade 9 Learner’s Material. First Edition, 2013. 2. Max Fajardo. Simplified Methods on Building Construction, 2000 Edition. 3. Carpentry NCII Curriculum Guide 4. Kiat, Macwin. Carpentry NCII Trainers Methodology Portfolio. 2017. 5. https://engineeringbasics.com/steps-in-setting-out-a-building/ 6. https://millworkguide.com/carpentry-tools-and-their-uses/ 7. https://healthyhandyman.com/essential-carpentry-tools-list/ 8. https://inpectapedia.com/decs/Batterboards&String. 9. https://www.garagetips-101.com/foundation-layout.html/ 10.https://theconstructor.org/construction/construction-tools-list-images- building/20238/