
Recommended
Recommended
More Related Content
What's hot
Viewers also liked
Viewers also liked (20)
Similar to How to set up Annke 4MP PoE security system
Similar to How to set up Annke 4MP PoE security system (20)
Recently uploaded
Recently uploaded (20)
How to set up Annke 4MP PoE security system
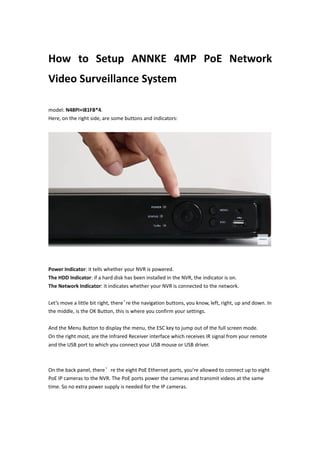
- 1. How to Setup ANNKE 4MP PoE Network Video Surveillance System model: N48PI+I81FB*4. Here, on the right side, are some buttons and indicators: Power Indicator: it tells whether your NVR is powered. The HDD Indicator: if a hard disk has been installed in the NVR, the indicator is on. The Network Indicator: it indicates whether your NVR is connected to the network. Let’s move a little bit right, there’re the navigation buttons, you know, left, right, up and down. In the middle, is the OK Button, this is where you confirm your settings. And the Menu Button to display the menu, the ESC key to jump out of the full screen mode. On the right most, are the Infrared Receiver interface which receives IR signal from your remote and the USB port to which you connect your USB mouse or USB driver. On the back panel, there’re the eight PoE Ethernet ports, you’re allowed to connect up to eight PoE IP cameras to the NVR. The PoE ports power the cameras and transmit videos at the same time. So no extra power supply is needed for the IP cameras.
- 2. The Audio-In: where you connect the microphone; Audio-out, where you stream audio to a headphone or speaker. The VGA video output: where you connect your monitor to. The HDMI output: another option for you to connect a monitor. The LAN port: this is where your router goes, so that the NVR is connected to the network. The USB 3.0 port: for USB mouse or USB backup. The Power-In: its where you plug in the power adapter and get your NVR powered. The ON/OFF switch: remember to turn it on after all the connections are done. The cooling fan: to cool off the system when it’s working. Now, let’s take a look at the 4MP bullet IP camera, here you can see, the lens is surrounded by numbers of infrared LEDs, they provide crystal clear night vision when the ambient is in darkness. And, the ANNKE logo is on both sides of the bullet camera.
- 3. The Three-Axis elbow design bracket is made for easy Do-it-Yourself installation. You can use a Screw Driver to adjust it from here. At the end of the cable, you’ll see two ports, one is the PoE Ethernet port, it can not only stream video to NVR but also power the camera as mentioned before. The extra power-in port is used for testing or power supply when needed, but in this kit you don’t have to use it. OK, before we begin connecting the system, let’s install the hard disk first, so that we can record videos to it. Otherwise, all you can do is live viewing. You’ll get two HDD cables in the kit, one HDD power cable and one HDD data cable. All you have to do is dismantle the casing of the NVR, plug both of the cables into the corresponding ports of the NVR and Hard Disk, fix the HDD and NVR casing, and then the HDD installation process is done.
- 4. Now, let’s hook up the camera, plug one end of the Ethernet cable into one of the Ethernet ports on the NVR, and the other end goes to the IP camera, remember to fix the weatherproof rubber ring and casing tightly, so that your system is totally weatherproof. Plug in the USB mouse. Then, the HDMI cable of the monitor goes to the HDMI port on the back panel of NVR. Plug in the power adapter, turn on the switch.
- 5. ANNKE logo appears on the screen when starting up, and then goes to the Activation menu. Create a password for your system and confirm it. Then click on OK to activate the system. Select the Language, there’re several languages available including English, Spanish, French, Germany, Italian and so on. Choose your common use language and click Apply. Then prompts the Wizard, you can choose whether to start the wizard or not when the system starts. In the time setting section, you can set the Time Zone, Date Format, System Date and System Time.
- 6. The network settings, DHCP is ON by default, and the IP address will be shown on the form if you have connected an Ethernet cable to the NVR. Click on Next. The P2P settings, P2P is ON by default, so that you can watch live video remotely on your mobile devices.
- 7. Click on Next, there is another way you connect your system to the network, through DDNS. Just click Next, there shows the hard disk you’ve installed, you caninitialize it before use. After the setup, go to the main menu. First, the Playback.You can choose the specific camera you want to playback:
- 8. Export: Choose the specific recording to export to external USB device for backup.
- 9. Parameters: Choose the resolution to record Configuration: To modify the general settings:
- 10. Set “language” “VGA/HDMI resolution” ,etc