
Recomendados
Recomendados
Mais conteúdo relacionado
Último
Último (9)
Destaque
Destaque (20)
How to Make a Grapevine Wedding Arch Part Four
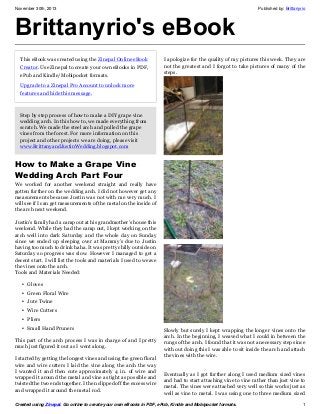
- 1. November 30th, 2013 Published by: Brittanyrio Created using Zinepal. Go online to create your own eBooks in PDF, ePub, Kindle and Mobipocket formats. 1 Brittanyrio's eBook This eBook was created using the Zinepal Online eBook Creator. Use Zinepal to create your own eBooks in PDF, ePub and Kindle/Mobipocket formats. Upgrade to a Zinepal Pro Account to unlock more features and hide this message. Step by step process of how to make a DIY grape vine wedding arch. In this how to, we made everything from scratch. We made the steel arch and pulled the grape vines from the forest. For more information on this project and other projects we are doing, please visit www.BrittanyandJustinWedding.blogspot.com How to Make a Grape Vine Wedding Arch Part Four We worked for another weekend straight and really have gotten further on the wedding arch. I did not however get any measurements because Justin was not with me very much. I will see if I can get measurements of the metal on the inside of the arch next weekend. Justin's family had a camp out at his grandmother's house this weekend. While they had the camp out, I kept working on the arch well into dark Saturday and the whole day on Sunday since we ended up sleeping over at Mammy's due to Justin having too much to drink haha. It was pretty chilly outside on Saturday so progress was slow. However I managed to get a decent start. I will list the tools and materials I used to weave the vines onto the arch. Tools and Materials Needed: • Gloves • Green Floral Wire • Jute Twine • Wire Cutters • Pliers • Small Hand Pruners This part of the arch process I was in charge of and I pretty much just figured it out as I went along. I started by getting the longest vines and using the green floral wire and wire cutters I laid the vine along the arch the way I wanted it and then cute approximately 4 in. of wire and wrapped it around the metal and vine as tight as possible and twisted the two ends together. I then clipped off the excess wire and wrapped it around the metal rod. I apologize for the quality of my pictures this week. They are not the greatest and I forgot to take pictures of many of the steps. Slowly but surely I kept wrapping the longer vines onto the arch. In the beginning, I weaved what I could in between the rungs of the arch. I found that it was not a necessary step since with out doing this I was able to sit inside the arch and attach the vines with the wire. Eventually as I got further along I used medium sized vines and had to start attaching vine to vine rather than just vine to metal. The vines were attached very well so this works just as well as vine to metal. I was using one to three medium sized
- 2. November 30th, 2013 Published by: Brittanyrio Created using Zinepal. Go online to create your own eBooks in PDF, ePub, Kindle and Mobipocket formats. 2 vines at a time to get the nice thick look of the vines. This required up to 6 in. pieces of floral wire. After dark I moved the arch into the garage and worked on it some. This is where the top started to get thicker than the sides. Which is OK because that is where a lot of the decorations will hang from, and we want the canopy look. In the picture it looks like the vines are sticking out all over but it is actually the pile of smaller vines I was using to weave into the top of the arch. Sunday is where the real progress began. Today I attached around half of the total vines to the arch. I continued repeating the steps above until, I ran into a small issue with the top of the arch. In the photo above, you can see the issue I ran into. In order to make the cascading sides I had to make something to attach the smaller vines to. I only had the two side posts. So I used a section of a thick vine to make two U shaped supports. I cut them into two pieces that were long enough to bend into a U shape and attach firmly to the posts. I attached them in the same fashion I attached the rest of the vines.
- 3. November 30th, 2013 Published by: Brittanyrio Created using Zinepal. Go online to create your own eBooks in PDF, ePub, Kindle and Mobipocket formats. 3 I then used a section of thinner vine that was sturdy to make two more rungs. One for each side, and then attached them to the post of the U shape. This will be where I will attach the cascading vines. By the time I finished this step, it was time for us to go home. I did all of the work today by myself since Justin had way too much to drink last night and slept literally all day!!! I think I got pretty much accomplished by my self!
- 4. November 30th, 2013 Published by: Brittanyrio Created using Zinepal. Go online to create your own eBooks in PDF, ePub, Kindle and Mobipocket formats. 4 Next weekend I plan to hopefully finish wrapping the vines if I have enough of them. This will allow them to dry over the winter months. We will be keeping the finished arch in our heated storage space out of the elements. Once again, if you have any questions, please feel free to ask them here in a comment. I did not go too into detail here since I kind of made up a lot of it as I went. If you ask a question I can probably give better details! Thanks for reading. How to Make a Grape Vine Wedding Arch Part Four By Brittanyrio on September 16th, 2013 We worked for another weekend straight and really have gotten further on the wedding arch. I did not however get any measurements because Justin was not with me very much. I will see if I can get measurements of the metal on the inside of the arch next weekend. Justin's family had a camp out at his grandmother's house this weekend. While they had the camp out, I kept working on the arch well into dark Saturday and the whole day on Sunday since we ended up sleeping over at Mammy's due to Justin having too much to drink haha. It was pretty chilly outside on Saturday so progress was slow. However I managed to get a decent start. I will list the tools and materials I used to weave the vines onto the arch. Tools and Materials Needed: • Gloves • Green Floral Wire • Jute Twine • Wire Cutters • Pliers • Small Hand Pruners This part of the arch process I was in charge of and I pretty much just figured it out as I went along. I started by getting the longest vines and using the green floral wire and wire cutters I laid the vine along the arch the way I wanted it and then cute approximately 4 in. of wire and wrapped it around the metal and vine as tight as possible and twisted the two ends together. I then clipped off the excess wire and wrapped it around the metal rod. I apologize for the quality of my pictures this week. They are not the greatest and I forgot to take pictures of many of the steps.
- 5. November 30th, 2013 Published by: Brittanyrio Created using Zinepal. Go online to create your own eBooks in PDF, ePub, Kindle and Mobipocket formats. 5 Slowly but surely I kept wrapping the longer vines onto the arch. In the beginning, I weaved what I could in between the rungs of the arch. I found that it was not a necessary step since with out doing this I was able to sit inside the arch and attach the vines with the wire. Eventually as I got further along I used medium sized vines and had to start attaching vine to vine rather than just vine to metal. The vines were attached very well so this works just as well as vine to metal. I was using one to three medium sized vines at a time to get the nice thick look of the vines. This required up to 6 in. pieces of floral wire. After dark I moved the arch into the garage and worked on it some. This is where the top started to get thicker than the sides. Which is OK because that is where a lot of the decorations will hang from, and we want the canopy look. In the picture it looks like the vines are sticking out all over but it is actually the pile of smaller vines I was using to weave into the top of the arch. Sunday is where the real progress began. Today I attached around half of the total vines to the arch. I continued repeating the steps above until, I ran into a small issue with the top of the arch. In the photo above, you can see the issue I ran into. In order to make the cascading sides I had to make something to attach the smaller vines to. I only had the two side posts. So I used a section of a thick vine to make two U shaped supports. I cut them into two pieces that were long enough to bend into a U shape and attach firmly to the posts. I attached them in the same fashion I attached the rest of the vines.
- 6. November 30th, 2013 Published by: Brittanyrio Created using Zinepal. Go online to create your own eBooks in PDF, ePub, Kindle and Mobipocket formats. 6 I then used a section of thinner vine that was sturdy to make two more rungs. One for each side, and then attached them to the post of the U shape. This will be where I will attach the cascading vines. By the time I finished this step, it was time for us to go home. I did all of the work today by myself since Justin had way too much to drink last night and slept literally all day!!! I think I got pretty much accomplished by my self!
- 7. November 30th, 2013 Published by: Brittanyrio Created using Zinepal. Go online to create your own eBooks in PDF, ePub, Kindle and Mobipocket formats. 7 Next weekend I plan to hopefully finish wrapping the vines if I have enough of them. This will allow them to dry over the winter months. We will be keeping the finished arch in our heated storage space out of the elements. Once again, if you have any questions, please feel free to ask them here in a comment. I did not go too into detail here since I kind of made up a lot of it as I went. If you ask a question I can probably give better details! Thanks for reading.