

Recomendados
Mais conteúdo relacionado
Mais procurados
Mais procurados (20)
Destaque
Destaque (20)
Semelhante a Formatting Paragraphs
Semelhante a Formatting Paragraphs (20)
Mais de Buffalo Seminary
Mais de Buffalo Seminary (20)
Último
Último (20)
Formatting Paragraphs
- 2. Formatting Marks Paragraph formatting allows you to change formatting options for entire paragraphs. A paragraph is defined as the text between two paragraph markers. The paragraph marker looks like a backwards P. Each time you press Enter, you insert an invisible character called a paragraph marker in your document. By default, these paragraph markers are not shown on screen. But you can display them by clicking the ¶ button on the Standard toolbar. The example shows paragraphs with the paragraph marker displayed. As you can see, paragraph markers aren't the only invisible characters you can display. Tab markers (right-pointing arrows), space markers (dots), and end-of-line markers (left-pointing arrows) also appear. Formatting marks can help you edit your document and check for errors such as extra spaces between words.
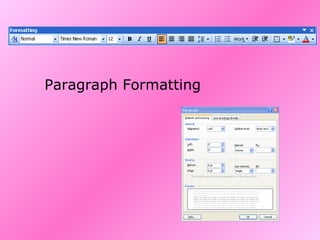
- 4. Using the Paragraph Dialog Box The Paragraph dialog box offers access to all of the paragraph-formatting options, all in one place. To display this dialog box, choose Format Paragraph. Set options as desired in this dialog box. As you make changes, the text in the Preview area changes accordingly, so you can see what the paragraph looks with your changes applied. When you're satisfied with your changes, click the OK button. The dialog box disappears and the formatting options you selected are applied to the selected paragraph(s). Alignment : Choose left, right, center, or justified. Indentation : Adjust the left and right margins by clicking the up and down arrows. Spacing : To emphasize a block of text, click the up and down arrows. Preview : Gives an idea how your text will look.
- 5. Alignment Select or Click anywhere inside the paragraph you want to align. Refers to the way text appears between the indents. Click the Align Left, Center, Align Right, or Justify button on the Formatting toolbar Use the Paragraph Dialog box OR
- 6. Click and Type in Print Layout View You can use the click and type feature to vary the alignment within a single line of text. For example, you can left align your name and right align the date on the same line. In order to use this feature, your document has to be displayed in the “print layout” view. In this view you can position your mouse anywhere on the page and double click to move your Insertion point there. The appearance of your mouse displays the way the text will align. Denotes left alignment Center alignment Right alignment
- 9. Line Spacing Line spacing refers to the amount of blank space before and after each line in a paragraph . It often determines how easy it is to read a document. Line spacing is measured in lines or points. You can quickly change the line spacing by using the spacing button on the formatting toolbar These commands affect the paragraph where your cursor is currently located. To spread the change wider, select several paragraphs or the entire document. Or by pressing Ctrl+1 for single-spaced, Ctrl+2 for double-spaced or Ctrl+5 for 1.5 spacing.
- 10. How to Change Line Spacing When you make a line spacing change, it affects only the text in a paragraph that contains the insertion point, unless your highlight other paragraphs or the entire document. When line spacing is measured in points, it is referred to as leading (pronounced ledding). Reducing leading makes the lines closer together and can make a text difficult to read, while increasing leading can help its readability. For example, the 10 point font usually uses 12 point leading. This is the default. You can also specify line spacing to be 3 lines, 4 lines, or more by choosing “Multiple” To specify the exact leading desired, click the arrow under “line spacing” and select “exactly”, then enter the points desired in the”at” box.
- 13. Tab Types symbol Align to the left of the tab stop When tabbing to this spot – text will: Center on the tab stop Align to the right of the tab stop Numbers typed at this tab stop will align with the decimal point on the tab The bar tab inserts a vertical line at the tab stop Tab leaders are characters that appear in the space between text and a tab stop. You've seen dots (periods) used as tab leaders lots of times in the Table of Contents for a book.
- 14. Using the Ruler The ruler allows you to set the two types of paragraph formatting: tabs and indentation. If the ruler is not showing, choose View Ruler to display it. Setting tabs with the ruler The tiny gray lines at the bottom of the ruler, appearing every 1/2 inch are the default tab stops. When you set a tab stop, you remove all the default tab stops to its left. On the far left end of the ruler is a box with what looks like a capital letter L in it. That's the tab type indicator. The L is for a left tab. Click the box to change the type of tab. The symbols were detailed in the previous slide. When you point to the box, a ToolTip appears with the name of the type of tab in it. Whatever type of tab appears in the box is the type of tab that will be set. To set a tab, click the tab type indicator to select the type of tab you want. Then click the ruler in the position you want the tab to appear. A tab marker appears on the ruler. To remove a tab, drag it from the ruler into the document window; when you release the mouse button, the tab disappears.
- 16. Setting Indentation With the Ruler The indent settings appear on either end of the white part of the ruler. By default, they're set at the same position as the margins and the area between the margins is indicated by the white area on the ruler. The indent markers are kind of triangular in shape. On the left, there are two of them for controlling the left indent: the top one is for the first line of a paragraph and the bottom one is for the remaining lines in the paragraph. On the right, there's only one for controlling the right indent. You set indentation by dragging these little markers along the ruler. The left indent markers can be moved separately to achieve different indentation effects. If you want to set both left indents identically, drag the little rectangle beneath the indent markers, it moves both markers together. The top triangle is the location for the First-line Indent . The first line of text in a paragraph will start at whatever location you put this on the ruler. The bottom triangle sets the location for Hanging Indents . This is where all lines of text—except the first—begin in a paragraph. The little square below the "hourglass" is the Left Indent . This one will move both of them simultaneously, allowing you to set them at the same place without having to do it twice. The text you need to change must be selected before you make changes on the ruler.
- 17. Adjusting Margins With the Ruler If you position your cursor between the light and dark margin area of the ruler until the cursor turns into a double arrow, as shown below, you can click and drag the margins on either the top or side ruler to quickly adjust the margins. Note : you must be in print layout view to see the vertical ruler If you hold down the Alt key as you drag you'll also be able to see the current measurements. This trick works on the top or the side rulers.
- 18. Shortcut to the Dialog Boxes Double click in the shaded area here or anywhere on the vertical ruler and the page setup dialog box opens Double click on the triangles or rectangle and the Paragraph dialog box opens Double click in the white area and the Tab Dialog box opens