Lab Manual Using Redshift
•
1 gostou•849 visualizações

by Marie Yap, Enterprise Solutions Architect AWS AWS Data & Analytics Week is an opportunity to learn about Amazon’s family of managed analytics services. These services provide easy, scalable, reliable, and cost-effective ways to manage your data in the cloud. We explain the fundamentals and take a technical deep dive into Amazon Redshift data warehouse; Data Lake services including Amazon EMR, Amazon Athena, & Amazon Redshift Spectrum; Log Analytics with Amazon Elasticsearch Service; and data preparation and placement services with AWS Glue and Amazon Kinesis. You'll will learn how to get started, how to support applications, and how to scale.

Recomendados
Recomendados
Mais conteúdo relacionado
Mais de Amazon Web Services
Mais de Amazon Web Services (20)
Lab Manual Using Redshift
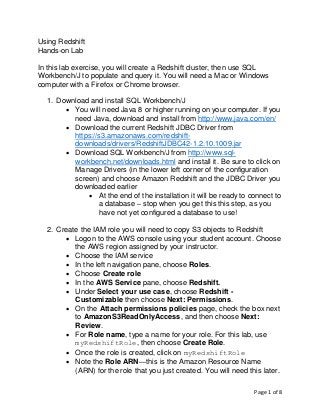
- 1. Page 1 of 8 Using Redshift Hands-on Lab In this lab exercise, you will create a Redshift cluster, then use SQL Workbench/J to populate and query it. You will need a Mac or Windows computer with a Firefox or Chrome browser. 1. Download and install SQL Workbench/J • You will need Java 8 or higher running on your computer. If you need Java, download and install from http://www.java.com/en/ • Download the current Redshift JDBC Driver from https://s3.amazonaws.com/redshift- downloads/drivers/RedshiftJDBC42-1.2.10.1009.jar • Download SQL Workbench/J from http://www.sql- workbench.net/downloads.html and install it. Be sure to click on Manage Drivers (in the lower left corner of the configuration screen) and choose Amazon Redshift and the JDBC Driver you downloaded earlier • At the end of the installation it will be ready to connect to a database – stop when you get this this step, as you have not yet configured a database to use! 2. Create the IAM role you will need to copy S3 objects to Redshift • Logon to the AWS console using your student account. Choose the AWS region assigned by your instructor. • Choose the IAM service • In the left navigation pane, choose Roles. • Choose Create role • In the AWS Service pane, choose Redshift. • Under Select your use case, choose Redshift - Customizable then choose Next: Permissions. • On the Attach permissions policies page, check the box next to AmazonS3ReadOnlyAccess, and then choose Next: Review. • For Role name, type a name for your role. For this lab, use myRedshiftRole, then choose Create Role. • Once the role is created, click on myRedshiftRole • Note the Role ARN—this is the Amazon Resource Name (ARN) for the role that you just created. You will need this later.
- 2. Page 2 of 8 3. Create a Redshift cluster • From the AWS Console, choose the Amazon Redshift service • Choose Launch Cluster • On the Cluster Details page, enter the following values and then choose Continue: o Cluster Identifier: type examplecluster. o Database Name: leave this box blank. Amazon Redshift will create a default database named dev. o Database Port: use the default port for Redshift, 5439 o Master User Name: type masteruser. You will use this username and password to connect to your database after the cluster is available. o Master User Password and Confirm Password: type a password for the master user account. Be sure to follow the rules for passwords. Don’t forget your password (!), and choose Continue • Create a single-node cluster using dc2.large and choose Continue • On the Additional Configuration page, use the default VPC and the default Security Group. Leave other settings on their defaults. o For AvailableRoles, choose myRedshiftRole and then choose Continue. • On the Review page, double-check your choices and choose Launch Cluster. Choose Close to return to the Clusters dashboard. 4. Authorize your access to the Redshift cluster, by adding a rule to your Security Group • On the Clusters dashboard, click on examplecluster. • Scroll down to find your VPC security groups. Click on your active security group. • On the Security Group pane, click on Inbound • Choose Edit, then Add Rule • Assign a Type of Redshift, which should automatically set the Protocol to TCP and the Port Range to 5439. • Assign a Source of Custom and set the CIDR block to 0.0.0.0/0. Choose Save. [Note: this allows access to your
- 3. Page 3 of 8 Redshift cluster from any computer on the Internet. Never do this in a production environment!!!] 5. Connect to your Redshift cluster using SQL Workbench/J • From the AWS Console, choose the Amazon Redshift service, then choose Clusters and click on examplecluster • Scroll down to the JDBC URL. This is your connection string. Copy it. It should look something like: jdbc:redshift://examplecluster.cdkituczqepk. us-west-2.redshift.amazonaws.com:5439/dev • Open SQL Workbench/J. Choose File, and then choose Connect window. Choose Create a new connection profile. • In the New profile text box, type a name for the profile. • In the Driver box, choose Amazon Redshift • In the URL box, paste the connection string you copied earlier. • In the Username box, type masteruser • In the Password box, type the password you chose when you created the Redshift cluster • IMPORTANT: be sure to click to Autocommit box • Choose Test. If there are any error messages, do what you need to fix them. If the test succeeds, choose OK.
- 4. Page 4 of 8 Load data and run queries • Copy and execute the following create table statements to create tables in the dev database. create table users( userid integer not null distkey sortkey, username char(8), firstname varchar(30), lastname varchar(30), city varchar(30), state char(2), email varchar(100), phone char(14), likesports boolean, liketheatre boolean, likeconcerts boolean, likejazz boolean, likeclassical boolean, likeopera boolean, likerock boolean, likevegas boolean, likebroadway boolean, likemusicals boolean); create table venue( venueid smallint not null distkey sortkey, venuename varchar(100), venuecity varchar(30), venuestate char(2), venueseats integer); create table category( catid smallint not null distkey sortkey, catgroup varchar(10), catname varchar(10), catdesc varchar(50)); create table date( dateid smallint not null distkey sortkey, caldate date not null, day character(3) not null, week smallint not null, month character(5) not null, qtr character(5) not null, year smallint not null, holiday boolean default('N'));
- 5. Page 5 of 8 create table event( eventid integer not null distkey, venueid smallint not null, catid smallint not null, dateid smallint not null sortkey, eventname varchar(200), starttime timestamp); create table listing( listid integer not null distkey, sellerid integer not null, eventid integer not null, dateid smallint not null sortkey, numtickets smallint not null, priceperticket decimal(8,2), totalprice decimal(8,2), listtime timestamp); create table sales( salesid integer not null, listid integer not null distkey, sellerid integer not null, buyerid integer not null, eventid integer not null, dateid smallint not null sortkey, qtysold smallint not null, pricepaid decimal(8,2), commission decimal(8,2), saletime timestamp); • Get the role ARN for myRedshiftRole (you created this earlier) and copy it. It should look something like: arn:aws:iam::011592912233:role/myRedshiftRole
- 6. Page 6 of 8 • Run these COPY commands to load data into your Redshift cluster. For each command, replace the text in <red> with your ARN. copy users from 's3://awssampledbuswest2/tickit/allusers_pipe.txt' credentials 'aws_iam_role=<iam-role-arn>' delimiter '|' region 'us-west-2'; copy venue from 's3://awssampledbuswest2/tickit/venue_pipe.txt' credentials 'aws_iam_role=<iam-role-arn>' delimiter '|' region 'us-west-2'; copy category from 's3://awssampledbuswest2/tickit/category_pipe.txt' credentials 'aws_iam_role=<iam-role-arn>' delimiter '|' region 'us-west-2'; copy date from 's3://awssampledbuswest2/tickit/date2008_pipe.txt' credentials 'aws_iam_role=<iam-role-arn>' delimiter '|' region 'us-west-2'; copy event from 's3://awssampledbuswest2/tickit/allevents_pipe.txt' credentials 'aws_iam_role=<iam-role-arn>' delimiter '|' timeformat 'YYYY-MM-DD HH:MI:SS' region 'us-west-2'; copy listing from 's3://awssampledbuswest2/tickit/listings_pipe.txt' credentials 'aws_iam_role=<iam-role-arn>' delimiter '|' region 'us-west-2'; copy sales from 's3://awssampledbuswest2/tickit/sales_tab.txt' credentials 'aws_iam_role=<iam-role-arn>'
- 7. Page 7 of 8 delimiter 't' timeformat 'MM/DD/YYYY HH:MI:SS' region 'us-west-2'; • Run some queries: -- Get definition for the sales table. SELECT * FROM pg_table_def WHERE tablename = 'sales'; -- Find total sales on a given calendar date. SELECT sum(qtysold) FROM sales, date WHERE sales.dateid = date.dateid AND caldate = '2008-01-05'; -- Find top 10 buyers by quantity. SELECT firstname, lastname, total_quantity FROM (SELECT buyerid, sum(qtysold) total_quantity FROM sales GROUP BY buyerid ORDER BY total_quantity desc limit 10) Q, users WHERE Q.buyerid = userid ORDER BY Q.total_quantity desc; -- Find events in the 99.9 percentile in terms of all time gross sales. SELECT eventname, total_price FROM (SELECT eventid, total_price, ntile(1000) over(order by total_price desc) as percentile FROM (SELECT eventid, sum(pricepaid) total_price FROM sales GROUP BY eventid)) Q, event E WHERE Q.eventid = E.eventid AND percentile = 1 ORDER BY total_price desc; • Explore the metrics in the Redshift console, especially those in the Query tab.
- 8. Page 8 of 8