Photoshop techniques.lightning effect.by Yapa Wijeratne
•
0 gostou•314 visualizações

Do you like to make lightning effect in your photos? This document simply explains how to make that with photoshop.

Recomendados
Mais conteúdo relacionado
Mais de Yapa
Mais de Yapa (20)
Último
Último (20)
Photoshop techniques.lightning effect.by Yapa Wijeratne
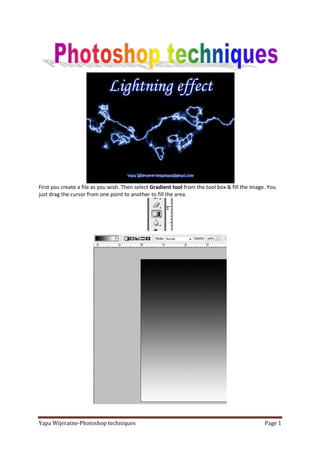
- 1. First you create a file as you wish. Then select Gradient tool from the tool box & fill the image. You just drag the cursor from one point to another to fill the area. Yapa Wijeratne-Photoshop techniques Page 1
- 2. Here I used black color but you may select any color. Then in go to the menu Filters > Render > Different clouds Then you ‘ll see your image like this. As we don’t wish in this way, we select inverse of this. Therefore you can simply click Ctrl+I or Image > Adjustments > Invert Yapa Wijeratne-Photoshop techniques Page 2
- 3. Then image changes to a dark one. Lightning will be on this image. Then go to Image > Adjustments > Levels Change the values in your way to best fit for your image. Here are my values. Now go Image > Adjustments > Hue/Saturation in menu bar. You can obtain desired color by altering the values in the dialog box, but remember to check the colorize option. Yapa Wijeratne-Photoshop techniques Page 3
- 4. This is your lightning image. You can enhance this by adding few layers & changing blending modes. Like this. Yapa Wijeratne-Photoshop techniques Page 4