
Recomendados
Recomendados
Mais conteúdo relacionado
Mais procurados
Mais procurados (18)
Destaque
Destaque (18)
Semelhante a A Guide to your Tagadab Shared Hosting Control Panel
Semelhante a A Guide to your Tagadab Shared Hosting Control Panel (20)
Mais de webhostingguy
Mais de webhostingguy (20)
A Guide to your Tagadab Shared Hosting Control Panel
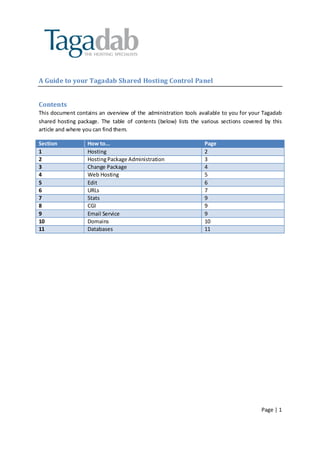
- 1. A Guide to your Tagadab Shared Hosting Control Panel Contents This document contains an overview of the administration tools available to you for your Tagadab shared hosting package. The table of contents (below) lists the various sections covered by this article and where you can find them. Section How to... Page 1 Hosting 2 2 Hosting Package Administration 3 3 Change Package 4 4 Web Hosting 5 5 Edit 6 6 URLs 7 7 Stats 9 8 CGI 9 9 Email Service 9 10 Domains 10 11 Databases 11 Page | 1
- 2. Hosting This page shows you a list of all of the Shared Hosting products you have with Tagadab. From here you can either: 1. Go to our main website to buy more shared hosting products 2. Click the ‘(settings)’ link to access the controls for a particular package 1 2 Page | 2
- 3. Hosting Package Administration Clicking the ‘(settings)’ link on the main Hosting page will take you the ‘Hosting Package Administration’ page. From this page you can alter settings relating to one of your hosting packages. The primary purpose of this page is to provide you with information about what function the menu links serve. At the bottom of the page you will also see a list of the domain names associated with this hosting package, and a list of the DNS names for a variety of services (for example you will see the names you can use for incoming and outgoing mail servers). Clicking a link from the menu on the left will allow you to administer that particular aspect of your hosting package. Page | 3
- 4. Change Package Using this page you can upgrade your shared hosting package. It is not possible to ‘downgrade’ your package. To upgrade your package, select the desired package and billing frequency and click the ‘Generate Quote’ link. You will then be presented with a quote for the upgrade and will be asked to confirm your payment method. Once you confirm the upgrade, you will be billed and our systems will automatically upgrade your package. This upgrade should be non-destructive (i.e. none of your files and settings will be deleted or altered) but we recommend that you make a full backup of your website and any e-mail accounts/mySQL databases you might have before proceeding with any upgrade. Page | 4
- 5. Web Hosting This page summarises the features of your hosting package, and includes a link to a placeholder URL for your website that can be used until the DNS for your actual domain has propagated across the Internet. (i.e. if you have transferred your domain to Tagadab and the DNS for that domain still points to your old ISP, you can still use the placeholder domain to upload your website files to and view your site). Page | 5
- 6. Edit The ‘Edit’ page allows you to enable or disable FTP access to your site, to view your FTP username and to change your FTP password. To enable/disable FTP for your site check or uncheck the relevant box and click the ‘submit’ link at the bottom of the page. To change your FTP password, delete the current password, enter your desired password (please make this a strong password, using a mixture of lower and upper case letters, numbers and symbols) and click the ‘submit’ link at the bottom of the page. Page | 6
- 7. URLs This page allows you to add and delete sub-domains and redirects for your website. At the bottom of the page you will see your existing redirects and sub-domains which can be deleted by clicking the appropriate link. To create a new sub-domain you need simply enter the name for this domain into the URL field (this name should just be what you want to appear before .<your domain> i.e. to create a sub-domain with the form ‘forum.tagadab.com’ you would simply enter ‘forum’) and click the ‘submit’ link. To add a redirect, click the ‘Add Web Redirect’ link near the top of the page. You will then see the page below which explains what the two types of redirects are. After reading the explanatory text you can use the fields at the bottom of the page to create the redirect you need. Page | 7
- 8. Page | 8
- 9. Stats This page simply lists the URL, username and password necessary for you to access your AWstats service. CGI This page lists several example CGI scripts that you may find useful for your website. E-mail Service Full details on configuring e-mail accounts for your shared hosting package can be found at: http://www.tagadab.com/support_pdf/hosting_04.pdf Page | 9
- 10. Domains This page allows you to configure your hosting package to accept traffic from external domains hosted either with Tagadab or with an external ISP. This allows you to have several domains, all pointing to the same web space. You can also access DNS controls for any Tagadab domain you have associated with this package. To configure your package to accept traffic from an external domain, enter the domain name you wish to associate with this hosting package in the ‘domain name’ field, select check boxes as appropriate to send either webhosting or e-mail services (or both) to this package and check the box to use our DNS servers ONLY if you do not wish to use your current host’s DNS controls to point your external domain to your Tagadab package. If you do decide to use our DNS servers, you will need to get your current Domain Registrar to update your domain’s name servers to: ns0.tagadab.com ns1.tagadab.com Once your current Registrar has updated these details (a process that generally takes 24 hours), all of the selected traffic to the external domain will be directed to your Tagadab hosting package. Page | 10
- 11. You can also edit the DNS zone of your Tagadab domain(s). Simply select the ‘Edit DNS records’ link in the table at the bottom of the page. For more information Domain Administration, please see this ‘how to...’ guide: http://www.tagadab.com/support_pdf/hosting_03.pdf Databases This page allows you to create, backup and delete the mySQL databases associated with your package. To create a new database, enter a database name (this will have to be a unique name and so you may have to add some numbers onto the end of the name you want), a strong password and click ‘submit’. You will see the database appear below in the ‘existing databases’ section. Once the database has been created, you will see an ‘admin’ link appear in the ‘phpMyAdmin’ column of the table and you will be able to access a GUI to administer the content of the MySQL database by clicking on this link. To delete or backup an existing database, click the appropriate link in the table. Page | 11