Recomendados

Recomendados
Mais conteúdo relacionado
Mais procurados
Mais procurados (20)
Destaque
Semelhante a Create Spine Labels in Word
Semelhante a Create Spine Labels in Word (20)
Mais de Marion Napier
Mais de Marion Napier (13)
Último
Último (20)
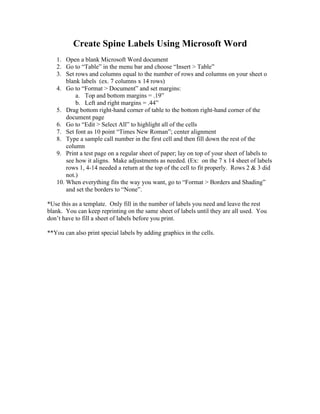
Create Spine Labels in Word
- 1. Create Spine Labels Using Microsoft Word 1. Open a blank Microsoft Word document 2. Go to “Table” in the menu bar and choose “Insert > Table” 3. Set rows and columns equal to the number of rows and columns on your sheet o blank labels (ex. 7 columns x 14 rows) 4. Go to “Format > Document” and set margins: a. Top and bottom margins = .19” b. Left and right margins = .44” 5. Drag bottom right-hand corner of table to the bottom right-hand corner of the document page 6. Go to “Edit > Select All” to highlight all of the cells 7. Set font as 10 point “Times New Roman”; center alignment 8. Type a sample call number in the first cell and then fill down the rest of the column 9. Print a test page on a regular sheet of paper; lay on top of your sheet of labels to see how it aligns. Make adjustments as needed. (Ex: on the 7 x 14 sheet of labels rows 1, 4-14 needed a return at the top of the cell to fit properly. Rows 2 & 3 did not.) 10. When everything fits the way you want, go to “Format > Borders and Shading” and set the borders to “None”. *Use this as a template. Only fill in the number of labels you need and leave the rest blank. You can keep reprinting on the same sheet of labels until they are all used. You don’t have to fill a sheet of labels before you print. **You can also print special labels by adding graphics in the cells.