How to allow users to access only selected web sites (domain) and block all others in version 10
1. How To - Allow users to access only selected web sites (domain) and block all others
in Version 10:
Issue: How to allow users to access only selected web sites (domain) and blocks all
others.
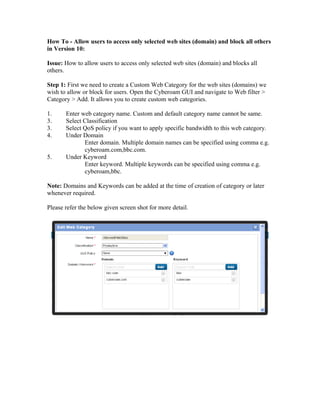
Step 1: First we need to create a Custom Web Category for the web sites (domains) we
wish to allow or block for users. Open the Cyberoam GUI and navigate to Web filter >
Category > Add. It allows you to create custom web categories.
1. Enter web category name. Custom and default category name cannot be same.
3. Select Classification
3. Select QoS policy if you want to apply specific bandwidth to this web category.
4. Under Domain
Enter domain. Multiple domain names can be specified using comma e.g.
cyberoam.com,bbc.com.
5. Under Keyword
Enter keyword. Multiple keywords can be specified using comma e.g.
cyberoam,bbc.
Note: Domains and Keywords can be added at the time of creation of category or later
whenever required.
Please refer the below given screen shot for more detail.
2. Step 2: Create a Web Filter Policy and allow/add this Custom Web Category.
In the Cyberoam GUI, navigate to:
1. Web filter > Policy > Add page allows you to create custom Web Filter Policy. Enter
policy name. Duplicate names are not allowed.
2. Select “Deny All” Template based on which you want to create new policy because
we only wish to allow our Custom Web Category. After creation you can always
customize the category restrictions according to the requirement.
Select:
Allow All – Allows access to all the categories except the specified categories.
Deny All– Allows denies access to all the categories except the specified categories.
3. Enter policy description.
4. To apply HTTPS Based Categorization, you need to select action “Allow or Deny”
for HTTPS while adding that custom web category in Web Filter Policy.
5. Enable Reporting: If “Unchecked”, it would bypass reporting for this Internet access
policy. Internet usage reports will not include access details of all the users to whom
this policy will be applied. “Check” Enable Reporting to include access details of all
the users in Internet usage reports to whom this policy is applied.
3. 7. Click on Add button to add the custom web category. Select the Custom Web
Category created for allowed websites and select the Strategy as ‘Allow’ in both
HTTP and HTTPS action and select the Schedule as ‘All the Time’. Click on Add to
add this Web Category and Click on “OK” button to save this Web Filter Policy.
8. Similarly, we can add more category by clicking ‘Add’ button as shown in the below
given screen shot.
9. We can apply this policy to User, Group or in Firewall Rule. This would allow users
to access only two websites which are specified in the Custom Web Category.
Note: When we select the Policy Type as DENY ALL template in Web Filter Policy, it
would only allow the HTTP based traffic, which means it would only allow traffic which
is running on port 80. So if there are application which requires login (running on
HTTPS), the Deny policy would not allow you to login with when you select deny all
template in Web Filter Policy. For Example, if we include the hotmail.com in the Internet
Access Policy with the Deny template, it would allow you to open the hotmail.com
website but it would not allow you to login to the hotmail.com as it is running on secure
port (HTTPS).
To allow secure web site in IAP, we need to create a Web Filter Policy with the
Policy Type as “Allow All” template. In the allow policy type, we need to deny all
the Web Categories except the categories we wish to allow. Please, find attached
snapshot for more detail as below: