
Recomendados
Mais conteúdo relacionado
Mais procurados
Mais procurados (20)
Destaque
Semelhante a Guide to create your blog and uploading files.
Semelhante a Guide to create your blog and uploading files. (20)
Mais de Springwood High School Media
Mais de Springwood High School Media (20)
Último
Último (20)
Guide to create your blog and uploading files.
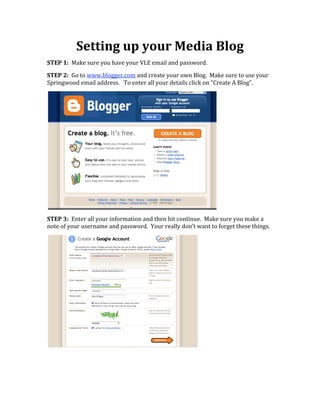
- 1. Setting up your Media Blog STEP 1: Make sure you have your VLE email and password. STEP 2: Go to www.blogger.com and create your own Blog. Make sure to use your Springwood email address. To enter all your details click on “Create A Blog”. STEP 3: Enter all your information and then hit continue. Make sure you make a note of your username and password. Your really don’t want to forget these things.
- 2. Step 4: Name your blog and url, make sure you name it using something that will be easy for the Exam Board and myself to identify you. Step 5: Choose a template, it is best to choose one that really goes with the theme or colours you are planning to use in your production. If you are unsure of what to choose you can always change this template later on. STEP 6: Start blogging!! The main tab you will use here is “Posting”. This will allow you to put your work up and tell us a little something about it. There are also some other tabs for you to experiment with; Settings, Layout, and Monetise. This is where you go crazy and make your blog your own.
- 3. STEP 7: Inserting your assignments into your blog. For this part in the blog making you are going to have to signup for another service, once you get the hang of using it, your life in media will become much easier. The site is www.slideshare.net and click on ‘Sign up’ to create an account for yourself. This is really important because it will allow you to directly paste in your presentations and youtube videos without having viewers navigate to the external site. STEP 8: Enter all your info in here, again, make sure to keep a note of what your user name and password is. You will get another screen pop up for more details, you don’t necessarily have to put your full name up if you are not comfortable with that. It asks you for your blog, it is OK to put that in. Make sure you click on the legal agreement at the bottom and you’re ready to post your word documents and powerpoint presentations.
- 4. STEP 9: When you are complete with the personal details a screen like this should pop up. Press skip this a the bottom of the screen. STEP 10: You will then get a screen like this pop up. This is where you can begin to upload your files. If you click on bulk upload you can upload as many files as you want at once. If you just need to upload one file go to single upload. These options are found on the top light green/ blue coloured menu. STEP 11: Upload your file. This step is very simple, you can give a description if you like but this is not necessary as you should be giving a description of your work in your blog. Make sure to give your document a good title though.
- 5. STEP 12: Your file should upload completely within a minute or two depending on how large your file was. Keep refreshing your page until you get a little thumbnail of your file as seen below. Now click on your file. STEP 13: You will now be directed to your file. Here you must copy the text in the embed box which is found near the top right of your file. If you look below at mine, it startes with “<div style="width:477px”. You need to click on this and then copy it. STEP 14: Go back to your blog and create a new post based on the file you just uploaded. Click on edit html in your post window and paste that “embed” information in. You can then go back to compose. Underneath the file you can write in a description of your assignment or comments on it or anything that will give me or the examiner information as to why this document is relevant.
- 6. STEP 15: PUBLISH POST. It is important you click on this or you will loose everything you have just worked on. Then click on “View Post” and you’ll get to see your blog and post!!! Go to our homepage www.springwoodmedia.blogspot.com I will be putting up all our homework and deadlines here. So if you happen to loose a document you will be able to find it here. Also, on the ride side of the screen add yourself as a follower. I need to get everyone as a follower so I can keep a close eye on your work and give you feedback on your work here. Other things to keep in mind: • Your blog isn’t just for your assignments to be put up. You can also use this as a diary to track your progress and to comment on any changes that you have decided to make to your project. • You can create your own header in your blog. If you want to do this, and I recommend that you do. I can give you a quick tutorial on this to get you started. • Make sure you have a clear style going on in your blog. • Don’t be afraid to experiment, you may figure out something cool to share with the class. • You can also embed YouTube videos just like these documents, all you need to do is find your uploaded video and copy the “embed” information. Any videos that I upload can be found at http://www.youtube.com/user/springwoodmedia. • It is important to experiment with all technology available to you as a media student. The more you get comfortable with technology the easier it will be for you in the future.