SlideShare uma empresa Scribd logo
1 de 33
Baixar para ler offline
CompeGPS Team S.L.

                                                                                                http://www.compegps.com

                                                                                            http://support.compegps.com


8.2.5 Create and edit
8.2.5.1       Create a route

8.2.5.1.1      Create a route on the map

The fastest and easiest way of creating a route is from the routes editor in the navigation window,
on the map.
To obtain a correct route you will need a well calibrated map as a reference. Besides, if you want
the waypoints of the wished route to have information on the altitude of the ground, an elevations
map of the area in CDEM format must be loaded.
You may create the route with the following steps:
            1. Keep a long pressure on the point in the map where you wish to begin the route. A
               contextual menu will be displayed.
            2. In this menu, select New > Begin route here.


               In this moment, the menu will close and will go into the routes edit mode.
            3. On the map and with the stylus, create the points of the route (clicking on the spots
               where waypoints must be):
CompeGPS Team S.L.

                                                                                             http://www.compegps.com

                                                                                       http://support.compegps.com


               While editing, you may move the map by dragging it for adding waypoints in other
               spots in the map. The dragging movement won‟t add waypoints it will only shift the
               map. To include a waypoint you must click briefly.
               You may move the position of the created waypoints by selecting and dragging them
               (+info)
            4. Once you are satisfied with the route, enter the Contextual Menu of route (by means
               of a long click on the screen) and select Close Edit.
See the section edit a route to add new waypoints or modify the existing ones.

8.2.5.1.2      Create a route from the routes list

When you enter the routes list and you have selected a route or nothing is selected, a button to
create a new route will be displayed                 .
When pressing it, a new route file will be generated and you will be asked how to name it.

The file won‟t contain any waypoints and they will have to be added using the      button (+info)


8.2.5.2       Edit a route

8.2.5.2.1      Add waypoints to the route

You may add waypoints to the route from the routes list or directly on the map.
8.2.5.2.1.1      On the map


    1. Open the contextual menu on the route and select „Edit route‟
       In this moment the menu will close and will go into the routes edit mode.
    2. Select (by means of a short click) the waypoint after which you want to add a new
       waypoint.
CompeGPS Team S.L.

                                                                                                http://www.compegps.com

                                                                                            http://support.compegps.com


    3. Press on the spot in the map where you want to generate the new waypoint.


    4. Add as many waypoints as you wish.
       If you want to add waypoints in other places along the route, all you have to do is repeat
       step 2 and 3.
    5. Once you are satisfied with the route, enter the Contextual Menu of the route (by means
       of a long click on the screen) and select „Close Edit‟.
When entering the editor, the selected waypoint will be the last, so if you press on the map,
waypoints will be added to the last part of the route.
8.2.5.2.1.2   From the routes list


You may enter the „New Waypoint‟ function from the routes list, be it through the contextual menu

of the route or by clicking briefly on the name of the route and pressing the     button.
You will be able to select the position of the new waypoint in 5 ways:
         Present position: GPS position in which you are at the moment.
         Present destination: if you have selected a destination.
         Address: choose country, city, street and number based on the Vmap information.
         By map: a window will open so you can place the waypoint on the map.
         Waypoint: it lets you copy a waypoint contained in any available waypoints file.
CompeGPS Team S.L.

                                                                                             http://www.compegps.com

                                                                                         http://support.compegps.com


8.2.5.2.2     Delete waypoints of the route

You may delete a waypoint from the routes list or directly from the map. To do so, open the
contextual menu on it and select „delete waypoint‟.

8.2.5.2.3     Move the position of the waypoints of the route

You may modify the position of any waypoint on the map or by introducing its coordinates:
8.2.5.2.3.1    On the map
    1. Open the contextual menu on your route and select „Edit route‟
       In this moment, the menu will close and will go into the routes selection mode.
    2. Select the waypoint that you wish by means of a brief click.


    3. Drag it to the spot you want by keeping the pressure on it.


    4. To move another waypoint you must first select it and then drag it.
    5. Once you are satisfied with the route, enter the Contextual Menu of the route (by means
       of a long click on the screen) and select „Close Edit‟.
CompeGPS Team S.L.

                                                                                              http://www.compegps.com

                                                                                          http://support.compegps.com


If after selecting a waypoint you click briefly on the map, a new waypoint will be created just after
the selected one.
8.2.5.2.3.2      Introduce coordinates
In order to modify the coordinates of a waypoint, all you have to do is enter its properties window
and introduce the new value, checking that the datum and the projection are correct.

8.2.5.2.4      Change the order of the waypoints in the route

To move the added waypoint and approach it or move it further from the beginning of the route,
make a long click on the name of the waypoint and select the option „Move Up‟ or „Move Down‟
from the Contextual Menu.

8.2.5.2.5      Invert the route

To apply on a route the contrary sense to the one it originally had, open the contextual menu of
the route from the routes list and select Tools > Invert the route. This way the sense of the
route will be changed and it will begin at the end.

8.2.5.2.6      Convert a route into a track

If you wish to change a route into a track format, open the contextual menu of the route from the
routes list and select Tools > Change into a track.

8.2.5.3       Save

8.2.5.3.1      Save route

If you are satisfied with the work on your routes, you may save it by selecting the option Save
route from the contextual menu of the route on the map or routes list.
The modifications that you may have made will be saved directly overwriting the old file.


8.2.5.3.2      Save route as

If you wish to save the route under a different name, location (folder) or (*.RTE or *.GPX) formats,
you may select the option Save route As from the contextual menu of the route contained in the
routes list.
CompeGPS Team S.L.

                                                                                             http://www.compegps.com

                                                                                         http://support.compegps.com


8.2.6 Search loaded route on screen
To centre the screen on a route:

1. Enter Main Menu by clicking on
2. Select „Main Menu > Data> Routes
3. Click on a concrete waypoint and choose between:


          a. Press the          button.
          b. Enter the Contextual Menu of the waypoint (long click on the name or „Menu‟ button)
             and then click on „Zoom here‟.
     A window will open displaying the waypoint on screen with a possibility of zooming in or out.
4. To exit the window, you may choose between:

          Press           and return to the waypoints list.


          Press        and return to the navigation window keeping the focus you had on the
          zoom window.


8.2.7 Properties
8.2.7.1    Properties of a route
Different data of a loaded route can be checked (distance, area it encloses, maximum altitude,
etc.) and modify some of its parameters (real and pixel colours) from the window of route
properties.
This window can be entered in two ways:
          Contextual Menu of the route in the list
          Contextual Menu of the route on the map
In order to modify the editable parameters, click on them. The ones that can be edited will
display a keypad, figures and a colour palette. The ones that cannot be edited will be displayed
in grey.
8.2.7.2    Properties of a waypoint
You may enter the properties of a single waypoint from the routes list (by selecting it and pressing
the direct button or from the contextual menu) or also from the navigation screen (by opening the
contextual menu of the waypoint on the map).
The properties of the waypoints that are contained in a route are the same as the loose waypoints
(+info)


8.2.8 Route Graph
You can see a graph of the loaded route in two ways:
          From the routes list: By selecting the „graphs‟ option from the contextual menu of the
          route.
CompeGPS Team S.L.

                                                                                              http://www.compegps.com

                                                                                          http://support.compegps.com


Through the data fields: You may place the field „route graph‟ in any position in the data pages,
although it is recommended to use the space of the graph page to do it. (+info)


8.2.9 Activate a route (navigate)
You may activate (navigate) a route in three ways:
        Menu “Navigate…”
        Contextual Menu of the route within the routes list (long click on the route within the
        routes list). The routes list also features a direct access button to the navigation function


        Contextual menu of the route on the map (long click on the route on the map).
CompeGPS Team S.L.

                                                                                               http://www.compegps.com

                                                                                           http://support.compegps.com


Once activated, TwoNav will guide you towards the first waypoint along the route. When you
reach a waypoint along the route, you will be guided towards the next one, and so on until the
end of the route.
If you are in Off-road mode, a straight line will be displayed from your position to the next
waypoint.
If you are in On-road mode, TwoNav will try to automatically calculate the sub-route through the
streets in order to orientate you in detail with voice instructions.
8.2.10 Routes contextual menus
To open the contextual menu on an element, all you have to do is keep the pressure on it for one
second.
    1. Contextual menu of a route file within the routes list:
                Properties of the Route (+info)
                Save Route (+info)
                Save Route As… (+info)
                Close Route (+info)
                Rename file
                Delete file (+info)
                Graphs (+info)
                Zoom here (+info)
                Send to
                Tools (+info)
                New Waypoint (+info)
                Activate (+info)
    2. Contextual menu of a concrete waypoint within a route file or in the routes list:
                Properties (+info)
                Delete Waypoint (+info)
                Zoom here (+info)
                Send to
                Navigate… (+info)
                Move Up (+info)
                Move Down (+info)


    3. Contextual menu of a route on the map:


                New…
CompeGPS Team S.L.

                                                            http://www.compegps.com

                                                        http://support.compegps.com


                  Waypoint here (+ info)
                  Begin route here (+ info)
                  Begin track here (+ info)
           Properties of the Route (+info)
           Save Route (+info)
           Close Route (+info)
           Edit Route (+info)
           Activate (+info)


4. Edit contextual menu of a route on the map:


           Close edit (+info)
           Delete Point (+info)
           New…
                  Waypoint here (+ info)
                  Begin route here (+ info)
                  Begin track here (+ info)
           Properties of the Route (+info)
           Save Route (+info)
           Close Route (+info)
           Edit Route (+info)
           Activate (+info)


5. Contextual menu of a concrete waypoint on the map:


           New… (+info)
                      Waypoint here (+ info)
                      Begin route here (+ info)
                      Begin track here (+ info)
           Properties (+info)
           Delete Waypoint (+info)
           Navigate… (+info)
CompeGPS Team S.L.

                                                                                             http://www.compegps.com

                                                                                         http://support.compegps.com


   8.3    Tracks
8.3.1 What is a track?
A track is a group of points ordered by time, where each point contains information on the
position, time and date, coordinates and, in most cases, altitudes.
Tracks can be split into 2 and 3 dimensional ones, depending on whether they have or not the
altitudes of the track points. For further information, check Track tools.
Whenever we save the tracks in TwoNav, besides the track points, a series of data is saved that
can be modified or inserted from the device, such as the name of the track, remarks, colour of
display, among others. For further information check Track properties.


8.3.2 Supported formats
TwoNav can open directly next track formats:
         *.TRK
         *.IGC
         *.PLT
         *.GPX
More track formats can be imported and converted to these ones from CompeGPS Land/Air.
8.3.3 Record a track while navigating
During navigation, TwoNav will record the track of your outing.
This recording will be saved by default in the „TwoNavData/Data‟ folder in *TRK format with a
name based on the date, (YYYY-MM-DD)*.
You may check if track points are being recorded from the „Status‟ page.


         By pressing the „record‟ button, the track points will be saved.
         By pressing the „pause‟ button, the track points won‟t be saved.
If you pause the track recording and retake it later, the points that open after the pause will be
part of the same track leg. This means that there will only be an open track, but made up of the
different legs (+info on legs).
If you wish to save the track that is currently being recorded and go on recording into a new file,
all you have to do is close the track currently open. Once closed, a new track will be automatically
created in which the new track points will be recorded.
You may set the recording parameters from „Main menu > Settings > Off-road >Tracklog‟ (+info).
CompeGPS Team S.L.

                                                                                              http://www.compegps.com

                                                                                          http://support.compegps.com


*Note: If, in the same day, you have made more than one track, the names will be distinguished
by a number at the end that identifies the order in which they were created, (e.g. 2008-12-15-
01.TRK, 2008-12-15-02.TRK, …).
You may rename both the tracks previously saved as the track currently being recorded by using
the track properties or save as.


8.3.4 Track list
                                   “Main menu > Data> Tracks”
Management of tracks is centred in the track list, although it is possible to carry out many actions
directly from the navigation screen through the contextual menu.
By entering the tracks list you will be able to see all the available tracks in the „TwoNavData/Data‟
folder.
See the Data section to get to know about the operation of the general lists.
If you have selected a track, the buttons at the bottom of the screen will let you enter the most
important functions to carry out on that element:


From left to right:
         Enter the track properties window
         See the track graph
         Zoom here
         Navigate (activate)
By means of a long click on any open track, you will enter the Contextual Menu with all the
available functionalities for this element.
When the list of recorded tracks becomes too long, they will automatically be grouped in folders
selected by year and, inside them, by month of creation (e.g. all the tracks created in 2009 will be
found in that folder and inside 2009-1, all the tracks created in January 2009).
CompeGPS Team S.L.

                                                                                                http://www.compegps.com

                                                                                            http://support.compegps.com


8.3.5 Open and close
8.3.5.1     Open track
From the tracks list, by clicking on the name of one of the available folders, it will open. You will
know it is open because it will be visible at the top of the list and with the left square marked      .


8.3.5.2     Close track

Press on the left check mark        of the open track in order to close it.
The folder will change position from the first place on the list and will go back to its alphabetical
position among the other unloaded files.
You may also enter this function from the contextual menu, from where you will also be able to
delete files from the memory completely.


8.3.6 Create and edit
8.3.6.1     Create a track
The way to create a track is from the tracks editor from the navigation window on the map.
To obtain a correct track, you must have a well calibrated map as a reference. Besides, if you
want the waypoints of the created track to have information on the altitude of the ground, a map
of the elevations of the area in CDEM format must be loaded.
You may create the track following these steps:
          1. By means of a long click on the point of the map where you want to begin the track. A
             contextual menu will be displayed.
CompeGPS Team S.L.

                                                                                               http://www.compegps.com

                                                                                           http://support.compegps.com


       2. On this menu, select New > Begin new track here.


           In this moment, the menu will close and it will go into the tracks edit mode.
       3. On the map and with the stylus, start creating the points of the track (by pressing on
          the places where there should be points):


During editing, you may move the map by dragging it in order to add points in other parts of the
map. The dragging movement won‟t add points, it will just move the map. To add a point you
must click briefly.
You may move the position of the created waypoints by selecting and dragging them (+info)
CompeGPS Team S.L.

                                                                                              http://www.compegps.com

                                                                                          http://support.compegps.com


            4. Once you are satisfied with the track, enter the Contextual Menu of the track (by a
               long click on the screen) and select Close Edit.
See the edit track section to add new points or modify the existing ones.
Besides the „manually‟ created tracks, TwoNav will keep creating „automatically‟ the track of your
outing recording your position according to the settings of tracklog (+info on the recording of the
present track).
8.3.6.2      Edit track

8.3.6.2.1      Add points to a track

You may add points directly on the map:
    1. Open the contextual menu on the track and select „Edit the track‟.
       In this moment, the menu will close and it will go into the track editing mode.
    2. Select (by means of a short click) the point of the track after which you want to add a new
       point.


    3. Press on the spot in the map where you wish to generate the new point.


    4. Add as many points as you wish.
       If you want to add points in other spots in the track, all you have to do is repeat steps 2
       and 3.
CompeGPS Team S.L.

                                                                                               http://www.compegps.com

                                                                                           http://support.compegps.com


    5. Once you are satisfied with the track, enter the contextual menu (by means of a long click
       on the screen) and select Close Edit.
When entering the editor, the point of the selected track will be the last one, so if you press on the
map, points will be added to the last part of the track.

8.3.6.2.2     Delete points from track

    1. Activate the edit mode: long click on the track on the navigation screen (on the map) and
       then select „edit track‟.
    2. Open the contextual menu on the point you wish to delete and select „delete point‟.
    3. Delete as many points as you wish by repeating step 2 while you are in edit mode.
    4. Exit the tracks editor (long click on the screen and then select Close Edit)

8.3.6.2.3     Move the position of the track points

You may modify the position of the track points directly on the map or by introducing its
coordinates:
8.3.6.2.3.1    On the map
    1. Open the contextual menu on the track and select „Edit track‟
       In this moment, the menu will close and it will go into the routes edit mode.
    2. Select the point you wish to move by pressing briefly.


    3. Drag it to the place of your choice by keeping the pressure on it.
CompeGPS Team S.L.

                                                                                                http://www.compegps.com

                                                                                           http://support.compegps.com


    4. To move another point you must select it first (by pressing briefly) and then drag it.
    5. Once you are satisfied with the track, enter the contextual menu (by a long click on the
       screen) and then select Close Edit.
If, once selected a point, you click briefly on the map, a new track point will be created right after
the selected one.
8.3.6.2.3.2      Introduce coordinates
In order to modify the coordinates of a track point, all you have to do is enter its properties
window and introduce the new value, checking that the datum and projection are correct.
8.3.6.3       Track legs
TwoNav allows you to work with tracks fractioned in legs.

8.3.6.3.1      Create legs

8.3.6.3.1.1      Create legs on an existing track
You may split the track in two legs by opening the contextual menu on the point that divides the
two selected legs „legs > Change leg here‟.
In this moment, the leg closer to the end of the track will change colour to highlight the difference
between the two legs. The initial leg will remain the original colour of the track.
You may repeat this operation as many times as you want in order to get the amount of tracks
you need.
8.3.6.3.1.2      Create new legs on the present track
If during the recording of the present track you activate a pause from the status window, when
starting recording again, the new points will keep being recorded in the same file as before the
pause, but a new leg with the new points will be generated automatically. This way, you will be
able to make out easily the parts of the present leg and apply independent modifications on them.
If there is a distance from the moment you paused the recording of the track until you activated it
again, the empty space passed in this time will be visible on its display.
CompeGPS Team S.L.

                                                                                             http://www.compegps.com

                                                                                         http://support.compegps.com


8.3.6.3.2      Operations with legs

If you open the contextual menu on a leg of the track in the navigation window from the „legs‟
option, you will be able to enter the following functions:
            Leg properties: You may change the colour and thickness of the leg and add a note.
            Change leg (+info)
            Delete this leg: the points of this leg will be deleted from the track, leaving an empty
            space in its place.
            Save track as: You may save the track independently from the rest of the track. This
            way, a new track file will be created with just this leg.
8.3.6.4      Reverse track
Any track can be reversed so the order of its points is the opposite. This can be especially useful
if you have run a distance recording the track as you go and then you wish to go back along the
same way.
To reverse the track, all you have to do is open the contextual menu on it from the track list and
select „Tools > Reverse track‟.
8.3.6.5      Advanced track tools
From the track contextual menu in the tracks list, you can enter the „Tools‟ submenu, which
includes highly interesting secondary tools for concrete needs:
            Calculate the altitude of the ground of each point (Import altitudes): If you have 3D
            relief (CDEM) loaded, TwoNav may assign each point of the track its altitude considering
            the information of the relief.
            Delete stopped points from the beginning and the end (Del.strt/end points): The
            track omits the repetitive points from the beginning and the end, where you were stopped
            before and after making the track.
CompeGPS Team S.L.

                                                                                             http://www.compegps.com

                                                                                         http://support.compegps.com


            Reduce the number of points (Reduce num. points): By introducing the number of
            points, the track is drawn with the points keeping the shape of the track in the most
            possible faithful manner.
            Assign time and speed (Assign time/speed): By using this option you may determine a
            time for departure and a constant speed so TwoNav calculates the estimated time of
            arrival to each point in the track.
If a track does not contain time data, you cannot enter the play function of its contextual menu.
            Delete the aberrant points (Del. aberrant points): In case a point diverts excessively
            from the rest, it will be considered an error and deleted.
            Change the track into a route (Convert TRK to RTE): This option will change the track
            into a route. The program will ask you to introduce the number of waypoints you want the
            route to have. The new file of the route will be displayed on the „Main Menu > Data>
            Routes‟.
            Invert track: This function reverses the sense of the itinerary of the track, so if you
            decide to navigate it, it will be in reverse sense.


8.3.6.6      Save

8.3.6.6.1      Save track

When you are satisfied with your track, you may save it by selecting the option Save track from
the contextual menu of the track or track list.
The modifications that you have made will be directly saved overwriting the old file.
Note: The track being recorded as you go is saved automatically every 5 minutes. When closing
the system, a final saving of the present track will be saved.


8.3.6.6.2      Save track as

If you wish to save the track under another name, location (folder) or format (*.TRK, *.IGC or
*.GPX) you may select the option „Save track as‟ from the contextual menu of the track in the
tracks lists.


8.3.7 Search a loaded track on screen
To centre a track on the screen:

 1. Enter the Main Menu by pressing
 2. Select „Main Menu > Data> Tracks
 3. Click on the track and choose between:


            a. Press           button.
            b. Enter the Contextual Menu of the track (long click on its name or „Menu‟ button) and
               click on „Zoom here‟.
CompeGPS Team S.L.

                                                                                             http://www.compegps.com

                                                                                         http://support.compegps.com


     A window displaying the track on screen with the possibility of zooming in or out will open.
4. To exit the window you may choose between:

          Press          and return to the tracks list.


          Press        and return to the navigation window keeping the focus you had in the
          zoom window.


8.3.8 Properties
8.3.8.1    Track properties
The different data on a loaded track can be consulted (distance, area it encloses, maximum
altitude, etc.) and modify some of its parameters (colour, thickness, description…) from the
properties window of the track.


You may enter this window in 3 ways:

          Direct button      : brief click on the name of the track on the List and then press the
          button at the bottom of the list.
          Contextual menu of track in the list
          Contextual menu of the track in the map

Once inside it, you will be able to modify some parameters of the track and consult a great variet y
of data grouped by sections:
CompeGPS Team S.L.

                                                                                                 http://www.compegps.com

                                                                                             http://support.compegps.com


          General: Name of file (you may also change the track name from the contextual menu of
          the tracks list or by „save as‟), User name, Outing name, Notes on track.

          Date and time: Day, Departure time (first track point), Arrival time (last track point),
          Duration, Difference between local time and UTC (more or less hours in regards to GMT),
          Time stopped, Time moving.

          Track points: Number of points, Recording intervals (this value can be set from „Main
          Menu > Settings > Off-road > Tracklog‟), Extra data fields (additional data that the tracks
          have besides the coordinates, altitude and time).

          See: Thickness, real width of track and colour of the track line.

          GPS: GPS model, series number and if the track features a digital signature.

          Distances: Projected distance (it is the distance that has been covered on the horizontal,
          disregards the distance covered in altitude), Distance with altitudes (the real distance
          covered by outlining the orography of the ground), linear distance (distance on a straight
          line between the first and the last point of the track), Area (surface enclosed by the track).
          This last datum is achieved by closing the track with a straight line in case there are no
          closed tracks).

          Altitudes: Track with altitudes (if the track features the altitude datum), Maximum
          altitude, Minimum altitude, Departure altitude (at the track origin), Arrival altitude (at the
          last point), Gain from the departure (difference between the departure altitude and the
          maximum reached), Departure-arrival slope, Maximum slope (difference of altitude
          between the highest and lowest point of the track), Accumulated climb * (total of the
          different gains in altitude made during the track, i.e. what we have had to climb in reality),
          accumulated descent*, ( Max. vertical speed (climbing speed), Min. Vertical speed
          (descent speed), Max. Slope, Min. Slope.

          Speed: Medium speed and Maximum speed reached in the track.

          Energy: Mass (weight of the person tracking together with the vehicle, bicycle,
          motorbike, rucksack, etc.), Energy measured in Joules, Average power measured in vats
          (consumed along the whole track), Average power on climbs measured in vats
          (consumed during the track climbs).

*Only altitudes changes over 5 metres will be computed in properties, such as accumulated
climb/descent. This is in order to prevent the resulting fluctuations of the GPS error margin from
adding non real differences of level.

As a result, a track that begins and ends in the same place may have an „accumulated climb‟ that
does not match the „accumulated descent‟.

CompeGPS Land lets you modify the “minimum difference to accumulate difference of level” in
order to adjust it to your preferences in the track analysis.

8.3.8.2    Properties of a track point
You may enter the properties of a single point in the track from the navigation screen by opening
the contextual menu on the point in the map and selecting „edit track point‟.
CompeGPS Team S.L.

                                                                                               http://www.compegps.com

                                                                                           http://support.compegps.com


From the window that will open, you may enter:
        Icon: Choose the icon with which you wish to mark the position on this point of the track
        Description: You may include a note of your choice for this place.
        Coordinates: You may consult or modify the coordinates of the point.
        Day and date
        Associations: it associates image or sound files to your waypoints so they are displayed
        during navigation when reaching this point.


8.3.9 Track graph
You may visualize a graph of the loaded route in two ways:
        From the tracks list: By selecting the contextual menu option of the route or by selecting
        the route and pressing the       button.


Through the data fields: You may place the „route graph‟ file in any position within the data pages,
      however, it is recommended to use the space of the graph page for this end. (+info)
8.3.10 Activate a track (Navigate)
You may activate (navigate) a track in three ways:
        Menu “Navigate…”
        Contextual menu of the track in the tracks list (long click on the track in the tracks lists).

        The tracks list also features a direct access button to the navigation function.
        Contextual menu of the track on the map (long click on the track on the map).
Once activated, TwoNav will guide you along the track by using two tools:
CompeGPS Team S.L.

                                                                                             http://www.compegps.com

                                                                                         http://support.compegps.com


        GOTO arrow: In the „next event‟ space, an arrow will be displayed to indicate a direction
        tangent to the track. It means you can take the direction of this arrow as a reference to
        keep going your way.
       Note: If you are over 50 metres far from the track, the GOTO arrow will indicate the
       perpendicular to the track instead of the tangent. At this distance it will be considered that
       you are off the way that you should be following and that you must go back to it in the
       most direct possible way, i.e. perpendicularly.


Guide line: Your position will be joined to the track by means a perpendicular line between them.
When you are over 50 metres from the track, this line will turn red.
       Note: If the track you are following has over 100 points, the guide line will indicate the
       point closest to the track instead of the perpendicular.


8.3.11 Tracks contextual menu
To open the contextual menu on an element, keep the pressure on it for 1 second.
    1. Contextual menu of a track inside the tracks list:
               Track properties (+info)
               Close Track (+info)
               Delete file (+info)
               Close all except this one
               Save Track as… (+info)
               Rename file (+info)
               Graph window (+info)
CompeGPS Team S.L.

                                                                                      http://www.compegps.com

                                                                                  http://support.compegps.com


                Play (+info)
                Zoom here (+info)
                Edit the track (+info)
                Send to
                Tools (+info)
                Activate (+info)
    2. Contextual menu of a track on the map:
            New…
                   Waypoint here (+ info)
                   Begin route here (+ info)
                   Begin track here (+ info)
            Track properties (+info)
            Save Track (+info)
            Close Track (+info)
            Edit Track (+info)
            Edit Track point (+info)
            Activate (+info)
            Legs (+info)
                   Leg properties
                   Change leg here
                   Delete this leg
                   Save leg as
            Play Here (+info)


   8.4    Maps
TwoNav lets you manage a great variety of maps in an easy way.
You may get more maps to use with TwoNav in various ways, from buying them directly from our
web page, to calibrate paper maps with CompeGPS Land.
For further information go to www.compegps.com or www.twonav.com.


8.4.1 Supported formats
TwoNav can open directly next map formats:
         *.RMAP (CompeGPS Raster map format)
         *.ECW (Raster)
CompeGPS Team S.L.

                                                                                               http://www.compegps.com

                                                                                           http://support.compegps.com


         *.VMAP/*MPVF (CompeGPS vector map format)
         *.IMP (calibration file requiring image file)
         *.MAP (calibration file requiring image file)
         *.CDEM (3D relief)
More map formats can be imported and converted to these ones from CompeGPS Land/Air.
8.4.2 Types of maps
There exist 3 different basic types of maps:
         Vmap: Road maps with which the On-road* works.
         Topo: Topographic maps from CompeGPS.
         CDEM relieves: Elevations maps whose only information is the altitude of the grounds.
         When having a relief loaded we may enter the 3D+ and give altitude to the created
         waypoints, routes and tracks.
Besides these three types of CompeGPS own ones, you may use other types of maps that you
may get by other means (air images, topographic maps from other sources, scanned and
calibrated paper maps, etc.).
*If the TwoNav memory does not contain any other road map, the On-road mode won‟t be
activated.
Enter the Map Shop in www.twonav.com.
8.4.3 Maps lists
Management of the maps is centralized in the maps list, however, it is also possible to carry out
many other actions directly from the navigation screen by means of the contextual menu.
See the Data section to learn the general operation of the lists.
By entering the maps list you will be able to see all the maps available in the „TwoNavData/Maps‟
folder for your present position.
If you wish to see the complete list of maps (not just the ones of the present position), activate the
„see all‟ button.


Each map has an icon to indicate which type of map it is:


      Vectorial

      Raster


      Relief (CDEM)


      If a map is present in maps folder but it is not activated (license required), a padlock will be
added to the icon.
If you have selected a map, the buttons at the bottom of the screen will let you enter the most
important functionalities this element has:
CompeGPS Team S.L.

                                                                                               http://www.compegps.com

                                                                                           http://support.compegps.com


From left to right:
          See all/See available ones for present position
          Properties
          Zoom here
          Close
8.4.4 Open and close
8.4.4.1    Automaps
By activating this position, TwoNav will try to load the best map in each moment.
          In On-road mode, the V-map (road map) of the area will be loaded and the rest will be
          closed.
          In Off-road mode, the map with the best resolution (not a V-map) will be loaded and any
          other Vmap will close.
If you want to keep the loaded maps when changing from one mode to another, deactivate the
„Automaps‟ function.
8.4.4.2    Open map
From the maps list, by pressing on the name of one of the available files, it will open. You will
know it is open because it will be placed on the top of the list with the left square marked      .


8.4.4.3    Close map

Press on the left check mark        of the open map for closing it.
The file will leave its position on the first places of the list and will return to its alphabetical
position among the other unloaded files.
You may also enter this function from the contextual menu (in the maps list or on the navigation
window) and pressing the „close‟ (X) button from the bottom of the list.
8.4.5 Search a loaded map on screen
To centre a map on the screen:

1. Enter the Main Menu by pressing
2. Select „Main Menu > Data > Maps
3. Click on the map and choose between:


          a. Press the         button
          b. Enter the Contextual Menu of the map (long click on the name or on the „Menu‟
             button) and click on „Zoom here‟.
CompeGPS Team S.L.

                                                                                              http://www.compegps.com

                                                                                          http://support.compegps.com


     A window display in the track on the screen will open with the possibility of zooming in or out.
4. To exit the window you may choose between:

         Press          and it will return to the tracks list.


         Press        and return to the navigation window keeping the focus you had in the
         zoom window.
8.4.6 Properties
You can check different data of a loaded map (description, map type, resolution, extension, etc.)
from the properties window of the map.
You may enter this window in three ways:

        Direct button      : brief click on the name of the map in the list and press the button at
        the bottom of the list.
        Contextual Menu of the map in the list
        Contextual Menu of the map in the navigation window
8.4.7 Multi-Maps
TwoNav lets you load more than one map at the same time. If you have two maps for the same
area (e.g. an orthophoto and a topographic map) and load them at the same time, one of them
will hide the other. The „Multi-Maps‟ function lets you set this maps superposition by selecting the
map you wish to be placed below or above the other.
To enter this tool, choose the „Multi-Maps‟ from the Contextual Menu of the map you wish to
manage („Main Menu > Data > Maps‟) and select „Bring to the front‟ or „Send back‟ as you prefer.
8.4.8   Contextual menu of the map
To open the contextual menu on an element, all you have to do is keep the pressure on it for 1
second.
1. Contextual menu of the map on the navigation screen:


        New…
            o    Waypoint here (+ info)
            o    Begin route here (+ info)
            o    Begin track here (+ info)
         Stop Nav.: You may stop your present navigation at any moment by this direct access
         alternative to „menu > navigate to > Stop nav.‟.
         Navigate here (+ info)
         Properties of the map (+ info)
         Close map (name of map) (+ info)
         Multi-map, Advanced...: (+ info).
CompeGPS Team S.L.

                                                                                            http://www.compegps.com

                                                                                        http://support.compegps.com


2. Contextual menu of the map in the maps list:
         Properties of the map (+ info)
         Close map (+ info)
         Zoom here (+ info)
         Multi-Maps, Advanced (+ info)


9 “Simulation” and “Zoom to...”

   9.1    Simulation
TwoNav lets you see a representation of the itinerary you are going to follow. It will be displayed
with the position icon in green to distinguish it from the „present position‟ icon in red.
It features two kinds of simulations:
         A->B (only in „On-road‟ mode): From „Main menu > Discover > Simulate‟, you may
         choose two points (POIs, addresses, favourites…) so it shows you the proposed route to
         go from point A to point B.


         Reproduce track: Open the Contextual Menu in the tracks list or with the track on the
         map and select „Play‟. An animation of the itinerary will be displayed. During the
         animation, the simulated position will be shown with a green arrow and will become the
         prevailing one, so the position will be centred on it and the movement statistics will be
         related to it.
CompeGPS Team S.L.

                                                                                             http://www.compegps.com

                                                                                         http://support.compegps.com


To stop the simulation, you may go to „Main menu > Discover > Stop sim.‟


   9.2    Zoom to…
The option „Zoom to…‟ allows you to carry out a quick pre-visualization of the element you wish to
see on the map*. There are a great number of elements to visualize:
         Address: if you have loaded a routable map, with this tool you will be able to see the
         address chosen by you and it will appear centred on the screen.


         POI: if you have loaded a routable map, you will be able to carry out a quick visualization
         of the Points of Interest (POIs), such as petrol stations theatres, etc.


         Favourites: you may establish places on the map as favourite points, as for example
         your home. If you have saved places as favourites, you will be able to zoom on them in
         order to see them centred on the map.


         Data: You will also be able to see waypoints, routes and tracks on the map. Although
         you do not need to have loaded the map on which this data was created, as pre-
         visualization is based on the geographical coordinates, it is interesting to „zoom to…‟
         these element on the map for you to see the details of the ground where they were made.


         Coordinates: TwoNav allows you to quickly visualize concrete coordinates introduced by
         you. Remember that to visualize what these coordinates correspond to, you must have
         loaded a map of that area.
CompeGPS Team S.L.

                                                                                            http://www.compegps.com

                                                                                        http://support.compegps.com


*Note: the option „Zoom to‟ shows you the element that you want to see in a window solely for
this purpose that is not the same as the navigation window. However, when you carry out a
„Zoom to…‟ an element, when returning to the navigation window, the focus will still be on this
element. To re-centre the focus on its present position you may use the „Re-centre‟ tools.
10 Support
If you have any kind of doubt or problem with the system, you may check the support sections of
the CompeGPS (www.compegps.com) or TwoNav (www.twonav.com) pages.
To make personalized enquiries you may use the „on-line‟ CompeGPS support system by
entering the http://support.compegps.com space.


11 Limited warranty
CompeGPS Team SL guarantees that this product is free from defects in material or
     workmanship for two years from the date of purchase.
During warranty period, CompeGPS Team SL commits to repair any defective product or replace
it for a functional one, without guarantee about preservation of any data that may be stored in it.
CompeGPS Team SL does not guarantee the quality of the included maps, being free of any
responsibility that may be derived from them.
Wear and tear effects that may happen in some elements (like screen, buttons, rubber caps or
moving parts) are out of guarantee.
Present warranty will be cancelled if any of the next circumstances happen:
1- Rough handling in any form: strong hits, torsions, compressions, etc.
2- Inappropriate exposure to water (i.e. any type of exposition if rubber caps are incorrectly
adjusted or immersions even with caps correctly placed), dust, extreme thermal conditions,
corrosion, oxidation or chemical substances
3- Manipulation of the product by non-allowed devices or applications, particularly if trying to
install any other software than the authorized (supplied exclusively in CompeGPS Team SL web
spaces www.compegps.com and www.twonav.com ) or using illegal activation keys not provided
by CompeGPS Team SL.
4- Disassembling, modifying or repairing when not performed by CompeGPS Team SL technical
service.
CompeGPS Team SL will not be liable for any damage derived from the use or bad use of the
product, being free of any obligation if any accident occurs when the device is used in any mean
of transport.
Any demand must be performed contacting with CompeGPS Team SL by one of these ways:
1- Through the reseller that made the sale of the product.
2- By the CompeGPS‟ on-line free support service, accessing from http://support.compegps.com
web page.
Once the contact has been confirmed, next steps to execute your guaranty will be communicated
to the client.
CompeGPS Team S.L.

                                                                                                http://www.compegps.com

                                                                                            http://support.compegps.com


Any demand must come with its correspondent original receipt, where vendor name and address,
date and place of purchase and type of product must be specified.
Any shipping costs are the sole responsibility of the customer.


12 Appendix 1 – Data fields
Next is a list of the items that you can find in the Data page or in the Data bar if it has been set:
More frequent:


        Altitude: Altitude over the sea level
        Ascent to destination: Difference between the altitude of destination and present
        altitude
        Ascent to next: Difference between the altitude of the next waypoint and the present
        one
        Compass: Address that is followed on the horizontal level (0 = N, 90 =E, 180 = S, 270 =
        O)
        Dist. to destination: Distance to destination (last waypoint of the route)
        Distance to the next: Distance to the to the next waypoint
        Est. Hour at Dest. : Estimated time of arrival to destination (last waypoint of the route) at
        present speed
        Est. Hour at Next : Estimated time of arrival to the next waypoint (at present speed)
        Goto arrow: Arrow that indicates the direction to the next waypoint
        Odometer Total 1: Accumulated distance of all your outings. It is not automatically reset
        when turning off the device
        Partial distance: Counter of distance covered from the beginning of departure. It is reset
        every time the device is turned off
        Route graph: Shows the graph of the route as it is being covered
        Speed: Present speed
        Slope: Slope of our present movement
        Time: Present time according to the selected time zone
        Track graph: Shows the track from the data page


Less frequent


        Accumulated Climb: Total amount climbed from departure to the present position
        Accumulated Descent: Total of the descents made from departure to the present
        position
CompeGPS Team S.L.

                                                                                  http://www.compegps.com

                                                                              http://support.compegps.com


Atmospheric pressure: It shows the present atmospheric pressure by means of the
barometric altimeter
Barometric altitude: Present altitude that the barometric altimeter captures by
atmospheric pressure
Battery: Remaining energy in PC/PDA
Bearing to the next: Course towards which the next waypoint is
Chronometer: Chronometer
Coordinates
Deviation from route: Distance to active route
Differential GPS: GPS gives differential signal (submetric accuracy)
E.T. Dest: Estimated time to reach destination (last waypoint of the route) (at current
speed)
E.T. Next: Estimated time to reach next waypoint (at current speed)
Free Memory: It shows the free memory of the system
GPS Altitude: Present altitude that the GPS perceives via satellites
GPS Bearing: Direction followed according to the GPS system

HDOP: Horizontal Dilution Of Precision (estimated current accuracy of the GPS)

L. Alt.: Altitude of the land looking at the loaded DEM file
Magnetic bearing: Direction followed according to the inner compass
Max. sp.: Maximum speed in current flight
Maximum altitude: Reached in this outing
Mean speed: Mean speed from start to now
Name of the track file

Next WPT: Name of the waypoint you are going to

Norm. Acc: Normal acceleration (perpendicular to movement, in circular movements)

Number of points: Track points saved up to this moment

Number of satellites in use: Satellites fixed in that moment
Partial CO2 emission: CO2 emission from departure. It is reset every time the device is
turned off

Place: When a vector map is loaded with information about the zone, this will show the
name of the element which fits with our current position

Precision: GPS error margin
Speed limit: It shows the speed limit established for the road
CompeGPS Team S.L.

                                                                                           http://www.compegps.com

                                                                                       http://support.compegps.com


        Sunrise: Indicates the time of sunrise, considering parameters such as time zone and
        season of the year
        Sunset: It tells the time it will get dark considering parameters such as time zone and
        season of the year

        Tangential acceleration

        Temperature
        Time stopped: Time gone without advancing
        Total CO2 emission: CO2 emission of all your outings. It does not automatically reset
        when he device is turned off
        Total Odom.2: Secondary counter of aggregate distance of all your trips. It is not reseted
        automatically when device is shutdown
        Turning radius
        Vertical speed


13 Appendix 2 – Equivalences of peculiar signs
When having to introduce an address into the TwoNav system for searching cities and streets,
you may find that you have to introduce signs that do not appear in the system keypad.
Next follows a table of equivalences for you to know which sign to introduce to be considered as
the „peculiar‟ sign.


„A‟                                              'À', 'Á', 'Ä', 'Â', 'Å', 'Ã', 'Æ'

'C'                                              'Ç'

'D'                                              'Ð'

„E‟                                              'É', 'È', 'Ë', 'Ê'

„I‟                                              'Í', 'Ì', 'Ï', 'Î'

'N'                                              'Ñ'

„O‟                                              'Ó', 'Õ', 'Ö', 'Ô', 'Ø', 'Õ', 'Œ'

'S'                                              'Š', 'ß'

'T'                                              'Þ'

„U‟                                              'Ú', 'Ù', 'Ü', 'Û'

„Y‟                                              'Ý', 'Ÿ'
CompeGPS Team S.L.

                                                                                            http://www.compegps.com

                                                                                     http://support.compegps.com


'Z'                                             'Ž'

'-', '_', ''                                   ' ' (space)

Therefore, if you have to introduce „LidlStraße’ you will have to press ‘S’ instead of ß.

Mais conteúdo relacionado

Destaque

Building Strong Advocacy Efforts to Address Southern HIV/AIDS Disparities
Building Strong Advocacy Efforts to Address Southern HIV/AIDS DisparitiesBuilding Strong Advocacy Efforts to Address Southern HIV/AIDS Disparities
Building Strong Advocacy Efforts to Address Southern HIV/AIDS DisparitiesPatrick Packer
 
Database audit policies copy
Database audit policies   copyDatabase audit policies   copy
Database audit policies copyOracle Apps DBA
 
Website Tips, Tricks And Tools
Website Tips, Tricks And ToolsWebsite Tips, Tricks And Tools
Website Tips, Tricks And Toolsixodmark
 
LiveTrix, a Dutch Metalib Mash-Up
LiveTrix, a Dutch Metalib Mash-UpLiveTrix, a Dutch Metalib Mash-Up
LiveTrix, a Dutch Metalib Mash-UpTry PurpleSearch
 
Lawrence Tom Design
Lawrence Tom DesignLawrence Tom Design
Lawrence Tom DesignLawrence Tom
 
Carolina Property Tax Advantage VS other States Cost Advantage carolina liv...
Carolina Property Tax Advantage VS other States Cost Advantage   carolina liv...Carolina Property Tax Advantage VS other States Cost Advantage   carolina liv...
Carolina Property Tax Advantage VS other States Cost Advantage carolina liv...Kenneth "Kip" Nance
 
Corso di carni
Corso di carniCorso di carni
Corso di carnidonasapo
 

Destaque (12)

Building Strong Advocacy Efforts to Address Southern HIV/AIDS Disparities
Building Strong Advocacy Efforts to Address Southern HIV/AIDS DisparitiesBuilding Strong Advocacy Efforts to Address Southern HIV/AIDS Disparities
Building Strong Advocacy Efforts to Address Southern HIV/AIDS Disparities
 
Database audit policies copy
Database audit policies   copyDatabase audit policies   copy
Database audit policies copy
 
Website Tips, Tricks And Tools
Website Tips, Tricks And ToolsWebsite Tips, Tricks And Tools
Website Tips, Tricks And Tools
 
Module 12 lesson 1
Module 12 lesson 1Module 12 lesson 1
Module 12 lesson 1
 
LiveTrix, a Dutch Metalib Mash-Up
LiveTrix, a Dutch Metalib Mash-UpLiveTrix, a Dutch Metalib Mash-Up
LiveTrix, a Dutch Metalib Mash-Up
 
Abraham Lincoln
Abraham LincolnAbraham Lincoln
Abraham Lincoln
 
Lawrence Tom Design
Lawrence Tom DesignLawrence Tom Design
Lawrence Tom Design
 
Carolina Property Tax Advantage VS other States Cost Advantage carolina liv...
Carolina Property Tax Advantage VS other States Cost Advantage   carolina liv...Carolina Property Tax Advantage VS other States Cost Advantage   carolina liv...
Carolina Property Tax Advantage VS other States Cost Advantage carolina liv...
 
Ws6.2.4
Ws6.2.4Ws6.2.4
Ws6.2.4
 
Corso di carni
Corso di carniCorso di carni
Corso di carni
 
Presentation
PresentationPresentation
Presentation
 
American Flag
American FlagAmerican Flag
American Flag
 

Semelhante a 3,

Garmin BaseCamp & Google Earth (From Tracking to Monitoring)
Garmin BaseCamp & Google Earth (From Tracking to Monitoring)Garmin BaseCamp & Google Earth (From Tracking to Monitoring)
Garmin BaseCamp & Google Earth (From Tracking to Monitoring)Andi Anriansyah
 
MapMapMap documentation
MapMapMap documentationMapMapMap documentation
MapMapMap documentationAnome
 
Geographical Information System (GIS) Georeferencing and Digitization, Bihar ...
Geographical Information System (GIS) Georeferencing and Digitization, Bihar ...Geographical Information System (GIS) Georeferencing and Digitization, Bihar ...
Geographical Information System (GIS) Georeferencing and Digitization, Bihar ...Kamlesh Kumar
 
Manual gis
Manual gisManual gis
Manual gissaha232
 
EMA3100A Target Motion Simulator User Guide - Chap4-Motion Modeling Projects
EMA3100A Target Motion Simulator User Guide - Chap4-Motion Modeling ProjectsEMA3100A Target Motion Simulator User Guide - Chap4-Motion Modeling Projects
EMA3100A Target Motion Simulator User Guide - Chap4-Motion Modeling ProjectsEngin Gul
 
Lesson 1. OPENSTREETMAP Basic Operations
Lesson 1. OPENSTREETMAP Basic Operations Lesson 1. OPENSTREETMAP Basic Operations
Lesson 1. OPENSTREETMAP Basic Operations gicait ait
 
Geopaparazzi workshop 2019
Geopaparazzi workshop 2019Geopaparazzi workshop 2019
Geopaparazzi workshop 2019silli
 
Exploring Halifax Attractions using the Esri Runtime SDK for Android
Exploring Halifax Attractions using the Esri Runtime SDK for AndroidExploring Halifax Attractions using the Esri Runtime SDK for Android
Exploring Halifax Attractions using the Esri Runtime SDK for AndroidCOGS Presentations
 
Creating Slope-Enhanced Shaded Relief Using Global Mapper
Creating Slope-Enhanced Shaded Relief Using Global MapperCreating Slope-Enhanced Shaded Relief Using Global Mapper
Creating Slope-Enhanced Shaded Relief Using Global MapperKent D. Brown
 
Gis arc map& georeferencing-arcgis
Gis arc map& georeferencing-arcgisGis arc map& georeferencing-arcgis
Gis arc map& georeferencing-arcgisAshok Peddi
 
Arc Gis Traininng.pptx
Arc Gis Traininng.pptxArc Gis Traininng.pptx
Arc Gis Traininng.pptxImran khan
 
pdfcoffee.com_pathloss-5-pdf-free.pdf
pdfcoffee.com_pathloss-5-pdf-free.pdfpdfcoffee.com_pathloss-5-pdf-free.pdf
pdfcoffee.com_pathloss-5-pdf-free.pdfDenissShala
 
Adding waypoints to Arc Map
Adding waypoints to Arc MapAdding waypoints to Arc Map
Adding waypoints to Arc MapJessica Meyer
 
Introduction to ArcGIS 10.1
Introduction to ArcGIS 10.1Introduction to ArcGIS 10.1
Introduction to ArcGIS 10.1Claudio Montoni
 

Semelhante a 3, (20)

ITB Tutorial
ITB TutorialITB Tutorial
ITB Tutorial
 
Garmin BaseCamp & Google Earth (From Tracking to Monitoring)
Garmin BaseCamp & Google Earth (From Tracking to Monitoring)Garmin BaseCamp & Google Earth (From Tracking to Monitoring)
Garmin BaseCamp & Google Earth (From Tracking to Monitoring)
 
Training Manual.docx
Training Manual.docxTraining Manual.docx
Training Manual.docx
 
Global mapperhelp
Global mapperhelpGlobal mapperhelp
Global mapperhelp
 
MapMapMap documentation
MapMapMap documentationMapMapMap documentation
MapMapMap documentation
 
Geographical Information System (GIS) Georeferencing and Digitization, Bihar ...
Geographical Information System (GIS) Georeferencing and Digitization, Bihar ...Geographical Information System (GIS) Georeferencing and Digitization, Bihar ...
Geographical Information System (GIS) Georeferencing and Digitization, Bihar ...
 
MSC Generator
MSC GeneratorMSC Generator
MSC Generator
 
Manual gis
Manual gisManual gis
Manual gis
 
EMA3100A Target Motion Simulator User Guide - Chap4-Motion Modeling Projects
EMA3100A Target Motion Simulator User Guide - Chap4-Motion Modeling ProjectsEMA3100A Target Motion Simulator User Guide - Chap4-Motion Modeling Projects
EMA3100A Target Motion Simulator User Guide - Chap4-Motion Modeling Projects
 
Lesson 1. OPENSTREETMAP Basic Operations
Lesson 1. OPENSTREETMAP Basic Operations Lesson 1. OPENSTREETMAP Basic Operations
Lesson 1. OPENSTREETMAP Basic Operations
 
Simplymap guide
Simplymap guideSimplymap guide
Simplymap guide
 
Geopaparazzi workshop 2019
Geopaparazzi workshop 2019Geopaparazzi workshop 2019
Geopaparazzi workshop 2019
 
Exploring Halifax Attractions using the Esri Runtime SDK for Android
Exploring Halifax Attractions using the Esri Runtime SDK for AndroidExploring Halifax Attractions using the Esri Runtime SDK for Android
Exploring Halifax Attractions using the Esri Runtime SDK for Android
 
Creating Slope-Enhanced Shaded Relief Using Global Mapper
Creating Slope-Enhanced Shaded Relief Using Global MapperCreating Slope-Enhanced Shaded Relief Using Global Mapper
Creating Slope-Enhanced Shaded Relief Using Global Mapper
 
Gis arc map& georeferencing-arcgis
Gis arc map& georeferencing-arcgisGis arc map& georeferencing-arcgis
Gis arc map& georeferencing-arcgis
 
Arc Gis Traininng.pptx
Arc Gis Traininng.pptxArc Gis Traininng.pptx
Arc Gis Traininng.pptx
 
pdfcoffee.com_pathloss-5-pdf-free.pdf
pdfcoffee.com_pathloss-5-pdf-free.pdfpdfcoffee.com_pathloss-5-pdf-free.pdf
pdfcoffee.com_pathloss-5-pdf-free.pdf
 
Adding waypoints to Arc Map
Adding waypoints to Arc MapAdding waypoints to Arc Map
Adding waypoints to Arc Map
 
Map Browser Training
Map Browser TrainingMap Browser Training
Map Browser Training
 
Introduction to ArcGIS 10.1
Introduction to ArcGIS 10.1Introduction to ArcGIS 10.1
Introduction to ArcGIS 10.1
 

3,

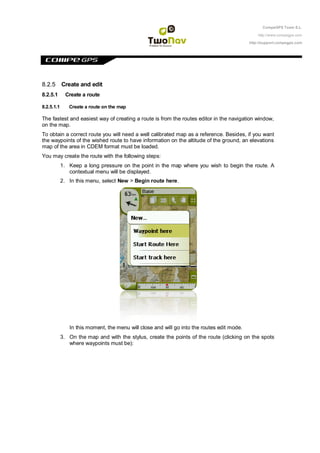
  • 1. CompeGPS Team S.L. http://www.compegps.com http://support.compegps.com 8.2.5 Create and edit 8.2.5.1 Create a route 8.2.5.1.1 Create a route on the map The fastest and easiest way of creating a route is from the routes editor in the navigation window, on the map. To obtain a correct route you will need a well calibrated map as a reference. Besides, if you want the waypoints of the wished route to have information on the altitude of the ground, an elevations map of the area in CDEM format must be loaded. You may create the route with the following steps: 1. Keep a long pressure on the point in the map where you wish to begin the route. A contextual menu will be displayed. 2. In this menu, select New > Begin route here. In this moment, the menu will close and will go into the routes edit mode. 3. On the map and with the stylus, create the points of the route (clicking on the spots where waypoints must be):
  • 2. CompeGPS Team S.L. http://www.compegps.com http://support.compegps.com While editing, you may move the map by dragging it for adding waypoints in other spots in the map. The dragging movement won‟t add waypoints it will only shift the map. To include a waypoint you must click briefly. You may move the position of the created waypoints by selecting and dragging them (+info) 4. Once you are satisfied with the route, enter the Contextual Menu of route (by means of a long click on the screen) and select Close Edit. See the section edit a route to add new waypoints or modify the existing ones. 8.2.5.1.2 Create a route from the routes list When you enter the routes list and you have selected a route or nothing is selected, a button to create a new route will be displayed . When pressing it, a new route file will be generated and you will be asked how to name it. The file won‟t contain any waypoints and they will have to be added using the button (+info) 8.2.5.2 Edit a route 8.2.5.2.1 Add waypoints to the route You may add waypoints to the route from the routes list or directly on the map. 8.2.5.2.1.1 On the map 1. Open the contextual menu on the route and select „Edit route‟ In this moment the menu will close and will go into the routes edit mode. 2. Select (by means of a short click) the waypoint after which you want to add a new waypoint.
  • 3. CompeGPS Team S.L. http://www.compegps.com http://support.compegps.com 3. Press on the spot in the map where you want to generate the new waypoint. 4. Add as many waypoints as you wish. If you want to add waypoints in other places along the route, all you have to do is repeat step 2 and 3. 5. Once you are satisfied with the route, enter the Contextual Menu of the route (by means of a long click on the screen) and select „Close Edit‟. When entering the editor, the selected waypoint will be the last, so if you press on the map, waypoints will be added to the last part of the route. 8.2.5.2.1.2 From the routes list You may enter the „New Waypoint‟ function from the routes list, be it through the contextual menu of the route or by clicking briefly on the name of the route and pressing the button. You will be able to select the position of the new waypoint in 5 ways: Present position: GPS position in which you are at the moment. Present destination: if you have selected a destination. Address: choose country, city, street and number based on the Vmap information. By map: a window will open so you can place the waypoint on the map. Waypoint: it lets you copy a waypoint contained in any available waypoints file.
  • 4. CompeGPS Team S.L. http://www.compegps.com http://support.compegps.com 8.2.5.2.2 Delete waypoints of the route You may delete a waypoint from the routes list or directly from the map. To do so, open the contextual menu on it and select „delete waypoint‟. 8.2.5.2.3 Move the position of the waypoints of the route You may modify the position of any waypoint on the map or by introducing its coordinates: 8.2.5.2.3.1 On the map 1. Open the contextual menu on your route and select „Edit route‟ In this moment, the menu will close and will go into the routes selection mode. 2. Select the waypoint that you wish by means of a brief click. 3. Drag it to the spot you want by keeping the pressure on it. 4. To move another waypoint you must first select it and then drag it. 5. Once you are satisfied with the route, enter the Contextual Menu of the route (by means of a long click on the screen) and select „Close Edit‟.
  • 5. CompeGPS Team S.L. http://www.compegps.com http://support.compegps.com If after selecting a waypoint you click briefly on the map, a new waypoint will be created just after the selected one. 8.2.5.2.3.2 Introduce coordinates In order to modify the coordinates of a waypoint, all you have to do is enter its properties window and introduce the new value, checking that the datum and the projection are correct. 8.2.5.2.4 Change the order of the waypoints in the route To move the added waypoint and approach it or move it further from the beginning of the route, make a long click on the name of the waypoint and select the option „Move Up‟ or „Move Down‟ from the Contextual Menu. 8.2.5.2.5 Invert the route To apply on a route the contrary sense to the one it originally had, open the contextual menu of the route from the routes list and select Tools > Invert the route. This way the sense of the route will be changed and it will begin at the end. 8.2.5.2.6 Convert a route into a track If you wish to change a route into a track format, open the contextual menu of the route from the routes list and select Tools > Change into a track. 8.2.5.3 Save 8.2.5.3.1 Save route If you are satisfied with the work on your routes, you may save it by selecting the option Save route from the contextual menu of the route on the map or routes list. The modifications that you may have made will be saved directly overwriting the old file. 8.2.5.3.2 Save route as If you wish to save the route under a different name, location (folder) or (*.RTE or *.GPX) formats, you may select the option Save route As from the contextual menu of the route contained in the routes list.
  • 6. CompeGPS Team S.L. http://www.compegps.com http://support.compegps.com 8.2.6 Search loaded route on screen To centre the screen on a route: 1. Enter Main Menu by clicking on 2. Select „Main Menu > Data> Routes 3. Click on a concrete waypoint and choose between: a. Press the button. b. Enter the Contextual Menu of the waypoint (long click on the name or „Menu‟ button) and then click on „Zoom here‟. A window will open displaying the waypoint on screen with a possibility of zooming in or out. 4. To exit the window, you may choose between: Press and return to the waypoints list. Press and return to the navigation window keeping the focus you had on the zoom window. 8.2.7 Properties 8.2.7.1 Properties of a route Different data of a loaded route can be checked (distance, area it encloses, maximum altitude, etc.) and modify some of its parameters (real and pixel colours) from the window of route properties. This window can be entered in two ways: Contextual Menu of the route in the list Contextual Menu of the route on the map In order to modify the editable parameters, click on them. The ones that can be edited will display a keypad, figures and a colour palette. The ones that cannot be edited will be displayed in grey. 8.2.7.2 Properties of a waypoint You may enter the properties of a single waypoint from the routes list (by selecting it and pressing the direct button or from the contextual menu) or also from the navigation screen (by opening the contextual menu of the waypoint on the map). The properties of the waypoints that are contained in a route are the same as the loose waypoints (+info) 8.2.8 Route Graph You can see a graph of the loaded route in two ways: From the routes list: By selecting the „graphs‟ option from the contextual menu of the route.
  • 7. CompeGPS Team S.L. http://www.compegps.com http://support.compegps.com Through the data fields: You may place the field „route graph‟ in any position in the data pages, although it is recommended to use the space of the graph page to do it. (+info) 8.2.9 Activate a route (navigate) You may activate (navigate) a route in three ways: Menu “Navigate…” Contextual Menu of the route within the routes list (long click on the route within the routes list). The routes list also features a direct access button to the navigation function Contextual menu of the route on the map (long click on the route on the map).
  • 8. CompeGPS Team S.L. http://www.compegps.com http://support.compegps.com Once activated, TwoNav will guide you towards the first waypoint along the route. When you reach a waypoint along the route, you will be guided towards the next one, and so on until the end of the route. If you are in Off-road mode, a straight line will be displayed from your position to the next waypoint. If you are in On-road mode, TwoNav will try to automatically calculate the sub-route through the streets in order to orientate you in detail with voice instructions. 8.2.10 Routes contextual menus To open the contextual menu on an element, all you have to do is keep the pressure on it for one second. 1. Contextual menu of a route file within the routes list: Properties of the Route (+info) Save Route (+info) Save Route As… (+info) Close Route (+info) Rename file Delete file (+info) Graphs (+info) Zoom here (+info) Send to Tools (+info) New Waypoint (+info) Activate (+info) 2. Contextual menu of a concrete waypoint within a route file or in the routes list: Properties (+info) Delete Waypoint (+info) Zoom here (+info) Send to Navigate… (+info) Move Up (+info) Move Down (+info) 3. Contextual menu of a route on the map: New…
  • 9. CompeGPS Team S.L. http://www.compegps.com http://support.compegps.com  Waypoint here (+ info)  Begin route here (+ info)  Begin track here (+ info) Properties of the Route (+info) Save Route (+info) Close Route (+info) Edit Route (+info) Activate (+info) 4. Edit contextual menu of a route on the map: Close edit (+info) Delete Point (+info) New…  Waypoint here (+ info)  Begin route here (+ info)  Begin track here (+ info) Properties of the Route (+info) Save Route (+info) Close Route (+info) Edit Route (+info) Activate (+info) 5. Contextual menu of a concrete waypoint on the map: New… (+info)  Waypoint here (+ info)  Begin route here (+ info)  Begin track here (+ info) Properties (+info) Delete Waypoint (+info) Navigate… (+info)
  • 10. CompeGPS Team S.L. http://www.compegps.com http://support.compegps.com 8.3 Tracks 8.3.1 What is a track? A track is a group of points ordered by time, where each point contains information on the position, time and date, coordinates and, in most cases, altitudes. Tracks can be split into 2 and 3 dimensional ones, depending on whether they have or not the altitudes of the track points. For further information, check Track tools. Whenever we save the tracks in TwoNav, besides the track points, a series of data is saved that can be modified or inserted from the device, such as the name of the track, remarks, colour of display, among others. For further information check Track properties. 8.3.2 Supported formats TwoNav can open directly next track formats: *.TRK *.IGC *.PLT *.GPX More track formats can be imported and converted to these ones from CompeGPS Land/Air. 8.3.3 Record a track while navigating During navigation, TwoNav will record the track of your outing. This recording will be saved by default in the „TwoNavData/Data‟ folder in *TRK format with a name based on the date, (YYYY-MM-DD)*. You may check if track points are being recorded from the „Status‟ page. By pressing the „record‟ button, the track points will be saved. By pressing the „pause‟ button, the track points won‟t be saved. If you pause the track recording and retake it later, the points that open after the pause will be part of the same track leg. This means that there will only be an open track, but made up of the different legs (+info on legs). If you wish to save the track that is currently being recorded and go on recording into a new file, all you have to do is close the track currently open. Once closed, a new track will be automatically created in which the new track points will be recorded. You may set the recording parameters from „Main menu > Settings > Off-road >Tracklog‟ (+info).
  • 11. CompeGPS Team S.L. http://www.compegps.com http://support.compegps.com *Note: If, in the same day, you have made more than one track, the names will be distinguished by a number at the end that identifies the order in which they were created, (e.g. 2008-12-15- 01.TRK, 2008-12-15-02.TRK, …). You may rename both the tracks previously saved as the track currently being recorded by using the track properties or save as. 8.3.4 Track list “Main menu > Data> Tracks” Management of tracks is centred in the track list, although it is possible to carry out many actions directly from the navigation screen through the contextual menu. By entering the tracks list you will be able to see all the available tracks in the „TwoNavData/Data‟ folder. See the Data section to get to know about the operation of the general lists. If you have selected a track, the buttons at the bottom of the screen will let you enter the most important functions to carry out on that element: From left to right: Enter the track properties window See the track graph Zoom here Navigate (activate) By means of a long click on any open track, you will enter the Contextual Menu with all the available functionalities for this element. When the list of recorded tracks becomes too long, they will automatically be grouped in folders selected by year and, inside them, by month of creation (e.g. all the tracks created in 2009 will be found in that folder and inside 2009-1, all the tracks created in January 2009).
  • 12. CompeGPS Team S.L. http://www.compegps.com http://support.compegps.com 8.3.5 Open and close 8.3.5.1 Open track From the tracks list, by clicking on the name of one of the available folders, it will open. You will know it is open because it will be visible at the top of the list and with the left square marked . 8.3.5.2 Close track Press on the left check mark of the open track in order to close it. The folder will change position from the first place on the list and will go back to its alphabetical position among the other unloaded files. You may also enter this function from the contextual menu, from where you will also be able to delete files from the memory completely. 8.3.6 Create and edit 8.3.6.1 Create a track The way to create a track is from the tracks editor from the navigation window on the map. To obtain a correct track, you must have a well calibrated map as a reference. Besides, if you want the waypoints of the created track to have information on the altitude of the ground, a map of the elevations of the area in CDEM format must be loaded. You may create the track following these steps: 1. By means of a long click on the point of the map where you want to begin the track. A contextual menu will be displayed.
  • 13. CompeGPS Team S.L. http://www.compegps.com http://support.compegps.com 2. On this menu, select New > Begin new track here. In this moment, the menu will close and it will go into the tracks edit mode. 3. On the map and with the stylus, start creating the points of the track (by pressing on the places where there should be points): During editing, you may move the map by dragging it in order to add points in other parts of the map. The dragging movement won‟t add points, it will just move the map. To add a point you must click briefly. You may move the position of the created waypoints by selecting and dragging them (+info)
  • 14. CompeGPS Team S.L. http://www.compegps.com http://support.compegps.com 4. Once you are satisfied with the track, enter the Contextual Menu of the track (by a long click on the screen) and select Close Edit. See the edit track section to add new points or modify the existing ones. Besides the „manually‟ created tracks, TwoNav will keep creating „automatically‟ the track of your outing recording your position according to the settings of tracklog (+info on the recording of the present track). 8.3.6.2 Edit track 8.3.6.2.1 Add points to a track You may add points directly on the map: 1. Open the contextual menu on the track and select „Edit the track‟. In this moment, the menu will close and it will go into the track editing mode. 2. Select (by means of a short click) the point of the track after which you want to add a new point. 3. Press on the spot in the map where you wish to generate the new point. 4. Add as many points as you wish. If you want to add points in other spots in the track, all you have to do is repeat steps 2 and 3.
  • 15. CompeGPS Team S.L. http://www.compegps.com http://support.compegps.com 5. Once you are satisfied with the track, enter the contextual menu (by means of a long click on the screen) and select Close Edit. When entering the editor, the point of the selected track will be the last one, so if you press on the map, points will be added to the last part of the track. 8.3.6.2.2 Delete points from track 1. Activate the edit mode: long click on the track on the navigation screen (on the map) and then select „edit track‟. 2. Open the contextual menu on the point you wish to delete and select „delete point‟. 3. Delete as many points as you wish by repeating step 2 while you are in edit mode. 4. Exit the tracks editor (long click on the screen and then select Close Edit) 8.3.6.2.3 Move the position of the track points You may modify the position of the track points directly on the map or by introducing its coordinates: 8.3.6.2.3.1 On the map 1. Open the contextual menu on the track and select „Edit track‟ In this moment, the menu will close and it will go into the routes edit mode. 2. Select the point you wish to move by pressing briefly. 3. Drag it to the place of your choice by keeping the pressure on it.
  • 16. CompeGPS Team S.L. http://www.compegps.com http://support.compegps.com 4. To move another point you must select it first (by pressing briefly) and then drag it. 5. Once you are satisfied with the track, enter the contextual menu (by a long click on the screen) and then select Close Edit. If, once selected a point, you click briefly on the map, a new track point will be created right after the selected one. 8.3.6.2.3.2 Introduce coordinates In order to modify the coordinates of a track point, all you have to do is enter its properties window and introduce the new value, checking that the datum and projection are correct. 8.3.6.3 Track legs TwoNav allows you to work with tracks fractioned in legs. 8.3.6.3.1 Create legs 8.3.6.3.1.1 Create legs on an existing track You may split the track in two legs by opening the contextual menu on the point that divides the two selected legs „legs > Change leg here‟. In this moment, the leg closer to the end of the track will change colour to highlight the difference between the two legs. The initial leg will remain the original colour of the track. You may repeat this operation as many times as you want in order to get the amount of tracks you need. 8.3.6.3.1.2 Create new legs on the present track If during the recording of the present track you activate a pause from the status window, when starting recording again, the new points will keep being recorded in the same file as before the pause, but a new leg with the new points will be generated automatically. This way, you will be able to make out easily the parts of the present leg and apply independent modifications on them. If there is a distance from the moment you paused the recording of the track until you activated it again, the empty space passed in this time will be visible on its display.
  • 17. CompeGPS Team S.L. http://www.compegps.com http://support.compegps.com 8.3.6.3.2 Operations with legs If you open the contextual menu on a leg of the track in the navigation window from the „legs‟ option, you will be able to enter the following functions: Leg properties: You may change the colour and thickness of the leg and add a note. Change leg (+info) Delete this leg: the points of this leg will be deleted from the track, leaving an empty space in its place. Save track as: You may save the track independently from the rest of the track. This way, a new track file will be created with just this leg. 8.3.6.4 Reverse track Any track can be reversed so the order of its points is the opposite. This can be especially useful if you have run a distance recording the track as you go and then you wish to go back along the same way. To reverse the track, all you have to do is open the contextual menu on it from the track list and select „Tools > Reverse track‟. 8.3.6.5 Advanced track tools From the track contextual menu in the tracks list, you can enter the „Tools‟ submenu, which includes highly interesting secondary tools for concrete needs: Calculate the altitude of the ground of each point (Import altitudes): If you have 3D relief (CDEM) loaded, TwoNav may assign each point of the track its altitude considering the information of the relief. Delete stopped points from the beginning and the end (Del.strt/end points): The track omits the repetitive points from the beginning and the end, where you were stopped before and after making the track.
  • 18. CompeGPS Team S.L. http://www.compegps.com http://support.compegps.com Reduce the number of points (Reduce num. points): By introducing the number of points, the track is drawn with the points keeping the shape of the track in the most possible faithful manner. Assign time and speed (Assign time/speed): By using this option you may determine a time for departure and a constant speed so TwoNav calculates the estimated time of arrival to each point in the track. If a track does not contain time data, you cannot enter the play function of its contextual menu. Delete the aberrant points (Del. aberrant points): In case a point diverts excessively from the rest, it will be considered an error and deleted. Change the track into a route (Convert TRK to RTE): This option will change the track into a route. The program will ask you to introduce the number of waypoints you want the route to have. The new file of the route will be displayed on the „Main Menu > Data> Routes‟. Invert track: This function reverses the sense of the itinerary of the track, so if you decide to navigate it, it will be in reverse sense. 8.3.6.6 Save 8.3.6.6.1 Save track When you are satisfied with your track, you may save it by selecting the option Save track from the contextual menu of the track or track list. The modifications that you have made will be directly saved overwriting the old file. Note: The track being recorded as you go is saved automatically every 5 minutes. When closing the system, a final saving of the present track will be saved. 8.3.6.6.2 Save track as If you wish to save the track under another name, location (folder) or format (*.TRK, *.IGC or *.GPX) you may select the option „Save track as‟ from the contextual menu of the track in the tracks lists. 8.3.7 Search a loaded track on screen To centre a track on the screen: 1. Enter the Main Menu by pressing 2. Select „Main Menu > Data> Tracks 3. Click on the track and choose between: a. Press button. b. Enter the Contextual Menu of the track (long click on its name or „Menu‟ button) and click on „Zoom here‟.
  • 19. CompeGPS Team S.L. http://www.compegps.com http://support.compegps.com A window displaying the track on screen with the possibility of zooming in or out will open. 4. To exit the window you may choose between: Press and return to the tracks list. Press and return to the navigation window keeping the focus you had in the zoom window. 8.3.8 Properties 8.3.8.1 Track properties The different data on a loaded track can be consulted (distance, area it encloses, maximum altitude, etc.) and modify some of its parameters (colour, thickness, description…) from the properties window of the track. You may enter this window in 3 ways: Direct button : brief click on the name of the track on the List and then press the button at the bottom of the list. Contextual menu of track in the list Contextual menu of the track in the map Once inside it, you will be able to modify some parameters of the track and consult a great variet y of data grouped by sections:
  • 20. CompeGPS Team S.L. http://www.compegps.com http://support.compegps.com General: Name of file (you may also change the track name from the contextual menu of the tracks list or by „save as‟), User name, Outing name, Notes on track. Date and time: Day, Departure time (first track point), Arrival time (last track point), Duration, Difference between local time and UTC (more or less hours in regards to GMT), Time stopped, Time moving. Track points: Number of points, Recording intervals (this value can be set from „Main Menu > Settings > Off-road > Tracklog‟), Extra data fields (additional data that the tracks have besides the coordinates, altitude and time). See: Thickness, real width of track and colour of the track line. GPS: GPS model, series number and if the track features a digital signature. Distances: Projected distance (it is the distance that has been covered on the horizontal, disregards the distance covered in altitude), Distance with altitudes (the real distance covered by outlining the orography of the ground), linear distance (distance on a straight line between the first and the last point of the track), Area (surface enclosed by the track). This last datum is achieved by closing the track with a straight line in case there are no closed tracks). Altitudes: Track with altitudes (if the track features the altitude datum), Maximum altitude, Minimum altitude, Departure altitude (at the track origin), Arrival altitude (at the last point), Gain from the departure (difference between the departure altitude and the maximum reached), Departure-arrival slope, Maximum slope (difference of altitude between the highest and lowest point of the track), Accumulated climb * (total of the different gains in altitude made during the track, i.e. what we have had to climb in reality), accumulated descent*, ( Max. vertical speed (climbing speed), Min. Vertical speed (descent speed), Max. Slope, Min. Slope. Speed: Medium speed and Maximum speed reached in the track. Energy: Mass (weight of the person tracking together with the vehicle, bicycle, motorbike, rucksack, etc.), Energy measured in Joules, Average power measured in vats (consumed along the whole track), Average power on climbs measured in vats (consumed during the track climbs). *Only altitudes changes over 5 metres will be computed in properties, such as accumulated climb/descent. This is in order to prevent the resulting fluctuations of the GPS error margin from adding non real differences of level. As a result, a track that begins and ends in the same place may have an „accumulated climb‟ that does not match the „accumulated descent‟. CompeGPS Land lets you modify the “minimum difference to accumulate difference of level” in order to adjust it to your preferences in the track analysis. 8.3.8.2 Properties of a track point You may enter the properties of a single point in the track from the navigation screen by opening the contextual menu on the point in the map and selecting „edit track point‟.
  • 21. CompeGPS Team S.L. http://www.compegps.com http://support.compegps.com From the window that will open, you may enter: Icon: Choose the icon with which you wish to mark the position on this point of the track Description: You may include a note of your choice for this place. Coordinates: You may consult or modify the coordinates of the point. Day and date Associations: it associates image or sound files to your waypoints so they are displayed during navigation when reaching this point. 8.3.9 Track graph You may visualize a graph of the loaded route in two ways: From the tracks list: By selecting the contextual menu option of the route or by selecting the route and pressing the button. Through the data fields: You may place the „route graph‟ file in any position within the data pages, however, it is recommended to use the space of the graph page for this end. (+info) 8.3.10 Activate a track (Navigate) You may activate (navigate) a track in three ways: Menu “Navigate…” Contextual menu of the track in the tracks list (long click on the track in the tracks lists). The tracks list also features a direct access button to the navigation function. Contextual menu of the track on the map (long click on the track on the map). Once activated, TwoNav will guide you along the track by using two tools:
  • 22. CompeGPS Team S.L. http://www.compegps.com http://support.compegps.com GOTO arrow: In the „next event‟ space, an arrow will be displayed to indicate a direction tangent to the track. It means you can take the direction of this arrow as a reference to keep going your way. Note: If you are over 50 metres far from the track, the GOTO arrow will indicate the perpendicular to the track instead of the tangent. At this distance it will be considered that you are off the way that you should be following and that you must go back to it in the most direct possible way, i.e. perpendicularly. Guide line: Your position will be joined to the track by means a perpendicular line between them. When you are over 50 metres from the track, this line will turn red. Note: If the track you are following has over 100 points, the guide line will indicate the point closest to the track instead of the perpendicular. 8.3.11 Tracks contextual menu To open the contextual menu on an element, keep the pressure on it for 1 second. 1. Contextual menu of a track inside the tracks list: Track properties (+info) Close Track (+info) Delete file (+info) Close all except this one Save Track as… (+info) Rename file (+info) Graph window (+info)
  • 23. CompeGPS Team S.L. http://www.compegps.com http://support.compegps.com Play (+info) Zoom here (+info) Edit the track (+info) Send to Tools (+info) Activate (+info) 2. Contextual menu of a track on the map: New…  Waypoint here (+ info)  Begin route here (+ info)  Begin track here (+ info) Track properties (+info) Save Track (+info) Close Track (+info) Edit Track (+info) Edit Track point (+info) Activate (+info) Legs (+info)  Leg properties  Change leg here  Delete this leg  Save leg as Play Here (+info) 8.4 Maps TwoNav lets you manage a great variety of maps in an easy way. You may get more maps to use with TwoNav in various ways, from buying them directly from our web page, to calibrate paper maps with CompeGPS Land. For further information go to www.compegps.com or www.twonav.com. 8.4.1 Supported formats TwoNav can open directly next map formats: *.RMAP (CompeGPS Raster map format) *.ECW (Raster)
  • 24. CompeGPS Team S.L. http://www.compegps.com http://support.compegps.com *.VMAP/*MPVF (CompeGPS vector map format) *.IMP (calibration file requiring image file) *.MAP (calibration file requiring image file) *.CDEM (3D relief) More map formats can be imported and converted to these ones from CompeGPS Land/Air. 8.4.2 Types of maps There exist 3 different basic types of maps: Vmap: Road maps with which the On-road* works. Topo: Topographic maps from CompeGPS. CDEM relieves: Elevations maps whose only information is the altitude of the grounds. When having a relief loaded we may enter the 3D+ and give altitude to the created waypoints, routes and tracks. Besides these three types of CompeGPS own ones, you may use other types of maps that you may get by other means (air images, topographic maps from other sources, scanned and calibrated paper maps, etc.). *If the TwoNav memory does not contain any other road map, the On-road mode won‟t be activated. Enter the Map Shop in www.twonav.com. 8.4.3 Maps lists Management of the maps is centralized in the maps list, however, it is also possible to carry out many other actions directly from the navigation screen by means of the contextual menu. See the Data section to learn the general operation of the lists. By entering the maps list you will be able to see all the maps available in the „TwoNavData/Maps‟ folder for your present position. If you wish to see the complete list of maps (not just the ones of the present position), activate the „see all‟ button. Each map has an icon to indicate which type of map it is: Vectorial Raster Relief (CDEM) If a map is present in maps folder but it is not activated (license required), a padlock will be added to the icon. If you have selected a map, the buttons at the bottom of the screen will let you enter the most important functionalities this element has:
  • 25. CompeGPS Team S.L. http://www.compegps.com http://support.compegps.com From left to right: See all/See available ones for present position Properties Zoom here Close 8.4.4 Open and close 8.4.4.1 Automaps By activating this position, TwoNav will try to load the best map in each moment. In On-road mode, the V-map (road map) of the area will be loaded and the rest will be closed. In Off-road mode, the map with the best resolution (not a V-map) will be loaded and any other Vmap will close. If you want to keep the loaded maps when changing from one mode to another, deactivate the „Automaps‟ function. 8.4.4.2 Open map From the maps list, by pressing on the name of one of the available files, it will open. You will know it is open because it will be placed on the top of the list with the left square marked . 8.4.4.3 Close map Press on the left check mark of the open map for closing it. The file will leave its position on the first places of the list and will return to its alphabetical position among the other unloaded files. You may also enter this function from the contextual menu (in the maps list or on the navigation window) and pressing the „close‟ (X) button from the bottom of the list. 8.4.5 Search a loaded map on screen To centre a map on the screen: 1. Enter the Main Menu by pressing 2. Select „Main Menu > Data > Maps 3. Click on the map and choose between: a. Press the button b. Enter the Contextual Menu of the map (long click on the name or on the „Menu‟ button) and click on „Zoom here‟.
  • 26. CompeGPS Team S.L. http://www.compegps.com http://support.compegps.com A window display in the track on the screen will open with the possibility of zooming in or out. 4. To exit the window you may choose between: Press and it will return to the tracks list. Press and return to the navigation window keeping the focus you had in the zoom window. 8.4.6 Properties You can check different data of a loaded map (description, map type, resolution, extension, etc.) from the properties window of the map. You may enter this window in three ways: Direct button : brief click on the name of the map in the list and press the button at the bottom of the list. Contextual Menu of the map in the list Contextual Menu of the map in the navigation window 8.4.7 Multi-Maps TwoNav lets you load more than one map at the same time. If you have two maps for the same area (e.g. an orthophoto and a topographic map) and load them at the same time, one of them will hide the other. The „Multi-Maps‟ function lets you set this maps superposition by selecting the map you wish to be placed below or above the other. To enter this tool, choose the „Multi-Maps‟ from the Contextual Menu of the map you wish to manage („Main Menu > Data > Maps‟) and select „Bring to the front‟ or „Send back‟ as you prefer. 8.4.8 Contextual menu of the map To open the contextual menu on an element, all you have to do is keep the pressure on it for 1 second. 1. Contextual menu of the map on the navigation screen: New… o Waypoint here (+ info) o Begin route here (+ info) o Begin track here (+ info) Stop Nav.: You may stop your present navigation at any moment by this direct access alternative to „menu > navigate to > Stop nav.‟. Navigate here (+ info) Properties of the map (+ info) Close map (name of map) (+ info) Multi-map, Advanced...: (+ info).
  • 27. CompeGPS Team S.L. http://www.compegps.com http://support.compegps.com 2. Contextual menu of the map in the maps list: Properties of the map (+ info) Close map (+ info) Zoom here (+ info) Multi-Maps, Advanced (+ info) 9 “Simulation” and “Zoom to...” 9.1 Simulation TwoNav lets you see a representation of the itinerary you are going to follow. It will be displayed with the position icon in green to distinguish it from the „present position‟ icon in red. It features two kinds of simulations: A->B (only in „On-road‟ mode): From „Main menu > Discover > Simulate‟, you may choose two points (POIs, addresses, favourites…) so it shows you the proposed route to go from point A to point B. Reproduce track: Open the Contextual Menu in the tracks list or with the track on the map and select „Play‟. An animation of the itinerary will be displayed. During the animation, the simulated position will be shown with a green arrow and will become the prevailing one, so the position will be centred on it and the movement statistics will be related to it.
  • 28. CompeGPS Team S.L. http://www.compegps.com http://support.compegps.com To stop the simulation, you may go to „Main menu > Discover > Stop sim.‟ 9.2 Zoom to… The option „Zoom to…‟ allows you to carry out a quick pre-visualization of the element you wish to see on the map*. There are a great number of elements to visualize: Address: if you have loaded a routable map, with this tool you will be able to see the address chosen by you and it will appear centred on the screen. POI: if you have loaded a routable map, you will be able to carry out a quick visualization of the Points of Interest (POIs), such as petrol stations theatres, etc. Favourites: you may establish places on the map as favourite points, as for example your home. If you have saved places as favourites, you will be able to zoom on them in order to see them centred on the map. Data: You will also be able to see waypoints, routes and tracks on the map. Although you do not need to have loaded the map on which this data was created, as pre- visualization is based on the geographical coordinates, it is interesting to „zoom to…‟ these element on the map for you to see the details of the ground where they were made. Coordinates: TwoNav allows you to quickly visualize concrete coordinates introduced by you. Remember that to visualize what these coordinates correspond to, you must have loaded a map of that area.
  • 29. CompeGPS Team S.L. http://www.compegps.com http://support.compegps.com *Note: the option „Zoom to‟ shows you the element that you want to see in a window solely for this purpose that is not the same as the navigation window. However, when you carry out a „Zoom to…‟ an element, when returning to the navigation window, the focus will still be on this element. To re-centre the focus on its present position you may use the „Re-centre‟ tools. 10 Support If you have any kind of doubt or problem with the system, you may check the support sections of the CompeGPS (www.compegps.com) or TwoNav (www.twonav.com) pages. To make personalized enquiries you may use the „on-line‟ CompeGPS support system by entering the http://support.compegps.com space. 11 Limited warranty CompeGPS Team SL guarantees that this product is free from defects in material or workmanship for two years from the date of purchase. During warranty period, CompeGPS Team SL commits to repair any defective product or replace it for a functional one, without guarantee about preservation of any data that may be stored in it. CompeGPS Team SL does not guarantee the quality of the included maps, being free of any responsibility that may be derived from them. Wear and tear effects that may happen in some elements (like screen, buttons, rubber caps or moving parts) are out of guarantee. Present warranty will be cancelled if any of the next circumstances happen: 1- Rough handling in any form: strong hits, torsions, compressions, etc. 2- Inappropriate exposure to water (i.e. any type of exposition if rubber caps are incorrectly adjusted or immersions even with caps correctly placed), dust, extreme thermal conditions, corrosion, oxidation or chemical substances 3- Manipulation of the product by non-allowed devices or applications, particularly if trying to install any other software than the authorized (supplied exclusively in CompeGPS Team SL web spaces www.compegps.com and www.twonav.com ) or using illegal activation keys not provided by CompeGPS Team SL. 4- Disassembling, modifying or repairing when not performed by CompeGPS Team SL technical service. CompeGPS Team SL will not be liable for any damage derived from the use or bad use of the product, being free of any obligation if any accident occurs when the device is used in any mean of transport. Any demand must be performed contacting with CompeGPS Team SL by one of these ways: 1- Through the reseller that made the sale of the product. 2- By the CompeGPS‟ on-line free support service, accessing from http://support.compegps.com web page. Once the contact has been confirmed, next steps to execute your guaranty will be communicated to the client.
  • 30. CompeGPS Team S.L. http://www.compegps.com http://support.compegps.com Any demand must come with its correspondent original receipt, where vendor name and address, date and place of purchase and type of product must be specified. Any shipping costs are the sole responsibility of the customer. 12 Appendix 1 – Data fields Next is a list of the items that you can find in the Data page or in the Data bar if it has been set: More frequent: Altitude: Altitude over the sea level Ascent to destination: Difference between the altitude of destination and present altitude Ascent to next: Difference between the altitude of the next waypoint and the present one Compass: Address that is followed on the horizontal level (0 = N, 90 =E, 180 = S, 270 = O) Dist. to destination: Distance to destination (last waypoint of the route) Distance to the next: Distance to the to the next waypoint Est. Hour at Dest. : Estimated time of arrival to destination (last waypoint of the route) at present speed Est. Hour at Next : Estimated time of arrival to the next waypoint (at present speed) Goto arrow: Arrow that indicates the direction to the next waypoint Odometer Total 1: Accumulated distance of all your outings. It is not automatically reset when turning off the device Partial distance: Counter of distance covered from the beginning of departure. It is reset every time the device is turned off Route graph: Shows the graph of the route as it is being covered Speed: Present speed Slope: Slope of our present movement Time: Present time according to the selected time zone Track graph: Shows the track from the data page Less frequent Accumulated Climb: Total amount climbed from departure to the present position Accumulated Descent: Total of the descents made from departure to the present position
  • 31. CompeGPS Team S.L. http://www.compegps.com http://support.compegps.com Atmospheric pressure: It shows the present atmospheric pressure by means of the barometric altimeter Barometric altitude: Present altitude that the barometric altimeter captures by atmospheric pressure Battery: Remaining energy in PC/PDA Bearing to the next: Course towards which the next waypoint is Chronometer: Chronometer Coordinates Deviation from route: Distance to active route Differential GPS: GPS gives differential signal (submetric accuracy) E.T. Dest: Estimated time to reach destination (last waypoint of the route) (at current speed) E.T. Next: Estimated time to reach next waypoint (at current speed) Free Memory: It shows the free memory of the system GPS Altitude: Present altitude that the GPS perceives via satellites GPS Bearing: Direction followed according to the GPS system HDOP: Horizontal Dilution Of Precision (estimated current accuracy of the GPS) L. Alt.: Altitude of the land looking at the loaded DEM file Magnetic bearing: Direction followed according to the inner compass Max. sp.: Maximum speed in current flight Maximum altitude: Reached in this outing Mean speed: Mean speed from start to now Name of the track file Next WPT: Name of the waypoint you are going to Norm. Acc: Normal acceleration (perpendicular to movement, in circular movements) Number of points: Track points saved up to this moment Number of satellites in use: Satellites fixed in that moment Partial CO2 emission: CO2 emission from departure. It is reset every time the device is turned off Place: When a vector map is loaded with information about the zone, this will show the name of the element which fits with our current position Precision: GPS error margin Speed limit: It shows the speed limit established for the road
  • 32. CompeGPS Team S.L. http://www.compegps.com http://support.compegps.com Sunrise: Indicates the time of sunrise, considering parameters such as time zone and season of the year Sunset: It tells the time it will get dark considering parameters such as time zone and season of the year Tangential acceleration Temperature Time stopped: Time gone without advancing Total CO2 emission: CO2 emission of all your outings. It does not automatically reset when he device is turned off Total Odom.2: Secondary counter of aggregate distance of all your trips. It is not reseted automatically when device is shutdown Turning radius Vertical speed 13 Appendix 2 – Equivalences of peculiar signs When having to introduce an address into the TwoNav system for searching cities and streets, you may find that you have to introduce signs that do not appear in the system keypad. Next follows a table of equivalences for you to know which sign to introduce to be considered as the „peculiar‟ sign. „A‟ 'À', 'Á', 'Ä', 'Â', 'Å', 'Ã', 'Æ' 'C' 'Ç' 'D' 'Ð' „E‟ 'É', 'È', 'Ë', 'Ê' „I‟ 'Í', 'Ì', 'Ï', 'Î' 'N' 'Ñ' „O‟ 'Ó', 'Õ', 'Ö', 'Ô', 'Ø', 'Õ', 'Œ' 'S' 'Š', 'ß' 'T' 'Þ' „U‟ 'Ú', 'Ù', 'Ü', 'Û' „Y‟ 'Ý', 'Ÿ'
  • 33. CompeGPS Team S.L. http://www.compegps.com http://support.compegps.com 'Z' 'Ž' '-', '_', '' ' ' (space) Therefore, if you have to introduce „LidlStraße’ you will have to press ‘S’ instead of ß.