Power point book 2010
•Transferir como DOCX, PDF•
0 gostou•1,078 visualizações

Notes for PowerPoint course

Recomendados
Mais conteúdo relacionado
Mais procurados
Mais procurados (15)
Destaque
Destaque (20)
Semelhante a Power point book 2010
Semelhante a Power point book 2010 (20)
Mais de Jacqui Sharp
Mais de Jacqui Sharp (20)
Power point book 2010
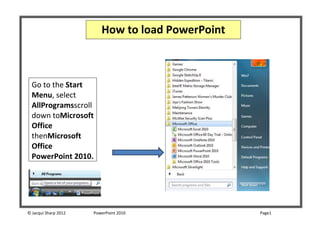
- 1. How to load PowerPoint Go to the Start Menu, select AllProgramsscroll down toMicrosoft Office thenMicrosoft Office PowerPoint 2010. © Jacqui Sharp 2012 PowerPoint 2010 Page1
- 2. Quick Access toolbar 1. Add more shortcuts to 2. Click on More your Quick Access Commands toolbar Click on a button that you might want to add to Click on the your toolbar and click on Click on any of the the button choices not selected and they will appear on the Quick Access toolbar. 4. Some of the buttons added to this example of a Quick Launch are 3. Click on Popular Commands, click on the tab that has the tool button you New Presentation want to use. Open File Click on the button, Insert Picture File click OK when you have Insert a Text box finished. New Slide © Jacqui Sharp 2012 PowerPoint 2010 Page2
- 3. Creating a Presentation This is your main toolbar, it is called a Ribbon There are some slight changes that you could make Click on View in the Menu Choices Normal should be highlighted You can adjust the zoom view of Click in the Ruler Box if it is not ticked the page by clicking on the + or the – symbols © Jacqui Sharp 2012 PowerPoint 2010 Page3
- 4. Creating a Slide Background Click on the Design tab Click on the Color button on the Ribbon and you can change the colour theme of the Click on the one you template by clicking on a like best. It will appear scheme. on your screen. If you don’t like that one, then click on another one. The template you choose will be on every slide. Or choose a new template by clicking on Click on the drop down arrow to see more choices © Jacqui Sharp 2012 PowerPoint 2010 Page4
- 5. Background Theme Make changes to a theme by changing the colour scheme (see page before) Or change Fonts by clicking on the Fonts button and choose a font theme from the dropdown menu. Add Effects by Change clicking on the Background Styles Effects button by clicking on the and Background Styles choose an effect button from the and choose a style dropdown menu. from the dropdown menu. © Jacqui Sharp 2012 PowerPoint 2010 Page5
- 6. Title Screen Click and type in a title for your presentation Click in the next box and type a subtitle. All these slides in this example has a background graphic, if there is a particular slide where you don’t want the background graphic to show then click on the Design tab and then click © Jacqui Sharp 2012 PowerPoint 2010 Page6
- 7. New Slide Click on the Home Tab, and then click on the New Slide button. It automatically selects the Title and Text layout. (Later you can click on the Drop down arrow next to Layout to choose a different layout, work with this layout first) © Jacqui Sharp 2012 PowerPoint 2010 Page7
- 8. Adding Information Click in the Click to Add Title Type ‘These were the things we saw!’ Click in the Click to Add Text Type Shells, press Enter Type Sand, press Enter Type Water etc © Jacqui Sharp 2012 PowerPoint 2010 Page8
- 9. Make some changes Enlarge the Text Click once in the Text Box to highlight the frame Change the size of the Font by clicking on the Large A © Jacqui Sharp 2012 PowerPoint 2010 Page9
- 10. Save Files to Hardrive, Floppy drive or Memory stick (Vista) 1. Click on the Save button on the Quick Access toolbar. 2. To save to Documents click on Documents . 3. Type in File Name and then click Save. To save to Memory Stick, click on the Save button, click on Computer in the left hand paneland then double click on Removable Disk . Click Save. © Jacqui Sharp 2012 PowerPoint 2010 Page10
- 11. Add aa Photo Add Graphic Click on the Insert Tab Click on the Insert Tab Click on Insert Picture button The Pictures folder will open; double click on the photo you want to button Click on Insert Clip Art insert If the photo is too large for the page double click on it A new sub menu will appear. Type in the name of the graphic you would like to find (in this case Shell). Click on the Format tab Click Go. Under Scale, Height: type in a size at least all the graphics The sub menu will change and youwill see half and Press Enter. If the photo is still too big, repeat last two steps available. Move down to see more. page by clicking and dragging in the centre of the photo. Scroll the photo on to the Resize the photo by clicking and dragging on a Click in the centre of the graphic. The graphic will appear on your screen. corner handle © Jacqui Sharp 2012 PowerPoint 2010 Page11
- 12. Add a Photo Click on the Home Tab, and then click on the arrow next to the New Slide button . Click on the Slide format that will show off the whole photo (Title and Content, or Content with Caption or Picture with Caption) 3. Click on the Insert Picture icon in the Content box 4. Select a photo and click Insert 5. Resize photo in the usual way if necessary © Jacqui Sharp 2012 PowerPoint 2010 Page12
- 13. Add text over the top Click on the Insert Tab Click on the Text box button Drag a text box over the photo Type in your text If you want a coloured background, click on the Drawing Tools Tab Change the background colours by choosing from Shape Styles © Jacqui Sharp 2012 PowerPoint 2010 Page13
- 14. Add a table Click on the Home Tab, and then click on the arrow next to the New Slide button . Choose Title and Content Click on the Table button Type in 4 in Number of Columns Type in 3 in Number of Rows, click OK Hint: when you first double click to add a table the Insert Table box has the first number highlighted, just type 4 straight away and then press the Tab key, this will jump to the next box and highlight the number, just type in your next number. You do not have to delete the number, when something is highlighted you can type over it. © Jacqui Sharp 2012 PowerPoint 2010 Step 14
- 15. Add information to a table Click in each individual cell to add information. Change size and font by highlighting text and using toolbars. Make the table bigger by clicking and dragging on the bottom of the table © Jacqui Sharp 2012 PowerPoint 2010 Step 15
- 16. Format a table To insert colours into your table, highlight the cells you wish to colour, click on the Home Tab, and select the arrow next to the Shape Fill button and choose a colour. Choose an auto formatted table by clicking on the Design Tab and selecting a format or click on the arrow next to the formats to see more choices. © Jacqui Sharp 2012 PowerPoint 2010 Step 16
- 17. Insert and Delete rows Click on the table. Click on the Layout button on the Table toolbar. Insert rows by clicking on Insert columns by clicking on Delete rows and columns by clicking on © Jacqui Sharp 2012 PowerPoint 2010 Step 17
- 18. Add a Movie or a Sound Click on the Home Tab, and then click on the arrow next to the New Slide button . Choose Title and Content Click on the Movie button Navigate to your movie file, click on it and click Open Click on Automatically with the next dialogue box © Jacqui Sharp 2012 PowerPoint 2010 Step 18
- 19. View Buttons NormalView SlideshowView Here you can This is the button write additional for playing your notes below the slideshow on a slide and view all full screen. Press of the slides Esc key to move down the side back to Normal SlideSorterView View View all your slides, move slides or copy slides to another presentation © Jacqui Sharp 2012 PowerPoint 2010 Step 19
- 20. Apply Transitions slide to slide Click on the Transitions tab Choose a Transition by clicking on one of these or click on the drop down arrow to select a different transition. Running your mouse over the transitions will demonstrate how they look. Change the speed of transition or Add a sound by clicking on Decide how it will happen by selecting by mouse click or have happen automatically by seconds. Click on Apply to all slides if you want the same transition right through otherwise click on each individual slide and choose a different transition for each slide. © Jacqui Sharp 2012 PowerPoint 2010 Step 20
- 21. Add effects to Bullet Points Click on Animations Click on the Bullet point slide in the main screen Choose an effect Click on the Animation Pane to make effects on each bullet point © Jacqui Sharp 2012 PowerPoint 2010 Step 21
- 22. Add effects to Photos, Graphics or WordArt Click on the photo, graphic or WordArt to select it Select AnimationsTab Choose an effect © Jacqui Sharp 2012 PowerPoint 2010 Step 22
- 23. To play your slideshow Click on the Slide show button or press F5 on the keyboard Press Esc to exit the Slideshow Or click on the button at the bottom left of the screen, select End Show from the menu © Jacqui Sharp 2012 PowerPoint 2010 Step 23
- 24. Link a page to another page using hyperlink buttons. Hyperlink Buttons You will need to have all your slides prepared before you can make links Click on the Insert tab Make a Home button that will take you back to your Home Page by clicking on the Shapes button, scroll down to the Actions button Click on the House button. Click and drag the button onto the screen. The Action Settings dialogue box will appear. © Jacqui Sharp 2012 PowerPoint 2010 Step 24
- 25. Hyperlink Buttons 1. Click on the Hyperlink to and select, which slide or file you want to link the button to. In this case we want to return Home so select First Slide 2. Click OK 3. Test out the button by clicking SlideShow button or press F5 Hint: Press Esc to go back to editing slideshow © Jacqui Sharp 2012 PowerPoint 2010 Step 25
- 26. Hyperlink Graphics 1. Insert a picture (it can be from any source you like) 2. Click once on the graphic to select it 3. Press Ctrl K on keyboard 4. Click on PlaceinthisDocument 5. Click on the slide you want to link to, click OK 6. Press F5 to view your new hyperlink, your mouse pointer will change into a hand when you pass it over the graphic © Jacqui Sharp 2012 PowerPoint 2010 Step 26
- 27. Hyperlink Text 1. Highlight the word or words that you want to hyperlink 1. Press Ctrl K on keyboard 2. Click on Place in this Document 3. Click on the slide you want to link to, click OK 4. Press F5 to view your new hyperlink, your mouse pointer will change into a hand when you pass it over the words The Hyperlinked text will now be underlined The Farmer went to open the gate and a different colour. © Jacqui Sharp 2012 PowerPoint 2010 Step 27
- 28. How to make a Chart Click on the Home Tab, and then click on the New Slide button and choose TitleandContentSlide from the Layout button then click on the InsertSmartArt Graphic button Click on the Hierarchy button, click on the OrganisationChart click OK Type information, the box will change shape to fit the words Type information in other shapes Delete a shape by clicking on it and pressing Delete on the keyboard To insert more shapes double click on one of the shapes Click on AddShape and choose © Jacqui Sharp 2012 PowerPoint 2010 Step 28
- 29. Make changes to the Chart Make changes to the Make changes to the Make changes to the Chart by clicking on Chart by clicking on Chart by clicking on Layout and change the Layout and change the layout (Run your mouse layout (Run your mouse over them and you will over them and you will Layout see a preview.) Click on see a preview. and change the layout the arrow for more choices. Click on the Click on the colours button SmartArtstyles and and change the choose a chart. colour of your Click on the arrow chart for more choices. © Jacqui Sharp 2012 PowerPoint 2010 Step 29
- 30. Convert to SmartArt Convert bullet points to SmartArt Click in a bullet point list, click on the Home Tab Click on Convert to SmartArt, run your mouse over the SmartArt examples and you will see previews in your bullet point list, click on your chosen example © Jacqui Sharp 2012 PowerPoint 2010 Step 30
- 31. Align Text in text boxes 1. Click in the text boxes 2. Click on the Align Text button on the Home Tab 3. Choose an alignment 4. repeat for other text boxes © Jacqui Sharp 2012 PowerPoint 2010 Step 31