SlideShare uma empresa Scribd logo
1 de 11
Baixar para ler offline
Basic	
  tutorial	
  for	
  Dreamweaver	
  CS5	


Creating	
  a	
  New	
  Website:	
  	
  
When	
  you	
  first	
  open	
  up	
  Dreamweaver,	
  a	
  welcome	
  screen	
  introduces	
  the	
  user	
  to	
  
some	
  basic	
  options	
  to	
  start	
  creating	
  websites.	


If	
  you’re	
  going	
  to	
  create	
  a	
  new	
  website,	
  most	
  of	
  the	
  time	
  you’ll	
  want	
  to	
  create	
  a	
  new	
  
HTML	
  (hyper-­‐text	
  markup	
  language)	
  document.	
  Web	
  pages	
  must	
  be	
  written	
  using	
  
HTML,	
  but	
  luckily	
  it’s	
  one	
  of	
  the	
  simpler	
  languages.	
  	
  CSS	
  (cascading	
  style	
  sheets)	
  
works	
  in	
  conjunction	
  with	
  HTML	
  pages	
  to	
  alter	
  the	
  presentation	
  of	
  the	
  website,	
  that	
  
is,	
  the	
  look	
  and	
  formatting	
  of	
  it.	


If	
  you	
  have	
  a	
  previously	
  created	
  website,	
  you	
  can	
  locate	
  it	
  by	
  clicking	
  on	
  ‘Open…’	


Using	
  a	
  Template:	
  	
  
By	
  clicking	
  on	
  any	
  of	
  the	
  ‘Create	
  New’	
  links,	
  it’ll	
  open	
  a	
  default	
  website	
  without	
  a	
  
template.	
  To	
  see	
  the	
  choices	
  that	
  Dreamweaver	
  has,	
  go	
  to	
  File	
  -­‐>	
  New…	
  or	
  simple	
  
press	
  	
  ‘⌘N’.	


Menu	
  for	
  choosing	
  different	
  templates.	
  To	
  get	
  there,	
  go	
  to	
  File	
  -­>	
  New…	


If	
  you	
  look	
  under	
  the	
  ‘Blank	
  Page’	
  tab	
  (as	
  demonstrated	
  above),	
  it’ll	
  allow	
  you	
  to	
  
choose	
  templates	
  within	
  these	
  different	
  page	
  types,	
  i.e.	
  HTML,	
  CSS,	
  JavaScript,	
  and	
  
XML,	
  among	
  others.	
  What’s	
  different,	
  however,	
  is	
  being	
  able	
  to	
  choose	
  layouts.	
  Now,	
  
it’s	
  possible	
  to	
  create	
  1	
  column	
  pages,	
  2	
  column	
  pages,	
  or	
  3	
  column	
  pages.	
  None	
  has	
  
just	
  that,	
  no	
  columns	
  but	
  rather	
  a	
  blank	
  canvas.	


There’s	
  also	
  an	
  option	
  for	
  adding	
  a	
  header	
  and	
  footer	
  into	
  the	
  web	
  page.	
  Headers	
  
are	
  often	
  used	
  for	
  the	
  website’s	
  name	
  and	
  logo.	
  The	
  footer	
  on	
  the	
  other	
  hand	
  is	
  often	
  
used	
  for	
  navigation	
  within	
  the	
  website	
  or	
  as	
  a	
  placeholder	
  for	
  the	
  website’s	
  
copyright	
  information.	
  Although	
  websites	
  have	
  developed	
  these	
  kind	
  of	
  standards,	
  
you	
  can	
  put	
  whatever	
  you	
  want	
  in	
  either	
  of	
  these	
  sections.	


Finally,	
  there’s	
  the	
  option	
  of	
  fixed	
  and	
  liquid	
  pages.	
  A	
  fixed	
  layout	
  is	
  a	
  website	
  
layout	
  where	
  your	
  website’s	
  size	
  doesn’t	
  change	
  as	
  your	
  browser	
  window’s	
  width	
  
increases	
  or	
  decreases,	
  it	
  remains	
  fixed.	
  A	
  liquid	
  layout,	
  however,	
  is	
  a	
  website	
  
layout	
  that	
  expands	
  or	
  compresses	
  with	
  your	
  browser	
  window’s	
  width.	
  Each	
  of	
  
these	
  layouts	
  has	
  its	
  own	
  advantages	
  and	
  disadvantages	
  that	
  could	
  be	
  used	
  in	
  
various	
  scenarios.	


Example	
  of	
  a	
  3	
  column	
  fixed	
  website	
  with	
  a	
  header	
  and	
  footer.	


Inserting	
  text:	
  	
  
There	
  are	
  two	
  ways	
  to	
  insert	
  text	
  into	
  a	
  website	
  through	
  Dreamweaver.	


The	
  two	
  ways	
  to	
  insert	
  text,	
  either:	
  1.	
  in	
  the	
  design	
  section,	
  or	
  2.	
  in	
  the	
  code	
  itself.	


The	
  different	
  codes	
  created	
  for	
  websites	
  dictate	
  what	
  is	
  visually	
  seen	
  on	
  a	
  website.	
  
Dreamweaver	
  allows	
  you	
  to	
  look	
  at	
  both	
  the	
  code	
  of	
  the	
  website	
  (2)	
  and	
  how	
  the	
  
website	
  will	
  look	
  like	
  with	
  the	
  codes	
  (1).	
  	
  Through	
  Dreamweaver,	
  you	
  can	
  insert	
  text	
  
into	
  either	
  of	
  these	
  fields.	
  Just	
  simply	
  click	
  where	
  you	
  want	
  to	
  be	
  inserted	
  into	
  and	
  
type	
  away.	


On	
  a	
  side	
  note,	
  don’t	
  be	
  worried	
  about	
  getting	
  lost	
  going	
  back	
  and	
  forth	
  between	
  the	
  
code	
  and	
  the	
  design	
  section.	
  If	
  you	
  click	
  the	
  mouse	
  on	
  a	
  section	
  in	
  the	
  design	
  section	
  
(1),	
  there	
  will	
  be	
  mark	
  in	
  the	
  code	
  itself	
  (2)	
  to	
  show	
  where	
  the	
  text	
  is.	


Cleaning	
  up	
  HTML	
  (from	
  Word):	
  	
  
You’ll	
  most	
  likely	
  find	
  yourself	
  importing	
  text	
  from	
  Microsoft	
  Word	
  into	
  
Dreamweaver.	
  Since	
  Word	
  uses	
  its	
  own	
  coding	
  to	
  show	
  different	
  design	
  changes	
  
(such	
  as	
  paragraphs,	
  indents,	
  characters,	
  and	
  tables),	
  a	
  lot	
  of	
  times	
  copying	
  and	
  
pasting	
  will	
  show	
  up	
  different	
  in	
  Dreamweaver.	
  Rather	
  than	
  going	
  through	
  the	
  
whole	
  document	
  again	
  and	
  changing	
  every	
  character	
  back	
  to	
  its	
  original	
  state,	
  here	
  
are	
  some	
  suggestions	
  to	
  clean	
  up	
  the	
  HTML.	


1. When	
  inserting	
  the	
  text,	
  click	
  where	
  you	
  want	
  the	
  text	
  to	
  be	
  inserted,	
  then	
  go	
  
to	
  Edit	
  -­‐>	
  Paste	
  Special.	
  In	
  the	
  pop-­‐up	
  box,	
  check	
  ‘Text	
  only’	
  as	
  demonstrated	
  
below.	
  This	
  will	
  remove	
  any	
  formatting	
  that	
  Word	
  has	
  added	
  and	
  leave	
  you	
  
with	
  just	
  the	
  text.	


2. Check	
  the	
  code	
  itself	
  to	
  see	
  if	
  there	
  are	
  any	
  unwanted	
  characters	
  added	
  into	
  
the	
  text.	
  Often	
  these	
  are	
  characters	
  only	
  noticeable	
  in	
  the	
  code	
  and	
  not	
  in	
  the	
  
design	
  view	
  itself,	
  so	
  it’s	
  rather	
  useful	
  to	
  scan	
  the	
  code	
  to	
  make	
  sure	
  
everything	
  looks	
  correct.	


Lists:	
  	
  
There	
  are	
  two	
  types	
  of	
  lists	
  that	
  can	
  be	
  created,	
  ordered	
  lists	
  and	
  unordered	
  lists.	
  An	
  
ordered	
  list	
  is	
  just	
  that,	
  a	
  list	
  that	
  goes	
  in	
  order,	
  either	
  numerically	
  or	
  
alphabetically.	
  An	
  unordered	
  list	
  is	
  typically	
  a	
  bulleted	
  list,	
  although	
  its	
  appearance	
  
can	
  be	
  altered	
  through	
  CSS.	


1. This	
  
2. Is	
  an	
  	
  
3. Ordered	
  list	
  
• This	
  
• Is	
  an	
  	
  
• unordered	
  list	
  
To	
  create	
  either	
  of	
  these	
  lists,	
  click	
  on	
  the	
  space	
  you	
  want	
  to	
  create	
  the	
  list	
  in	
  the	
  
design	
  view.	
  Then	
  below	
  in	
  the	
  Properties	
  menu,	
  the	
  lists	
  will	
  be	
  to	
  the	
  right	
  of	
  the	
  
bold	
  and	
  italicize	
  symbols.	
  The	
  first	
  of	
  the	
  buttons	
  on	
  the	
  left	
  is	
  an	
  unordered	
  list,	
  
and	
  the	
  button	
  on	
  the	
  right	
  is	
  the	
  ordered	
  list.	
  After	
  clicking	
  either	
  of	
  the	
  buttons,	
  
start	
  typing	
  above.	
  Every	
  time	
  you	
  hit	
  ‘return’,	
  the	
  list	
  will	
  continue.	
  To	
  get	
  out	
  of	
  the	
  
list,	
  hit	
  ‘return’	
  twice.	


If	
  you’re	
  having	
  difficulty	
  finding	
  the	
  Properties	
  bar	
  below,	
  go	
  to	
  Window	
  -­‐>	
  
Properties	
  (or	
  ⌘F3).	
  An	
  alternative	
  way	
  to	
  access	
  the	
  lists	
  is	
  by	
  going	
  into	
  Insert	
  -­‐>	
  
HTML	
  -­‐>	
  Text	
  Objects	
  -­‐>	
  Unordered	
  List	
  or	
  Ordered	
  List.	


History	
  Panel:	


The	
  history	
  panel	
  shows	
  recent	
  changes	
  that	
  you’ve	
  made	
  to	
  your	
  document.	
  This	
  
panel	
  allows	
  you	
  to	
  undo	
  or	
  redo	
  commands	
  you’ve	
  completed.	
  To	
  activate	
  the	
  
history	
  panel,	
  simply	
  go	
  to	
  Windows	
  -­‐>	
  History.	


(http://help.adobe.com/en_US/dreamweaver/cs/using/WSc78c5058ca073340dcda91
10b1f693f21-­7cf5a.html)	


Dreamweaver	
  CSS	
  Classes:	
  	
  
Dreamweaver	
  has	
  a	
  window	
  to	
  manage	
  the	
  different	
  CSS	
  styles.	
  These	
  CSS	
  styles,	
  as	
  
explained	
  earlier,	
  allow	
  users	
  to	
  customize	
  the	
  appearance	
  of	
  the	
  HTML	
  website.	
  
When	
  you	
  create	
  a	
  new	
  website,	
  you	
  have	
  the	
  option	
  to	
  attach	
  the	
  CSS	
  style	
  to	
  the	
  
head	
  of	
  the	
  HTML	
  page,	
  or	
  to	
  create	
  a	
  separate	
  CSS	
  page	
  that	
  is	
  linked	
  to	
  the	
  HTML	
  
page.	


Often,	
  it’s	
  useful	
  to	
  create	
  a	
  new	
  CSS	
  style.	
  If	
  you	
  decide	
  to	
  create	
  another	
  HTML	
  
page	
  but	
  you	
  want	
  to	
  use	
  a	
  previously	
  created	
  CSS	
  page,	
  it’s	
  as	
  easy	
  as	
  clicking	
  the	
  
link	
  button	
  under	
  the	
  ‘Attach	
  CSS	
  file’	
  query	
  (as	
  shown	
  above),	
  finding	
  the	
  CSS	
  page,	
  
and	
  accepting	
  it.	
  Also,	
  if	
  you	
  change	
  any	
  aspects	
  of	
  the	
  CSS	
  page,	
  it	
  changes	
  all	
  of	
  the	
  
previously	
  linked	
  HTML	
  pages,	
  making	
  it	
  easier	
  to	
  keep	
  everything	
  in	
  unison.	


On	
  the	
  right	
  side	
  of	
  the	
  screen,	
  there	
  should	
  be	
  
a	
  CSS	
  Styles	
  window.	
  If	
  not,	
  go	
  to	
  Window	
  -­‐>	
  
CSS	
  Styles.	


Each	
  of	
  these	
  properties	
  has	
  a	
  slew	
  of	
  
customizations	
  that	
  each	
  user	
  can	
  apply	
  to	
  it.	
  To	
  
access	
  these	
  customizations,	
  double-­‐click	
  on	
  
any	
  of	
  these	
  properties.	


There	
  is	
  quite	
  a	
  lot	
  of	
  different	
  ways	
  to	
  
customize	
  these	
  CSS	
  style	
  pages,	
  and	
  most	
  of	
  it	
  
you’ll	
  pick	
  up	
  while	
  making	
  changes	
  to	
  your	
  
pages.	
  Dreamweaver	
  lets	
  you	
  change	
  the	
  
following	
  fields:	
  Type,	
  Background,	
  Block,	
  Box,	
  
Border,	
  List,	
  Positioning,	
  and	
  Extensions.	


Type	
  lets	
  you	
  change	
  the	
  font	
  of	
  the	
  text.	
  This	
  
includes	
  the	
  size,	
  the	
  weight,	
  the	
  color,	
  and	
  
decorations.	


Background	
  lets	
  you	
  change	
  the	
  background	
  of	
  
a	
  field.	
  You	
  can	
  change	
  it	
  into	
  a	
  color	
  or	
  into	
  an	
  image.	
  There	
  are	
  fields	
  that	
  allow	
  
you	
  to	
  position	
  it	
  according	
  to	
  its	
  x	
  and	
  y-­‐axis	
  along	
  with	
  how	
  it	
  repeats	
  itself.	


Block	
  lets	
  the	
  users	
  change	
  the	
  alignment	
  of	
  text	
  and	
  how	
  it’s	
  placed.	
  The	
  display	
  
section	
  can	
  be	
  used	
  to	
  change	
  unordered	
  lists	
  into	
  creative	
  navigations.	


Box	
  lets	
  you	
  change	
  attributes	
  of	
  boxes.	
  This	
  includes	
  its	
  width	
  and	
  height,	
  along	
  
with	
  padding	
  and	
  margin.	


Border	
  adds	
  a	
  border	
  to	
  a	
  certain	
  section.	
  You	
  can	
  change	
  the	
  type	
  of	
  style,	
  width,	
  
and	
  color	
  for	
  all	
  four	
  sides	
  (top,	
  right,	
  bottom,	
  and	
  left)	
  of	
  a	
  box.	


List	
  lets	
  you	
  change	
  aspects	
  of	
  lists,	
  such	
  as	
  the	
  type	
  of	
  bullet	
  used	
  for	
  unordered	
  
lists,	
  images,	
  and	
  positions.	


Positioning	
  lets	
  you	
  move	
  the	
  position	
  of	
  an	
  attribute,	
  such	
  as	
  its	
  placement,	
  
position,	
  visibility,	
  along	
  with	
  its	
  z-­‐index	
  and	
  overflow.	


Extensions	
  allow	
  you	
  to	
  change	
  aspects	
  of	
  page	
  breaks	
  and	
  visual	
  effects,	
  such	
  as	
  
different	
  cursor	
  types	
  and	
  filters.	
  
Links	
  (websites,	
  documents,	
  PDF	
  files,	
  emails):	
  	
  
To	
  include	
  a	
  hyperlink,	
  highlight	
  the	
  text	
  that	
  you	
  want	
  to	
  link.	
  Below	
  in	
  the	
  
Properties	
  bar,	
  enter	
  in	
  the	
  desired	
  URL	
  under	
  the	
  ‘Link’	
  query	
  and	
  then	
  hit	
  enter.	


Another	
  method	
  to	
  create	
  a	
  
hyperlink	
  is	
  to	
  highlight	
  a	
  text	
  
and	
  then	
  right-­‐click.	
  In	
  the	
  
contextual	
  menu,	
  select	
  ‘Make	
  
Link’.	


In	
  the	
  window,	
  at	
  the	
  bottom	
  
there	
  is	
  a	
  section	
  to	
  include	
  a	
  
URL.	
  Simply	
  enter	
  in	
  the	
  URL.	


If	
  you	
  want	
  to	
  link	
  to	
  another	
  
document	
  (i.e.	
  an	
  HTML	
  page,	
  
a	
  PDF,	
  etc.),	
  find	
  the	
  document	
  
and	
  hit	
  OK.	


Emails	
  are	
  treated	
  similarly.	
  Highlight	
  the	
  text,	
  enter	
  in	
  the	
  email	
  address	
  in	
  the	
  
‘Link’	
  query	
  below	
  (John.Doe@gmail.com	
  for	
  example),	
  then	
  hit	
  enter.	
  It’s	
  
recommended	
  to	
  use	
  an	
  email	
  obfuscator	
  to	
  avoid	
  spambots	
  from	
  using	
  available	
  
email	
  addresses	
  online.	


Dreamweaver	
  also	
  allows	
  you	
  to	
  use	
  the	
  HTML	
  code	
  to	
  enter	
  in	
  a	
  hyperlink.	
  The	
  
code	
  is	
  as	
  follows:	


<a	
  href="http://www.sjfc.edu">This	
  is	
  the	
  text.</a>	


The	
  “http://www.sjfc.edu”	
  is	
  where	
  the	
  URL	
  goes,	
  where	
  ‘This	
  is	
  the	
  text.”	
  is	
  the	
  text	
  
that	
  appears	
  for	
  the	
  link.	
  So	
  you’d	
  be	
  left	
  with	
  a	
  field	
  that	
  looks	
  like	
  this:	
  	
  
This	
  is	
  the	
  text.	


Make	
  sure	
  to	
  enter	
  this	
  code	
  online	
  in	
  the	
  code	
  section	
  of	
  Dreamweaver.	
  If	
  you	
  enter	
  
it	
  in	
  the	
  Design	
  view,	
  then	
  it	
  will	
  not	
  work.	
  	
  
Anchors:	
  	
  
A	
  technique	
  that	
  websites	
  use	
  is	
  allowing	
  users	
  to	
  be	
  linked	
  to	
  a	
  specific	
  part	
  of	
  a	
  
website.	
  This	
  is	
  often	
  used	
  with	
  news	
  stories,	
  where	
  a	
  user	
  is	
  taken	
  to	
  a	
  perhaps	
  the	
  
third	
  or	
  fourth	
  paragraph	
  rather	
  than	
  at	
  the	
  beginning.	
  To	
  create	
  this,	
  you	
  should	
  
use	
  IDs.	
  There	
  are	
  two	
  steps,	
  the	
  first	
  is	
  labeling	
  the	
  area	
  to	
  link	
  to	
  with	
  an	
  ID	
  and	
  
the	
  second	
  is	
  linking	
  to	
  this	
  ID.	


1. To	
  create	
  an	
  anchor,	
  highlight	
  a	
  word	
  where	
  you	
  want	
  the	
  anchor	
  to	
  be.	
  	
  In	
  
the	
  Property	
  Window,	
  type	
  in	
  a	
  name	
  for	
  the	
  ID.	
  
2. To link to the ID, select the text that will be the link in the Design view. Under the
Link box in the Property window, type # and then the name of the ID created in
step 1. If you chose the ID name to be “fisher”, type in #fisher in the Link box.
3. It’s also possible to link to an ID in a different HTML page. Rather than typing in
“#fisher” into the Link box, put the filename ahead of it. So if the ID is on a page
titled “about.html”, you would type in “about.html#fisher”.
	
  
Multiple	
  Text	
  Link	
  Styles:	
  	
  
Dreamweaver	
  lets	
  you	
  change	
  the	
  different	
  styles	
  of	
  hyperlinks	
  depending	
  on	
  what	
  
the	
  user	
  does.	
  There	
  are	
  three	
  main	
  styles	
  for	
  links:	


1. Link	
  color	
  –	
  How	
  the	
  link	
  is	
  viewed	
  regularly	
  on	
  a	
  website	
  without	
  the	
  
cruiser	
  hovering	
  over	
  it.	
  	
  (a:link)	
  
2. Visited	
  links	
  –	
  After	
  a	
  link	
  is	
  clicked,	
  the	
  link	
  is	
  changed	
  to	
  a	
  different	
  color.	
  
This	
  lets	
  the	
  user	
  know	
  that	
  they	
  had	
  already	
  visited	
  the	
  hyperlink.	
  
(a:visited)	
  
3. Rollover	
  links	
  –	
  When	
  the	
  user	
  rolls	
  over	
  the	
  link	
  with	
  the	
  mouse	
  without	
  
clicking	
  it,	
  the	
  link	
  turns	
  into	
  a	
  different	
  color.	
  When	
  the	
  mouse	
  is	
  rolled	
  off	
  
the	
  link,	
  it	
  reverts	
  to	
  its	
  original	
  link	
  color.	
  	
  (a:hover)	


You	
  can	
  define	
  different	
  rules	
  for	
  different	
  areas	
  of	
  a	
  page	
  by	
  placing	
  the	
  name	
  of	
  the	
  
ID	
  or	
  class	
  before	
  the	
  “pseudo-­‐tags”	
  described	
  above:	


.content	
  a:link	


OR	


  .sidebar1	
  a:link	


Inserting	
  Images:	
  	
  
To	
  insert	
  an	
  image,	
  place	
  the	
  insertion	
  marker	
  in	
  the	
  Design	
  view	
  of	
  Dreamweaver.	
  
Next,	
  go	
  to	
  Insert	
  -­‐>	
  Image.	
  You	
  can	
  then	
  either	
  choose	
  to	
  insert	
  an	
  image	
  saved	
  
locally	
  on	
  your	
  computer	
  (or	
  hosted	
  on	
  the	
  server),	
  or	
  you	
  can	
  insert	
  the	
  URL	
  of	
  the	
  
image	
  if	
  taken	
  online.	


To	
  use	
  the	
  image	
  as	
  a	
  link,	
  first	
  click	
  on	
  the	
  image.	
  In	
  the	
  Properties	
  box	
  below,	
  go	
  
to	
  the	
  ‘Link’	
  box.	
  Then	
  either	
  insert	
  the	
  URL	
  and	
  press	
  enter,	
  or	
  click	
  on	
  the	
  folder	
  
button	
  and	
  find	
  a	
  document	
  to	
  link	
  the	
  image	
  to.	


Background	
  Images:	
  	
  
To	
  insert	
  a	
  background	
  image,	
  you’ll	
  need	
  to	
  go	
  through	
  the	
  CSS	
  Styles	
  panel.	
  
Double-­‐click	
  on	
  an	
  existing	
  rule	
  to	
  open	
  the	
  properties	
  for	
  it.	
  (Typically,	
  the	
  
templates	
  use	
  ‘body’	
  as	
  the	
  background	
  for	
  the	
  whole	
  page,	
  but	
  depending	
  on	
  how	
  
the	
  page	
  is	
  set	
  up,	
  it	
  may	
  be	
  something	
  different.)	


In	
  the	
  CSS	
  Rule	
  Definition	
  
dialogue	
  box,	
  select	
  
Background.	
  The	
  second	
  
field	
  has	
  ‘Background-­‐
image’,	
  which	
  lets	
  you	
  
choose	
  whichever	
  image	
  
you’d	
  like	
  to	
  be	
  the	
  
background	
  of	
  that	
  
property.	
  This	
  can	
  either	
  
be	
  a	
  URL	
  or	
  a	
  saved	
  
image.	


Image	
  Maps:	
  	
  
Images	
  can	
  be	
  divided	
  into	
  regions	
  called	
  hotspots,	
  creating	
  image	
  maps.	
  When	
  
someone	
  clicks	
  on	
  the	
  hotspot,	
  an	
  action	
  happens,	
  such	
  as	
  following	
  a	
  URL	
  or	
  
opening	
  a	
  file.	


After an image is put onto your page, click on it. Below in the Properties field there will
be a section titled ‘Map’. Fill in a name for the hotspot to keep track of the image map.
After entering in a name, click on either the circle tool, the rectangle tool, or the polygon
tool. You can use either of these tools to create a hotspot shaped to fit whatever you need.
After clicking on the tool, go to the image and click and drag to create the desired shape.
If you have the polygon tool, you can click on the image wherever you want a point, and
to close it simply click on the first point created.
You’ll	
  be	
  asked	
  to	
  fill	
  out	
  an	
  
Alternative	
  title	
  so	
  people	
  that	
  are	
  
either	
  unable	
  to	
  view	
  the	
  picture	
  or	
  
whose	
  computers	
  can’t	
  access	
  it	
  
will	
  be	
  able	
  to	
  know	
  what	
  the	
  
image	
  is	
  of.	


After	
  creating	
  the	
  hotspot,	
  click	
  on	
  
the	
  hotspot.	
  Below	
  in	
  the	
  
Properties	
  field,	
  insert	
  the	
  URL	
  in	
  
the	
  ‘Link’	
  box,	
  or	
  click	
  on	
  the	
  folder	
  
and	
  search	
  for	
  a	
  document	
  on	
  the	
  
computer.	


Mais conteúdo relacionado

Mais procurados

Microsoft word tutorials COMPLETE by Gulshan K Maheshwari(QAU)
Microsoft word tutorials COMPLETE by Gulshan  K Maheshwari(QAU)Microsoft word tutorials COMPLETE by Gulshan  K Maheshwari(QAU)
Microsoft word tutorials COMPLETE by Gulshan K Maheshwari(QAU)GulshanKumar368
 
Microsoft Word Home tab Presentation
Microsoft Word Home tab PresentationMicrosoft Word Home tab Presentation
Microsoft Word Home tab PresentationTanveer Ahmed
 
Microsoft Office Word Tutorial
Microsoft Office Word TutorialMicrosoft Office Word Tutorial
Microsoft Office Word TutorialvirtualMaryam
 
Microsoft Word 2010 Beginning Class
Microsoft Word 2010 Beginning ClassMicrosoft Word 2010 Beginning Class
Microsoft Word 2010 Beginning ClassLady_Informationado
 
Word 2007 Presentation
Word 2007 PresentationWord 2007 Presentation
Word 2007 PresentationKristen T
 
Microsoft word-getting-started-basics
Microsoft word-getting-started-basicsMicrosoft word-getting-started-basics
Microsoft word-getting-started-basicsPraveen Sudarsan
 
Google chrome developer and tags
Google chrome developer and tagsGoogle chrome developer and tags
Google chrome developer and tagsgreg robertson
 
Word2007 tutorial
Word2007 tutorialWord2007 tutorial
Word2007 tutorialsat646
 
LU Communications Fillable Form Guide
LU Communications Fillable Form GuideLU Communications Fillable Form Guide
LU Communications Fillable Form GuideZachary Uhlmann
 
Microsoft Power Point 2007 (Basics)
Microsoft Power Point 2007 (Basics)Microsoft Power Point 2007 (Basics)
Microsoft Power Point 2007 (Basics)NikitaSharma332
 
Introduction to-power point-2016
Introduction to-power point-2016Introduction to-power point-2016
Introduction to-power point-2016Damilola Mosaku
 
Introduction to Microsoft Office
Introduction to Microsoft OfficeIntroduction to Microsoft Office
Introduction to Microsoft OfficeCik Na Shohaili
 

Mais procurados (20)

Ms word
Ms wordMs word
Ms word
 
Rubistar tutorial
Rubistar tutorialRubistar tutorial
Rubistar tutorial
 
Microsoft word tutorials COMPLETE by Gulshan K Maheshwari(QAU)
Microsoft word tutorials COMPLETE by Gulshan  K Maheshwari(QAU)Microsoft word tutorials COMPLETE by Gulshan  K Maheshwari(QAU)
Microsoft word tutorials COMPLETE by Gulshan K Maheshwari(QAU)
 
Ms word 2007 pptx
Ms word 2007 pptxMs word 2007 pptx
Ms word 2007 pptx
 
Fewd week7 slides
Fewd week7 slidesFewd week7 slides
Fewd week7 slides
 
Microsoft Word Home tab Presentation
Microsoft Word Home tab PresentationMicrosoft Word Home tab Presentation
Microsoft Word Home tab Presentation
 
Microsoft Office Word Tutorial
Microsoft Office Word TutorialMicrosoft Office Word Tutorial
Microsoft Office Word Tutorial
 
Microsoft Word 2010 Beginning Class
Microsoft Word 2010 Beginning ClassMicrosoft Word 2010 Beginning Class
Microsoft Word 2010 Beginning Class
 
Word 2007 Presentation
Word 2007 PresentationWord 2007 Presentation
Word 2007 Presentation
 
Fewd week8 slides
Fewd week8 slidesFewd week8 slides
Fewd week8 slides
 
Microsoft word-getting-started-basics
Microsoft word-getting-started-basicsMicrosoft word-getting-started-basics
Microsoft word-getting-started-basics
 
Google chrome developer and tags
Google chrome developer and tagsGoogle chrome developer and tags
Google chrome developer and tags
 
MS Word 2010 tutorial 3
MS Word 2010 tutorial 3MS Word 2010 tutorial 3
MS Word 2010 tutorial 3
 
Word2007 tutorial
Word2007 tutorialWord2007 tutorial
Word2007 tutorial
 
LU Communications Fillable Form Guide
LU Communications Fillable Form GuideLU Communications Fillable Form Guide
LU Communications Fillable Form Guide
 
Microsoft Power Point 2007 (Basics)
Microsoft Power Point 2007 (Basics)Microsoft Power Point 2007 (Basics)
Microsoft Power Point 2007 (Basics)
 
Introduction to-power point-2016
Introduction to-power point-2016Introduction to-power point-2016
Introduction to-power point-2016
 
Introduction to Microsoft Office
Introduction to Microsoft OfficeIntroduction to Microsoft Office
Introduction to Microsoft Office
 
171dreamweaver
171dreamweaver171dreamweaver
171dreamweaver
 
Dw Lesson01
Dw Lesson01Dw Lesson01
Dw Lesson01
 

Destaque

Dreamweaver cs6 multiple browsers and devices training demo
Dreamweaver cs6 multiple browsers and devices training demoDreamweaver cs6 multiple browsers and devices training demo
Dreamweaver cs6 multiple browsers and devices training demoyunjuli
 
Modul pengenalan dreamweaver
Modul pengenalan dreamweaverModul pengenalan dreamweaver
Modul pengenalan dreamweaverRomaAngga
 
modul pemrograman web dengan dreamweaver, sql & php
modul pemrograman web dengan dreamweaver, sql & phpmodul pemrograman web dengan dreamweaver, sql & php
modul pemrograman web dengan dreamweaver, sql & phpIsmi Islamia
 
Tutorial 08 - Creating Effective Web Pages
Tutorial 08 - Creating Effective Web PagesTutorial 08 - Creating Effective Web Pages
Tutorial 08 - Creating Effective Web Pagesdpd
 
Designing Responsively with Dreamweaver
Designing Responsively with DreamweaverDesigning Responsively with Dreamweaver
Designing Responsively with Dreamweaverjameswillweb
 
How to Use Dreamweaver cs6
How to Use Dreamweaver cs6 How to Use Dreamweaver cs6
How to Use Dreamweaver cs6 Salman Memon
 
php tutorial - By Bally Chohan
php tutorial - By Bally Chohanphp tutorial - By Bally Chohan
php tutorial - By Bally Chohanballychohanuk
 
Dreamweaver cs6 step by step
Dreamweaver cs6 step by stepDreamweaver cs6 step by step
Dreamweaver cs6 step by stepzoran Jelinek
 
Tutorial 8 - Creating Effective Web Pages
Tutorial 8 - Creating Effective Web PagesTutorial 8 - Creating Effective Web Pages
Tutorial 8 - Creating Effective Web Pagesdpd
 
Dreamweaver CS6, jQuery, PhoneGap, mobile design
Dreamweaver CS6, jQuery, PhoneGap, mobile designDreamweaver CS6, jQuery, PhoneGap, mobile design
Dreamweaver CS6, jQuery, PhoneGap, mobile designDee Sadler
 
Tutorial PHP and Dreamweaver CS3
Tutorial PHP and Dreamweaver CS3Tutorial PHP and Dreamweaver CS3
Tutorial PHP and Dreamweaver CS3Halizah Ahmad
 

Destaque (12)

Dreamweaver cs6 multiple browsers and devices training demo
Dreamweaver cs6 multiple browsers and devices training demoDreamweaver cs6 multiple browsers and devices training demo
Dreamweaver cs6 multiple browsers and devices training demo
 
Dreamweaver
DreamweaverDreamweaver
Dreamweaver
 
Modul pengenalan dreamweaver
Modul pengenalan dreamweaverModul pengenalan dreamweaver
Modul pengenalan dreamweaver
 
modul pemrograman web dengan dreamweaver, sql & php
modul pemrograman web dengan dreamweaver, sql & phpmodul pemrograman web dengan dreamweaver, sql & php
modul pemrograman web dengan dreamweaver, sql & php
 
Tutorial 08 - Creating Effective Web Pages
Tutorial 08 - Creating Effective Web PagesTutorial 08 - Creating Effective Web Pages
Tutorial 08 - Creating Effective Web Pages
 
Designing Responsively with Dreamweaver
Designing Responsively with DreamweaverDesigning Responsively with Dreamweaver
Designing Responsively with Dreamweaver
 
How to Use Dreamweaver cs6
How to Use Dreamweaver cs6 How to Use Dreamweaver cs6
How to Use Dreamweaver cs6
 
php tutorial - By Bally Chohan
php tutorial - By Bally Chohanphp tutorial - By Bally Chohan
php tutorial - By Bally Chohan
 
Dreamweaver cs6 step by step
Dreamweaver cs6 step by stepDreamweaver cs6 step by step
Dreamweaver cs6 step by step
 
Tutorial 8 - Creating Effective Web Pages
Tutorial 8 - Creating Effective Web PagesTutorial 8 - Creating Effective Web Pages
Tutorial 8 - Creating Effective Web Pages
 
Dreamweaver CS6, jQuery, PhoneGap, mobile design
Dreamweaver CS6, jQuery, PhoneGap, mobile designDreamweaver CS6, jQuery, PhoneGap, mobile design
Dreamweaver CS6, jQuery, PhoneGap, mobile design
 
Tutorial PHP and Dreamweaver CS3
Tutorial PHP and Dreamweaver CS3Tutorial PHP and Dreamweaver CS3
Tutorial PHP and Dreamweaver CS3
 

Semelhante a Basic Dreamweaver CS5 Tutorial for Creating Websites

Lesson 2 cs5
Lesson 2   cs5Lesson 2   cs5
Lesson 2 cs5dtelepos
 
Customizing Your WordPress Theme Using Firebug and Basic CSS
Customizing Your WordPress Theme Using Firebug and Basic CSSCustomizing Your WordPress Theme Using Firebug and Basic CSS
Customizing Your WordPress Theme Using Firebug and Basic CSSLaura Hartwig
 
Intermediate Web Design.doc
Intermediate Web Design.docIntermediate Web Design.doc
Intermediate Web Design.docbutest
 
Intermediate Web Design.doc
Intermediate Web Design.docIntermediate Web Design.doc
Intermediate Web Design.docbutest
 
Top 8 hidden handy features of word press
Top 8 hidden handy features of word pressTop 8 hidden handy features of word press
Top 8 hidden handy features of word pressJohn057
 
Web Designing Training in Ambala ! BATRA COMPUTER CENTRE
Web Designing Training in Ambala ! BATRA COMPUTER CENTREWeb Designing Training in Ambala ! BATRA COMPUTER CENTRE
Web Designing Training in Ambala ! BATRA COMPUTER CENTREjatin batra
 
Behance prosite beginners guide
Behance prosite beginners guideBehance prosite beginners guide
Behance prosite beginners guideMicrosoft
 
Create content template
Create content templateCreate content template
Create content templatevokeron
 
Nvu tutorial1 1
Nvu tutorial1 1Nvu tutorial1 1
Nvu tutorial1 1RJOROZCO
 

Semelhante a Basic Dreamweaver CS5 Tutorial for Creating Websites (20)

Dreamweaver
DreamweaverDreamweaver
Dreamweaver
 
Dreamweaver
DreamweaverDreamweaver
Dreamweaver
 
Dreamweaver cs4
Dreamweaver cs4Dreamweaver cs4
Dreamweaver cs4
 
Lesson 2 cs5
Lesson 2   cs5Lesson 2   cs5
Lesson 2 cs5
 
Customizing Your WordPress Theme Using Firebug and Basic CSS
Customizing Your WordPress Theme Using Firebug and Basic CSSCustomizing Your WordPress Theme Using Firebug and Basic CSS
Customizing Your WordPress Theme Using Firebug and Basic CSS
 
Dreamweaver
DreamweaverDreamweaver
Dreamweaver
 
Intermediate Web Design.doc
Intermediate Web Design.docIntermediate Web Design.doc
Intermediate Web Design.doc
 
Intermediate Web Design.doc
Intermediate Web Design.docIntermediate Web Design.doc
Intermediate Web Design.doc
 
Top 8 hidden handy features of word press
Top 8 hidden handy features of word pressTop 8 hidden handy features of word press
Top 8 hidden handy features of word press
 
Web Designing Training in Ambala ! BATRA COMPUTER CENTRE
Web Designing Training in Ambala ! BATRA COMPUTER CENTREWeb Designing Training in Ambala ! BATRA COMPUTER CENTRE
Web Designing Training in Ambala ! BATRA COMPUTER CENTRE
 
Behance prosite beginners guide
Behance prosite beginners guideBehance prosite beginners guide
Behance prosite beginners guide
 
Create content template
Create content templateCreate content template
Create content template
 
MS Word
MS WordMS Word
MS Word
 
Task 2
Task 2Task 2
Task 2
 
Nvu tutorial1 1
Nvu tutorial1 1Nvu tutorial1 1
Nvu tutorial1 1
 
Dw cs3-introduction
Dw cs3-introductionDw cs3-introduction
Dw cs3-introduction
 
TemplateTutorial
TemplateTutorialTemplateTutorial
TemplateTutorial
 
TemplateTutorial
TemplateTutorialTemplateTutorial
TemplateTutorial
 
CSS_tutorial_1
CSS_tutorial_1CSS_tutorial_1
CSS_tutorial_1
 
CSS_tutorial_1
CSS_tutorial_1CSS_tutorial_1
CSS_tutorial_1
 

Basic Dreamweaver CS5 Tutorial for Creating Websites

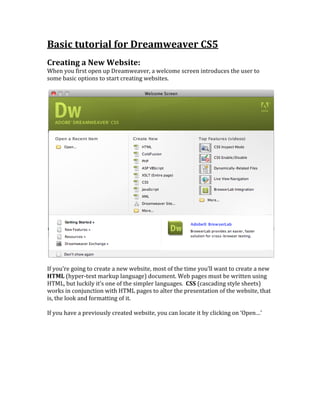
  • 1. Basic  tutorial  for  Dreamweaver  CS5     Creating  a  New  Website:     When  you  first  open  up  Dreamweaver,  a  welcome  screen  introduces  the  user  to   some  basic  options  to  start  creating  websites.           If  you’re  going  to  create  a  new  website,  most  of  the  time  you’ll  want  to  create  a  new   HTML  (hyper-­‐text  markup  language)  document.  Web  pages  must  be  written  using   HTML,  but  luckily  it’s  one  of  the  simpler  languages.    CSS  (cascading  style  sheets)   works  in  conjunction  with  HTML  pages  to  alter  the  presentation  of  the  website,  that   is,  the  look  and  formatting  of  it.       If  you  have  a  previously  created  website,  you  can  locate  it  by  clicking  on  ‘Open…’      
  • 2. Using  a  Template:     By  clicking  on  any  of  the  ‘Create  New’  links,  it’ll  open  a  default  website  without  a   template.  To  see  the  choices  that  Dreamweaver  has,  go  to  File  -­‐>  New…  or  simple   press    ‘⌘N’.       Menu  for  choosing  different  templates.  To  get  there,  go  to  File  -­>  New…     If  you  look  under  the  ‘Blank  Page’  tab  (as  demonstrated  above),  it’ll  allow  you  to   choose  templates  within  these  different  page  types,  i.e.  HTML,  CSS,  JavaScript,  and   XML,  among  others.  What’s  different,  however,  is  being  able  to  choose  layouts.  Now,   it’s  possible  to  create  1  column  pages,  2  column  pages,  or  3  column  pages.  None  has   just  that,  no  columns  but  rather  a  blank  canvas.       There’s  also  an  option  for  adding  a  header  and  footer  into  the  web  page.  Headers   are  often  used  for  the  website’s  name  and  logo.  The  footer  on  the  other  hand  is  often   used  for  navigation  within  the  website  or  as  a  placeholder  for  the  website’s   copyright  information.  Although  websites  have  developed  these  kind  of  standards,   you  can  put  whatever  you  want  in  either  of  these  sections.       Finally,  there’s  the  option  of  fixed  and  liquid  pages.  A  fixed  layout  is  a  website   layout  where  your  website’s  size  doesn’t  change  as  your  browser  window’s  width   increases  or  decreases,  it  remains  fixed.  A  liquid  layout,  however,  is  a  website   layout  that  expands  or  compresses  with  your  browser  window’s  width.  Each  of   these  layouts  has  its  own  advantages  and  disadvantages  that  could  be  used  in   various  scenarios.    
  • 3.     Example  of  a  3  column  fixed  website  with  a  header  and  footer.         Inserting  text:     There  are  two  ways  to  insert  text  into  a  website  through  Dreamweaver.         The  two  ways  to  insert  text,  either:  1.  in  the  design  section,  or  2.  in  the  code  itself.       The  different  codes  created  for  websites  dictate  what  is  visually  seen  on  a  website.   Dreamweaver  allows  you  to  look  at  both  the  code  of  the  website  (2)  and  how  the   website  will  look  like  with  the  codes  (1).    Through  Dreamweaver,  you  can  insert  text   into  either  of  these  fields.  Just  simply  click  where  you  want  to  be  inserted  into  and   type  away.    
  • 4.   On  a  side  note,  don’t  be  worried  about  getting  lost  going  back  and  forth  between  the   code  and  the  design  section.  If  you  click  the  mouse  on  a  section  in  the  design  section   (1),  there  will  be  mark  in  the  code  itself  (2)  to  show  where  the  text  is.         Cleaning  up  HTML  (from  Word):     You’ll  most  likely  find  yourself  importing  text  from  Microsoft  Word  into   Dreamweaver.  Since  Word  uses  its  own  coding  to  show  different  design  changes   (such  as  paragraphs,  indents,  characters,  and  tables),  a  lot  of  times  copying  and   pasting  will  show  up  different  in  Dreamweaver.  Rather  than  going  through  the   whole  document  again  and  changing  every  character  back  to  its  original  state,  here   are  some  suggestions  to  clean  up  the  HTML.       1. When  inserting  the  text,  click  where  you  want  the  text  to  be  inserted,  then  go   to  Edit  -­‐>  Paste  Special.  In  the  pop-­‐up  box,  check  ‘Text  only’  as  demonstrated   below.  This  will  remove  any  formatting  that  Word  has  added  and  leave  you   with  just  the  text.           2. Check  the  code  itself  to  see  if  there  are  any  unwanted  characters  added  into   the  text.  Often  these  are  characters  only  noticeable  in  the  code  and  not  in  the   design  view  itself,  so  it’s  rather  useful  to  scan  the  code  to  make  sure   everything  looks  correct.       Lists:     There  are  two  types  of  lists  that  can  be  created,  ordered  lists  and  unordered  lists.  An   ordered  list  is  just  that,  a  list  that  goes  in  order,  either  numerically  or   alphabetically.  An  unordered  list  is  typically  a  bulleted  list,  although  its  appearance   can  be  altered  through  CSS.         1. This   2. Is  an     3. Ordered  list   • This   • Is  an     • unordered  list  
  • 5. To  create  either  of  these  lists,  click  on  the  space  you  want  to  create  the  list  in  the   design  view.  Then  below  in  the  Properties  menu,  the  lists  will  be  to  the  right  of  the   bold  and  italicize  symbols.  The  first  of  the  buttons  on  the  left  is  an  unordered  list,   and  the  button  on  the  right  is  the  ordered  list.  After  clicking  either  of  the  buttons,   start  typing  above.  Every  time  you  hit  ‘return’,  the  list  will  continue.  To  get  out  of  the   list,  hit  ‘return’  twice.           If  you’re  having  difficulty  finding  the  Properties  bar  below,  go  to  Window  -­‐>   Properties  (or  ⌘F3).  An  alternative  way  to  access  the  lists  is  by  going  into  Insert  -­‐>   HTML  -­‐>  Text  Objects  -­‐>  Unordered  List  or  Ordered  List.               History  Panel:       The  history  panel  shows  recent  changes  that  you’ve  made  to  your  document.  This   panel  allows  you  to  undo  or  redo  commands  you’ve  completed.  To  activate  the   history  panel,  simply  go  to  Windows  -­‐>  History.      
  • 6.     (http://help.adobe.com/en_US/dreamweaver/cs/using/WSc78c5058ca073340dcda91 10b1f693f21-­7cf5a.html)       Dreamweaver  CSS  Classes:     Dreamweaver  has  a  window  to  manage  the  different  CSS  styles.  These  CSS  styles,  as   explained  earlier,  allow  users  to  customize  the  appearance  of  the  HTML  website.   When  you  create  a  new  website,  you  have  the  option  to  attach  the  CSS  style  to  the   head  of  the  HTML  page,  or  to  create  a  separate  CSS  page  that  is  linked  to  the  HTML   page.           Often,  it’s  useful  to  create  a  new  CSS  style.  If  you  decide  to  create  another  HTML   page  but  you  want  to  use  a  previously  created  CSS  page,  it’s  as  easy  as  clicking  the   link  button  under  the  ‘Attach  CSS  file’  query  (as  shown  above),  finding  the  CSS  page,  
  • 7. and  accepting  it.  Also,  if  you  change  any  aspects  of  the  CSS  page,  it  changes  all  of  the   previously  linked  HTML  pages,  making  it  easier  to  keep  everything  in  unison.           On  the  right  side  of  the  screen,  there  should  be   a  CSS  Styles  window.  If  not,  go  to  Window  -­‐>   CSS  Styles.       Each  of  these  properties  has  a  slew  of   customizations  that  each  user  can  apply  to  it.  To   access  these  customizations,  double-­‐click  on   any  of  these  properties.       There  is  quite  a  lot  of  different  ways  to   customize  these  CSS  style  pages,  and  most  of  it   you’ll  pick  up  while  making  changes  to  your   pages.  Dreamweaver  lets  you  change  the   following  fields:  Type,  Background,  Block,  Box,   Border,  List,  Positioning,  and  Extensions.       Type  lets  you  change  the  font  of  the  text.  This   includes  the  size,  the  weight,  the  color,  and   decorations.       Background  lets  you  change  the  background  of   a  field.  You  can  change  it  into  a  color  or  into  an  image.  There  are  fields  that  allow   you  to  position  it  according  to  its  x  and  y-­‐axis  along  with  how  it  repeats  itself.       Block  lets  the  users  change  the  alignment  of  text  and  how  it’s  placed.  The  display   section  can  be  used  to  change  unordered  lists  into  creative  navigations.       Box  lets  you  change  attributes  of  boxes.  This  includes  its  width  and  height,  along   with  padding  and  margin.       Border  adds  a  border  to  a  certain  section.  You  can  change  the  type  of  style,  width,   and  color  for  all  four  sides  (top,  right,  bottom,  and  left)  of  a  box.       List  lets  you  change  aspects  of  lists,  such  as  the  type  of  bullet  used  for  unordered   lists,  images,  and  positions.       Positioning  lets  you  move  the  position  of  an  attribute,  such  as  its  placement,   position,  visibility,  along  with  its  z-­‐index  and  overflow.     Extensions  allow  you  to  change  aspects  of  page  breaks  and  visual  effects,  such  as   different  cursor  types  and  filters.  
  • 8. Links  (websites,  documents,  PDF  files,  emails):     To  include  a  hyperlink,  highlight  the  text  that  you  want  to  link.  Below  in  the   Properties  bar,  enter  in  the  desired  URL  under  the  ‘Link’  query  and  then  hit  enter.             Another  method  to  create  a   hyperlink  is  to  highlight  a  text   and  then  right-­‐click.  In  the   contextual  menu,  select  ‘Make   Link’.       In  the  window,  at  the  bottom   there  is  a  section  to  include  a   URL.  Simply  enter  in  the  URL.       If  you  want  to  link  to  another   document  (i.e.  an  HTML  page,   a  PDF,  etc.),  find  the  document   and  hit  OK.             Emails  are  treated  similarly.  Highlight  the  text,  enter  in  the  email  address  in  the   ‘Link’  query  below  (John.Doe@gmail.com  for  example),  then  hit  enter.  It’s   recommended  to  use  an  email  obfuscator  to  avoid  spambots  from  using  available   email  addresses  online.       Dreamweaver  also  allows  you  to  use  the  HTML  code  to  enter  in  a  hyperlink.  The   code  is  as  follows:       <a  href="http://www.sjfc.edu">This  is  the  text.</a>     The  “http://www.sjfc.edu”  is  where  the  URL  goes,  where  ‘This  is  the  text.”  is  the  text   that  appears  for  the  link.  So  you’d  be  left  with  a  field  that  looks  like  this:     This  is  the  text.       Make  sure  to  enter  this  code  online  in  the  code  section  of  Dreamweaver.  If  you  enter   it  in  the  Design  view,  then  it  will  not  work.    
  • 9. Anchors:     A  technique  that  websites  use  is  allowing  users  to  be  linked  to  a  specific  part  of  a   website.  This  is  often  used  with  news  stories,  where  a  user  is  taken  to  a  perhaps  the   third  or  fourth  paragraph  rather  than  at  the  beginning.  To  create  this,  you  should   use  IDs.  There  are  two  steps,  the  first  is  labeling  the  area  to  link  to  with  an  ID  and   the  second  is  linking  to  this  ID.       1. To  create  an  anchor,  highlight  a  word  where  you  want  the  anchor  to  be.    In   the  Property  Window,  type  in  a  name  for  the  ID.   2. To link to the ID, select the text that will be the link in the Design view. Under the Link box in the Property window, type # and then the name of the ID created in step 1. If you chose the ID name to be “fisher”, type in #fisher in the Link box. 3. It’s also possible to link to an ID in a different HTML page. Rather than typing in “#fisher” into the Link box, put the filename ahead of it. So if the ID is on a page titled “about.html”, you would type in “about.html#fisher”.   Multiple  Text  Link  Styles:     Dreamweaver  lets  you  change  the  different  styles  of  hyperlinks  depending  on  what   the  user  does.  There  are  three  main  styles  for  links:       1. Link  color  –  How  the  link  is  viewed  regularly  on  a  website  without  the   cruiser  hovering  over  it.    (a:link)   2. Visited  links  –  After  a  link  is  clicked,  the  link  is  changed  to  a  different  color.   This  lets  the  user  know  that  they  had  already  visited  the  hyperlink.   (a:visited)   3. Rollover  links  –  When  the  user  rolls  over  the  link  with  the  mouse  without   clicking  it,  the  link  turns  into  a  different  color.  When  the  mouse  is  rolled  off   the  link,  it  reverts  to  its  original  link  color.    (a:hover)     You  can  define  different  rules  for  different  areas  of  a  page  by  placing  the  name  of  the   ID  or  class  before  the  “pseudo-­‐tags”  described  above:     .content  a:link       OR      .sidebar1  a:link            
  • 10. Inserting  Images:     To  insert  an  image,  place  the  insertion  marker  in  the  Design  view  of  Dreamweaver.   Next,  go  to  Insert  -­‐>  Image.  You  can  then  either  choose  to  insert  an  image  saved   locally  on  your  computer  (or  hosted  on  the  server),  or  you  can  insert  the  URL  of  the   image  if  taken  online.       To  use  the  image  as  a  link,  first  click  on  the  image.  In  the  Properties  box  below,  go   to  the  ‘Link’  box.  Then  either  insert  the  URL  and  press  enter,  or  click  on  the  folder   button  and  find  a  document  to  link  the  image  to.       Background  Images:     To  insert  a  background  image,  you’ll  need  to  go  through  the  CSS  Styles  panel.   Double-­‐click  on  an  existing  rule  to  open  the  properties  for  it.  (Typically,  the   templates  use  ‘body’  as  the  background  for  the  whole  page,  but  depending  on  how   the  page  is  set  up,  it  may  be  something  different.)       In  the  CSS  Rule  Definition   dialogue  box,  select   Background.  The  second   field  has  ‘Background-­‐ image’,  which  lets  you   choose  whichever  image   you’d  like  to  be  the   background  of  that   property.  This  can  either   be  a  URL  or  a  saved   image.           Image  Maps:     Images  can  be  divided  into  regions  called  hotspots,  creating  image  maps.  When   someone  clicks  on  the  hotspot,  an  action  happens,  such  as  following  a  URL  or   opening  a  file.       After an image is put onto your page, click on it. Below in the Properties field there will be a section titled ‘Map’. Fill in a name for the hotspot to keep track of the image map. After entering in a name, click on either the circle tool, the rectangle tool, or the polygon tool. You can use either of these tools to create a hotspot shaped to fit whatever you need.
  • 11. After clicking on the tool, go to the image and click and drag to create the desired shape. If you have the polygon tool, you can click on the image wherever you want a point, and to close it simply click on the first point created. You’ll  be  asked  to  fill  out  an   Alternative  title  so  people  that  are   either  unable  to  view  the  picture  or   whose  computers  can’t  access  it   will  be  able  to  know  what  the   image  is  of.       After  creating  the  hotspot,  click  on   the  hotspot.  Below  in  the   Properties  field,  insert  the  URL  in   the  ‘Link’  box,  or  click  on  the  folder   and  search  for  a  document  on  the   computer.