SlideShare uma empresa Scribd logo
1 de 18
Baixar para ler offline
Sun Rise Int’l Industry Development Limited
www.theebikemotor.com
Contents
Getting started…………………………............Page 2,3
Tool List………………………………...............Page 4
Mounting the Tire………………………………Page 5
Preparing the Rear Wheel …………………...Page 6
Preparing and installing the Front Wheel…...Page 7
Installing the wheel……………………………..Page 8
Installing brake lever and throttle……..………Page 9,
Installing LED or LCD meter ……………….....Page 10
PAS Installation……………………………….....Page 11
Installing Vehicle Speed Sensor……………….Page 12
Connections of Controllers……………………..Page 13 – 15
Installing the controller bag…………………….Page 16
Installing the water-bottle/tube battery………..Page 17
Cable tying…………………………..………...…Page 18
1
Getting started:
First, open up the box and lay out the contents inside.
Check that you have:
1) A motorized BLDC motor wheel or
3) A controller set
5)Twist throttle or Thumb Throttle
2
2) A mini geared motor wheel
4) A pair of power brake
6) PAS system
Optional items:
1) Lithium battery 2) controller's bag
(Example: water-bottle li-ion battery)
3)LED meter or 4) Multifunction LCD meter
Different types of lithium batteries
3
Basic Tools:
List:
P) At least 6 Zip Ties (For holding wires firmly to your bicycle frame) Q) 3
Allen Wrench with diameters 2.5mm, 3.0mm, 5.0mm
R) Adjustable wrench
S) Philip Screwdriver
Locating the parts on the bike
4
Preparing the Back Wheel (Includes Gear and Disc Brake)
1) Installing the gear on the back wheel
2) Installing the Disc Brake
Note: Please check your disc brake diameter. In most cases, 140mm disc brake are used for
the rear wheel while 160mm are used for the front wheel.
5
Mounting the Tire
First confirm the direction of the thread pattern of your tires.
Turn the wheel around and insert the tube’s valve into the opening of the wheel's rim.
Place the rest of the tube between the rim and the tire and pull the tire over the rim. Then
pump it up, check for leaks and you're done assembling the wheel.
Important Note: Please choose a tube with a longer valve as
THEEBIKEMOTOR rims are double walled. The rims are double walled to be
able to with stand the powerful torque from the motor.
6
Preparing and installing the Front Wheel
1) Remove your front wheel
2) Insert the motorized wheel, insuring, that the cables running to the motor are on
the right handside in normal driving direction. Otherwise the wheel will run backwards! Please
orient yourself using the following pictures
7
Installing the wheel
Place the hub of your motor between the dropouts of your bike frame. Firmly seat the axle into
the dropouts to gain a good fit. Tighten the nuts very firmly. This is a crucial step in building
a good electric bike, as the motor provides a very large torque, which may otherwise loosen
your nuts.
8
Installing brake levers
Slide the hand brakes into both sides of the
handlebar. Find a comfortable position.
Then tighten using a 5.0mm Allen
Wrench
Installing the thumb throttle/twist throttle
A-Thumb throttle
Slide the thumb throttle into either side of the Place your hand on the bar and find the
handlebar that you f eel comfortable with. position where your thumb feels most
comfortable pressing down on the throttle.
B- Twist throttle
Slide the Twist throttle into the right side of
the handlebar and get a feel of twisting the
throttle.
9
When you feel comfortable with the
position, use the 3.0mm Allen Wrench
and secure it into place.
Installing LED Display
Slide the LED display on either side of the steering bar so you feel comfortable.
Installing Multifunction LCD Display
Slide the display on either side of the steering bar so you feel comfortable.
10
Installing Vehicle Speed Sensor
When the LCD instrument matches the high-speed motor without signal for speed output
(with built-in clutch), it requires an external vehicle speed sensor.The installation method of
the external vehicle speed sensor refers to the pictures below.
Mount the sensor to the fork using the
rubber bands
Mount the magnet to the spokes using a
Philips screwdriver
11
Installing Pedal Assistance System (PAS)
The Pedal Assistance System, also known as pedal system, is a compulsory component of an
electric vehicle in European countries. The system controls the amount of electricity
supplied to the motor proportional to the angular velocity of the pedal. (i.e. the faster you
pedal, the faster the motor turns.)
Remove the pedal crank arm.
Place the sensor ring to the bottom
bracket and secure it in position using
washers or superglue.
Place the outer magnetic ring next to the
sensor ring. Make sure they do not have any
contact by spacing them apart using washers.
Detail of sensor ring and magnetic ring.
Screw back the pedal into place, connect the PAS wire with the controller and you are
ready to ride legally in Europe.
12
Connection of Controllers
There are three intelligent controllers for our normal (A), LED (B) and LCD (C) kits. So
please connect your kits with different controller according to the connection graph below.
Note: please check which controller you have before connecting.
A: Normal controller:
13
B: LCD/LED controller:
LCD meter: it has two parts, one is the LCD display, the other is LCD speed sensor. LED
meter : everything is same to LCD ,just don’t care about speed sensor connector
14
Installing the water-bottle/tube battery
Remove screws for bottle holder from
frame
Use the screws to fix the battery holder to
the frame
Put the battery into the case. And
connect the battery to the controller
15
Installing the controller bag
The controller bag kit includes: one bag, a mounting plate, a clip plate, two screws and
nuts, one Allen key.
Slip the mounting plate under the saddle
support
Clip on the controller bag
Fasten the clip plate to the mounting
plate using both screws and nuts
Put the controller in the bag and connect the
cables
16
Cable tying
It is advisable to use cable ties to secure the cables to your bicycle frame. Perhaps you find a
way to tie them, so that they are almost invisible. Remember however to check, if they
impede the movement of the handlebars. Also secure the brake cables running to your front
and back brakes accordingly.
Note: As a suggestion, after you tied your cables, rotate your handlebars to see if the
movement is smooth and undisturbed.
Finishing the fight
Check-List: (Turn off the battery)
1)
2)
3)
4)
5)
6)
7)
8)
9)
Wheel is secured in place.
Back wheel is vertically aligned with front wheel.
Wheel has no loose parts.
All components on the handlebar have been secured tightly.
You are comfortable with the throttle, brakes, etc.
The handlebar is able to rotate freely.
The mechanical brakes work properly.
The battery cannot slide off without unlocking it.
Check that the battery poles are connected correctly.
17

Mais conteúdo relacionado

Mais procurados

Anti+lock+braking+system
Anti+lock+braking+systemAnti+lock+braking+system
Anti+lock+braking+system
Naishadh Desai
 
Groschopp 62401 specsheet
Groschopp 62401 specsheetGroschopp 62401 specsheet
Groschopp 62401 specsheet
Electromate
 
Antilocking brake sys
Antilocking brake sysAntilocking brake sys
Antilocking brake sys
Bharath Kanna
 

Mais procurados (20)

final ppt
final pptfinal ppt
final ppt
 
Anti Lock braking system
Anti Lock braking systemAnti Lock braking system
Anti Lock braking system
 
Groschopp 50138 specsheet
Groschopp 50138 specsheetGroschopp 50138 specsheet
Groschopp 50138 specsheet
 
Anti-lock Braking System
Anti-lock Braking SystemAnti-lock Braking System
Anti-lock Braking System
 
Seminar on ABS
Seminar on ABSSeminar on ABS
Seminar on ABS
 
anti lock braking system
anti lock braking systemanti lock braking system
anti lock braking system
 
Anti lock braking system(abs)
Anti lock braking system(abs)Anti lock braking system(abs)
Anti lock braking system(abs)
 
emergency braking system
emergency braking systememergency braking system
emergency braking system
 
Anti+lock+braking+system
Anti+lock+braking+systemAnti+lock+braking+system
Anti+lock+braking+system
 
Anti Lock Brakes System
Anti Lock Brakes SystemAnti Lock Brakes System
Anti Lock Brakes System
 
abs
absabs
abs
 
ABS Sensor
ABS SensorABS Sensor
ABS Sensor
 
Anti lock breaking system pro
Anti lock breaking system proAnti lock breaking system pro
Anti lock breaking system pro
 
ANTI LOCK BRAKING SYSTEM
ANTI LOCK BRAKING SYSTEMANTI LOCK BRAKING SYSTEM
ANTI LOCK BRAKING SYSTEM
 
Abs system
Abs systemAbs system
Abs system
 
Hydraulic brakes and anti lock braking system(ABS)
Hydraulic brakes and anti lock braking system(ABS)Hydraulic brakes and anti lock braking system(ABS)
Hydraulic brakes and anti lock braking system(ABS)
 
Anti-lock braking system
Anti-lock braking systemAnti-lock braking system
Anti-lock braking system
 
Anti lock(main)
Anti lock(main)Anti lock(main)
Anti lock(main)
 
Groschopp 62401 specsheet
Groschopp 62401 specsheetGroschopp 62401 specsheet
Groschopp 62401 specsheet
 
Antilocking brake sys
Antilocking brake sysAntilocking brake sys
Antilocking brake sys
 

Destaque

Merchant Program True Money - Complete
Merchant Program True Money - CompleteMerchant Program True Money - Complete
Merchant Program True Money - Complete
Novita Anugrah
 
JessicaPotter_WorkSample
JessicaPotter_WorkSampleJessicaPotter_WorkSample
JessicaPotter_WorkSample
Jessica Potter
 
SIMULATION OF CYCLE DELIV. MKM REV2
SIMULATION OF CYCLE DELIV. MKM REV2SIMULATION OF CYCLE DELIV. MKM REV2
SIMULATION OF CYCLE DELIV. MKM REV2
Imam Khudori sudibyo
 

Destaque (18)

Questioons on Optics_ For CBSE Students
Questioons on Optics_ For CBSE StudentsQuestioons on Optics_ For CBSE Students
Questioons on Optics_ For CBSE Students
 
programs
programsprograms
programs
 
Merchant Program True Money - Complete
Merchant Program True Money - CompleteMerchant Program True Money - Complete
Merchant Program True Money - Complete
 
JessicaPotter_WorkSample
JessicaPotter_WorkSampleJessicaPotter_WorkSample
JessicaPotter_WorkSample
 
MAHESH
MAHESHMAHESH
MAHESH
 
Banco de preguntas
Banco de preguntasBanco de preguntas
Banco de preguntas
 
SIMULATION OF CYCLE DELIV. MKM REV2
SIMULATION OF CYCLE DELIV. MKM REV2SIMULATION OF CYCLE DELIV. MKM REV2
SIMULATION OF CYCLE DELIV. MKM REV2
 
Practica 10
Practica 10Practica 10
Practica 10
 
Water treatment plant
Water treatment plantWater treatment plant
Water treatment plant
 
Dt
DtDt
Dt
 
Expo comunicacion.pptx la pobreza
Expo comunicacion.pptx la pobrezaExpo comunicacion.pptx la pobreza
Expo comunicacion.pptx la pobreza
 
Partesdeuncomputador
Partesdeuncomputador Partesdeuncomputador
Partesdeuncomputador
 
Tarea 2 prese Rosario Abril
Tarea 2  prese Rosario AbrilTarea 2  prese Rosario Abril
Tarea 2 prese Rosario Abril
 
Autobiografia
AutobiografiaAutobiografia
Autobiografia
 
Princess game-กัลยาณี
Princess game-กัลยาณีPrincess game-กัลยาณี
Princess game-กัลยาณี
 
¿Mariana inteligibilidad esquemas
¿Mariana inteligibilidad esquemas¿Mariana inteligibilidad esquemas
¿Mariana inteligibilidad esquemas
 
Ukrmova 8-klas-bondarenko
Ukrmova 8-klas-bondarenkoUkrmova 8-klas-bondarenko
Ukrmova 8-klas-bondarenko
 
Trabajo
TrabajoTrabajo
Trabajo
 

Semelhante a Installation user manual

Semelhante a Installation user manual (15)

BLDC motor ebike conversion kit user manual-for 350 to 1200W kit
BLDC motor ebike conversion kit user manual-for 350 to 1200W kitBLDC motor ebike conversion kit user manual-for 350 to 1200W kit
BLDC motor ebike conversion kit user manual-for 350 to 1200W kit
 
Jcb 437 wheel loader service repair manual (437 sn 22312947 and up)
Jcb 437 wheel loader service repair manual (437 sn 22312947 and up)Jcb 437 wheel loader service repair manual (437 sn 22312947 and up)
Jcb 437 wheel loader service repair manual (437 sn 22312947 and up)
 
Jcb 437 wheel loader service repair manual (437 sn 22312947 and up)
Jcb 437 wheel loader service repair manual (437 sn 22312947 and up)Jcb 437 wheel loader service repair manual (437 sn 22312947 and up)
Jcb 437 wheel loader service repair manual (437 sn 22312947 and up)
 
Jcb 437 wheel loader service repair manual (437 sn 22312947 and up)
Jcb 437 wheel loader service repair manual (437 sn 22312947 and up)Jcb 437 wheel loader service repair manual (437 sn 22312947 and up)
Jcb 437 wheel loader service repair manual (437 sn 22312947 and up)
 
Jcb 437 wheel loader service repair manual (437 sn 22312947 and up)
Jcb 437 wheel loader service repair manual (437 sn 22312947 and up)Jcb 437 wheel loader service repair manual (437 sn 22312947 and up)
Jcb 437 wheel loader service repair manual (437 sn 22312947 and up)
 
Claas targo k50 telehandlers service repair manual
Claas targo k50 telehandlers service repair manualClaas targo k50 telehandlers service repair manual
Claas targo k50 telehandlers service repair manual
 
Claas targo k70 telehandlers service repair manual
Claas targo k70 telehandlers service repair manualClaas targo k70 telehandlers service repair manual
Claas targo k70 telehandlers service repair manual
 
Claas targo k60 telehandlers service repair manual
Claas targo k60 telehandlers service repair manualClaas targo k60 telehandlers service repair manual
Claas targo k60 telehandlers service repair manual
 
Claas targo k50 telehandlers service repair manual
Claas targo k50 telehandlers service repair manualClaas targo k50 telehandlers service repair manual
Claas targo k50 telehandlers service repair manual
 
Claas targo k70 telehandlers service repair manual
Claas targo k70 telehandlers service repair manualClaas targo k70 telehandlers service repair manual
Claas targo k70 telehandlers service repair manual
 
Claas targo k60 telehandlers service repair manual
Claas targo k60 telehandlers service repair manualClaas targo k60 telehandlers service repair manual
Claas targo k60 telehandlers service repair manual
 
Claas targo k60 telehandlers service repair manual
Claas targo k60 telehandlers service repair manualClaas targo k60 telehandlers service repair manual
Claas targo k60 telehandlers service repair manual
 
Claas targo k70 telehandlers service repair manual
Claas targo k70 telehandlers service repair manualClaas targo k70 telehandlers service repair manual
Claas targo k70 telehandlers service repair manual
 
Claas targo k50 telehandlers service repair manual
Claas targo k50 telehandlers service repair manualClaas targo k50 telehandlers service repair manual
Claas targo k50 telehandlers service repair manual
 
Claas targo k70 telehandlers service repair manual
Claas targo k70 telehandlers service repair manualClaas targo k70 telehandlers service repair manual
Claas targo k70 telehandlers service repair manual
 

Último

+971565801893>>SAFE AND ORIGINAL ABORTION PILLS FOR SALE IN DUBAI AND ABUDHAB...
+971565801893>>SAFE AND ORIGINAL ABORTION PILLS FOR SALE IN DUBAI AND ABUDHAB...+971565801893>>SAFE AND ORIGINAL ABORTION PILLS FOR SALE IN DUBAI AND ABUDHAB...
+971565801893>>SAFE AND ORIGINAL ABORTION PILLS FOR SALE IN DUBAI AND ABUDHAB...
Health
 
🔝|97111༒99012🔝 Call Girls In {Delhi} Cr Park ₹5.5k Cash Payment With Room De...
🔝|97111༒99012🔝 Call Girls In  {Delhi} Cr Park ₹5.5k Cash Payment With Room De...🔝|97111༒99012🔝 Call Girls In  {Delhi} Cr Park ₹5.5k Cash Payment With Room De...
🔝|97111༒99012🔝 Call Girls In {Delhi} Cr Park ₹5.5k Cash Payment With Room De...
Diya Sharma
 

Último (20)

+971565801893>>SAFE AND ORIGINAL ABORTION PILLS FOR SALE IN DUBAI AND ABUDHAB...
+971565801893>>SAFE AND ORIGINAL ABORTION PILLS FOR SALE IN DUBAI AND ABUDHAB...+971565801893>>SAFE AND ORIGINAL ABORTION PILLS FOR SALE IN DUBAI AND ABUDHAB...
+971565801893>>SAFE AND ORIGINAL ABORTION PILLS FOR SALE IN DUBAI AND ABUDHAB...
 
Trossard's Message Bridging Celebrities and Sports in Euro Cup 2024.docx
Trossard's Message Bridging Celebrities and Sports in Euro Cup 2024.docxTrossard's Message Bridging Celebrities and Sports in Euro Cup 2024.docx
Trossard's Message Bridging Celebrities and Sports in Euro Cup 2024.docx
 
Spain Vs Albania- Spain at risk of being thrown out of Euro 2024 with Tournam...
Spain Vs Albania- Spain at risk of being thrown out of Euro 2024 with Tournam...Spain Vs Albania- Spain at risk of being thrown out of Euro 2024 with Tournam...
Spain Vs Albania- Spain at risk of being thrown out of Euro 2024 with Tournam...
 
ALL NFL NETWORK CONTACTS- April 29, 2024
ALL NFL NETWORK CONTACTS- April 29, 2024ALL NFL NETWORK CONTACTS- April 29, 2024
ALL NFL NETWORK CONTACTS- April 29, 2024
 
Ramban Escorts ☎️8617697112 Starting From 5K to 15K High Profile Escorts In...
Ramban  Escorts ☎️8617697112  Starting From 5K to 15K High Profile Escorts In...Ramban  Escorts ☎️8617697112  Starting From 5K to 15K High Profile Escorts In...
Ramban Escorts ☎️8617697112 Starting From 5K to 15K High Profile Escorts In...
 
WhatsApp Chat: 📞 8617697112 Birbhum Call Girl available for hotel room package
WhatsApp Chat: 📞 8617697112 Birbhum  Call Girl available for hotel room packageWhatsApp Chat: 📞 8617697112 Birbhum  Call Girl available for hotel room package
WhatsApp Chat: 📞 8617697112 Birbhum Call Girl available for hotel room package
 
08448380779 Call Girls In Lajpat Nagar Women Seeking Men
08448380779 Call Girls In Lajpat Nagar Women Seeking Men08448380779 Call Girls In Lajpat Nagar Women Seeking Men
08448380779 Call Girls In Lajpat Nagar Women Seeking Men
 
Technical Data | Sig Sauer Easy6 BDX 1-6x24 | Optics Trade
Technical Data | Sig Sauer Easy6 BDX 1-6x24 | Optics TradeTechnical Data | Sig Sauer Easy6 BDX 1-6x24 | Optics Trade
Technical Data | Sig Sauer Easy6 BDX 1-6x24 | Optics Trade
 
Spain Vs Italy 20 players confirmed for Spain's Euro 2024 squad, and three po...
Spain Vs Italy 20 players confirmed for Spain's Euro 2024 squad, and three po...Spain Vs Italy 20 players confirmed for Spain's Euro 2024 squad, and three po...
Spain Vs Italy 20 players confirmed for Spain's Euro 2024 squad, and three po...
 
🔝|97111༒99012🔝 Call Girls In {Delhi} Cr Park ₹5.5k Cash Payment With Room De...
🔝|97111༒99012🔝 Call Girls In  {Delhi} Cr Park ₹5.5k Cash Payment With Room De...🔝|97111༒99012🔝 Call Girls In  {Delhi} Cr Park ₹5.5k Cash Payment With Room De...
🔝|97111༒99012🔝 Call Girls In {Delhi} Cr Park ₹5.5k Cash Payment With Room De...
 
JORNADA 5 LIGA MURO 2024INSUGURACION.pdf
JORNADA 5 LIGA MURO 2024INSUGURACION.pdfJORNADA 5 LIGA MURO 2024INSUGURACION.pdf
JORNADA 5 LIGA MURO 2024INSUGURACION.pdf
 
08448380779 Call Girls In International Airport Women Seeking Men
08448380779 Call Girls In International Airport Women Seeking Men08448380779 Call Girls In International Airport Women Seeking Men
08448380779 Call Girls In International Airport Women Seeking Men
 
Who Is Emmanuel Katto Uganda? His Career, personal life etc.
Who Is Emmanuel Katto Uganda? His Career, personal life etc.Who Is Emmanuel Katto Uganda? His Career, personal life etc.
Who Is Emmanuel Katto Uganda? His Career, personal life etc.
 
Personal Brand Exploration - By Bradley Dennis
Personal Brand Exploration - By Bradley DennisPersonal Brand Exploration - By Bradley Dennis
Personal Brand Exploration - By Bradley Dennis
 
Sports Writing (Rules,Tips, Examples, etc)
Sports Writing (Rules,Tips, Examples, etc)Sports Writing (Rules,Tips, Examples, etc)
Sports Writing (Rules,Tips, Examples, etc)
 
Slovenia Vs Serbia UEFA Euro 2024 Fixture Guide Every Fixture Detailed.docx
Slovenia Vs Serbia UEFA Euro 2024 Fixture Guide Every Fixture Detailed.docxSlovenia Vs Serbia UEFA Euro 2024 Fixture Guide Every Fixture Detailed.docx
Slovenia Vs Serbia UEFA Euro 2024 Fixture Guide Every Fixture Detailed.docx
 
Unveiling the Mystery of Main Bazar Chart
Unveiling the Mystery of Main Bazar ChartUnveiling the Mystery of Main Bazar Chart
Unveiling the Mystery of Main Bazar Chart
 
Croatia vs Italy Euro Cup 2024 Three pitfalls for Spalletti’s Italy in Group ...
Croatia vs Italy Euro Cup 2024 Three pitfalls for Spalletti’s Italy in Group ...Croatia vs Italy Euro Cup 2024 Three pitfalls for Spalletti’s Italy in Group ...
Croatia vs Italy Euro Cup 2024 Three pitfalls for Spalletti’s Italy in Group ...
 
08448380779 Call Girls In IIT Women Seeking Men
08448380779 Call Girls In IIT Women Seeking Men08448380779 Call Girls In IIT Women Seeking Men
08448380779 Call Girls In IIT Women Seeking Men
 
TAM Sports_IPL 17 Till Match 37_Celebrity Endorsement _Report.pdf
TAM Sports_IPL 17 Till Match 37_Celebrity Endorsement _Report.pdfTAM Sports_IPL 17 Till Match 37_Celebrity Endorsement _Report.pdf
TAM Sports_IPL 17 Till Match 37_Celebrity Endorsement _Report.pdf
 

Installation user manual

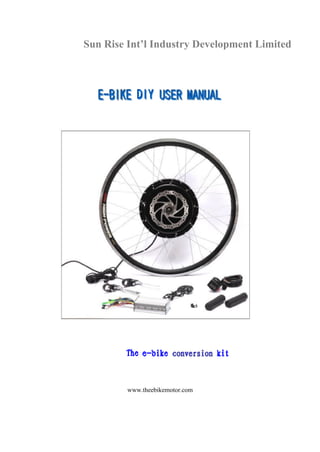
  • 1. Sun Rise Int’l Industry Development Limited www.theebikemotor.com
  • 2. Contents Getting started…………………………............Page 2,3 Tool List………………………………...............Page 4 Mounting the Tire………………………………Page 5 Preparing the Rear Wheel …………………...Page 6 Preparing and installing the Front Wheel…...Page 7 Installing the wheel……………………………..Page 8 Installing brake lever and throttle……..………Page 9, Installing LED or LCD meter ……………….....Page 10 PAS Installation……………………………….....Page 11 Installing Vehicle Speed Sensor……………….Page 12 Connections of Controllers……………………..Page 13 – 15 Installing the controller bag…………………….Page 16 Installing the water-bottle/tube battery………..Page 17 Cable tying…………………………..………...…Page 18 1
  • 3. Getting started: First, open up the box and lay out the contents inside. Check that you have: 1) A motorized BLDC motor wheel or 3) A controller set 5)Twist throttle or Thumb Throttle 2 2) A mini geared motor wheel 4) A pair of power brake 6) PAS system
  • 4. Optional items: 1) Lithium battery 2) controller's bag (Example: water-bottle li-ion battery) 3)LED meter or 4) Multifunction LCD meter Different types of lithium batteries 3
  • 5. Basic Tools: List: P) At least 6 Zip Ties (For holding wires firmly to your bicycle frame) Q) 3 Allen Wrench with diameters 2.5mm, 3.0mm, 5.0mm R) Adjustable wrench S) Philip Screwdriver Locating the parts on the bike 4
  • 6. Preparing the Back Wheel (Includes Gear and Disc Brake) 1) Installing the gear on the back wheel 2) Installing the Disc Brake Note: Please check your disc brake diameter. In most cases, 140mm disc brake are used for the rear wheel while 160mm are used for the front wheel. 5
  • 7. Mounting the Tire First confirm the direction of the thread pattern of your tires. Turn the wheel around and insert the tube’s valve into the opening of the wheel's rim. Place the rest of the tube between the rim and the tire and pull the tire over the rim. Then pump it up, check for leaks and you're done assembling the wheel. Important Note: Please choose a tube with a longer valve as THEEBIKEMOTOR rims are double walled. The rims are double walled to be able to with stand the powerful torque from the motor. 6
  • 8. Preparing and installing the Front Wheel 1) Remove your front wheel 2) Insert the motorized wheel, insuring, that the cables running to the motor are on the right handside in normal driving direction. Otherwise the wheel will run backwards! Please orient yourself using the following pictures 7
  • 9. Installing the wheel Place the hub of your motor between the dropouts of your bike frame. Firmly seat the axle into the dropouts to gain a good fit. Tighten the nuts very firmly. This is a crucial step in building a good electric bike, as the motor provides a very large torque, which may otherwise loosen your nuts. 8
  • 10. Installing brake levers Slide the hand brakes into both sides of the handlebar. Find a comfortable position. Then tighten using a 5.0mm Allen Wrench Installing the thumb throttle/twist throttle A-Thumb throttle Slide the thumb throttle into either side of the Place your hand on the bar and find the handlebar that you f eel comfortable with. position where your thumb feels most comfortable pressing down on the throttle. B- Twist throttle Slide the Twist throttle into the right side of the handlebar and get a feel of twisting the throttle. 9 When you feel comfortable with the position, use the 3.0mm Allen Wrench and secure it into place.
  • 11. Installing LED Display Slide the LED display on either side of the steering bar so you feel comfortable. Installing Multifunction LCD Display Slide the display on either side of the steering bar so you feel comfortable. 10
  • 12. Installing Vehicle Speed Sensor When the LCD instrument matches the high-speed motor without signal for speed output (with built-in clutch), it requires an external vehicle speed sensor.The installation method of the external vehicle speed sensor refers to the pictures below. Mount the sensor to the fork using the rubber bands Mount the magnet to the spokes using a Philips screwdriver 11
  • 13. Installing Pedal Assistance System (PAS) The Pedal Assistance System, also known as pedal system, is a compulsory component of an electric vehicle in European countries. The system controls the amount of electricity supplied to the motor proportional to the angular velocity of the pedal. (i.e. the faster you pedal, the faster the motor turns.) Remove the pedal crank arm. Place the sensor ring to the bottom bracket and secure it in position using washers or superglue. Place the outer magnetic ring next to the sensor ring. Make sure they do not have any contact by spacing them apart using washers. Detail of sensor ring and magnetic ring. Screw back the pedal into place, connect the PAS wire with the controller and you are ready to ride legally in Europe. 12
  • 14. Connection of Controllers There are three intelligent controllers for our normal (A), LED (B) and LCD (C) kits. So please connect your kits with different controller according to the connection graph below. Note: please check which controller you have before connecting. A: Normal controller: 13
  • 15. B: LCD/LED controller: LCD meter: it has two parts, one is the LCD display, the other is LCD speed sensor. LED meter : everything is same to LCD ,just don’t care about speed sensor connector 14
  • 16. Installing the water-bottle/tube battery Remove screws for bottle holder from frame Use the screws to fix the battery holder to the frame Put the battery into the case. And connect the battery to the controller 15
  • 17. Installing the controller bag The controller bag kit includes: one bag, a mounting plate, a clip plate, two screws and nuts, one Allen key. Slip the mounting plate under the saddle support Clip on the controller bag Fasten the clip plate to the mounting plate using both screws and nuts Put the controller in the bag and connect the cables 16
  • 18. Cable tying It is advisable to use cable ties to secure the cables to your bicycle frame. Perhaps you find a way to tie them, so that they are almost invisible. Remember however to check, if they impede the movement of the handlebars. Also secure the brake cables running to your front and back brakes accordingly. Note: As a suggestion, after you tied your cables, rotate your handlebars to see if the movement is smooth and undisturbed. Finishing the fight Check-List: (Turn off the battery) 1) 2) 3) 4) 5) 6) 7) 8) 9) Wheel is secured in place. Back wheel is vertically aligned with front wheel. Wheel has no loose parts. All components on the handlebar have been secured tightly. You are comfortable with the throttle, brakes, etc. The handlebar is able to rotate freely. The mechanical brakes work properly. The battery cannot slide off without unlocking it. Check that the battery poles are connected correctly. 17