Introduction to Behavior Driven Development
•Transferir como PPT, PDF•
1 gostou•1,267 visualizações

Introduction to Behavior Driven Development including a short tutorial and links to other resources!

Recomendados
Mais conteúdo relacionado
Mais procurados
Mais procurados (19)
Semelhante a Introduction to Behavior Driven Development
Semelhante a Introduction to Behavior Driven Development (20)
Último
Último (20)
Introduction to Behavior Driven Development
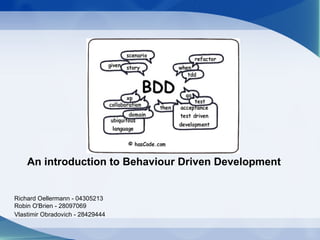
- 1. An introduction to Behaviour Driven Development Richard Oellermann - 04305213 Robin O'Brien - 28097069 Vlastimir Obradovich - 28429444
- 2. Introduction Ever since the dawn of software development, there is a communication and knowledge gap between the developers and their clients. The knowledge gap cannot be helped, as we all are human and cannot know about everything, but the communication gap can be bridged, by providing a specification-based testing solution, that is written in a language that both the clients and the developers can understand.
- 3. Introduction (Cont.) It is the responsibility of a professional software engineer to write quality code, this means knowing the code is tested and that that the code does what it should and delivers business-value to the client, who wants quality products. This does not however mean that this testing approach is just meant for the closed-source world: In a large and distributed open-source product, it is key to know that every unit and component of code is tested. How does one facilitate communication among developers that are distributed and from different countries and have learnt different coding styles?
- 4. Introduction (Cont.) This project takes a look at how to make acceptance and unit-testing in non co-located software development easier with Behaviour Driven Development (BDD) using social networks to communicate the acceptance and user tests. We also look at version controlled "Stories" to aid communication and productivity.
- 5. What is BDD? BBD evolved out of Test-driven development (TDD), simply due to developers not knowing what to test, how far to test, what to call their tests, or why a test failed. The client, or product owner, cannot help them, because in most cases he does not understand the code developers are trying to write or the product owner’s response is too vague to determine what to test.
- 6. What is BDD? (Cont.) Additionally, it was found that 3 of the “big wins” of TDD often went unrealized by novice practitioners, namely: 3.The developer can discover the API to their code from the tests 4.TDD’s goal is defining behavior rather than testing 5.The behavior of a system is the interaction between its components, whereby mocking becomes essential.
- 7. What is BDD? (Cont.) BDD focuses development on prioritized, business- verifiable products through the use of a common vocabulary between business and developers. The bridging of the knowledge gap is accomplished by minimizing difficulties between specification, design, implementation and testing. Ambiguity and miscommunication are avoided by utilizing this concise vocabulary. BDD is not a radical new approach to software engineering but rather a restatement and unification of existing good practices with a common language under one umbrella.
- 8. Why is it useful? BDD helps the developers and the product owners in the following ways: • Test method names should be sentences o Helps the developers with some of their documentation o Helps the client, because the method names are in their language and the documentation made sense to business users, analysts and testers.
- 9. Why is it useful? (Cont.) A simple sentence template keeps test method focused o This helps the developers to write focused test methods for the current class. If one is writing a test whose name does not fit the template, then it means refactoring the behavior of the method to a different class, or creating a new class altogether.
- 10. Why is it useful? (Cont.) An expressive test name is helpful when a test fails o Helps the developer understand why a test is failing by just reading the test method name. In an agile project, test may become absolute, because the premise of the system may change and thus a few test may be failing. A descriptive method name can also indicate an absolute test and requires to be deleted.
- 11. Why is it useful? (Cont.) Rather think of describing the behaviour of the system than just “testing” it. o This helps the developers describe, in code, the behavior of the system before and after the unit or component being tested. If the methods cannot describe the behavior of the system, then they are just pushing you in a false sense of security.
- 12. Why is it useful? (Cont.) • Determining the next most important behaviour o Developers can prioritize expected behaviours of a system according to the business value of the methods to be tested. This solves another TDD question: “Where to start?” o Clients can take the written up tests, that are written in their language, and argue what methods are still missing or if this is really the expected behaviour of the system.
- 13. Why is it useful? (Cont.) • Requirements are behaviours too o This helps the developers write down the acceptance test of the system in the format that they understand, that the test-application can understand and that the product-owner can understand and sign-off.
- 14. Practical Example In this section, we will guide you through setting up an IDE for BDD as well as run through a small example of BDD using jBehave and Java
- 15. What will we need? The following items are needed in order to begin with BDD. • jbehave-web-distribution-3.4.3-bin.zip - http://jbehave.org/download.html (download the stable Web binaries version) • ideaIC-11.0.1.exe - http://www.jetbrains.com/idea/download/index.html (download the Community edition) • junit4.10.zip - https://github.com/KentBeck/junit/downloads (download the latest version) • IntelliJBehave_10658.zip - http://plugins.intellij.net/plugin/?idea&id=6629 (download the latest version)
- 16. Take Note: Please note, that for this tutorial we will be using IntelliJ IDEA, however please feel free to use any IDE you feel comfortable with. Various plugins may be required depending on your IDE
- 17. Setting up the IDE and Libraries First things first, install IntelliJ IDEA. This is not complicated step so we will not go into detail regarding this step. Once you have successfully install the IDE, extract the jbehave archive as well as the junit archive. The final step before we launch IntelliJ is to install the jBehave plugin. Extract the intellijbehave archive and copy the contents of the ‘lib’ directory into the lib directory located inside your IntelliJ install location.
- 18. Setting up the IDE and Libraries (Cont.) Next, start up IntelliJ IDEA and create a new project • FIle > New Project • Create a new project from scratch • Fill in all the details needed. (For this tutorial we will be using “vehicleSimulator” as the name of the project, and the type as “Java Module”) • Create a source directory • Do not select “Groovy”
- 19. Setting up the IDE and Libraries (Cont.) We are almost ready to begin with the coding section of this tutorial but before we begin with that we need to add the last of the libraries. • In your project navigation panel on the left, right click on the first child node under “External Libraries.” In our case we have <1.6> as we are using Sun’s JDK 1.6 • Click on “Open Library Settings”
- 20. Setting up the IDE and Libraries (Cont.) • Click on “SDK’s” (Under platform settings) • Click “Add” • Navigate to the folder in which you extracted the jBehave archive. • Then navigate to the “lib” folder and add all the “.jar” files. (There may be more than we need) • Finally do the same for the jUnit archive. (Simply add jUnit-x.xx.jar)
- 21. Setting up the IDE and Libraries (Cont.) So that wraps up the initial setting up of an IDE and project. We are now ready to begin coding using BDD with jBehave.
- 22. The Code: .story The code parts of jBehave are split into 3 separate files. The first part we will look at is the textual story. This part is a very important part of BDD. It is used to foster better communication amongst various stakeholders. As we can see, the textual story is readable by parties that may not be able to understand code.
- 23. The Code: .story The story we will be using is as follows and is saved in a text file named: breaking_simulation.story Scenario: We want to test the breaks on a vehicle Given A vehicle travelling at 70 km/h When The brakes are applied Then The vehicle must have slowed down
- 24. The Code: .story As we can see the story is broken down into different parts. What is given, what must happen and what the results of this action are. The last line should fail if the code we will write does not result in the expected behaviour.
- 25. The Code: Steps The next document is the steps that link code to the above story. jBehave annotations are used to match up regex expressions with the plaintext story file. The steps file will be a java file named: breakingSimulationSteps.java
- 26. The Code: Steps public class breakingSimulationSteps { private Vehicle vehicle; private int speed; @Given("A vehicle travelling at $speed km/h") public void givenAVehicleAtASpeed(int speed) { vehicle = new Vehicle(speed); this.speed = speed; } @When("The brakes are applied") public void applyTheBreaks() { vehicle.applyBreaks(); } @Then("The vehicle must have slowed down") public void theVehcileShouldBeSlower() { assertThat(vehicle.getSpeed(), lessThan(speed)); } }
- 27. The Code: Steps As we can see, it is important to make sure the content of the annotations parameter is identical to the statement in the story. The only exception to this is when passing values from the story to the code as done in the @Given section of the above example.
- 28. The Code: Linking the two The last class we need is a way of linking the stories to the jbehave executor. For this we have the following class. It is important to note that the name needs match the .story files name. So in our case the following class will be called: BreakingSimulation.java
- 29. The Code: Linking the two public class BreakingSimulation extends JUnitStory { @Override public Configuration configuration() { return new MostUsefulConfiguration() // where to find the stories .useStoryLoader(new LoadFromClasspath(this.getClass())) // CONSOLE and TXT reporting .useStoryReporterBuilder(new StoryReporterBuilder().withDefaultFormats().withFormats(Format.CONSOLE, Format.TXT)); } // Here we specify the steps classes @Override public InjectableStepsFactory stepsFactory() { return new InstanceStepsFactory(configuration(), new breakingSimulationSteps()); } } Not the most important line in this class is the last line where we link it to the steps java class we defined earlier.
- 30. Conclusion As we can see above, it is fairly easy to get started with jBehave and BDD. Once the 3 parts have been created, one can simply run them as normal jUnit test files. Following a BDD method, the above files should be created before all the implementation of the main program has been done. As one continues to implement the main program, the defined scenarios will begin to succeed.
- 31. Conclusion cont... In a project, sub-versioning is important, for stories too, as many developers or even the client may change the story at any time and having the newest version available is critical, as the behavior may have changed in the newest version. Follow this link to see an example: http://code.google.com/p/open-source-synergy-behaviour-driven-development
- 32. Give it a try! If you want to learn more about BDD or have a hands on experience of BDD or even just want to connect with like minded individuals, head over to our Facebook page: http://www.facebook.com/OpenSourceSynergy
- 33. References [1] http://dannorth.net/introducing-bdd/, accessed on 28/04/2012 [2] http://behaviour-driven.org/Introduction, accessed on 27/04/2012