SlideShare uma empresa Scribd logo
1 de 14
CONTENTS : I knew what I wanted to do for my contents page, and the process that followed was pretty straight forward… I started off by putting my chosen pictures onto Photoshop After transferring  the pictures, I changed the brightness and contrast of each picture…
… I created a new document, changed the canvas size and used the ‘fill’ tool to make the whole thing black…  After that, I placed it where it was supposed to be To get the background onto InDesign, I clicked on ‘File’, ‘Place’ and then opened up the file … to save the document, I clicked on ‘Use OS Dialog’ so that it was compatible when it came to placing the image on InDesign,  and  saved it as a JPEG
I tried to use the ‘magic eraser’ tool on my cow picture with the aim of removing the background around it but, instead, I ended up erasing more than what I intended To reduce the amount of erasing I’d have to do, I cropped the image and used the eraser tool to get rid of the background. I had to zoom in a couple of times so that I got the outline of the picture exactly  :COW
I combined the cow image and the magnets image together by dragging one on to the other, in this case, the cow onto the magnets Then I re-sized and moved the image around till I was happy with it I enlarged the canvas size and then darkened around the edges by using the burn tool and then dragged it onto a new document where I smudged it towards the bottom and erased the white background  :COW + MAGNETS
I created a new layer on InDesign, as I would have to do each time I wanted to place something, and placed the image, once again, moving it and resizing it so I got it as I wanted  I saved it using OS Dialog, this time as a PNG as it had a transparent background I created several white boxes by copying the previous layer repeatedly. I did this so that the width of the  boxes were the same, then I put them all at different lengths and typed my contents text inside them
Contents Page:  FINISHING TOUCHES For one of the questions in my questionnaire, the options laid out received, near enough, an equal amount of votes. To make my magazine as successful as it could be, I decided not to ignore my feedback and, someway or another, at least attempt to include all of the articles from my feedback, in my contents page I added a page number –like I would have to remember to do for the remaining parts of my magazine  Previously, I’d left a small gap between the background and main image, (shown below), after looking at it a couple of times I decided to get rid of the gap which, I think, made my contents look stronger I added an additional page number in the left hand corner of the page, making it clear to the reader, if they are interested in the article involving ‘The Magnets’, that the article can be found on page 16 and the reader can then turn straight to that page. Also, if the reader continued to read through the contents page they would be able to see what the article was placed under, in this case, as ‘The Magnets’ article is on page 16, the reader would be able to find it within the segment ‘Platapus Presents’
FRONT COVER : I found a font that I liked and thought would suit my magazine. I got it from the internet by using the font website www.dafont.com and because I didn’t want to download it, and I couldn’t save it as an image, I print screened it onto PowerPoint, cropped it and then saved it When the image was on Photoshop, I erased the white background.  I wanted the masthead of my magazine to be a cross between a light orange and a dark yellow so, using regular yellow as a starting colour, I experimented with the colour arrows and when I got the colour I wanted I used the fill tool to fill in the white parts inside the letters. After I finished creating my masthead I saved it as a PNG and placed it into InDesign later
I added text boxes, filled in with the colour black and used them as the top and bottom strips; I used coloured text boxes because I thought it was the obvious thing to do considering that I would be typing in them anyway, it was also easier than creating a rectangle, filling it with black and then inserting a text box on top.  I left out the features for the top and bottom strips simply because at this point I hadn’t decided on what to type in them  As I thought the colour of my masthead looked too light, I went back into Photoshop and  used the burn tool to make the black parts look darker and, overall, make my masthead  look more defined when on my magazine; then, I placed it into InDesign once again
I changed the brightness and contrast of the original picture to make the shapes clearer and to bring out and emphasize the colours within the image I placed the image onto InDesign, beneath the layers that were set in place currently, and unfortunately it was too small; the picture didn’t cover a lot of the space on the left side of the front cover To solve this problem, I went back into Photoshop and smudged the left side of the image, towards the edge, and burned it so that it would blend in with the black background that I planned on using as a part of my solution. I then enlarged  the image so that my main ‘story’ would have a certain presence (with or without any text being there) BEFORE: AFTER:
I almost forgot to add the simplest thing on a magazine -the barcode. I created my own as I’d decided to make my magazine free, I did this using a barcode generator on the internet( http://www.terryburton.co.uk/barcodewriter/generator/ ) , then saving it as a JPEG, cropping it a little with the help of Photoshop and then  placed it where I wanted it on InDesign, rotating it once or twice in the process to get it in the direction I wanted it to go I filled in the bottom strip with bands from the indie/rock genre and added duplicated white boxes to act as a separator so that the reader wouldn’t become confused as to which band is which  I filled in the top strip with the repeated words ‘LIMITED EDITION’  FRONT COVER:  FINISHING TOUCHES I added ‘plus’ (+) features in the left third, therefore, sticking to the codes and conventions of a magazine During the construction stages, I’d tried  leaving out the left third articles but it didn’t look like the front cover of a magazine, it looked too spacious, and also, I hadn’t really planned on leaving the left third empty in my flatplan so, in the end, I just stuck to my original flatplan idea  I had to go through a variety of different greys until I found the right contrast between my grey background and coloured font I added names for each finger (band member –making them realistic) and then brought them all together, in a way, by calling them ‘ESPY’  As the area beneath my masthead looked too spacious I added a strapline, changing the gradient to achieve the effect that I wanted. I didn’t think this suited my magazine, so I changed it to a colour that I thought would bring my entire front cover together –lilac  For both my top and bottom strips, I added a white outline so that the strips didn’t blend in with the dark background
I found a picture on the internet of a platypus silhouette and put it onto Photoshop, I chose this image because it went with my masthead of ‘Platapus’ and could therefore act as a logo for my magazine. As I knew I couldn’t use any images off the internet, I used the internet image as a stencil, filled in the white area with a bright colour and erased the background, I did this so, technically, I’d created my own picture of a platypus for my logo For my article image I changed the brightness and contrast and then used curves so that the image had the right amount of dark areas and light areas. After that I used the dodge tool to lighten areas of the box that, I thought, were too dark; I saved it, then put it onto InDesign where I added a heading, which I used the method of trial and error to get to both my final font and font colour, I added page numbers, which were in the same font as the contents page number so that I had a running theme. I changed the colour of the platypus stencil, (above), a number of times till I got the right colour, placed it in InDesign, resized it and then put it in the corner of the page on top of the text ‘Platapus Presents’  D.P.S: (DOUBLE PAGE SPREAD)
To get my article into columns, I selected my D.P.S pages and clicked on ‘Layout’, then, ‘Margin and Columns’ where I selected the amount of columns I wanted  I created text boxes within the column guidelines then, copied and pasted my final checked article inside the text boxes; however, I repeatedly got confused as to which parts had already been copied and which parts had already been pasted which made the process a little more difficult.  As well as that, I had to keep on adjusting the size of the text boxes so they fit the columns perfectly and I had to keep rearranging my article around because sentences weren’t ending or lining up where they should’ve been. The first time around, I chose to have three columns, however, this later proved to be too many; so  I re visited Margins and Columns and changed the amount of columns to two
I didn’t have to add many finishing touches to my double page spread because I’d already completed most of it through its production. The final touches that I did add, were minor things that I’d almost forgot to include, e.g. page numbers, which were simple but essential in a magazine, or small details that I thought would make my article look more professional e.g. the album information D.P.S:  FINISHING TOUCHES After many adjustments, my article was finally in its place and measuring up to the guidelines, I also changed the colours of some of my letters so that they could be seen by the reader  I re-cycled my barcode image from the front I added page numbers to make my D.P.S look realistic cover and used it as ‘BoxHeads’ album cover, by rotating it so the image was vertical, I used it to accompany the article. After experimenting with the effects, the album cover looked less like a barcode and more album-like, to make it more realistic, I added an album title which also helped to make  the article make sense; to make the title noticeable I put it in a white box  I changed the font and colourings of the first letter of my article to create a drop capital
Final Saving Stages:  JPEG  As my front cover and D.P.S were on the same InDesign document, to save my front cover as a separate JPEG, first, I had to select the my front page. Then, I went on ‘File’, ‘Export’ –changed the name so that it didn’t replace the existing InDesign file- and when the ‘Export JPEG’ box came up, I clicked on ‘Range’ so that it wouldn’t save my front cover and D.P.S as one file, changed the quality to maximum and then, finally, pressed export. Then, I just repeated this process for my contents page.  However, when it came to saving my D.P.S as a JPEG I had to alter the process slightly. When the ‘Export JPEG’ box came up, instead of just clicking ‘Range’ and then exporting, I had to select ‘Spreads’ as well (so that the JPEGs were separate) and then type 2-3 into the box next to the word range so it changed both pages into JPEG’s

Mais conteúdo relacionado

Mais procurados

Final content page and double spread article designs
Final content page and double spread article designsFinal content page and double spread article designs
Final content page and double spread article designsIllyaBoyko1
 
Hannah Ungricht Portfolio
Hannah Ungricht PortfolioHannah Ungricht Portfolio
Hannah Ungricht PortfolioHannah Ungricht
 
Process of magazine jaye
Process of magazine jayeProcess of magazine jaye
Process of magazine jayeaslihan_s
 
Print Screens
Print ScreensPrint Screens
Print ScreensMaresx
 
Portfolio - Jenner Porter
Portfolio - Jenner PorterPortfolio - Jenner Porter
Portfolio - Jenner PorterJenner Porter
 
2. idea development (1) (1) (1)
2. idea development (1) (1) (1)2. idea development (1) (1) (1)
2. idea development (1) (1) (1)Charlotte Oliver
 
Stages of development
Stages of developmentStages of development
Stages of developmentasmediag12
 
Rebekah Gallegos Portfolio
Rebekah Gallegos PortfolioRebekah Gallegos Portfolio
Rebekah Gallegos PortfolioRebekah Gallegos
 
Music magazine construction
Music magazine constructionMusic magazine construction
Music magazine constructionAdella1
 
Process- Front Cover
Process- Front CoverProcess- Front Cover
Process- Front Coverguest638784
 
13a brandontrimble Portfolio
13a brandontrimble Portfolio13a brandontrimble Portfolio
13a brandontrimble PortfolioBrandon Trimble
 
Portfolio - Heather Holt
Portfolio - Heather HoltPortfolio - Heather Holt
Portfolio - Heather HoltHeather Holt
 

Mais procurados (20)

Final content page and double spread article designs
Final content page and double spread article designsFinal content page and double spread article designs
Final content page and double spread article designs
 
Hannah Ungricht Portfolio
Hannah Ungricht PortfolioHannah Ungricht Portfolio
Hannah Ungricht Portfolio
 
Process of magazine jaye
Process of magazine jayeProcess of magazine jaye
Process of magazine jaye
 
Evaluation print
Evaluation printEvaluation print
Evaluation print
 
Production log1
Production log1Production log1
Production log1
 
Print Screens
Print ScreensPrint Screens
Print Screens
 
Task 4
Task 4Task 4
Task 4
 
Portfolio - Jenner Porter
Portfolio - Jenner PorterPortfolio - Jenner Porter
Portfolio - Jenner Porter
 
13 a jeremytaylor
13 a jeremytaylor13 a jeremytaylor
13 a jeremytaylor
 
2. idea development (1) (1) (1)
2. idea development (1) (1) (1)2. idea development (1) (1) (1)
2. idea development (1) (1) (1)
 
Portfolio
Portfolio Portfolio
Portfolio
 
13A Portfolio
13A Portfolio13A Portfolio
13A Portfolio
 
Stages of development
Stages of developmentStages of development
Stages of development
 
Rebekah Gallegos Portfolio
Rebekah Gallegos PortfolioRebekah Gallegos Portfolio
Rebekah Gallegos Portfolio
 
13 a kimberleecurtiss
13 a kimberleecurtiss13 a kimberleecurtiss
13 a kimberleecurtiss
 
Music magazine construction
Music magazine constructionMusic magazine construction
Music magazine construction
 
Process- Front Cover
Process- Front CoverProcess- Front Cover
Process- Front Cover
 
13a brandontrimble Portfolio
13a brandontrimble Portfolio13a brandontrimble Portfolio
13a brandontrimble Portfolio
 
Overall Evaluation
Overall EvaluationOverall Evaluation
Overall Evaluation
 
Portfolio - Heather Holt
Portfolio - Heather HoltPortfolio - Heather Holt
Portfolio - Heather Holt
 

Destaque

Lecodedelart
LecodedelartLecodedelart
Lecodedelart123albums
 
Plastic Pop:
Plastic Pop:Plastic Pop:
Plastic Pop:rebecca
 
[Other Elements] Analysis:
[Other Elements] Analysis:[Other Elements] Analysis:
[Other Elements] Analysis:rebecca
 
Analysis
AnalysisAnalysis
Analysisrebecca
 
Codes and conventions
Codes and conventionsCodes and conventions
Codes and conventionsrebecca
 
Music institutions
Music institutionsMusic institutions
Music institutionsrebecca
 
Equpment
EqupmentEqupment
Equpmentrebecca
 
Codes and Conventions:
Codes and Conventions:Codes and Conventions:
Codes and Conventions:rebecca
 
Music Institutions:
Music Institutions:Music Institutions:
Music Institutions:rebecca
 

Destaque (9)

Lecodedelart
LecodedelartLecodedelart
Lecodedelart
 
Plastic Pop:
Plastic Pop:Plastic Pop:
Plastic Pop:
 
[Other Elements] Analysis:
[Other Elements] Analysis:[Other Elements] Analysis:
[Other Elements] Analysis:
 
Analysis
AnalysisAnalysis
Analysis
 
Codes and conventions
Codes and conventionsCodes and conventions
Codes and conventions
 
Music institutions
Music institutionsMusic institutions
Music institutions
 
Equpment
EqupmentEqupment
Equpment
 
Codes and Conventions:
Codes and Conventions:Codes and Conventions:
Codes and Conventions:
 
Music Institutions:
Music Institutions:Music Institutions:
Music Institutions:
 

Semelhante a Construction:

Skills journal 97 03
Skills journal 97 03Skills journal 97 03
Skills journal 97 03kieranlhyde
 
Media construction
Media constructionMedia construction
Media constructionguest278914
 
Media construction
Media constructionMedia construction
Media constructionguestd25728
 
Music Magazine Construction InDesign
Music Magazine Construction InDesignMusic Magazine Construction InDesign
Music Magazine Construction InDesignCharlene
 
Music magazine construction indesi gn
Music magazine construction indesi gnMusic magazine construction indesi gn
Music magazine construction indesi gnCharlene
 
Double paged spread progress
Double paged spread progressDouble paged spread progress
Double paged spread progresseleanornatalie
 
Double Page Article Construction
Double Page Article ConstructionDouble Page Article Construction
Double Page Article Constructionhassan
 
Double Page Article Construction
Double Page Article ConstructionDouble Page Article Construction
Double Page Article Constructionhassan
 
Construction of contents page
Construction of contents pageConstruction of contents page
Construction of contents pageAS Media Column D
 
Skills Development Journal
Skills Development JournalSkills Development Journal
Skills Development JournalKimberley Jarvis
 
Front page Production Log
Front page Production LogFront page Production Log
Front page Production Loglilflickmania
 
Development diary (contents)
Development diary (contents)Development diary (contents)
Development diary (contents)Kate-Anna Smith
 
6. Production Reflection (visual)
6. Production Reflection (visual)6. Production Reflection (visual)
6. Production Reflection (visual)TamzinTwose
 
Music magazine construction
Music magazine  constructionMusic magazine  construction
Music magazine constructionAdella1
 
Making of the double page spread
Making of the double page spreadMaking of the double page spread
Making of the double page spreadjoshfoo
 
Double page spread production log
Double page spread production logDouble page spread production log
Double page spread production loglilflickmania
 
Contents page production log
Contents page production logContents page production log
Contents page production loglilflickmania
 
Music magazine construction
Music magazine constructionMusic magazine construction
Music magazine constructionbenjichandra
 

Semelhante a Construction: (20)

Skills journal 97 03
Skills journal 97 03Skills journal 97 03
Skills journal 97 03
 
Media construction
Media constructionMedia construction
Media construction
 
Media construction
Media constructionMedia construction
Media construction
 
Screenshots dps
Screenshots dps Screenshots dps
Screenshots dps
 
Music Magazine Construction InDesign
Music Magazine Construction InDesignMusic Magazine Construction InDesign
Music Magazine Construction InDesign
 
Music magazine construction indesi gn
Music magazine construction indesi gnMusic magazine construction indesi gn
Music magazine construction indesi gn
 
Double paged spread progress
Double paged spread progressDouble paged spread progress
Double paged spread progress
 
Double Page Article Construction
Double Page Article ConstructionDouble Page Article Construction
Double Page Article Construction
 
Double Page Article Construction
Double Page Article ConstructionDouble Page Article Construction
Double Page Article Construction
 
Construction of contents page
Construction of contents pageConstruction of contents page
Construction of contents page
 
Skills Development Journal
Skills Development JournalSkills Development Journal
Skills Development Journal
 
Front page Production Log
Front page Production LogFront page Production Log
Front page Production Log
 
Development diary (contents)
Development diary (contents)Development diary (contents)
Development diary (contents)
 
6. Production Reflection (visual)
6. Production Reflection (visual)6. Production Reflection (visual)
6. Production Reflection (visual)
 
Music magazine construction
Music magazine  constructionMusic magazine  construction
Music magazine construction
 
Making of the double page spread
Making of the double page spreadMaking of the double page spread
Making of the double page spread
 
Double page spread production log
Double page spread production logDouble page spread production log
Double page spread production log
 
Contents page production log
Contents page production logContents page production log
Contents page production log
 
Q6
Q6Q6
Q6
 
Music magazine construction
Music magazine constructionMusic magazine construction
Music magazine construction
 

Mais de rebecca

Equipment and Programmes:
Equipment and Programmes:Equipment and Programmes:
Equipment and Programmes:rebecca
 
Mystery Jets - Young Love
Mystery Jets - Young LoveMystery Jets - Young Love
Mystery Jets - Young Loverebecca
 
Questionairre Results:
Questionairre Results:Questionairre Results:
Questionairre Results:rebecca
 
Audience Feedback:
Audience Feedback:Audience Feedback:
Audience Feedback:rebecca
 
Audience Profile:
Audience Profile:Audience Profile:
Audience Profile:rebecca
 
Evaluation: [Music Magazine]
Evaluation: [Music Magazine]Evaluation: [Music Magazine]
Evaluation: [Music Magazine]rebecca
 
[Music] Magazine: Unused Images
[Music] Magazine: Unused Images[Music] Magazine: Unused Images
[Music] Magazine: Unused Imagesrebecca
 
[School] Magazine: Unused Images
[School] Magazine: Unused Images[School] Magazine: Unused Images
[School] Magazine: Unused Imagesrebecca
 
Questionnaire Results:
Questionnaire Results:Questionnaire Results:
Questionnaire Results:rebecca
 
Evaluation: [School Magazine]
Evaluation: [School Magazine]Evaluation: [School Magazine]
Evaluation: [School Magazine]rebecca
 
Research: Audience
Research: AudienceResearch: Audience
Research: Audiencerebecca
 
Questionnaire Results:
Questionnaire Results:Questionnaire Results:
Questionnaire Results:rebecca
 

Mais de rebecca (12)

Equipment and Programmes:
Equipment and Programmes:Equipment and Programmes:
Equipment and Programmes:
 
Mystery Jets - Young Love
Mystery Jets - Young LoveMystery Jets - Young Love
Mystery Jets - Young Love
 
Questionairre Results:
Questionairre Results:Questionairre Results:
Questionairre Results:
 
Audience Feedback:
Audience Feedback:Audience Feedback:
Audience Feedback:
 
Audience Profile:
Audience Profile:Audience Profile:
Audience Profile:
 
Evaluation: [Music Magazine]
Evaluation: [Music Magazine]Evaluation: [Music Magazine]
Evaluation: [Music Magazine]
 
[Music] Magazine: Unused Images
[Music] Magazine: Unused Images[Music] Magazine: Unused Images
[Music] Magazine: Unused Images
 
[School] Magazine: Unused Images
[School] Magazine: Unused Images[School] Magazine: Unused Images
[School] Magazine: Unused Images
 
Questionnaire Results:
Questionnaire Results:Questionnaire Results:
Questionnaire Results:
 
Evaluation: [School Magazine]
Evaluation: [School Magazine]Evaluation: [School Magazine]
Evaluation: [School Magazine]
 
Research: Audience
Research: AudienceResearch: Audience
Research: Audience
 
Questionnaire Results:
Questionnaire Results:Questionnaire Results:
Questionnaire Results:
 

Último

4.16.24 Poverty and Precarity--Desmond.pptx
4.16.24 Poverty and Precarity--Desmond.pptx4.16.24 Poverty and Precarity--Desmond.pptx
4.16.24 Poverty and Precarity--Desmond.pptxmary850239
 
AUDIENCE THEORY -CULTIVATION THEORY - GERBNER.pptx
AUDIENCE THEORY -CULTIVATION THEORY -  GERBNER.pptxAUDIENCE THEORY -CULTIVATION THEORY -  GERBNER.pptx
AUDIENCE THEORY -CULTIVATION THEORY - GERBNER.pptxiammrhaywood
 
Music 9 - 4th quarter - Vocal Music of the Romantic Period.pptx
Music 9 - 4th quarter - Vocal Music of the Romantic Period.pptxMusic 9 - 4th quarter - Vocal Music of the Romantic Period.pptx
Music 9 - 4th quarter - Vocal Music of the Romantic Period.pptxleah joy valeriano
 
4.16.24 21st Century Movements for Black Lives.pptx
4.16.24 21st Century Movements for Black Lives.pptx4.16.24 21st Century Movements for Black Lives.pptx
4.16.24 21st Century Movements for Black Lives.pptxmary850239
 
Incoming and Outgoing Shipments in 3 STEPS Using Odoo 17
Incoming and Outgoing Shipments in 3 STEPS Using Odoo 17Incoming and Outgoing Shipments in 3 STEPS Using Odoo 17
Incoming and Outgoing Shipments in 3 STEPS Using Odoo 17Celine George
 
Influencing policy (training slides from Fast Track Impact)
Influencing policy (training slides from Fast Track Impact)Influencing policy (training slides from Fast Track Impact)
Influencing policy (training slides from Fast Track Impact)Mark Reed
 
ROLES IN A STAGE PRODUCTION in arts.pptx
ROLES IN A STAGE PRODUCTION in arts.pptxROLES IN A STAGE PRODUCTION in arts.pptx
ROLES IN A STAGE PRODUCTION in arts.pptxVanesaIglesias10
 
INTRODUCTION TO CATHOLIC CHRISTOLOGY.pptx
INTRODUCTION TO CATHOLIC CHRISTOLOGY.pptxINTRODUCTION TO CATHOLIC CHRISTOLOGY.pptx
INTRODUCTION TO CATHOLIC CHRISTOLOGY.pptxHumphrey A Beña
 
Field Attribute Index Feature in Odoo 17
Field Attribute Index Feature in Odoo 17Field Attribute Index Feature in Odoo 17
Field Attribute Index Feature in Odoo 17Celine George
 
Earth Day Presentation wow hello nice great
Earth Day Presentation wow hello nice greatEarth Day Presentation wow hello nice great
Earth Day Presentation wow hello nice greatYousafMalik24
 
Difference Between Search & Browse Methods in Odoo 17
Difference Between Search & Browse Methods in Odoo 17Difference Between Search & Browse Methods in Odoo 17
Difference Between Search & Browse Methods in Odoo 17Celine George
 
Daily Lesson Plan in Mathematics Quarter 4
Daily Lesson Plan in Mathematics Quarter 4Daily Lesson Plan in Mathematics Quarter 4
Daily Lesson Plan in Mathematics Quarter 4JOYLYNSAMANIEGO
 
THEORIES OF ORGANIZATION-PUBLIC ADMINISTRATION
THEORIES OF ORGANIZATION-PUBLIC ADMINISTRATIONTHEORIES OF ORGANIZATION-PUBLIC ADMINISTRATION
THEORIES OF ORGANIZATION-PUBLIC ADMINISTRATIONHumphrey A Beña
 
Keynote by Prof. Wurzer at Nordex about IP-design
Keynote by Prof. Wurzer at Nordex about IP-designKeynote by Prof. Wurzer at Nordex about IP-design
Keynote by Prof. Wurzer at Nordex about IP-designMIPLM
 
MULTIDISCIPLINRY NATURE OF THE ENVIRONMENTAL STUDIES.pptx
MULTIDISCIPLINRY NATURE OF THE ENVIRONMENTAL STUDIES.pptxMULTIDISCIPLINRY NATURE OF THE ENVIRONMENTAL STUDIES.pptx
MULTIDISCIPLINRY NATURE OF THE ENVIRONMENTAL STUDIES.pptxAnupkumar Sharma
 
What is Model Inheritance in Odoo 17 ERP
What is Model Inheritance in Odoo 17 ERPWhat is Model Inheritance in Odoo 17 ERP
What is Model Inheritance in Odoo 17 ERPCeline George
 
Barangay Council for the Protection of Children (BCPC) Orientation.pptx
Barangay Council for the Protection of Children (BCPC) Orientation.pptxBarangay Council for the Protection of Children (BCPC) Orientation.pptx
Barangay Council for the Protection of Children (BCPC) Orientation.pptxCarlos105
 
HỌC TỐT TIẾNG ANH 11 THEO CHƯƠNG TRÌNH GLOBAL SUCCESS ĐÁP ÁN CHI TIẾT - CẢ NĂ...
HỌC TỐT TIẾNG ANH 11 THEO CHƯƠNG TRÌNH GLOBAL SUCCESS ĐÁP ÁN CHI TIẾT - CẢ NĂ...HỌC TỐT TIẾNG ANH 11 THEO CHƯƠNG TRÌNH GLOBAL SUCCESS ĐÁP ÁN CHI TIẾT - CẢ NĂ...
HỌC TỐT TIẾNG ANH 11 THEO CHƯƠNG TRÌNH GLOBAL SUCCESS ĐÁP ÁN CHI TIẾT - CẢ NĂ...Nguyen Thanh Tu Collection
 

Último (20)

4.16.24 Poverty and Precarity--Desmond.pptx
4.16.24 Poverty and Precarity--Desmond.pptx4.16.24 Poverty and Precarity--Desmond.pptx
4.16.24 Poverty and Precarity--Desmond.pptx
 
AUDIENCE THEORY -CULTIVATION THEORY - GERBNER.pptx
AUDIENCE THEORY -CULTIVATION THEORY -  GERBNER.pptxAUDIENCE THEORY -CULTIVATION THEORY -  GERBNER.pptx
AUDIENCE THEORY -CULTIVATION THEORY - GERBNER.pptx
 
Music 9 - 4th quarter - Vocal Music of the Romantic Period.pptx
Music 9 - 4th quarter - Vocal Music of the Romantic Period.pptxMusic 9 - 4th quarter - Vocal Music of the Romantic Period.pptx
Music 9 - 4th quarter - Vocal Music of the Romantic Period.pptx
 
Raw materials used in Herbal Cosmetics.pptx
Raw materials used in Herbal Cosmetics.pptxRaw materials used in Herbal Cosmetics.pptx
Raw materials used in Herbal Cosmetics.pptx
 
4.16.24 21st Century Movements for Black Lives.pptx
4.16.24 21st Century Movements for Black Lives.pptx4.16.24 21st Century Movements for Black Lives.pptx
4.16.24 21st Century Movements for Black Lives.pptx
 
Incoming and Outgoing Shipments in 3 STEPS Using Odoo 17
Incoming and Outgoing Shipments in 3 STEPS Using Odoo 17Incoming and Outgoing Shipments in 3 STEPS Using Odoo 17
Incoming and Outgoing Shipments in 3 STEPS Using Odoo 17
 
Influencing policy (training slides from Fast Track Impact)
Influencing policy (training slides from Fast Track Impact)Influencing policy (training slides from Fast Track Impact)
Influencing policy (training slides from Fast Track Impact)
 
ROLES IN A STAGE PRODUCTION in arts.pptx
ROLES IN A STAGE PRODUCTION in arts.pptxROLES IN A STAGE PRODUCTION in arts.pptx
ROLES IN A STAGE PRODUCTION in arts.pptx
 
INTRODUCTION TO CATHOLIC CHRISTOLOGY.pptx
INTRODUCTION TO CATHOLIC CHRISTOLOGY.pptxINTRODUCTION TO CATHOLIC CHRISTOLOGY.pptx
INTRODUCTION TO CATHOLIC CHRISTOLOGY.pptx
 
Field Attribute Index Feature in Odoo 17
Field Attribute Index Feature in Odoo 17Field Attribute Index Feature in Odoo 17
Field Attribute Index Feature in Odoo 17
 
Earth Day Presentation wow hello nice great
Earth Day Presentation wow hello nice greatEarth Day Presentation wow hello nice great
Earth Day Presentation wow hello nice great
 
Difference Between Search & Browse Methods in Odoo 17
Difference Between Search & Browse Methods in Odoo 17Difference Between Search & Browse Methods in Odoo 17
Difference Between Search & Browse Methods in Odoo 17
 
LEFT_ON_C'N_ PRELIMS_EL_DORADO_2024.pptx
LEFT_ON_C'N_ PRELIMS_EL_DORADO_2024.pptxLEFT_ON_C'N_ PRELIMS_EL_DORADO_2024.pptx
LEFT_ON_C'N_ PRELIMS_EL_DORADO_2024.pptx
 
Daily Lesson Plan in Mathematics Quarter 4
Daily Lesson Plan in Mathematics Quarter 4Daily Lesson Plan in Mathematics Quarter 4
Daily Lesson Plan in Mathematics Quarter 4
 
THEORIES OF ORGANIZATION-PUBLIC ADMINISTRATION
THEORIES OF ORGANIZATION-PUBLIC ADMINISTRATIONTHEORIES OF ORGANIZATION-PUBLIC ADMINISTRATION
THEORIES OF ORGANIZATION-PUBLIC ADMINISTRATION
 
Keynote by Prof. Wurzer at Nordex about IP-design
Keynote by Prof. Wurzer at Nordex about IP-designKeynote by Prof. Wurzer at Nordex about IP-design
Keynote by Prof. Wurzer at Nordex about IP-design
 
MULTIDISCIPLINRY NATURE OF THE ENVIRONMENTAL STUDIES.pptx
MULTIDISCIPLINRY NATURE OF THE ENVIRONMENTAL STUDIES.pptxMULTIDISCIPLINRY NATURE OF THE ENVIRONMENTAL STUDIES.pptx
MULTIDISCIPLINRY NATURE OF THE ENVIRONMENTAL STUDIES.pptx
 
What is Model Inheritance in Odoo 17 ERP
What is Model Inheritance in Odoo 17 ERPWhat is Model Inheritance in Odoo 17 ERP
What is Model Inheritance in Odoo 17 ERP
 
Barangay Council for the Protection of Children (BCPC) Orientation.pptx
Barangay Council for the Protection of Children (BCPC) Orientation.pptxBarangay Council for the Protection of Children (BCPC) Orientation.pptx
Barangay Council for the Protection of Children (BCPC) Orientation.pptx
 
HỌC TỐT TIẾNG ANH 11 THEO CHƯƠNG TRÌNH GLOBAL SUCCESS ĐÁP ÁN CHI TIẾT - CẢ NĂ...
HỌC TỐT TIẾNG ANH 11 THEO CHƯƠNG TRÌNH GLOBAL SUCCESS ĐÁP ÁN CHI TIẾT - CẢ NĂ...HỌC TỐT TIẾNG ANH 11 THEO CHƯƠNG TRÌNH GLOBAL SUCCESS ĐÁP ÁN CHI TIẾT - CẢ NĂ...
HỌC TỐT TIẾNG ANH 11 THEO CHƯƠNG TRÌNH GLOBAL SUCCESS ĐÁP ÁN CHI TIẾT - CẢ NĂ...
 

Construction:

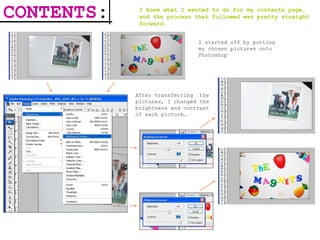
  • 1. CONTENTS : I knew what I wanted to do for my contents page, and the process that followed was pretty straight forward… I started off by putting my chosen pictures onto Photoshop After transferring the pictures, I changed the brightness and contrast of each picture…
  • 2. … I created a new document, changed the canvas size and used the ‘fill’ tool to make the whole thing black… After that, I placed it where it was supposed to be To get the background onto InDesign, I clicked on ‘File’, ‘Place’ and then opened up the file … to save the document, I clicked on ‘Use OS Dialog’ so that it was compatible when it came to placing the image on InDesign, and saved it as a JPEG
  • 3. I tried to use the ‘magic eraser’ tool on my cow picture with the aim of removing the background around it but, instead, I ended up erasing more than what I intended To reduce the amount of erasing I’d have to do, I cropped the image and used the eraser tool to get rid of the background. I had to zoom in a couple of times so that I got the outline of the picture exactly :COW
  • 4. I combined the cow image and the magnets image together by dragging one on to the other, in this case, the cow onto the magnets Then I re-sized and moved the image around till I was happy with it I enlarged the canvas size and then darkened around the edges by using the burn tool and then dragged it onto a new document where I smudged it towards the bottom and erased the white background :COW + MAGNETS
  • 5. I created a new layer on InDesign, as I would have to do each time I wanted to place something, and placed the image, once again, moving it and resizing it so I got it as I wanted I saved it using OS Dialog, this time as a PNG as it had a transparent background I created several white boxes by copying the previous layer repeatedly. I did this so that the width of the boxes were the same, then I put them all at different lengths and typed my contents text inside them
  • 6. Contents Page: FINISHING TOUCHES For one of the questions in my questionnaire, the options laid out received, near enough, an equal amount of votes. To make my magazine as successful as it could be, I decided not to ignore my feedback and, someway or another, at least attempt to include all of the articles from my feedback, in my contents page I added a page number –like I would have to remember to do for the remaining parts of my magazine Previously, I’d left a small gap between the background and main image, (shown below), after looking at it a couple of times I decided to get rid of the gap which, I think, made my contents look stronger I added an additional page number in the left hand corner of the page, making it clear to the reader, if they are interested in the article involving ‘The Magnets’, that the article can be found on page 16 and the reader can then turn straight to that page. Also, if the reader continued to read through the contents page they would be able to see what the article was placed under, in this case, as ‘The Magnets’ article is on page 16, the reader would be able to find it within the segment ‘Platapus Presents’
  • 7. FRONT COVER : I found a font that I liked and thought would suit my magazine. I got it from the internet by using the font website www.dafont.com and because I didn’t want to download it, and I couldn’t save it as an image, I print screened it onto PowerPoint, cropped it and then saved it When the image was on Photoshop, I erased the white background. I wanted the masthead of my magazine to be a cross between a light orange and a dark yellow so, using regular yellow as a starting colour, I experimented with the colour arrows and when I got the colour I wanted I used the fill tool to fill in the white parts inside the letters. After I finished creating my masthead I saved it as a PNG and placed it into InDesign later
  • 8. I added text boxes, filled in with the colour black and used them as the top and bottom strips; I used coloured text boxes because I thought it was the obvious thing to do considering that I would be typing in them anyway, it was also easier than creating a rectangle, filling it with black and then inserting a text box on top. I left out the features for the top and bottom strips simply because at this point I hadn’t decided on what to type in them As I thought the colour of my masthead looked too light, I went back into Photoshop and used the burn tool to make the black parts look darker and, overall, make my masthead look more defined when on my magazine; then, I placed it into InDesign once again
  • 9. I changed the brightness and contrast of the original picture to make the shapes clearer and to bring out and emphasize the colours within the image I placed the image onto InDesign, beneath the layers that were set in place currently, and unfortunately it was too small; the picture didn’t cover a lot of the space on the left side of the front cover To solve this problem, I went back into Photoshop and smudged the left side of the image, towards the edge, and burned it so that it would blend in with the black background that I planned on using as a part of my solution. I then enlarged the image so that my main ‘story’ would have a certain presence (with or without any text being there) BEFORE: AFTER:
  • 10. I almost forgot to add the simplest thing on a magazine -the barcode. I created my own as I’d decided to make my magazine free, I did this using a barcode generator on the internet( http://www.terryburton.co.uk/barcodewriter/generator/ ) , then saving it as a JPEG, cropping it a little with the help of Photoshop and then placed it where I wanted it on InDesign, rotating it once or twice in the process to get it in the direction I wanted it to go I filled in the bottom strip with bands from the indie/rock genre and added duplicated white boxes to act as a separator so that the reader wouldn’t become confused as to which band is which I filled in the top strip with the repeated words ‘LIMITED EDITION’ FRONT COVER: FINISHING TOUCHES I added ‘plus’ (+) features in the left third, therefore, sticking to the codes and conventions of a magazine During the construction stages, I’d tried leaving out the left third articles but it didn’t look like the front cover of a magazine, it looked too spacious, and also, I hadn’t really planned on leaving the left third empty in my flatplan so, in the end, I just stuck to my original flatplan idea I had to go through a variety of different greys until I found the right contrast between my grey background and coloured font I added names for each finger (band member –making them realistic) and then brought them all together, in a way, by calling them ‘ESPY’ As the area beneath my masthead looked too spacious I added a strapline, changing the gradient to achieve the effect that I wanted. I didn’t think this suited my magazine, so I changed it to a colour that I thought would bring my entire front cover together –lilac For both my top and bottom strips, I added a white outline so that the strips didn’t blend in with the dark background
  • 11. I found a picture on the internet of a platypus silhouette and put it onto Photoshop, I chose this image because it went with my masthead of ‘Platapus’ and could therefore act as a logo for my magazine. As I knew I couldn’t use any images off the internet, I used the internet image as a stencil, filled in the white area with a bright colour and erased the background, I did this so, technically, I’d created my own picture of a platypus for my logo For my article image I changed the brightness and contrast and then used curves so that the image had the right amount of dark areas and light areas. After that I used the dodge tool to lighten areas of the box that, I thought, were too dark; I saved it, then put it onto InDesign where I added a heading, which I used the method of trial and error to get to both my final font and font colour, I added page numbers, which were in the same font as the contents page number so that I had a running theme. I changed the colour of the platypus stencil, (above), a number of times till I got the right colour, placed it in InDesign, resized it and then put it in the corner of the page on top of the text ‘Platapus Presents’ D.P.S: (DOUBLE PAGE SPREAD)
  • 12. To get my article into columns, I selected my D.P.S pages and clicked on ‘Layout’, then, ‘Margin and Columns’ where I selected the amount of columns I wanted I created text boxes within the column guidelines then, copied and pasted my final checked article inside the text boxes; however, I repeatedly got confused as to which parts had already been copied and which parts had already been pasted which made the process a little more difficult. As well as that, I had to keep on adjusting the size of the text boxes so they fit the columns perfectly and I had to keep rearranging my article around because sentences weren’t ending or lining up where they should’ve been. The first time around, I chose to have three columns, however, this later proved to be too many; so I re visited Margins and Columns and changed the amount of columns to two
  • 13. I didn’t have to add many finishing touches to my double page spread because I’d already completed most of it through its production. The final touches that I did add, were minor things that I’d almost forgot to include, e.g. page numbers, which were simple but essential in a magazine, or small details that I thought would make my article look more professional e.g. the album information D.P.S: FINISHING TOUCHES After many adjustments, my article was finally in its place and measuring up to the guidelines, I also changed the colours of some of my letters so that they could be seen by the reader I re-cycled my barcode image from the front I added page numbers to make my D.P.S look realistic cover and used it as ‘BoxHeads’ album cover, by rotating it so the image was vertical, I used it to accompany the article. After experimenting with the effects, the album cover looked less like a barcode and more album-like, to make it more realistic, I added an album title which also helped to make the article make sense; to make the title noticeable I put it in a white box I changed the font and colourings of the first letter of my article to create a drop capital
  • 14. Final Saving Stages: JPEG As my front cover and D.P.S were on the same InDesign document, to save my front cover as a separate JPEG, first, I had to select the my front page. Then, I went on ‘File’, ‘Export’ –changed the name so that it didn’t replace the existing InDesign file- and when the ‘Export JPEG’ box came up, I clicked on ‘Range’ so that it wouldn’t save my front cover and D.P.S as one file, changed the quality to maximum and then, finally, pressed export. Then, I just repeated this process for my contents page. However, when it came to saving my D.P.S as a JPEG I had to alter the process slightly. When the ‘Export JPEG’ box came up, instead of just clicking ‘Range’ and then exporting, I had to select ‘Spreads’ as well (so that the JPEGs were separate) and then type 2-3 into the box next to the word range so it changed both pages into JPEG’s