How to use the Training Materials
•
2 gostaram•1,054 visualizações

A guide to take you through how to use the training materials for the PMSD Roadmap. Includes a collection of all of the Top Facilitation Tips used in the training materials, which can be used to provide guidance when running the training sessions, and also as tips for the participants themselves. Tips created by Lindsay Berresford. Last updated 21/06/12
![Session title: [As displayed in the agenda above]
Time:
6. Repetition of the time allowance given in the above agenda. The
Materials: materials do not tell you what time each session should start, the start and
finish times for the day, break times etc. You will need to work these out
Objective: depending on your defined schedule, i.e. whether you are delivering all the
modules consecutively over a few days, or spreading the modules out.
Context:
7. This provides you with an introduction to the session and why it’s important.
This bit should be said out loud to the participants, but should be adapted where
possible to make it specific to the group.
Process:
8. This section will lead you through the process of the session – it will include
presentations, activities, discussions and debriefs. Most of the text can be read
word for word, although it will sound better in your own words!
[instructions for the facilitator are in square brackets like this]
Notes:
9. Supplementary information relevant to the session. This should not be shared
word for word, but you may choose to share some or all of it at the relevant
moments. It may also include additional instructions for the facilitator.
2](data:image/gif;base64,R0lGODlhAQABAIAAAAAAAP///yH5BAEAAAAALAAAAAABAAEAAAIBRAA7)
Recomendados
Mais conteúdo relacionado
Mais procurados
Mais procurados (20)
Semelhante a How to use the Training Materials
Semelhante a How to use the Training Materials (20)
Mais de PMSD Roadmap
Mais de PMSD Roadmap (20)
Último
Último (20)
How to use the Training Materials
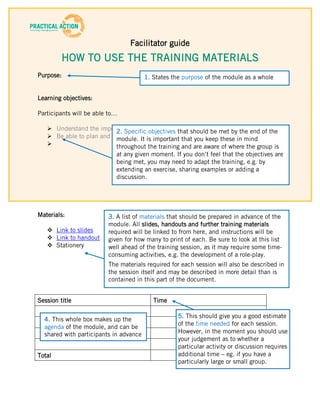
- 1. Facilitator guide HOW TO USE THE TRAINING MATERIALS Purpose: 1. States the purpose of the module as a whole Learning objectives: Participants will be able to… Understand the importance 2. Specific objectives that should be met by the end of the Be able to plan and module. It is important that you keep these in mind throughout the training and are aware of where the group is at any given moment. If you don’t feel that the objectives are being met, you may need to adapt the training, e.g. by extending an exercise, sharing examples or adding a discussion. Materials: 3. A list of materials that should be prepared in advance of the module. All slides, handouts and further training materials Link to slides required will be linked to from here, and instructions will be Link to handout given for how many to print of each. Be sure to look at this list Stationery well ahead of the training session, as it may require some time- consuming activities, e.g. the development of a role-play. The materials required for each session will also be described in the session itself and may be described in more detail than is contained in this part of the document. Session title Time 5. This should give you a good estimate 4. This whole box makes up the of the time needed for each session. agenda of the module, and can be shared with participants in advance However, in the moment you should use your judgement as to whether a particular activity or discussion requires Total additional time – eg. if you have a particularly large or small group.
- 2. Session title: [As displayed in the agenda above] Time: 6. Repetition of the time allowance given in the above agenda. The Materials: materials do not tell you what time each session should start, the start and finish times for the day, break times etc. You will need to work these out Objective: depending on your defined schedule, i.e. whether you are delivering all the modules consecutively over a few days, or spreading the modules out. Context: 7. This provides you with an introduction to the session and why it’s important. This bit should be said out loud to the participants, but should be adapted where possible to make it specific to the group. Process: 8. This section will lead you through the process of the session – it will include presentations, activities, discussions and debriefs. Most of the text can be read word for word, although it will sound better in your own words! [instructions for the facilitator are in square brackets like this] Notes: 9. Supplementary information relevant to the session. This should not be shared word for word, but you may choose to share some or all of it at the relevant moments. It may also include additional instructions for the facilitator. 2
- 3. Top 10. Each module of the facilitator guide will include a top Facilitation facilitation tip – these are general tips for all the trainings, Tip! and are not specific to any module. You can choose to use these in any of the following ways: Reflect on and implement one for each module in order to fully understand and master it before moving on to the next Study them all before commencing the training Have them available as a resource to draw on when you have a particular challenge or are tackling a particular issue All of the top facilitation tips used throughout the PMSD Roadmap training materials have been compiled below, for you to print and use as you wish. 3
- 4. Top Module 0: Role modelling Facilitation For this module in particular, it is vital that you role model Tip! the skills attitudes and behaviours you are introducing to the participants. Remember to: Demonstrate active listening, including repeating back what you have heard to clarify Check in with participants to ensure that they have understood your instructions Ask frequently if people have questions Reflect questions back to the group or the individual “What do you think the answer might be?” “Does anyone else have experience of this?” When you ask a question to the group, be genuinely open that you may learn new ideas or insights. There may be some key points you need to highlight, but the purpose of the question is not to get the ‘right’ answer but to explore ideas Be sure to create a fun, open atmosphere conducive to trying things out and learning. In a ‘performing’ (as opposed to ‘learning’) mode, some of the participants may feel defensive or embarrassed, so continually emphasise the learning points. Ask for feedback! 4
- 5. Top Module 1: Getting people into groups for activities: Facilitation Group activities are a great opportunity for people to share Tip! ideas with people they would not normally have the chance to. Therefore, don’t just have people get into groups where they’re sitting, as they are likely to sit next to people they know. Here are two simple ways to get mixed groups: Get people to count themselves off ‘1, 2, 3…’ up to the number of groups you want to have (total group size/no. of people per group = no. of groups), then ask all the 1s to work together, all the 2s etc. Get everyone to stand up and line themselves up in a particular order e.g. ‘month of birth’ or ‘number of siblings’ (choose something culturally suitable) Getting people into groups can also be an opportunity to re-energise participants. Here is an activity that does both… Get everyone up and walking around the room Choose a few local forms of transport, e.g. ‘rickshaw’ or ‘matatu’ and for each, state the number of people that must group together and the action they will do (e.g. if it’s a motorbike taxi everyone must get into pairs one behind the other and move around the room quickly and noisily). Ensure that one of the modes of transport gives you the size of group you are looking for. Spend 5 minutes playing the game – i.e. calling out the different forms of transport and having everyone immediately get into the appropriate grouping. The last one you call should be the correct group size for your next activity. 5
- 6. Top Module 2: Guided reflection: Facilitation The ‘debrief’ is essentially a guided reflection process, Tip! allowing participants to get maximum learning and insight from each exercise you do, as well as from each module or training day. The type of questions you ask will have an impact on the quality of the discussion, it is not enough just to ask ‘So, what do you think?’. There are a number of different models or processes you can refer to. Here are a few options: 1. The ORID method (Observational / Reflective / Interpretive / Decisional): What happened in that exercise? What did you like / enjoy? How has this changed your thinking? What will you do differently in future as a result? 2. The What? So What? Now What? method: What have you learned? So what – what is the significance of the learning? Now what are you going to do or change going forward? 3. Start. Stop. Continue. Change: Based on what you’ve learned, what will you: start doing and stop doing? continue doing? How will you change what you’re already doing? 4. AH-HAH! Ask everyone to write ‘Ah-hah!’ on a page of their notebook and to make a note every time they learn something new, have a new insight or make a new connection. At the end of each module (or day or hour…) have each person (or team) share their most important Ah-hah! moments. 5. Could you really use this? This can be an important additional question to ask. If not, is it because you’ve not gone into enough detail or because you think this framework is not relevant to you? Often the answer might be ‘I’ve not put enough contextual detail’. This can lead from a generic reporting back to tackling some of the important specific issues. The type of debrief it is best to use will depend on whether you are debriefing an exercise, a module or an entire training programme. Give time to this process and don’t be afraid of silence – reflection takes time. 6
- 7. Top Module 3: If it’s just not working: Facilitation Here is a set of tips to help you deal with those times when Tip! what you’re doing just doesn’t seem to be working… If participants seem disengaged during a plenary session, try getting them into small groups to discuss learning, then ask them to share the highlights If report-backs are taking too long and are too detailed to hold people’s attention, try focusing the reports e.g. by asking ‘what did you disagree on?’ If the group don’t seem to understand what you’re saying, try illustrating it with an example, or ask if someone else would like to try explaining it If energy is low, move quickly to the next session and get people into different groups, requiring them to get up and move around If people seem a bit overwhelmed with information, take some time out for individual or group reflection on what has been covered so far If you’re not really sure how participants are doing, you can quickly take the ‘temperature’ of the room by asking each person to say two words that describe how they’re feeling e.g. ‘tired and frustrated’ or ‘inspired and motivated’ If participants keep looking to you to have all the answers, try reflecting questions back to the group If participants are asking lots of questions about an exercise and you have explained it clearly a few times, ask them to try it out and see what questions come up as they go If a topic is brought up that is not directly relevant to the session and is likely to cause long and heated discussion, don’t be afraid to say that it is unfortunately not a question that it is within the scope of the session to answer If you are really not sure what to do… announce a short ‘energy break’ to give yourself time to stop and think! 7
- 8. Top Module 4: Gathering Objectives for each module Facilitation In order to focus your mind, as well as the minds of the Tip! participants, it can be useful to set learning objectives for each module. These should be based on the outlined topic for each module as well as participants having an idea of what will be covered. There are a number of different ways you can do this: Send out an agenda and request objectives in advance of the module – this will work if you have time gaps between modules, and will give you the opportunity to tailor the module according to what they say. Get participants into pairs or small groups at the start of the module to discuss their objectives, then they can report back the highlights to the whole group Ask each participant to think of the one thing they would most like to get from the module and write them all up on a flipchart. This also gives you the opportunity to review at the end of the day whether or not they achieved their objective. 8
- 9. Top Module 5: Reviewing learning: Facilitation Tip! At the end of each module, or each day depending on how you are structuring the training, it is important to review participants’ learning and address any questions or confusion, as well as get feedback for how the training was run. This will enable you to: Cement learning Understand what participants know and don’t know Understand what participants are gaining from the training Address questions or confusion in the moment and/or… …Revisit difficult topics in the next sessions Improve your facilitation skills Provide feedback to the PMSD Roadmap team about how the training can be improved There are a number of ways of doing this ranging from the very simple to the more complex. The simplest review would consist of 2-3 questions answered verbally by each of the participants e.g. ‘What made you happy?’ ‘What frustrated you?’ ‘What confused you?’ There are many variations of these questions e.g. ‘What was most valuable for you?’ ‘What did you learn?’ ‘What should we do differently in future?’ A slightly more complex review could involve participants discussing these questions in small groups and reporting back their key points If you are particularly keen to know what information they have absorbed, you can use a quiz… You could put the questions together yourself; some example questions are included below which you might use for a quiz on this module: 1. Define a ‘key actor’ 2. What are the five elements of the trust equation? 3. Name two elements of an invitation which can be personalised to attract key actors to attend? An alternative (and usually more effective) technique is to have the participants prepare the questions themselves: - Get them into groups of 3-5 and have each group think-up as many questions as there are other groups and prepare an answer for each of the questions. 9
- 10. - Have group 1 ask their questions first – one each to group 2, group 3 etc. - Give each group a minute to answer their question – check back with the questioning group what their answer was and allocate a point for each correct answer – if there is a disagreement you may have to arbitrate - Then get group 2 to ask their questions to the other groups in turn - When all the groups are done, you should have a winner! NB – you might like to have a tie-break question prepared in case you do not have a clear winner 10
- 11. Top Module 7: Keeping Timings on your side: Facilitation An important element of facilitation is planning effectively so Tip! that you make maximum use of people’s time without overloading them. For any given activity there will be a range of potential timings you could use. For example, individual reflection on a particular question could range from 1 minute to 15 minutes, depending on whether it is a familiar subject and you are looking for a quick brainstorm or it is a new area and/or you are looking for their considered view. A group activity where you are asking them to match a set of statements to a set of categories could range from 10 minutes to an hour depending on the complexity of the exercise and whether the purpose is to generate discussion or to become really familiar with the material. Pace should be appropriate for the group and the purpose. Sometimes it is essential to slow the pace and allow for deep reflection and discussion, at other times you may want to keep the pace up to keep people engaged and make significant progress. Generally you will want to vary the pace throughout a given workshop or training session. With experience you will start to learn how long specific activities need. As you go through a training or workshop, note down the actual time used for an exercise and adjust future sessions accordingly. You will learn more generally about how long things take and be able to estimate more accurately how much time new activities will need when you invent them. However, every group is different. Therefore… a. Use your intuition to tap into the energy of the group. You can usually sense whether groups are still fully engaged in productive and animated discussion and may therefore need more time, or have got maximum benefit from the group work and have moved into ‘chat’. b. Being clear about your objectives will help you to assess how flexible or rigid to be in your timings. Don’t miss out on opportunities for important insights or discussion because you are afraid to go off schedule, but on the other hand you must remember that additional time spent one thing will have to be recovered from elsewhere, and you may be aware of how essential a later exercise is in getting the group to where they need to be. 11
- 12. Top Module 8: Group size: Facilitation Tip! Some tips and advice on how to adapt the training materials to work with different group sizes, and the ideal number of participants to aim for. Number of Notes Suggestions participants 1-7 You will struggle to run some 1. Get some more people involved! Invite of the exercises with a group other staff in the office or from partner this size organisations – they will get lots of benefit too. 2. Adapt the exercises – use more pair work and have more whole group discussions 8-11 This group size will work See notes in the sessions plans well but some exercises will need to be adapted 12-16 This is a perfect group size Aim for this number! You will be able to for this training run most of the sessions with no adaptations. 17-30 This is a large group – the 1. If possible give yourself more time as exercises should still be you may find that sessions take longer with effective but you may find this size of group. plenary discussions more of 2. Involve a co-facilitator, this size of group a challenge is too big for one person 3. You may want to split the group in half for some sections 4. See notes for adaptations of exercises for larger groups 12