

Recommended
More Related Content
More from School Vegetable Gardening - Victory Gardens
More from School Vegetable Gardening - Victory Gardens (20)
Recently uploaded
Recently uploaded (20)
Tomatoes Gardening
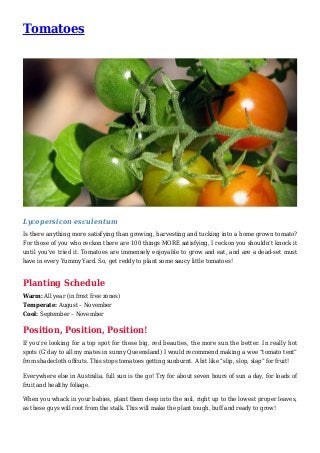
- 1. Tomatoes Lycopersicon esculentum Is there anything more satisfying than growing, harvesting and tucking into a home grown tomato? For those of you who reckon there are 100 things MORE satisfying, I reckon you shouldn’t knock it until you’ve tried it. Tomatoes are immensely enjoyable to grow and eat, and are a dead-set must have in every Yummy Yard. So, get reddy to plant some saucy little tomatoes! Planting Schedule Warm: All year (in frost free zones) Temperate: August – November Cool: September – November Position, Position, Position! If you’re looking for a top spot for these big, red beauties, the more sun the better. In really hot spots (G’day to all my mates in sunny Queensland) I would recommend making a wee “tomato tent” from shadecloth offcuts. This stops tomatoes getting sunburnt. A bit like “slip, slop, slap” for fruit! Everywhere else in Australia, full sun is the go! Try for about seven hours of sun a day, for loads of fruit and healthy foliage. When you whack in your babies, plant them deep into the soil, right up to the lowest proper leaves, as these guys will root from the stalk. This will make the plant tough, buff and ready to grow!
- 2. Talking Dirty Unlike some other Yummy Yard favourites, (I’m looking at you sweet corn and pumpkin), tomatoes can be grown in a good-sized pot as well as a garden bed. In fact, there are some tasty little hybrids bred especially for pots and even hanging baskets! Tomatoes love compost, and a bit of pelletised chook poo won’t do them any harm either. The best way to ensure top toms is to prepare the bed at least one month before planting time. Whack in some top quality compost, pelletised poo, a nice straw mulch and then count down the days! The tip here is to ensure the soil drains freely and isn’t too heavy (meaning not dense and clayey). Now, tomatoes can be a wee bit fussy with regards to their soil pH, so I would suggest either buying a kit, or taking some soil down to the local SGA nursery for testing. Ideally, soil pH for tomatoes should be between 6.5 – 6.7, and this prevents all manner of hideous stuff from happening, in particular a dirty little disorder called Blossom End Rot. Prevention, as with most things, is better than a cure here, so my tip is whacking some dolomite lime into the tomato bed well before planting (about two months is perfect). Blossom End Rot is essentially a calcium deficiency, and dolomite lime will provide a nice whack of calcium ovber a long period. Don’t leave this to the last minute, as it can take a while to become available to the plant. Ideally, if your soil has not been limed in the last two years (and honestly, whose has), it is recommended that 1 handful of dolomite lime be applied per tomato plant. I reckon mix this through with your compost, and walk away for a couple of months! Too easy! In cooler areas, my tip is hold the mulch until late spring / early summer when the sun has had a chance to warm up the soil. Warm soil will help your big red legends grow like crazy! Tomatoes are one of the few plants which can tolerate mulch being applied right up to the stalk.
- 3. Feed Me! Feeding tomatoes is pretty unnecessary at first, especially if you have prepared your soil well. Avoid manufactured fertilisers for these guys, in my opinion it’s a waste of money, environmentally irresponsible and they really don’t need it. If you are dead keen to feed, give ‘em more compost! My secret is good soil preparation, coupled with the occasional drink of liquid chook poo… soak some pellets in a big old bucket of water for a few days, giving it a stir occasionally, and you’re away. I do this every two to three weeks during the flowering and fruiting period! Stake ya’ claim! Stake your claim with tomatoes! All toms, even the tiny little ones and the pot-bred varieties will benefit from staking. Like me, they have a tendency to want to be horizontal all the time. I love training mine on a bit of lattice or trellis, mainly because I like the look of it. Normal staking involves knocking in a fair size tomato stake or two (ask at your SGA nursery and they’ll tell you what it is), and tying the stem to the stake with some sort of material that has a bit of give in it. I use old stockings, (not that I have any, but my neighbour has loads on her clothes line) and be careful not to tie them too tight… you don’t want to strangle your toms! What about the Water? Never ever let the soil dry out with tomatoes, especially during the flowering and fruiting stages! This causes all manner of bad things to happen, mainly hideous diseases, fruit and flower drop, and plants really susceptible to attack by pests and the rest! That said, don’t over water… wet boggy soils are just as bad as dry soils! Use the trusty soil moisture indicator (your pointer finger) to assess the situation! Oh, and as for the other Yummy Yardies… no Greywater on or near your tomato plants! Are We There Yet? Well, here’s a rough guide… the big fellas take between 10 -14 weeks to mature, while the little cherry tomatoes (and friends) take about 11-13 weeks. The best time to pick tomatoes is… well… undecided! I tend to pick mine when they are slightly ripe, that is, they have changed colour, but are still quite firm, and a little green. This works especially well in warmer climes (hi Brisbane!!) as, if they are left on the plant too long, they tend to over ripen and split, due to the heat! In cooler climates you have a bit more freedom, and can leave them on the vine a bit longer. Again, watch that they don’t get too soft, or you’ll run the risk of them being fairly unpleasant to eat. Also, if you are leaving them on the vine to ripen, watch out for stealthy tomato-stealers! Rats, possums, roos, rabbits, birds and all manner of critters love ripening tomatoes, so it’s best if you get to them before they do! Now, my nanna, an ace tomato grower, used to pick her toms when they were fairly green, and whack them on the kitchen window sill to ripen. I got a lot of gardening tips from my grandma, but this ain’t one of the better ones. In my experience, tomatoes placed on a window sill can, if it’s a really hot spot, warm up too much and blister, which makes for a very tasteless (and very unattractive) tomato harvest. Check out the hot tips below for better ways to ripen tomatoes… still love you heaps, Nanna!
- 4. Pests and the Rest Unfortunately, tomatoes can be host to a plethora of garden nasties, but there are a couple of preventative measures you can take to “stop the rot” so to speak! Diverse Yummy Yards, full of tasty treats and pretty plants, will attract a range of good bugs to your patch. These guys will make short work of loads of pest outbreaks. The other hot tips are a consistent watering regime, and crop rotation. Don’t plant this year’s toms in a patch where tomatoes, chillies, eggplants or potatoes have been in the last two years… this lessens the possibility of disease. Also, companion planting and tomatoes go hand in hand. Now, if all this fails and you do have an issue, never fear, Sustainable Gardening Australia is here! Below is a list of common issues, their causes and a couple of solutions for taming tomatoes! Flowers fall off before the fruit forms – Could be caused by loads of things, including too much or not enough water, not enough light, over fertilising (I tried to warn you), possums or thrips. Check flowers for thrips Leaves wilting Did you water your plants? This generally happens when humans are overcome by laziness, or holidayitis! Especially common during summer school holidays. Yellowish patches on fruit and burnt bits on leaves – “We’re melting, we’re melting”! If your toms could talk this is what they would say! It’s too hot… read the “Position, Position Position” section above for some tips! Mottled yellow patches on leaves and fruit – Sorry Mum, but this happens to my tomatoes a fair bit! It’s called tobacco mosaic virus, and it’s spread by smokers not washing their dirty little hands before touching their tomatoes! Make sure your crop is maintained, hygienic and rotated seasonally. And for goodness sake you puffers – wash your hands!!! White powdery patches on upper surfaces of leaves – Ahh, our old mate powdery mildew. Often caused by water hanging around on the leaves of plants. Try to water the soil, rather than the foliage. Remove affected leaves and put them in the bin, not the compost. Holes in your leaves – Pretty sure it’s caterpillars Really ugly wet looking patches on the tomato – It’s probably Blossom End Rot. Hot Tips Now, thanks to my Nan, we have some great ways to speed up the ripening of toms… and it’s so simple! Grab 10 or so green tomatoes, and pop them in a paper bag with a banana (not too ripe… that would spoil it). Ripening bananas release ethylene, which seriously speeds up the ripening of tomatoes! How easy is that? Finally, the best way of storing your home grown tomatoes is on your kitchen bench, away from direct sunlight. Don’t ever, ever put them in the fridge, as it destroys their structure and flavour… something I didn’t know until last week, but it makes a pile of sense!
- 5. Eat me! Tomatoes are the love apple, so it’s best to K.I.S.S. them and enjoy the homegrown taste of fresh juicy tomatoes “vine ripened.” So… Make the salad from the Basil Yummy Yards fact sheet. Do a bruschetta. Chop tomato, onion and red onion or shallot. Tear up some basil leaves. Season with salt and pepper and stir through your best quality olive oil. Toast some bread and smear a cut garlic clove on it. Pile the bruschetta mix on top. Ahh, the taste of summer. Throw some breadcrumbs, freshly picked herbs, olive oil and garlic into a frying pan. Allow to heat through for a minute. Add halved tomatoes, cut side down. Move each tomato in a circular manner to ensure it is coated with the breadcrumbs mix. Allow to cook for about 5 minutes. Gently turn the tomatoes over and cook through for a few more minutes. Serve with toast for breakfast or alongside chicken or steak for dinner. Make the Ratatouille from the Capsicums and Chilies fact sheet. Chop them and toss through the cous cous Recipe from the Cucumbers page. Mock Chicken Try this ‘Mock Chicken’ recipe. It will take you back to the days when tomatoes tasted like tomatoes! 2 home grown tomatoes chopped 1 onion chopped 1 egg beaten Salt and pepper 1 Cup cheddar cheese grated Handful fresh homegrown herbs Finely diced onion and tomato Fry onion till soft, then add tomato and cook until starting to fall apart. Beat the egg and add. Cook till egg firms. Turn off the heat. Add chopped herbs and cheese and salt and pepper to taste Eat straight away on toast for breakfast or chill before filling a roll with the mixture for lunch. Also great served with crackers. Pictures Tomato pics: Mary Trigger (SGA)