Violin stars lesson_3 (www.sheetmusic-violin.blogspot.com)
•
1 gostou•432 visualizações

(www.sheetmusic-violin.blogspot.com)

Recomendados
Mais conteúdo relacionado
Semelhante a Violin stars lesson_3 (www.sheetmusic-violin.blogspot.com)
Semelhante a Violin stars lesson_3 (www.sheetmusic-violin.blogspot.com) (20)
Mais de William Soph
Mais de William Soph (20)
Violin stars lesson_3 (www.sheetmusic-violin.blogspot.com)
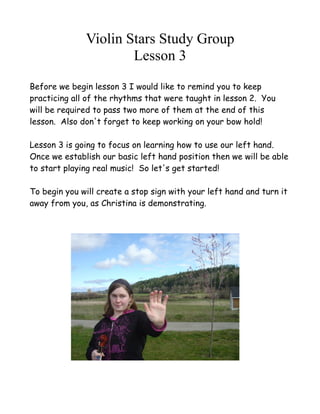
- 1. Violin Stars Study Group Lesson 3 Before we begin lesson 3 I would like to remind you to keep practicing all of the rhythms that were taught in lesson 2. You will be required to pass two more of them at the end of this lesson. Also don't forget to keep working on your bow hold! Lesson 3 is going to focus on learning how to use our left hand. Once we establish our basic left hand position then we will be able to start playing real music! So let's get started! To begin you will create a stop sign with your left hand and turn it away from you, as Christina is demonstrating.
- 2. Then turn the stop sign so that it is facing you. This is your basic left hand position. Now slide your stop sign up and down the neck of the violin. Do this a few times and keep your hand loose and relaxed.
- 3. After sliding a few times, come to a stop near the scroll of the violin. Notice the open space in Christina's hand? That's good! Do you see the space between her thumb and the violin neck? This can be clearly seen in both pictures. This means that the thumb is relaxed and soft. The hand is not squeezing the violin! Use the mirror often to check for tension. You should be able to see daylight between your thumb and the neck. Now place your index (also known as 1st) finger on the fingerboard. It should come down on the top with the knuckle pointing up. You will need to cut your nails short! I know, if you're a girl this can be tough, but it's worth the sacrifice! They have to be short though or you won't be able to place your finger correctly.
- 4. Here are some pictures of 1st finger placement. Okay, so now you know how to correctly place your left hand. For the first couple of weeks you are going to constantly need to be on the watch for bad habits starting to form. Getting the left hand right is just as important as your bow hand. And it is so much easier to get it right now while the information is fresh in your brain! You need to be aware that every time you play you are teaching your muscles. You are programming them to learn new skills. Whatever you do right now while you are learning will soon become an unconscious reflex. You will pick up the bow and your brain will instantly tell your fingers how to hold the bow without you even thinking about it. How you hold the bow depends on how you have trained your muscles. Did you teach them to do it correctly, or were you lazy and sloppy? So take the time to do it right and you
- 5. will impress everyone with your beautiful violin playing! Now I am going to give you some examples of common left hand errors. It's good to know what they look like so that you can more easily examine your own playing. Here is an example of the most common error. The wrist has collapsed and is supporting the weight of the violin. The violin needs to be supported by the thumb and the base of the index finger. The beginner should never have their wrist touching the violin.
- 6. This is the 2nd most common error. The finger is flat with the knuckle pointing down. This will result in poor intonation and slopping playing. To fix this, point the knuckle up and make sure you land on the tip of the finger right by the nail. Another common error. Notice how her elbow is pointing to the left, this will throw off the position of her hand and cause tension. The elbow should hang naturally from the hand. And as the hand moves over the strings the elbow will follow. For example, when
- 7. playing on the G string the elbow will be much farther around than when playing on the E string. But it should never point to the left in an awkward position. Rule of thumb – if it looks awkward it probably is! In this picture the scroll of the violin has drooped throwing off the balance and causing the wrist to collapse and support the instrument. This can lead to injury if it is not corrected. To fix this lift the scroll and find the balance between the thumb and index finger.
- 8. Sometimes after I correct a student with a drooping scroll the opposite happens! The violin suddenly points too high. This makes you lose the balance of the violin because now you are fighting gravity. This will also strain your arm. The solution? Simply lower the scroll a little, it will feel much better! So you may be wondering why I am so picky! Well that's because I want you to succeed with your music! And I don't mean you have to be famous, but I want you to personally succeed. I want you to enjoy your music. I want you to have fun with it! And you may think “Well I do just want to have fun with it, so who cares about all of this boring technical stuff! I just want to play some songs, it doesn't matter how I hold the violin or bow, I just want to play for fun.” But that's not true. The truth is the better you play
- 9. your violin, the more enjoyment you will receive from it! Because you will be able to play anything you want, and you will be able to produce a sound that is pleasing to your ears and to others who may be listening. And regardless of what many people think, it doesn't take talent to play well. Every student can produce a pleasing sound on the violin within just a few months, if they are taught correctly. You can be one of these students! Isn't that exciting? I think it is! I am so excited to be able to offer this course to you and I hope that you will make the most of it! I want you to play well! Okay now let's have some fun and learn how to play the Flower Song! For this little tune you will be using the open E string, the first finger on the E string, and the open A string. You should go listen to the midi file before we begin so that you can learn what it sounds like. For this song we will be using the Huckleberry pancake rhythm on each note. So you will play huckleberry on the open E string, then you will carefully place your first finger on the E string (this note is an F sharp) and repeat the HP rhythm. Then you will lift the first finger and play HP on the open E string. Then you will tilt the bow to the A string and play HP on the open A string. So every note is played Huckleberry Pancake and it goes E 1 E A You can play along with the flower song midi file if you like. It will repeat several times for you, which is a good way to play Flower Song. You guys are my stars!! Good job! I love working with you. Now here's what I would like you to do in order to pass this lesson. You should already know how to record yourself after working
- 10. through lesson 2. So here's what I would like to hear. 1. Mama Oh Mama rhythm on E and A strings 2. Wish I had a motorcycle rhythm on E and A strings 3. Seagull Song 4. Send a picture of your left hand hold with your first finger down. Show a nice space between your thumb and the neck of the violin. No pinching the neck! You don't have to play the flower song for me yet. But do practice it! And again, I'm not looking for perfection. I just want to know that you are trying. And I want to be able to offer as much advice as I can to help you along. Keep up the good work!