SlideShare uma empresa Scribd logo
1 de 10
1
                             Using the Laptop: A Quick Overview
This document provides a short tutorial for getting started with the laptop. The material presented
here is being covered in the teacher training. This document will also be essential for teachers when
they introduce the laptop to the students the first time. The teachers themselves will be responsible
for teaching the students how to use the laptop. Hence, we recommend that the participants of the
training go through this tutorial on their own a number of times after the training so that they are
completely familiar with the basics of the laptop before the beginning of the school year.

The official name of this laptop is the “XO Machine.” The XO has been designed for rugged use in rural
areas. Hence it is not something that will break down through normal use. In fact, we encourage you
to to use it as much as possible. However, like all machines, its life depends on the extent to which it is
used properly.

The tutorial is divided into ten parts. Parts A through F focus more on the hardware (the physical
components) while parts G through J focus on the use of the software (programs or activities) in the
computer.

A. Getting familiar with physical structure of the machine

    1. Explore the the closed machine. Get a good feel for it.
       Q1. What is its size, weight, color, texture etc.?
       Q2. What do you think is the purpose of the rubber legs at the bottom?
       Q3. What is the best way to carry this laptop?
       Q4. Where are the hinges, are there any holes, are there any gaps?

    2.   Try to open the laptop. But be gentle!!

B. Opening and turning on the computer.

    1. How do you open the computer?

         Put the computer in front of you with handle facing away. Unlock the antennae (latches). Pry
         open the top by pulling along the seam (do not pull at the antennae).


    2. How do you turn on the computer?
         Press the power button        and relax!

         Note: Do not press any keys or buttons until the
         computer shows the following image on the
         screen.

    3. How do you turn off the computer?


                                                                                          SDBhatta
2
       Hold down the power button for 10 seconds. But as will be explained later, you can also do it
       by selecting the “shutdown” option from the home view.

C. Basic tasks (what you can do with the computer) and associated components

       Basic task                                 Which computer component to use
     1 Putting things in the computer             Input devices:
                                                  Keyboard
                                                  USB memory stick (through USB port)
                                                   Touchpad
                                                   Microphone
                                                  Camera
     2 Seeing things in the computer              Screen
     3 Moving around in the computer, using       Touchpad
       programs in the computer                   Left click button below touchpad
                                                  Arrows (on keyboard)
                                                  Game pad
                                                  Game controller buttons
                                                  Screen rotation button
     4 Getting things out of the computer         Output devices:
                                                  USB memory stick (through USB port)
                                                  Speaker
                                                  Headphone
                                                  Screen
     5 Communicating with other computers          Antennae


                                                                                    SDBhatta
3
    D. Keeping the computer running

      Q. What do you need to keep the computer running?

      A. Electric power from the battery.


       Note: to save power, always dim the screen to the extent possible by using the button on
                       the keyboard.

Questions regarding power:

    How do you do this?                     Which component to use for this
1   Turn power on                           Power button (press it)
2   Check if power is on                    Power indicator light (should be green)
3   Supply power to computer from           Power cord(plug into power jack)
    outside (to charge battery)
4   Check if battery is fully charged       Battery icon on screen (will be fully shaded)
                                            Battery indicator light (should be green if
                                            power cord is plugged in)


5 Check if battery is low                   Battery indicator light (will be red if power
                                            cord is plugged in); battery icon on screen
                                            (will be partially shaded)


6 Check exactly how much battery charge     Battery icon on screen (place cursor on top
  is remaining                              of it)
7 Turn power off                            Power button (hold down for 10 seconds)
                                            Shutdown option on main screen menu


                                                                                      SDBhatta
4
E. Understanding the home view on the screen

     The home view is what you finally see on the computer screen after the computer has been turned
     on. In this view, the image you see at the center of the screen ( ) represents you. The donut
     shaped area around you shows the different activities or programs that you are currently running on
     the computer. The bar at the bottom of the screen shows you all the activities or programs that you
     have access to. The battery icon shows how much battery charge is remaining on your computer.
     This view also tells you whether or not you are connected to a computer network. See the table
     below for details.

     It is very easy to get to the home view. All you have to do is press the    button on the keyboard or
     click on this button on the screen.

     Advice: Whenever you are unsure of what is going on with the computer, come back to the
     home view by pressing the   button on the keyboard.

       What you see                                        What it tells you
 1     XO logo in the center                               Represents you

 2     Battery image below circle                          How much battery charge is remaining

 3     Symbols in the donut                                Which particular programs you are
       (called activity circle)                            currently running (the Journal is
       around the XO logo                                  always open)

 4     Symbols at the bottom of the screen (activity       List of all the different programs that
       task bar)                                           are available in the computer


 5     Symbols at left top of screen                       Different views of the computer
                                                           (white circle with single dot in the
                                                           center is the Home view)

 6     A shaded circle next to the battery                 Shows whether you are connected to
                                                           the network


                                                                                            SDBhatta
5
F.   Understanding the keyboard

The keyboard enables you to enter information and commands into the computer. The computer
responds to the inputs you give through the keyboard.

The most important keys on the keyboard are marked in the picture below. The following table
describes these keys.


             What do you see                      What it tells you

         1 Buttons for different views                 Home view: view at startup; allows you to
                                                  see activity task bar and launch programs
                                                       Activity view: takes you to activity you are
                                                  currently working within
                                                      Friends view: shows other computers with
                                                  which you are collaborating
                                                      Neighborhood view: shows ALL computers
                                                  in the neighborhood

            Buttons for brightness control        Left button reduces brightness of screen
                                                  Right increases brightness
                                                  In sunlight, keep pressing left button until get
                                                  black and white screen

                                                  Note: to save power, always dim the screen
                                                  to the extent possible

            Buttons for loudness control          Left button decreases sound level
                                                  Right button increases sound level


                                                  Holding this down allows us to type the
            Shift key                             letters/symbols that appear on the top part of
                                                  each key in the keyboard

                                                  Pressing this confirms that we accept what we
            Enter key                             just typed (very important key)


                                                                                       SDBhatta
6
                                                         Erases the character just typed
                Erase key

                                                         Move cursor in different directions (left,
                Arrow keys                               down, right, up)


                                                         Shows/hides the taskbar and the buttons for
                Hide/Show button                         the different views on the screen

                Spacebar                                 Enters a space or gap when typing


G. Using the touchpad, left click button, and arrows to run programs in the computer

  1.       Moving the cursor using the touch pad

           Sliding your finger over the touchpad will move the cursor on the screen (cursor is the arrow or
            whatever shape you see on the screen). Try it.
           Move the cursor and place it on top of any icon on the screen. What do you see? Do this with
            the other icons as well.

  2.       Starting a program

           The task bar at the bottom of the screen shows the different programs on the computer. If the
            task bar does not show, press the        button on the keyboard.
            Move the cursor on top of the E-Paati program.
           Now click on the left click button. This will start the E-Paati program.
           Try starting another program. To do this, you will first need to go to the Home view by pressing
               . The taskbar should show at the bottom of the home view (press     on the keyboard if you
            don’t see the taskbar). Move the cursor to another program on the taskbar—say the write
            program—and left-click on it. The write program will start.
           Try starting yet another program--the record program      .
           Press     to go to the home view again. Can you tell which programs are currently running on
            your computer? How can you tell?

  3.       Switching between programs running on your computer

           How will you go back to the most recent program you started (i.e.,      program)?
                 o By pressing the activity view button
           You know that E-Paati is also running in the background (you saw it in the activity circle). How
            will you switch to the E-paati program?
           Press     to go to the home view again. Move cursor to the E-paati icon on the activity circle.
            Then left click on this icon. You will enter the E-paati program.

  4.       Stopping or ending a program


                                                                                              SDBhatta
7
            Say you want to stop the E-paati progam. How will you do it?
                 o Go back to the home view by pressing        on the keyboard.
                 o Place cursor over the E-paati program on the activity circle. What do you see?
                 o You will see the name of the activity (E-paati) as well as two options: resume and stop.
                     Move the cursor to the stop option and left-click on it.
            Try stopping the record program as well. How will you do it?

5.       How do you turn off the computer?

                  Go to home view.
                  Place cursor over the XO logo (the symbol at the center). What do you see?
                  Move cursor down and left-click on “shutdown”.

             Note: Always use this approach to turning off the computer. Turn off the computer by
             holding down the power button only if this “shutdown” process does not work.

H. Dragging and dropping items using the touchpad, cursor, and left-click button

         A number of interactive activities on the computer will require you to drag and drop items. So it is
         important to get used to this function.

              Dragging: means dragging an item from one place to another on the screen
              Dropping: means depositing an item in some location of the screen after dragging it

         Exercise: You will learn one way of dragging and dropping items in the course of doing this
             exercise.
             1. Start E-paatiClick on the grade 6 tabClick on the English tab.
             2. start the activity “Pronouns and Verbs” by clicking on it
             3. Click on the pronoun “He” and the verb “Playing”
             4. Answer the question “what is he doing” by dragging and dropping the correct words in the
                 correct places.
                     a. To drag a word, first click on the word.
                     b. Then use the touchpad to move (drag) the word to the desired location.
                     c. Then click on the location. The word drops there.


                                                                                            SDBhatta
8
I.   Writing a using the keyboard

     The XO comes with a simple program (activity) you can use for writing. The program is called
     “write” and you can see it on your taskbar. You can save the written document and open it again
     later to view and edit it.
      Start “write” activity: Go to the Home View. Then click on “write” activity on the taskbar as
         explained earlier.
      Typing in English:
              o Move the cursor using the touchpad  Take it to the upper left corner  click on the
                  left-click button. The cursor will look like a vertical line “|” and blink. This is where
                  your typed letters will appear.
              o Type something using the keyboard. For example, type “ Hello”. To type a capital “H”,
                  you need to first press the Shift key and then click on the “h” key while the Shift key is
                  held down.
      Typing in Nepali:
              o To type in Nepali, you need to select Nepali letters first. This is called selecting a
                  Nepali font. The Nepali font we will select is called Preeti. Here is how you select the
                  Preeti font:
                        Among the various areas shown at the top of the page is an area that says
                            “DejaVu Serif”. This is telling you that the default font on the computer is an
                            English font called Dejavu Serif.
                        Take the cursor to this location and left click. You will see a long list of fonts.
                        Use the down arrow “↓” on the keyboard to move down and highlight the
                            Preeti font.
                        While the Preeti font is highlighted, click on the left-click button.
                        Now when you type, you will end up typing in Nepali.
              o Q. But which key types which Nepali character?
                        See the attached Keyboard Layout picture to understand which key types
                            which Nepali character.
      Switching back to English:
              o Select the DejaVu Serif font using the process outlined above.
              o Then start typing.
      Erasing mistakes:
              o You can use the Erase button to erase the character just before the cursor.
              o To go to another location on your document to erase a character, youcan
                        Either use the arrows to move your cursor to the desired location and then
                            use the erase key,
                        Or you can use the touchpad to move the cursor to take the cursor the
                            desired location. But before pressing the erase key, you must first click on the
                            left-click button. This will put the blinking cursor in that location. Now use the
                            erase key.
      Saving your writing:


                                                                                            SDBhatta
9
             o    What you typed will be lost when you exit the “write” activity or when you turn off
                  the computer unless you “save” the document. So you must get into the habit of
                  saving the document frequently.
              o To save the document, do the following:
                       Click on the menu item that says “activity” at the top left c
                       Give the document a name you like: Put the cursor in the long oval shaped
                          box on the top left corner. Type the name for the document (e.g., call it
                          mydoc).
                       Save the document: Place the cursor on top of the icon that looks like a book
                          (at the top right hand corner). Then click on the left-click button. The
                          document is saved.
                       Note: you should save the document whenever you make changes to it.
        Exiting the “write” activity:
              o Go to the Home View.
              o In the activity circle, place the cursor over the write activity.
              o Double-click on Stop.
        Viewing previously saved documents:
              o Go to the Home View.
              o In the activity circle, left click on Journal activity.
              o The list shows all things you did recently starting with the most recent.
              o Left click on the most recent version of mydoc to open the document.

J.   Connecting to the e-library

     You can access the e-library from you XO by clicking on the e-library icon on the taskbar. But it is
     important to keep in mind that the e-library is physically located on a different computer called
     the library server. So before you can access the e-library, you need to connect to the computer
     network that includes the library server.

     1. Check if you are connected to the network
         Go to the Home View
         If the ball next to the battery icon is colored, it means you are connected. If the ball is
             gray, it means you are not connected
         Place cursor over the shaded ball next to the battery icon—it will tell you the name of the
             network to which you are connected (e.g., OLE Omni AP)
         If you are connected go to step 2. If you are not connected, go to step 3.
     2. I f you are already connected to the network, then
         Go to the Home View
         Click on the e-library icon on the taskbar
     3. If you are not already connected, then
         Go to Neighborhood View by clicking on the button on the keyboard
         Place cursor over the circle that gives the name of your desired network (e.g., OLE Omni
             AP) and left-click on it. Now you are connected.


                                                                                          SDBhatta
10
Appendix: Do’s and Don’ts

Do’s:

1. After you turn the computer on, always make sure there is enough charge in the battery before
   using (see the battery icon on the Home View).

2. Whenever possible, dim the screen to save power.

3. Whenever possible, use the “shutdown “ option in the Home View to turn off the computer.

4. Always turn off the computer if it is not going to be use for a long period of time.

5. After use, always close and secure the antennae before putting the laptop in a bag.

6. Protect the computer from dust and water to the extent possible.

7. Be gentle with your computer!!


Don’ts:

1. Never pull at the antennae ears (especially when opening the computer) of carry the computer by
   holding onto the antennae ears.

2. Do not scratch the keyboard or touchpad.

3. Do not press any keys when the computer is booting up (i.e., is in the process of turning on)

4. Do not take the battery out while the computer is running.

5. Do not press the keys on the keyboard with anything other than your fingers.

6. Do not put stuff inside the different opening you see on the computer (e.g., USP ports, power
   jack, microphone/headphone jack etc.).

7. Avoid touching the screen. In particular, do not touch the screen with any sharp object.

8. Do not place heavy objects on the computer.

Troubleshooting tips:

1. If the computer hangs (freezes or stops working while you are using it), turn it off using the
   power button.

2. If the computer turns off automatically while you are working, try charging the battery.


                                                                                          SDBhatta

Mais conteúdo relacionado

Mais procurados

Mais procurados (19)

Computre Basics and Hardware
Computre Basics and HardwareComputre Basics and Hardware
Computre Basics and Hardware
 
740688 001
740688 001740688 001
740688 001
 
Iwb instructions
Iwb instructionsIwb instructions
Iwb instructions
 
Ideapad
IdeapadIdeapad
Ideapad
 
Wm Wb3200 User Guide
Wm Wb3200 User GuideWm Wb3200 User Guide
Wm Wb3200 User Guide
 
introduction to computer
introduction to computerintroduction to computer
introduction to computer
 
Computer hardware-peripherals compress
Computer hardware-peripherals compressComputer hardware-peripherals compress
Computer hardware-peripherals compress
 
Parts Of The Computer
Parts Of The ComputerParts Of The Computer
Parts Of The Computer
 
Lesson 1 desktop (grade 1) 4th qtr
Lesson 1 desktop (grade 1) 4th qtrLesson 1 desktop (grade 1) 4th qtr
Lesson 1 desktop (grade 1) 4th qtr
 
Lesson 3 Basic Parts Of The Computer
Lesson 3   Basic Parts Of The ComputerLesson 3   Basic Parts Of The Computer
Lesson 3 Basic Parts Of The Computer
 
User manual for ICAM FHD 18
User manual for ICAM FHD 18User manual for ICAM FHD 18
User manual for ICAM FHD 18
 
Part’s of computer
Part’s of computerPart’s of computer
Part’s of computer
 
Suchita khairnar
Suchita khairnar Suchita khairnar
Suchita khairnar
 
Vodafone Tab Prime 6 Manual / User Guide
Vodafone Tab Prime 6 Manual / User GuideVodafone Tab Prime 6 Manual / User Guide
Vodafone Tab Prime 6 Manual / User Guide
 
L09 slides
L09 slidesL09 slides
L09 slides
 
Basic computer class 1
Basic computer class 1Basic computer class 1
Basic computer class 1
 
Parts of computer
Parts of computerParts of computer
Parts of computer
 
AV Operator's Guide
AV Operator's GuideAV Operator's Guide
AV Operator's Guide
 
What’s new with windows 7
What’s new with windows 7What’s new with windows 7
What’s new with windows 7
 

Destaque (6)

Eilat
EilatEilat
Eilat
 
Las mejores fotos
Las mejores fotosLas mejores fotos
Las mejores fotos
 
ODFmobile
ODFmobileODFmobile
ODFmobile
 
берлин
берлинберлин
берлин
 
Linguagem e cama
Linguagem e camaLinguagem e cama
Linguagem e cama
 
Acertijo De Einstein I
Acertijo De Einstein IAcertijo De Einstein I
Acertijo De Einstein I
 

Semelhante a XO tutorial March '08

Introduction to Computers Slides
Introduction to Computers SlidesIntroduction to Computers Slides
Introduction to Computers SlidesSaide OER Africa
 
Introtocomputershibbspowerpoint 120405033637-phpapp01
Introtocomputershibbspowerpoint 120405033637-phpapp01Introtocomputershibbspowerpoint 120405033637-phpapp01
Introtocomputershibbspowerpoint 120405033637-phpapp01ABDUL MUHAIMAN
 
Alcatel Onetouch Evo 7 Manual / User Guide
Alcatel Onetouch Evo 7 Manual / User GuideAlcatel Onetouch Evo 7 Manual / User Guide
Alcatel Onetouch Evo 7 Manual / User Guidemanualsheet
 
Lenovo Ideapad 310 (15" Touch) user guide manual PDF (English)
  Lenovo Ideapad 310 (15" Touch) user guide manual PDF (English)  Lenovo Ideapad 310 (15" Touch) user guide manual PDF (English)
Lenovo Ideapad 310 (15" Touch) user guide manual PDF (English)manualsheet
 
Manual lenovo y700
Manual lenovo y700Manual lenovo y700
Manual lenovo y700jesus_666
 
Introduction to computers
Introduction to computersIntroduction to computers
Introduction to computersFestus Oppong
 
Lenovo Flex 4 (14") user guide manual PDF (English) / User Guide
Lenovo Flex 4 (14") user guide manual PDF (English) / User GuideLenovo Flex 4 (14") user guide manual PDF (English) / User Guide
Lenovo Flex 4 (14") user guide manual PDF (English) / User Guidemanualsheet
 
Lesson 1- Get Started With Your First Computer 1.pptx
Lesson 1- Get Started With Your First Computer 1.pptxLesson 1- Get Started With Your First Computer 1.pptx
Lesson 1- Get Started With Your First Computer 1.pptxrubben7
 
English for Computer Unit 7 Maintenance and Safety
English for Computer Unit 7 Maintenance and SafetyEnglish for Computer Unit 7 Maintenance and Safety
English for Computer Unit 7 Maintenance and Safetyanchalee khunseesook
 
The Lenovo Ideapad 100s user guide manual PDF (English)
The Lenovo Ideapad 100s user guide manual PDF (English)The Lenovo Ideapad 100s user guide manual PDF (English)
The Lenovo Ideapad 100s user guide manual PDF (English)manualsheet
 
Pc laptop 101 learn the basics
Pc laptop 101 learn the basicsPc laptop 101 learn the basics
Pc laptop 101 learn the basicsRalpTorregosa
 
DESKTOP COMPUsqTEe2e2eR serbest is 1.docx
DESKTOP COMPUsqTEe2e2eR serbest is 1.docxDESKTOP COMPUsqTEe2e2eR serbest is 1.docx
DESKTOP COMPUsqTEe2e2eR serbest is 1.docxssusere41835
 
Computer basics
Computer basicsComputer basics
Computer basicslev12
 
Lenovo Ideapad 700 (17") user manual PDF (english) / User Guide
  Lenovo Ideapad 700 (17") user manual PDF (english) / User Guide  Lenovo Ideapad 700 (17") user manual PDF (english) / User Guide
Lenovo Ideapad 700 (17") user manual PDF (english) / User Guidemanualsheet
 
2. PC Laptop - The Basics.pdf
2. PC Laptop - The Basics.pdf2. PC Laptop - The Basics.pdf
2. PC Laptop - The Basics.pdfTonarSystems
 

Semelhante a XO tutorial March '08 (20)

Part 1 learning computer basics
Part 1 learning computer basicsPart 1 learning computer basics
Part 1 learning computer basics
 
Introduction to Computers Slides
Introduction to Computers SlidesIntroduction to Computers Slides
Introduction to Computers Slides
 
How to Use The Computer and The Internet
How to Use The Computer and The InternetHow to Use The Computer and The Internet
How to Use The Computer and The Internet
 
Introtocomputershibbspowerpoint 120405033637-phpapp01
Introtocomputershibbspowerpoint 120405033637-phpapp01Introtocomputershibbspowerpoint 120405033637-phpapp01
Introtocomputershibbspowerpoint 120405033637-phpapp01
 
Alcatel Onetouch Evo 7 Manual / User Guide
Alcatel Onetouch Evo 7 Manual / User GuideAlcatel Onetouch Evo 7 Manual / User Guide
Alcatel Onetouch Evo 7 Manual / User Guide
 
Lenovo Ideapad 310 (15" Touch) user guide manual PDF (English)
  Lenovo Ideapad 310 (15" Touch) user guide manual PDF (English)  Lenovo Ideapad 310 (15" Touch) user guide manual PDF (English)
Lenovo Ideapad 310 (15" Touch) user guide manual PDF (English)
 
Manual lenovo y700
Manual lenovo y700Manual lenovo y700
Manual lenovo y700
 
Introduction to computers
Introduction to computersIntroduction to computers
Introduction to computers
 
Computer
ComputerComputer
Computer
 
Lenovo Flex 4 (14") user guide manual PDF (English) / User Guide
Lenovo Flex 4 (14") user guide manual PDF (English) / User GuideLenovo Flex 4 (14") user guide manual PDF (English) / User Guide
Lenovo Flex 4 (14") user guide manual PDF (English) / User Guide
 
Lesson 1- Get Started With Your First Computer 1.pptx
Lesson 1- Get Started With Your First Computer 1.pptxLesson 1- Get Started With Your First Computer 1.pptx
Lesson 1- Get Started With Your First Computer 1.pptx
 
Driver english
Driver englishDriver english
Driver english
 
English for Computer Unit 7 Maintenance and Safety
English for Computer Unit 7 Maintenance and SafetyEnglish for Computer Unit 7 Maintenance and Safety
English for Computer Unit 7 Maintenance and Safety
 
The Lenovo Ideapad 100s user guide manual PDF (English)
The Lenovo Ideapad 100s user guide manual PDF (English)The Lenovo Ideapad 100s user guide manual PDF (English)
The Lenovo Ideapad 100s user guide manual PDF (English)
 
Pc laptop 101 learn the basics
Pc laptop 101 learn the basicsPc laptop 101 learn the basics
Pc laptop 101 learn the basics
 
DESKTOP COMPUsqTEe2e2eR serbest is 1.docx
DESKTOP COMPUsqTEe2e2eR serbest is 1.docxDESKTOP COMPUsqTEe2e2eR serbest is 1.docx
DESKTOP COMPUsqTEe2e2eR serbest is 1.docx
 
Computer Basics
Computer BasicsComputer Basics
Computer Basics
 
Computer basics
Computer basicsComputer basics
Computer basics
 
Lenovo Ideapad 700 (17") user manual PDF (english) / User Guide
  Lenovo Ideapad 700 (17") user manual PDF (english) / User Guide  Lenovo Ideapad 700 (17") user manual PDF (english) / User Guide
Lenovo Ideapad 700 (17") user manual PDF (english) / User Guide
 
2. PC Laptop - The Basics.pdf
2. PC Laptop - The Basics.pdf2. PC Laptop - The Basics.pdf
2. PC Laptop - The Basics.pdf
 

Mais de One Laptop per Child (17)

Khun Pisuth Learning Community part 1
Khun Pisuth Learning Community part 1Khun Pisuth Learning Community part 1
Khun Pisuth Learning Community part 1
 
BB Slides OLPC Bangkok 7/28/08
BB Slides OLPC Bangkok 7/28/08BB Slides OLPC Bangkok 7/28/08
BB Slides OLPC Bangkok 7/28/08
 
OLPC Nepal Presentation w/ script
OLPC Nepal Presentation w/ scriptOLPC Nepal Presentation w/ script
OLPC Nepal Presentation w/ script
 
Using Computational Thinking as means for human comprehension
Using Computational Thinking as means for human comprehensionUsing Computational Thinking as means for human comprehension
Using Computational Thinking as means for human comprehension
 
OLPC in Paraguay
OLPC in ParaguayOLPC in Paraguay
OLPC in Paraguay
 
Learn 2 Teach, Teach 2 Learn
Learn 2 Teach, Teach 2 LearnLearn 2 Teach, Teach 2 Learn
Learn 2 Teach, Teach 2 Learn
 
Real World Implementation
Real World ImplementationReal World Implementation
Real World Implementation
 
Connectivity on the XO
Connectivity on the XOConnectivity on the XO
Connectivity on the XO
 
Laptop Hardware
Laptop HardwareLaptop Hardware
Laptop Hardware
 
Storytelling on the XO
Storytelling on the XOStorytelling on the XO
Storytelling on the XO
 
Power on the XO
Power on the XOPower on the XO
Power on the XO
 
Country Technical Support
Country Technical SupportCountry Technical Support
Country Technical Support
 
Customizing your XO
Customizing your XOCustomizing your XO
Customizing your XO
 
Birmingham, AL Deployment
Birmingham, AL DeploymentBirmingham, AL Deployment
Birmingham, AL Deployment
 
Software Presentation
Software PresentationSoftware Presentation
Software Presentation
 
The XO and Learning
The XO and LearningThe XO and Learning
The XO and Learning
 
International Operations
International OperationsInternational Operations
International Operations
 

Último

Sample pptx for embedding into website for demo
Sample pptx for embedding into website for demoSample pptx for embedding into website for demo
Sample pptx for embedding into website for demoHarshalMandlekar2
 
The Fit for Passkeys for Employee and Consumer Sign-ins: FIDO Paris Seminar.pptx
The Fit for Passkeys for Employee and Consumer Sign-ins: FIDO Paris Seminar.pptxThe Fit for Passkeys for Employee and Consumer Sign-ins: FIDO Paris Seminar.pptx
The Fit for Passkeys for Employee and Consumer Sign-ins: FIDO Paris Seminar.pptxLoriGlavin3
 
"ML in Production",Oleksandr Bagan
"ML in Production",Oleksandr Bagan"ML in Production",Oleksandr Bagan
"ML in Production",Oleksandr BaganFwdays
 
Moving Beyond Passwords: FIDO Paris Seminar.pdf
Moving Beyond Passwords: FIDO Paris Seminar.pdfMoving Beyond Passwords: FIDO Paris Seminar.pdf
Moving Beyond Passwords: FIDO Paris Seminar.pdfLoriGlavin3
 
New from BookNet Canada for 2024: BNC CataList - Tech Forum 2024
New from BookNet Canada for 2024: BNC CataList - Tech Forum 2024New from BookNet Canada for 2024: BNC CataList - Tech Forum 2024
New from BookNet Canada for 2024: BNC CataList - Tech Forum 2024BookNet Canada
 
DevEX - reference for building teams, processes, and platforms
DevEX - reference for building teams, processes, and platformsDevEX - reference for building teams, processes, and platforms
DevEX - reference for building teams, processes, and platformsSergiu Bodiu
 
SIP trunking in Janus @ Kamailio World 2024
SIP trunking in Janus @ Kamailio World 2024SIP trunking in Janus @ Kamailio World 2024
SIP trunking in Janus @ Kamailio World 2024Lorenzo Miniero
 
TeamStation AI System Report LATAM IT Salaries 2024
TeamStation AI System Report LATAM IT Salaries 2024TeamStation AI System Report LATAM IT Salaries 2024
TeamStation AI System Report LATAM IT Salaries 2024Lonnie McRorey
 
A Journey Into the Emotions of Software Developers
A Journey Into the Emotions of Software DevelopersA Journey Into the Emotions of Software Developers
A Journey Into the Emotions of Software DevelopersNicole Novielli
 
Gen AI in Business - Global Trends Report 2024.pdf
Gen AI in Business - Global Trends Report 2024.pdfGen AI in Business - Global Trends Report 2024.pdf
Gen AI in Business - Global Trends Report 2024.pdfAddepto
 
WordPress Websites for Engineers: Elevate Your Brand
WordPress Websites for Engineers: Elevate Your BrandWordPress Websites for Engineers: Elevate Your Brand
WordPress Websites for Engineers: Elevate Your Brandgvaughan
 
Visualising and forecasting stocks using Dash
Visualising and forecasting stocks using DashVisualising and forecasting stocks using Dash
Visualising and forecasting stocks using Dashnarutouzumaki53779
 
(How to Program) Paul Deitel, Harvey Deitel-Java How to Program, Early Object...
(How to Program) Paul Deitel, Harvey Deitel-Java How to Program, Early Object...(How to Program) Paul Deitel, Harvey Deitel-Java How to Program, Early Object...
(How to Program) Paul Deitel, Harvey Deitel-Java How to Program, Early Object...AliaaTarek5
 
DevoxxFR 2024 Reproducible Builds with Apache Maven
DevoxxFR 2024 Reproducible Builds with Apache MavenDevoxxFR 2024 Reproducible Builds with Apache Maven
DevoxxFR 2024 Reproducible Builds with Apache MavenHervé Boutemy
 
The State of Passkeys with FIDO Alliance.pptx
The State of Passkeys with FIDO Alliance.pptxThe State of Passkeys with FIDO Alliance.pptx
The State of Passkeys with FIDO Alliance.pptxLoriGlavin3
 
Take control of your SAP testing with UiPath Test Suite
Take control of your SAP testing with UiPath Test SuiteTake control of your SAP testing with UiPath Test Suite
Take control of your SAP testing with UiPath Test SuiteDianaGray10
 
Anypoint Exchange: It’s Not Just a Repo!
Anypoint Exchange: It’s Not Just a Repo!Anypoint Exchange: It’s Not Just a Repo!
Anypoint Exchange: It’s Not Just a Repo!Manik S Magar
 
How to write a Business Continuity Plan
How to write a Business Continuity PlanHow to write a Business Continuity Plan
How to write a Business Continuity PlanDatabarracks
 
Time Series Foundation Models - current state and future directions
Time Series Foundation Models - current state and future directionsTime Series Foundation Models - current state and future directions
Time Series Foundation Models - current state and future directionsNathaniel Shimoni
 
unit 4 immunoblotting technique complete.pptx
unit 4 immunoblotting technique complete.pptxunit 4 immunoblotting technique complete.pptx
unit 4 immunoblotting technique complete.pptxBkGupta21
 

Último (20)

Sample pptx for embedding into website for demo
Sample pptx for embedding into website for demoSample pptx for embedding into website for demo
Sample pptx for embedding into website for demo
 
The Fit for Passkeys for Employee and Consumer Sign-ins: FIDO Paris Seminar.pptx
The Fit for Passkeys for Employee and Consumer Sign-ins: FIDO Paris Seminar.pptxThe Fit for Passkeys for Employee and Consumer Sign-ins: FIDO Paris Seminar.pptx
The Fit for Passkeys for Employee and Consumer Sign-ins: FIDO Paris Seminar.pptx
 
"ML in Production",Oleksandr Bagan
"ML in Production",Oleksandr Bagan"ML in Production",Oleksandr Bagan
"ML in Production",Oleksandr Bagan
 
Moving Beyond Passwords: FIDO Paris Seminar.pdf
Moving Beyond Passwords: FIDO Paris Seminar.pdfMoving Beyond Passwords: FIDO Paris Seminar.pdf
Moving Beyond Passwords: FIDO Paris Seminar.pdf
 
New from BookNet Canada for 2024: BNC CataList - Tech Forum 2024
New from BookNet Canada for 2024: BNC CataList - Tech Forum 2024New from BookNet Canada for 2024: BNC CataList - Tech Forum 2024
New from BookNet Canada for 2024: BNC CataList - Tech Forum 2024
 
DevEX - reference for building teams, processes, and platforms
DevEX - reference for building teams, processes, and platformsDevEX - reference for building teams, processes, and platforms
DevEX - reference for building teams, processes, and platforms
 
SIP trunking in Janus @ Kamailio World 2024
SIP trunking in Janus @ Kamailio World 2024SIP trunking in Janus @ Kamailio World 2024
SIP trunking in Janus @ Kamailio World 2024
 
TeamStation AI System Report LATAM IT Salaries 2024
TeamStation AI System Report LATAM IT Salaries 2024TeamStation AI System Report LATAM IT Salaries 2024
TeamStation AI System Report LATAM IT Salaries 2024
 
A Journey Into the Emotions of Software Developers
A Journey Into the Emotions of Software DevelopersA Journey Into the Emotions of Software Developers
A Journey Into the Emotions of Software Developers
 
Gen AI in Business - Global Trends Report 2024.pdf
Gen AI in Business - Global Trends Report 2024.pdfGen AI in Business - Global Trends Report 2024.pdf
Gen AI in Business - Global Trends Report 2024.pdf
 
WordPress Websites for Engineers: Elevate Your Brand
WordPress Websites for Engineers: Elevate Your BrandWordPress Websites for Engineers: Elevate Your Brand
WordPress Websites for Engineers: Elevate Your Brand
 
Visualising and forecasting stocks using Dash
Visualising and forecasting stocks using DashVisualising and forecasting stocks using Dash
Visualising and forecasting stocks using Dash
 
(How to Program) Paul Deitel, Harvey Deitel-Java How to Program, Early Object...
(How to Program) Paul Deitel, Harvey Deitel-Java How to Program, Early Object...(How to Program) Paul Deitel, Harvey Deitel-Java How to Program, Early Object...
(How to Program) Paul Deitel, Harvey Deitel-Java How to Program, Early Object...
 
DevoxxFR 2024 Reproducible Builds with Apache Maven
DevoxxFR 2024 Reproducible Builds with Apache MavenDevoxxFR 2024 Reproducible Builds with Apache Maven
DevoxxFR 2024 Reproducible Builds with Apache Maven
 
The State of Passkeys with FIDO Alliance.pptx
The State of Passkeys with FIDO Alliance.pptxThe State of Passkeys with FIDO Alliance.pptx
The State of Passkeys with FIDO Alliance.pptx
 
Take control of your SAP testing with UiPath Test Suite
Take control of your SAP testing with UiPath Test SuiteTake control of your SAP testing with UiPath Test Suite
Take control of your SAP testing with UiPath Test Suite
 
Anypoint Exchange: It’s Not Just a Repo!
Anypoint Exchange: It’s Not Just a Repo!Anypoint Exchange: It’s Not Just a Repo!
Anypoint Exchange: It’s Not Just a Repo!
 
How to write a Business Continuity Plan
How to write a Business Continuity PlanHow to write a Business Continuity Plan
How to write a Business Continuity Plan
 
Time Series Foundation Models - current state and future directions
Time Series Foundation Models - current state and future directionsTime Series Foundation Models - current state and future directions
Time Series Foundation Models - current state and future directions
 
unit 4 immunoblotting technique complete.pptx
unit 4 immunoblotting technique complete.pptxunit 4 immunoblotting technique complete.pptx
unit 4 immunoblotting technique complete.pptx
 

XO tutorial March '08

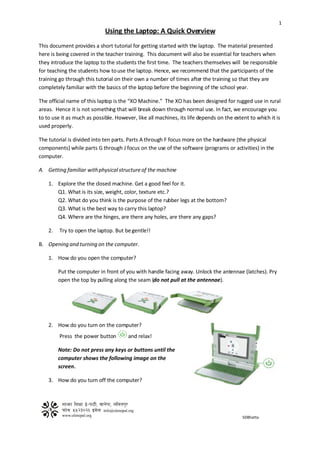
  • 1. 1 Using the Laptop: A Quick Overview This document provides a short tutorial for getting started with the laptop. The material presented here is being covered in the teacher training. This document will also be essential for teachers when they introduce the laptop to the students the first time. The teachers themselves will be responsible for teaching the students how to use the laptop. Hence, we recommend that the participants of the training go through this tutorial on their own a number of times after the training so that they are completely familiar with the basics of the laptop before the beginning of the school year. The official name of this laptop is the “XO Machine.” The XO has been designed for rugged use in rural areas. Hence it is not something that will break down through normal use. In fact, we encourage you to to use it as much as possible. However, like all machines, its life depends on the extent to which it is used properly. The tutorial is divided into ten parts. Parts A through F focus more on the hardware (the physical components) while parts G through J focus on the use of the software (programs or activities) in the computer. A. Getting familiar with physical structure of the machine 1. Explore the the closed machine. Get a good feel for it. Q1. What is its size, weight, color, texture etc.? Q2. What do you think is the purpose of the rubber legs at the bottom? Q3. What is the best way to carry this laptop? Q4. Where are the hinges, are there any holes, are there any gaps? 2. Try to open the laptop. But be gentle!! B. Opening and turning on the computer. 1. How do you open the computer? Put the computer in front of you with handle facing away. Unlock the antennae (latches). Pry open the top by pulling along the seam (do not pull at the antennae). 2. How do you turn on the computer? Press the power button and relax! Note: Do not press any keys or buttons until the computer shows the following image on the screen. 3. How do you turn off the computer? SDBhatta
  • 2. 2 Hold down the power button for 10 seconds. But as will be explained later, you can also do it by selecting the “shutdown” option from the home view. C. Basic tasks (what you can do with the computer) and associated components Basic task Which computer component to use 1 Putting things in the computer Input devices: Keyboard USB memory stick (through USB port) Touchpad Microphone Camera 2 Seeing things in the computer Screen 3 Moving around in the computer, using Touchpad programs in the computer Left click button below touchpad Arrows (on keyboard) Game pad Game controller buttons Screen rotation button 4 Getting things out of the computer Output devices: USB memory stick (through USB port) Speaker Headphone Screen 5 Communicating with other computers Antennae SDBhatta
  • 3. 3 D. Keeping the computer running Q. What do you need to keep the computer running? A. Electric power from the battery. Note: to save power, always dim the screen to the extent possible by using the button on the keyboard. Questions regarding power: How do you do this? Which component to use for this 1 Turn power on Power button (press it) 2 Check if power is on Power indicator light (should be green) 3 Supply power to computer from Power cord(plug into power jack) outside (to charge battery) 4 Check if battery is fully charged Battery icon on screen (will be fully shaded) Battery indicator light (should be green if power cord is plugged in) 5 Check if battery is low Battery indicator light (will be red if power cord is plugged in); battery icon on screen (will be partially shaded) 6 Check exactly how much battery charge Battery icon on screen (place cursor on top is remaining of it) 7 Turn power off Power button (hold down for 10 seconds) Shutdown option on main screen menu SDBhatta
  • 4. 4 E. Understanding the home view on the screen The home view is what you finally see on the computer screen after the computer has been turned on. In this view, the image you see at the center of the screen ( ) represents you. The donut shaped area around you shows the different activities or programs that you are currently running on the computer. The bar at the bottom of the screen shows you all the activities or programs that you have access to. The battery icon shows how much battery charge is remaining on your computer. This view also tells you whether or not you are connected to a computer network. See the table below for details. It is very easy to get to the home view. All you have to do is press the button on the keyboard or click on this button on the screen. Advice: Whenever you are unsure of what is going on with the computer, come back to the home view by pressing the button on the keyboard. What you see What it tells you 1 XO logo in the center Represents you 2 Battery image below circle How much battery charge is remaining 3 Symbols in the donut Which particular programs you are (called activity circle) currently running (the Journal is around the XO logo always open) 4 Symbols at the bottom of the screen (activity List of all the different programs that task bar) are available in the computer 5 Symbols at left top of screen Different views of the computer (white circle with single dot in the center is the Home view) 6 A shaded circle next to the battery Shows whether you are connected to the network SDBhatta
  • 5. 5 F. Understanding the keyboard The keyboard enables you to enter information and commands into the computer. The computer responds to the inputs you give through the keyboard. The most important keys on the keyboard are marked in the picture below. The following table describes these keys. What do you see What it tells you 1 Buttons for different views Home view: view at startup; allows you to see activity task bar and launch programs Activity view: takes you to activity you are currently working within Friends view: shows other computers with which you are collaborating Neighborhood view: shows ALL computers in the neighborhood Buttons for brightness control Left button reduces brightness of screen Right increases brightness In sunlight, keep pressing left button until get black and white screen Note: to save power, always dim the screen to the extent possible Buttons for loudness control Left button decreases sound level Right button increases sound level Holding this down allows us to type the Shift key letters/symbols that appear on the top part of each key in the keyboard Pressing this confirms that we accept what we Enter key just typed (very important key) SDBhatta
  • 6. 6 Erases the character just typed Erase key Move cursor in different directions (left, Arrow keys down, right, up) Shows/hides the taskbar and the buttons for Hide/Show button the different views on the screen Spacebar Enters a space or gap when typing G. Using the touchpad, left click button, and arrows to run programs in the computer 1. Moving the cursor using the touch pad  Sliding your finger over the touchpad will move the cursor on the screen (cursor is the arrow or whatever shape you see on the screen). Try it.  Move the cursor and place it on top of any icon on the screen. What do you see? Do this with the other icons as well. 2. Starting a program  The task bar at the bottom of the screen shows the different programs on the computer. If the task bar does not show, press the button on the keyboard.  Move the cursor on top of the E-Paati program.  Now click on the left click button. This will start the E-Paati program.  Try starting another program. To do this, you will first need to go to the Home view by pressing . The taskbar should show at the bottom of the home view (press on the keyboard if you don’t see the taskbar). Move the cursor to another program on the taskbar—say the write program—and left-click on it. The write program will start.  Try starting yet another program--the record program .  Press to go to the home view again. Can you tell which programs are currently running on your computer? How can you tell? 3. Switching between programs running on your computer  How will you go back to the most recent program you started (i.e., program)? o By pressing the activity view button  You know that E-Paati is also running in the background (you saw it in the activity circle). How will you switch to the E-paati program?  Press to go to the home view again. Move cursor to the E-paati icon on the activity circle. Then left click on this icon. You will enter the E-paati program. 4. Stopping or ending a program SDBhatta
  • 7. 7  Say you want to stop the E-paati progam. How will you do it? o Go back to the home view by pressing on the keyboard. o Place cursor over the E-paati program on the activity circle. What do you see? o You will see the name of the activity (E-paati) as well as two options: resume and stop. Move the cursor to the stop option and left-click on it.  Try stopping the record program as well. How will you do it? 5. How do you turn off the computer?  Go to home view.  Place cursor over the XO logo (the symbol at the center). What do you see?  Move cursor down and left-click on “shutdown”. Note: Always use this approach to turning off the computer. Turn off the computer by holding down the power button only if this “shutdown” process does not work. H. Dragging and dropping items using the touchpad, cursor, and left-click button A number of interactive activities on the computer will require you to drag and drop items. So it is important to get used to this function.  Dragging: means dragging an item from one place to another on the screen  Dropping: means depositing an item in some location of the screen after dragging it Exercise: You will learn one way of dragging and dropping items in the course of doing this exercise. 1. Start E-paatiClick on the grade 6 tabClick on the English tab. 2. start the activity “Pronouns and Verbs” by clicking on it 3. Click on the pronoun “He” and the verb “Playing” 4. Answer the question “what is he doing” by dragging and dropping the correct words in the correct places. a. To drag a word, first click on the word. b. Then use the touchpad to move (drag) the word to the desired location. c. Then click on the location. The word drops there. SDBhatta
  • 8. 8 I. Writing a using the keyboard The XO comes with a simple program (activity) you can use for writing. The program is called “write” and you can see it on your taskbar. You can save the written document and open it again later to view and edit it.  Start “write” activity: Go to the Home View. Then click on “write” activity on the taskbar as explained earlier.  Typing in English: o Move the cursor using the touchpad  Take it to the upper left corner  click on the left-click button. The cursor will look like a vertical line “|” and blink. This is where your typed letters will appear. o Type something using the keyboard. For example, type “ Hello”. To type a capital “H”, you need to first press the Shift key and then click on the “h” key while the Shift key is held down.  Typing in Nepali: o To type in Nepali, you need to select Nepali letters first. This is called selecting a Nepali font. The Nepali font we will select is called Preeti. Here is how you select the Preeti font:  Among the various areas shown at the top of the page is an area that says “DejaVu Serif”. This is telling you that the default font on the computer is an English font called Dejavu Serif.  Take the cursor to this location and left click. You will see a long list of fonts.  Use the down arrow “↓” on the keyboard to move down and highlight the Preeti font.  While the Preeti font is highlighted, click on the left-click button.  Now when you type, you will end up typing in Nepali. o Q. But which key types which Nepali character?  See the attached Keyboard Layout picture to understand which key types which Nepali character.  Switching back to English: o Select the DejaVu Serif font using the process outlined above. o Then start typing.  Erasing mistakes: o You can use the Erase button to erase the character just before the cursor. o To go to another location on your document to erase a character, youcan  Either use the arrows to move your cursor to the desired location and then use the erase key,  Or you can use the touchpad to move the cursor to take the cursor the desired location. But before pressing the erase key, you must first click on the left-click button. This will put the blinking cursor in that location. Now use the erase key.  Saving your writing: SDBhatta
  • 9. 9 o What you typed will be lost when you exit the “write” activity or when you turn off the computer unless you “save” the document. So you must get into the habit of saving the document frequently. o To save the document, do the following:  Click on the menu item that says “activity” at the top left c  Give the document a name you like: Put the cursor in the long oval shaped box on the top left corner. Type the name for the document (e.g., call it mydoc).  Save the document: Place the cursor on top of the icon that looks like a book (at the top right hand corner). Then click on the left-click button. The document is saved.  Note: you should save the document whenever you make changes to it.  Exiting the “write” activity: o Go to the Home View. o In the activity circle, place the cursor over the write activity. o Double-click on Stop.  Viewing previously saved documents: o Go to the Home View. o In the activity circle, left click on Journal activity. o The list shows all things you did recently starting with the most recent. o Left click on the most recent version of mydoc to open the document. J. Connecting to the e-library You can access the e-library from you XO by clicking on the e-library icon on the taskbar. But it is important to keep in mind that the e-library is physically located on a different computer called the library server. So before you can access the e-library, you need to connect to the computer network that includes the library server. 1. Check if you are connected to the network  Go to the Home View  If the ball next to the battery icon is colored, it means you are connected. If the ball is gray, it means you are not connected  Place cursor over the shaded ball next to the battery icon—it will tell you the name of the network to which you are connected (e.g., OLE Omni AP)  If you are connected go to step 2. If you are not connected, go to step 3. 2. I f you are already connected to the network, then  Go to the Home View  Click on the e-library icon on the taskbar 3. If you are not already connected, then  Go to Neighborhood View by clicking on the button on the keyboard  Place cursor over the circle that gives the name of your desired network (e.g., OLE Omni AP) and left-click on it. Now you are connected. SDBhatta
  • 10. 10 Appendix: Do’s and Don’ts Do’s: 1. After you turn the computer on, always make sure there is enough charge in the battery before using (see the battery icon on the Home View). 2. Whenever possible, dim the screen to save power. 3. Whenever possible, use the “shutdown “ option in the Home View to turn off the computer. 4. Always turn off the computer if it is not going to be use for a long period of time. 5. After use, always close and secure the antennae before putting the laptop in a bag. 6. Protect the computer from dust and water to the extent possible. 7. Be gentle with your computer!! Don’ts: 1. Never pull at the antennae ears (especially when opening the computer) of carry the computer by holding onto the antennae ears. 2. Do not scratch the keyboard or touchpad. 3. Do not press any keys when the computer is booting up (i.e., is in the process of turning on) 4. Do not take the battery out while the computer is running. 5. Do not press the keys on the keyboard with anything other than your fingers. 6. Do not put stuff inside the different opening you see on the computer (e.g., USP ports, power jack, microphone/headphone jack etc.). 7. Avoid touching the screen. In particular, do not touch the screen with any sharp object. 8. Do not place heavy objects on the computer. Troubleshooting tips: 1. If the computer hangs (freezes or stops working while you are using it), turn it off using the power button. 2. If the computer turns off automatically while you are working, try charging the battery. SDBhatta