SlideShare uma empresa Scribd logo
1 de 24
Baixar para ler offline
Bulletin 6055-11
                                                                      October, 1993
    Instruction Bulletin


Vacuum Circuit Breaker
Type VAD-3
 • 4.76 kV, 29 kA (250 MVA)             1200A & 2000A
 • 4.76 kV, 41 kA (350 MVA)             1200A & 2000A
 • 8.25 kV, 33 kA (500 MVA)             1200A & 2000A
 • 15.0 kV, 18 kA (500 MVA)             1200A & 2000A
 • 15.0 kV, 28 kA (750 MVA)             1200A & 2000A
 • 15,0 kV, 37 kA (1000 MVA)            1200A & 2000A


                       © 1993 Square D Company All Rights Reserved                 1
Bulletin 6055-11
October, 1993


                                                                     NOTICE

    Read these instructions carefully and look at the equipment to become familiar with the device before trying to install,
    operate, or maintain it. The following special messages may appear throughout this bulletin to warn of potential
    hazards and to call attention to additional information which clarifies or simplifies a procedure.


                                                              !       DANGER
                             Used where there is a hazard of severe bodily injury or death. Failure to
                             follow a “DANGER” instruction will result in severe bodily injury or death.


                                                            !       WARNING
                             Used where there is a hazard of bodily injury or death. Failure to follow a
                             “WARNING” instruction may result in bodily injury or death.


                                                             !       CAUTION
                             Used where there is a hazard of equipment damage. Failure to follow a
                             “CAUTION” instruction may result in damage to equipment.


                                                                     NOTE
                             Provides additional information to clarify or simplify a procedure.


    Square D and       are Registered Trademarks of Square D Company.


    © 1993 Square D Company, all rights reserved. This bulletin may not be copied in whole or in part, or transferred to any other media, without the
    written permission of Square D Company.
2                                                © 1993 Square D Company All Rights Reserved
Bulletin 6055-11
                                                                                                                                  October, 1993


CONTENTS                                                                                                                    PAGE

 1. INTRODUCTION ................................................................................................... 1
      Surge Protection For VAD-3 Circuit Breakers — Statement Of Use ........... 1
 2. SAFETY PRECAUTIONS ...................................................................................... 2
 3. RECEIVING, HANDLING, AND STORAGE .................................................... 3
      Receiving .............................................................................................................. 3
      Handling .............................................................................................................. 3
      Storage .................................................................................................................. 3
 4. INITIAL CIRCUIT BREAKER PREPARATION ................................................ 4
      Performing A Hi-Pot Test ................................................................................. 4
 5. INSTALLATION .................................................................................................... 5
      Site Preparation And Circuit Breaker Installation ........................................ 5
 6. VACUUM CIRCUIT BREAKER DESCRIPTION ............................................... 6
      Vacuum Interrupters .......................................................................................... 6
      Primary Disconnects .......................................................................................... 6
      Operating Mechanism ....................................................................................... 6
      Control Circuit .................................................................................................... 6
      Auxiliary Switch ................................................................................................. 8
      Motor Limit Switch ............................................................................................ 8
      Motor Relay ......................................................................................................... 8
      Anti-Pump Relay ................................................................................................ 9
      Latch Check Switch ............................................................................................ 9
      Closing Spring Interlock .................................................................................... 9
      Indicators ............................................................................................................. 9
 7. OPERATING THE CIRCUIT BREAKER .......................................................... 10
     Manual Charging .............................................................................................. 10
     Slow Closing Feature ....................................................................................... 10
     Drawout Operation .......................................................................................... 11
     Racking In Procedure ....................................................................................... 11
     Racking Out Procedure ................................................................................... 12
     Locking Provision ............................................................................................. 12
     Test Position Operation ................................................................................... 12
 8. OPERATING MECHANISM .............................................................................. 13
     Drive Spring Charging .................................................................................... 13
     Closing Operation ............................................................................................ 14
     Opening Operation .......................................................................................... 15
 9. MAINTENANCE .................................................................................................. 16
     Vacuum Interrupters ........................................................................................ 16
     Insulating Surfaces ........................................................................................... 16
     Mechanism ......................................................................................................... 17
     Lubrication ......................................................................................................... 17
     Electrical ............................................................................................................. 17
10. REPLACEMENT PARTS ..................................................................................... 18
      Minimum Requirements ................................................................................. 18
      Ordering Instructions ...................................................................................... 18
11. INSTALLATION AND MAINTENANCE LOG ............................................. 19


                          © 1993 Square D Company All Rights Reserved                                                                          3
Bulletin 6055-11
October, 1993


                   ILLUSTRATIONS                                                                                                         PAGE

                    1.   Circuit breaker, front view .................................................................................... 5
                    2.   Circuit breaker, rear view ..................................................................................... 6
                    3.   Contact circuit schematic ...................................................................................... 7
                    4.   Circuit breaker, left front view without cover (18 kA, 28 kA, and 29 kA) .... 8
                    5.   Circuit breaker, right front view without cover (18 kA, 28 kA, and 29 kA) ....... 8
                    6.   Circuit breaker, front view without cover (37 kA and 41 kA) ........................ 9
                    7.   Charging the drive springs ................................................................................... 9
                    8.   Removing the closing spring .............................................................................. 10
                    9.   Slow close feature ................................................................................................. 10
                   10.   Racking mechanism in test position .................................................................. 11
                   11.   Racking mechanism in operating (connected) position ................................. 11
                   12.   Racking mechanism padlock provision ............................................................ 12
                   13.   Circuit breaker mechanism, two views ............................................................ 13
                   14.   Mainshaft mechanism .......................................................................................... 14
                   15.   Contact erosion measurement ............................................................................ 14


                   TABLES                                                                                                                PAGE

                    1. Lubrication Chart ................................................................................................. 17
                    2. Replacement Parts ................................................................................................ 18
                    3. Pole Assembly Replacement Parts ..................................................................... 18


4                                                 © 1993 Square D Company All Rights Reserved
Bulletin 6055-11
                                                                                              October, 1993


SECTION 1— INTRODUCTION

                            This manual provides installation, operation, and maintenance instructions
                            for the type VAD-3 series of horizontal drawout vacuum circuit breakers.


Surge Protection For        VAD-3 medium voltage vacuum circuit breakers are designed and tested
VAD-3 Circuit Breakers —    in accordance with ANSI/IEEE C37.04, .06, and .09. Used in conjunction with
Statement Of Use            switchgear designed and tested to ANSI/IEEE C37.20.2, circuit breakers can
                            be applied as general purpose devices.

                            VAD-3 circuit breakers may be installed over a wide range of applications
                            and system parameters. Several IEEE publications are available to provide
                            guidance for use in industry practices (IEEE Color Book Series).

                            Distribution systems can be exposed to lightning or switching surges. Older
                            systems, with aging insulation or out-of-date standards, may be more
                            susceptible to damage.

                            For this reason, consider adding metal oxide surge arrestors to the circuitry
                            on the load side of the terminals of VAD-3 circuit breakers used in retro-fit
                            applications. Place the surge protection in the switchgear or at the equipment
                            being protected, but not on the circuit breaker.

                            Metal oxide arrestors limit the magnitude of prospective overvoltages, but
                            do not affect the rate of rise (di/dt) of surge transients. Consider using surge
                            capacitors for this additional protection.


                           © 1993 Square D Company All Rights Reserved                                         5
Bulletin 6055-11
October, 1993


SECTION 2 — SAFETY PRECAUTIONS


                                                 !      DANGER
                     HAZARD OF ELECTRICAL SHOCK OR BURN.

                     • Only qualified electrical workers with training and experience on
                       high voltage circuits should perform work described in this set of
                       instructions. These workers must understand the hazards involved
                       in working with or near high voltage equipment. Perform such work only
                       after reading this complete set of instructions.
                     • The successful operation of circuit breakers depends upon proper
                       handling, installation, operation, and maintenance. Neglecting
                       fundamental installation and maintenance requirements may lead
                       to personal injury, as well as damage to electrical equipment or
                       other property.
                     • VAD-3 circuit breakers have features designed to direct proper operation,
                       but it is not possible to eliminate every hazard with these features.
                       Therefore, the person using this device is responsible for recognizing the
                       potential hazards, wearing protective equipment, and taking adequate
                       safety precautions.
                     • Do not make any modifications to the equipment or operate the
                       system with safety features removed. Contact your local Square D
                       representative for additional instructions if the VAD-3 circuit breaker
                       does not function as described in this manual.
                     • Before performing visual inspections, tests, or maintenance on this
                       device, disconnect all sources of electric power. Assume all circuits
                       are live until they are completely de-energized, tested, grounded, and
                       tagged. Pay particular attention to the design of the power system.
                       Consider all sources of power, including the possibility of backfeeding.
                     • Before replacing covers, carefully inspect the circuit breaker work area for
                       tools and objects left inside the equipment.
                     • All maintenance must be performed by qualified personnel in accordance
                       with local codes and ordinances, and under the following conditions:
                       – The circuit breaker must be removed from its cell and isolated from the
                           high voltage.
                       – Control voltage must be removed from the controls.
                       – The circuit breaker must be in the open position.
                       – All circuit breaker springs must be discharged.

                     All instructions in this manual assume the customer has taken the above
                     steps to obtain safe conditions before performing maintenance or testing.

                     Failure to observe these precautions will result in severe personal
                     injury or death!


6                      © 1993 Square D Company All Rights Reserved
Bulletin 6055-11
                                                                                          October, 1993


SECTION 3 — RECEIVING, HANDLING, AND STORAGE

Receiving              Upon receipt, inspect the entire circuit breaker for damage that may have
                       occurred in transit. Check all items against the packing list provided. Notify
                       the transportation company and Square D immediately if there are damages
                       or shortages.

Handling               Use care when uncrating and handling the circuit breaker. Roll and
                       maneuver the circuit breaker by the handle on the front mechanism cover or
                       by grasping the top edge of the front mechanism cover. When using a hoist,
                       lift the circuit breaker by the holes in the frame to prevent damage.


                                                    !     CAUTION
                          HAZARD OF EQUIPMENT DAMAGE.
                          Never lift the circuit breaker by placing forklift bars beneath the circuit
                          breaker frame. Never use racking arms or primary disconnects as
                          handles.
                          Failure to observe this precaution can result in equipment damage.


Storage                If the circuit breaker must be stored before it is put into operation, keep it in
                       a clean, dry, corrosion-free area where it is protected from damage. Place
                       the circuit breaker in its permanent location as soon as possible. If the circuit
                       breaker will be used in switchgear employing space heaters, install it only
                       after the heaters are operating.

                       When circuit breakers are stored for prolonged periods, inspect them
                       regularly for rusting and overall condition. Lubricate when necessary.


                     © 1993 Square D Company All Rights Reserved                                        7
Bulletin 6055-11
October, 1993


SECTION 4 — INITIAL CIRCUIT BREAKER PREPARATION

                           Follow these steps to prepare the circuit breaker for installation in
                           its enclosure:
                           1) Examine the entire circuit breaker for damage, dirt, and moisture.
                           2) Use a clean, dry cloth to remove dirt and moisture that may have
                              collected on the insulating parts.
                           3) Operate the circuit breaker several times to check for proper operation.
Performing A Hi-Pot Test   4) To ensure no damage has occurred during shipment, perform a hi-pot
                              test across the open contacts of each vacuum interrupter. Then, with
                              the circuit breaker in the closed position, perform a phase-to-ground and
                              phase-to-phase hi-pot test for each pole. Gradually increase the voltage to
                              the proper level. The hi-pot test voltage should be 27 kV rms or 38 kVdc
                              for 15.0 kV, and 14 kV rms or 20 kVdc for 4.76 kV switchgear. The circuit
                              breaker should sustain this potential for one minute.


                                                      !      WARNING
                                HAZARD OF PERSONAL INJURY OR EQUIPMENT DAMAGE.
                                Observe the following instructions when performing the hi-pot test:
                                • Do not exceed the voltages specified in step 4 above.
                                • Keep all people at least six feet away from the circuit breaker
                                  being tested.
                                • Perform tests only after all insulating parts are installed.
                                • Discharge to ground the primary disconnects before handling.
                                  These areas can retain a static charge after a hi-pot test.
                                Failure to observe these precautions can result in severe
                                personal injury or death!


                           5) To insert the circuit breaker into its enclosure, follow the applicable
                              directions provided in the switchgear instruction manual.
                           6) With the main power off, cycle the circuit breaker several times and check
                              forproper operation.
                           The circuit breaker is now ready for normal operation.


8                          © 1993 Square D Company All Rights Reserved
Bulletin 6055-11
                                                                                                           October, 1993


SECTION 5— INSTALLATION

Site Preparation And                    Refer to the metal-enclosed switchgear instruction bulletin that was shipped
Circuit Breaker Installation            with your equipment; follow the site preparation and installation
                                        instructions found in that manual.


                                                                                                                       “


                                                      ∆                                                             


                                                                                                                   ”

                      Œ    Racking Port                   Œ
                          Front Mechanism Cover
                      Ž    Open Lever
                      √    Close Lever
                          Secondary Disconnect                                                                    •
                           Handle
                      ≈    Manual Charging Arm Port
                      ∆    Racking Arm                                                                             ≈
                      “    Counter
                      ”    Open-Close Indicator
                      •    Spring Charge-Discharge
                           Indicator
                      •
                      11   Test Position Interlock                                                    √   
                                                                                 •
                                                                                 11        Ž

                                                              Figure 1: Circuit breaker, front view


                                      © 1993 Square D Company All Rights Reserved                                          9
Bulletin 6055-11
October, 1993


SECTION 6 — VACUUM CIRCUIT BREAKER DESCRIPTION
Vacuum Interrupters                Vacuum interrupters (figure 2), mounted vertically within the circuit
                                   breaker frame, perform the circuit breaker interruption. Consisting of a pair
                                   of butt contacts, one movable and one fixed, interrupters require only a
                                   short contact gap for circuit interruption. The resulting high-speed
                                   operation allows the entire operating sequence, from fault to clear, to be
                                   consistently performed in three cycles or less.

Primary Disconnects                The primary connection to the associated switchgear is through the six
                                   primary disconnects (figure 2) mounted horizontally at the rear of the
                                   circuit breaker. Do not subject the primary disconnects to rough treatment.
                                   Never use the primary disconnects as handles when maneuvering the
                                   breaker.

Operating Mechanism                The operating mechanism is of the stored energy type. It uses charged
                                   springs to perform breaker opening and closing functions. The operating
                                   mechanism contains all necessary controls and interlocks. It is mounted at
                                   the front of the circuit breaker for easy access during inspection and
                                   maintenance.

Control Circuit                    Figure 3 shows a typical schematic diagram for the control circuit. The
                                   following paragraphs discuss operation of the control circuit components.
                                   The control circuit design may vary, depending upon customer requirements.
                                   Always refer to the schematic diagram for the specific equipment in question.


                                                                                                               Œ


                                       ∆

                                                                                                           ≈


                                     


                      ΠPrimary Disconnect
                       Shutter Roller
                      Ž Secondary Disconnect
                      √ Code Plate
                       Ground Contact                                                                 
                      ≈ Vacuum Interrupter
                                                                                           √
                                                             Ž
                      ∆ Racking Arm

                                                    Figure 2: Circuit breaker, rear view

10                                  © 1993 Square D Company All Rights Reserved
Bulletin 6055-11
                                                                                                                                                          October, 1993


   1                                              3                         4                     7           10          12          14         16          21         23

                                                                            9
                                                  52Y                 11
   5                          7                   202                       52/a                  13           51          53          55         57          59        61
                                        21                            12
                                                                            205
                                                  52/b                4
                                        22
                                                  203                       52/a
52/M          52MR                52Y                                  3
                                                 52/CC                      210
                                                                            52/TC            5           15           9         19          13          23         17
                           201                    209
   207        200
                                                  52/LC                     206                   52/b         52/a       52/b         52/a      52/b        52/a       52/b
       52MR    52/LS    52Y       52MR            204                 8
                                                                                             6           16         10          20          14          24         18
                                                                            52/a
                                                  52MR
                                                                      7
                                                                            10                    14          52          54           56        58          60         62

              2           6                                                 5                     9           11          13          15         17          22         24

              Charging/Closing                                         Trip                                                Auxiliary
                  Circuit                                             Circuit                                              Contacts


  Legend                                                                                                              Note:          Circuit breaker shown in open
  52/M                 Spring Charging Motor                                                                                         position with closing
  52MR                 Motor Relay                                                                                                   springs charged
  52/LS                Closing Springs Limit Switch;
                       Closed When Springs Are Discharged
  52Y                  Anti-Pump Relay
  52/CC                Closing Coil (Spring Release Coil)
  52/TC                Tripping Coil
  52/a                 Auxiliary Switch Contact; Open When Circuit
                       Breaker Is In Tripped (Open) Position
  52/b                 Auxiliary Switch Contact; Closed When Circuit
                       Breaker Is In Tripped (Open) Position
  52/LC                Latch Check Switch


                                         Rear View Of Circuit Breaker Control Plug
                                             1        2    3     4     5     6      7    8   9    10 11 12

                                             5        6    7     9     10    —      13   —   14   51     52    53


                                             54       55   56    57    58    —      —    —   59   60     61    62

                                         13 14 15 16 17 18 19 20 21 22 23 24

                                                               Figure 3: Control circuit schematic

                                                  © 1993 Square D Company All Rights Reserved                                                                                  11
Bulletin 6055-11
October, 1993


Auxiliary Switch                              The auxiliary switch (figure 4) is a multi-stage switch used to operate circuits
                                              that depend on the position of the circuit breaker contacts. The schematic diagram in
                                              figure 3 (page 7) illustrates how each auxiliary switch stage interconnects with the
                                              circuit breaker circuitry. The stages function as follows:
                                              • Three a-type auxiliary contacts connect in series with the trip coil. Because
                                                these stages are open when the circuit breaker is in the open position,
                                                the auxiliary contacts de-energize the trip coil when the breaker is in the
                                                open position.
                                              • The b-type contact, connected in series with the closing coil, de-energizes
                                                the closing coil when the circuit breaker contacts are in the closed position.
                                              • As shown, several a-type and b-type contacts are provided for optional use.

Motor Limit Switch                            The motor limit switch (figure 4) energizes the motor relay (figure 4) when
                                              a drive spring charging operation is required. The motor limit switch
                                              de-energizes the motor relay when the drive springs (figure 5) reach the
                                              fully charged position. As shown in the schematic diagram (figure 3), the motor
                                              limit switch is connected in the normally open position. When the drive
                                              springs are not in the fully charged position, the motor limit switch is
                                              closed.

Motor Relay                                   When energized by the closing of the motor limit switch, the motor relay
                                              energizes the spring charging motor (figure 4) through a pair of normally
                                              open contacts. The motor relay disables the closing coil (figure 5) through a
                                              pair of normally closed contacts.
                                                                                                                         ∆           ≈
                                                   “           ≈
                                                          ∆              


                                                                                                                                         


  ”
                                                                           Œ
     Œ      Ž                                                                                                 Ž                      √
                                       √
 Œ   MOC Operator             ≈ Motor Relay                             Œ   Return Spring (2 places)      Ratchet Arm
    Motor Limit Switch       ∆ Anti-Pump Relay                            Shock Absorber               ≈ Drive Spring (2 places)
 Ž   Opening Coil             “ Spring Charging Motor                   Ž   Manual Charging Arm          ∆ Closing Coil
 √   Latch Check Switch       ” Return Spring                           √   Crank Arm (2 places)
    Auxiliary Switch

         Figure 4: Circuit breaker, left front view without                     Figure 5: Circuit breaker, right front view
         cover (18 kA, 28 kA, and 29 kA)                                        without cover (18 kA, 28 kA, and 29 kA)

12                                             © 1993 Square D Company All Rights Reserved
Bulletin 6055-11
                                                                                                            October, 1993


Anti-Pump Relay                        If the closing coil circuit (52/CC, figure 3, page 7) is continuously energized, the
                                       anti-pump relay (figure 4) ensures that the circuit breaker does not “pump” open
                                       and closed in the event that a trip signal is also present. The anti-pump relay
                                       performs this function by allowing the closing coil to activate only if:
                                       • the circuit is energized
                                       • the drive springs are fully charged, and
                                       • the motor relay is de-energized
                                       The anti-pump relay activates when the close circuit and motor relay are energized.
                                       If the close circuit is energized continuously, the anti-pump relay will be latched
                                       in the energized position after the motor relay is de-energized by a pair of its own
                                       normally open contacts. When the anti-pump relay is energized, a pair of its
                                       normally closed contacts, in series with the closing coil, ensure that the closing
                                       coil cannot be energized. The closing coil activates only when the closing circuit is
                                       de-energized (de-energizing the anti-pump relay), then closed again.

Latch Check Switch                     The latch check switch (figure 4) allows the circuit breaker to be used for
                                       instantaneous reclosing. The contacts of the latch check switch connect in series
                                       with the closing coil. When the guide cam moves out of its normal position, it
                                       activates the latch check switch. The closing circuit cannot be energized until the
                                       guide cam fully returns to its normal position and the mechanism is in position to
                                       allow a close operation.

Closing Spring Interlock               An interlock located between the manual trip and close lever at the bottom of the
                                       circuit breaker prevents the closing springs from “dumping” when the circuit
                                       breaker is closed. An interlock bar slides under the closing lever after the circuit
                                       breaker closes and prevents the closing lever from being pushed down.

Indicators                             There are two indicators on the operating mechanism. The open-close indicator
                                       (figure 7) designates whether the vacuum interrupter contacts are open or closed.
                                       The charge-discharge indicator (figure 7) displays the state (charged
                                       or discharged) of the drive springs.


                                                                               Œ


                                                                               Ž


                                                                                                                      
                                                              ΠOpen-Close Indicator
                                                               Manual Charging Arm
                                                              Ž Charge-Discharge
                                                                Indicator

      Figure 6: Circuit breaker, front view without                        Figure 7: Charging the drive springs
      cover (37 kA and 41 kA)

                                     © 1993 Square D Company All Rights Reserved                                          13
Bulletin 6055-11
October, 1993


SECTION 7 — OPERATING THE CIRCUIT BREAKER

Manual Charging                        To manually charge the drive springs (figure 7, page 9), use the handle supplied
                                       with the circuit breaker to move the manual charging arm (figure 7) up and
                                       down until the drive springs are fully charged. The drive springs are fully
                                       charged when the charge-discharge indicator (figure 7) reads charged and the
                                       manual charging arm no longer advances the gear.

Slow Closing Feature                   Occasionally, it may be necessary to manually slow close the circuit breaker.
                                       The operating mechanism has a built-in feature for this purpose. Follow the
                                       steps below to manually slow close.


                                                                   !     WARNING
                                         HAZARD OF BODILY INJURY.
                                         Only qualified personnel should perform this operation. Stored energy in
                                         springs and sudden operation of mechanisms can cause serious bodily
                                         injury if a person touches or comes in close proximity of the mechanism.
                                         Failure to observe this precaution can result in personal injury!


                                       1. With the circuit breaker in the open position and the drive springs
                                          discharged, slide the manual charging handle onto one of the drive spring
                                          brackets (figure 8). Press up on the manual charging handle just enough to
                                          off-load the drive spring; remove the upper 1/2" bolt (figure 8). Release the
                                          drive spring pressure; remove the spring. Repeat with the other drive
                                          spring.
                                       2. Using the manual charging handle as described in the Manual Charging
                                          section above, advance the gear until the drive pawl (figure 13, page 13)
                                          rides up on the lift cam. Remove the manual charging handle.

ΠManual Charging Handle
 1/2" Bolt
Ž Drive Spring
                                             Œ
                                                    


                                                        Ž
                                                                                                                   


                                                                ΠClose Lever
                                                                 1" Open-End
                                                                  Wrench                        Œ

            Figure 8: Removing the closing spring                               Figure 9: Slow close feature


14                                      © 1993 Square D Company All Rights Reserved
Bulletin 6055-11
                                                                                                            October, 1993


Slow Closing Feature (cont.)            3. While pressing down on the close lever (figure 9), use a 1" open-end wrench
                                           to rotate the drive shaft until the drive pawl clears the lift cam and once
                                           again engages the gear. See figure 9 for use of the wrench. Press down on
                                           the wrench to achieve the correct direction of rotation.
                                        4. Release the close lever. Remove the 1" wrench.
                                        5. Continue using the manual charging handle to perform manual charging.
                                           The circuit breaker slowly closes with each advance of the gear.

Drawout Operation                       The circuit breaker must be in the open position when it is racked in or out of
                                        its cubicle. The racking mechanism (figures 10 and 11) interlocks with the
                                        circuit breaker mechanism. This prevents the racking shaft from being turned
                                        when the circuit breaker is in the closed position.
Racking In Procedure                    1. The racking arms (figure 10) must be in the drawout position before
                                            inserting the breaker into the cell. In the drawout position, the racking arms
                                            extend toward the rear of the breaker and are just below the horizontal.
                                        2. If required, move the racking arms to the drawout position. Follow
                                            these steps:
                                            a. Open the circuit breaker.
                                            b. Insert the racking handle into the racking port (figure 10).
                                            c. Rotate the racking handle counterclockwise until the racking mechanism
                                               comes to a stop. Do not over-torque.


                                                                  !       WARNING
                                       HAZARD OF BODILY INJURY OR EQUIPMENT DAMAGE.

                                       When the switchgear is energized, always open and close the circuit breaker
                                       and rack the circuit breaker from one position to another with the door closed.
                                       Never use force to move the circuit breaker inside the circuit breaker cell.
                                       Failure to observe these precautions can result in severe personal injury
                                       or death!


                                                         

                                                                  Œ


                                                          Ž


 ΠRacking Arm                     Π                             ΠRoller In Operating Position
  Roller In Test Position
 Ž Racking Port

        Figure 10: Racking mechanism in test position                    Figure 11: Racking mechanism in operating
                                                                         (connected) position

                                       © 1993 Square D Company All Rights Reserved                                      15
Bulletin 6055-11
October, 1993


Racking In Procedure (cont.)   3. Insert the circuit breaker into the cell until the rollers on the racking arms
                                  come into contact with the channels on the sides of the cell.
                               4. Rotate the racking handle clockwise until the racking mechanism stops. Do
                                  not over-torque.

Racking Out Procedure          1. Open the circuit breaker.
                               2. Insert the racking handle into the racking port.
                               3. Rotate the racking handle counterclockwise until the racking mechanism
                                  stops. Do not over-torque.
                               4. Press down on the test position interlock (figure 1, page 5) at the lower
                                  left front of the circuit breaker; roll the circuit breaker out of the cell.

Locking Provision              The racking mechanism of the circuit breaker can be locked in either the test or
                               the operating position with a multiple padlock hasp and a padlock, as shown in
                               figure 12.

Test Position Operation        The secondary disconnect (figure 2, page 6) mounts on a retractable slide so that
                               it can connect to the control circuit of the cell while the cell shutters are down
                               and the primary connections have not been made. This provides a convenient
                               and safe method for electrically testing the operation of the circuit breaker
                               mechanism and control circuit. Test position operation is achieved by following
                               these steps:
                               1. Insert the circuit breaker into the test position of the cell by following
                                  steps 1through 3 of the Racking In Procedure section on page 11. (Do not
                                  rack the circuit breaker into the cell.)
                               2. Pull the secondary disconnect handle (figure 2, page 6) out of its
                                  retaining clip; rotate it down so that it protrudes straight out from the
                                  circuit breaker.
                               3. Lift slightly on the secondary disconnect handle and push it into the
                                  circuit breaker until the control circuits connect.
                               4. The control circuit of the circuit breaker is now connected with that of
                                  the cell.
                               5. Retract the secondary disconnect by reversing the above procedure.


                                                     Figure 12: Racking mechanism
                                                     padlock provision


16                              © 1993 Square D Company All Rights Reserved
Bulletin 6055-11
                                                                                               October, 1993


SECTION 8— OPERATING MECHANISM

Drive Spring Charging    Place the interrupter contacts in the open position; ensure that the drive
                         springs (figure 13) and return springs (figure 5, page 8) are discharged. When
                         power is supplied to the circuit breaker control circuit, the charging motor
                         (figure 13) is energized. The eccentric, mounted on the charging motor shaft,
                         drives the ratchet arm (figure 13) backward and forward.

                         With each forward stroke of the ratchet arm, the spring-loaded drive pawl
                         (figure 13) mounted on the ratchet arm engages a tooth on the gear (figure 13).
                         The gear advances a few degrees clockwise. The drive pawl (figure 13) holds
                         the gear in position while the drive pawl makes its reverse stroke to engage
                         another tooth. The gear is free to rotate on the drive shaft (figure 13).

                         As the gear advances, the drive pin mounted on the gear face engages and
                         rotates the lift cam (figure 13). Because the lift cam is keyed to the drive shaft,
                         the drive shaft rotates with the lift cam.

                         The crank arms (figure 13) rotate with the drive shaft and pull the drive springs
                         to the charged position. As the springloads pass top dead center and attempt to
                         discharge, the closing roller on the drive cam contacts the close cam (figure 14,
                         page 14). The drive springs stay in this charged position until closing is
                         initiated.

                         When the drive springs are fully charged, the charging motor limit switch
                         contacts open, de-energizing the charging motor. Simultaneously, the raised

                                                                                                         •


                                                      •
                                                      11

            “
                                                                                                          “
            ”

            

                                                                                                          Œ
                                                      Ž
Œ    Ratchet Arm                                                                                           
    Drive Pawl
Ž    Lift Cam
√    Gear
    Drive Shaft                                     ≈                                                       √
≈    Manual
     Charging Arm
∆    Mainshaft
“    Drive Springs                                                                                           
”    Crank Arm
•    Closing Coil
•
11   Charging Motor
                                                      ∆                                                   ≈


                        Figure 13: Circuit breaker mechanism, two views

                        © 1993 Square D Company All Rights Reserved                                              17
Bulletin 6055-11
October, 1993


Drive Spring Charging (cont.)          surface on the lift cam lifts the drive pawl above the gear. This allows the
                                       charging motor and ratchet arm to coast smoothly to a stop.

Closing Operation                      Once the drive springs are charged, close the circuit breaker by energizing the
                                       closing coil (figure 13) or by manually pressing the close lever (figure 9, page
                                       10).

                                                                     !     WARNING
                                                     HAZARD OF BODILY INJURY OR EQUIPMENT DAMAGE.
                                          The manual closing lever should be used only in the test position, or if the
                                          power to the circuit breaker has been removed.
                                          Failure to observe this precaution can result in personal injury or
                                          equipment damage!


                                       This disengages the close cam (figure 14) from the closing roller and allows the
                                       drive springs to discharge. The discharging drive springs rotate the drive shaft
                                       (figure 13) counterclockwise. This rotation also gives the drive cam (figure 14) a
                                       counterclockwise rotation.
                                       The rotation of the drive cam pushes the drive cam follower (figure 14) down.
                                       Linkage with the mainshaft (figure 13) causes a downward motion of the
                                       racking arms (figure 14). The resulting upward motion of the rear of the
                                       racking arms closes the vacuum interrupter contacts and charges the bias
                                       springs (figure 15).


                              √              Œ
                                                                                  Œ

                                                 
                          Ž
                                                     ≈


                                                    ∆


                                                                                 
 Π  Close Cam
    Drive Cam
 Ž   Drive Cam Roller                 ”              “
 √   Guide Cam                    •
    Trip Cam
 ≈   Drive Cam Follower                                                                   “E”
 ∆   Main Link
 “   Cross Bar Pivot                                               Œ Vacuum Interrupter
 ”   Cross Bar                                                      Bias Spring
 •   Racking Arm

                Figure 14: Mainshaft mechanism                              Figure 15: Contact erosion measurement

18                                        © 1993 Square D Company All Rights Reserved
Bulletin 6055-11
                                                                                              October, 1993


Closing Operation (cont.)    The counterclockwise rotation of the drive shaft also rotates the lift cam out
                             of contact with the drive pin. Because the gear rotates freely on the drive
                             shaft, the gear remains stationary. The rotation of the lift cam allows the
                             drive pawl to engage the gear. The motor limit switch (figure 4, page 8)
                             energizes the charging motor which once again charges the drive springs.

Opening Operation            With the return springs charged and the circuit breaker closed, the
                             operating mechanism is ready to perform an opening operation. If the open
                             lever (figure 1, page 5) is pushed or if the opening coil (figure 4, page 8) is
                             energized, the trip cam rotates counterclockwise away from the guide cam
                             (figure 14). The force of the charged return springs pulling up on the
                             mainshaft causes the guide cam to move out toward the front of the
                             mechanism. This allows the drive cam follower to collapse off the top of the
                             drive cam. The mainshaft is pulled up, pulling the front of the racking arms
                             up. The resulting downward motion of the rear of the racking arms opens
                             the vacuum interrupter contacts (figure 15).


                            © 1993 Square D Company All Rights Reserved                                   19
Bulletin 6055-11
October, 1993


SECTION 9 — MAINTENANCE

                      Because of wide variations in operating uses and environments, each
                      operating company should develop a maintenance schedule, based on
                      operating experience, which will ensure proper circuit breaker condition.
                      Until such a schedule is determined, inspect circuit breakers after three
                      years or every 3,000 operations, whichever occurs first.

                      Also inspect circuit breakers after severe fault operations and record any
                      contact erosion. The following paragraphs discuss proper inspection and
                      maintenance procedures.

                                                  !     WARNING
                          HAZARD OF PERSONAL INJURY OR EQUIPMENT DAMAGE.
                          Always remove the circuit breaker from its cubicle, and discharge the
                          drive springs and return springs, before performing any maintenance or
                          repair work.
                          Failure to observe these precautions could result in personal injury
                          or death, or equipment damage!


Vacuum Interrupters   To ensure reliable interruption, perform the following two checks:
                      1. Contact erosion: Any contact erosion results in a reduction of spring
                          overtravel. Contact erosion can be determined by closing the circuit
                         breaker and measuring spring overtravel. Spring overtravel is
                         represented by dimension “E” in figure 15. The difference between this
                         measurement and the original spring overtravel, measured when the
                         interrupter was first put into service, represents contact erosion.
                         Spring overtravel is factory set at 0.210" (5.3 mm) for a new circuit
                         breaker rated 23 kA or less maximum interrupting. For a new circuit
                         breaker rated above 23 kA maximum interrupting, spring overtravel is
                         0.188" (4.8 mm). The vacuum interrupter reaches the end of its life when
                         spring overtravel has been reduced to 0.085" (2.2 mm) on a circuit
                         breaker rated 23 kA or less maximum interrupting, or 0.060" (1.5 mm) on
                         a circuit breaker rated above
                         23 kA maximum interrupting.
                      2. Hi-pot test: Hi-pot test the circuit breaker in accordance with the
                         instructions provided in the Initial Breaker Preparation section, page 4,
                         item 4.
                         If, because of contact erosion or hi-pot test failure, a vacuum bottle must
                         be replaced, order a complete pole assembly (see table 3 on page 16).
                         Vacuum interrupter contacts are sealed using fragile metal bellows and
                         are sensitive to excessive torque and handling. See the caution on page
                         16.

Insulating Surfaces   Using a clean, dry cloth, remove all dirt and moisture from insulating parts.


20                    © 1993 Square D Company All Rights Reserved
Bulletin 6055-11
                                                                                            October, 1993


Mechanism             Inspect the entire circuit breaker and operating mechanism for loose
                      hardware and worn or broken parts. Check all wiring for loose connections
                      and damaged insulation. Inspect all bearings and contact surfaces for
                      damage or excessive wear.

Lubrication           All ball and roller bearings used in these circuit breakers are sealed; they do
                      not require lubrication.
                      The lubrication chart in table 1 gives the location of each lubrication point
                      and the method of lubrication required. Lubricate after 3,000 operations or
                      three years, whichever occurs first.
                      Severe operating conditions may warrant different lubrication intervals and
                      procedures. Variations should be based on the experience of the operating
                      company.

Electrical            Ensure that all electrical connections are tight and clean.


                                                   !    WARNING
                          HAZARD OF BODILY INJURY OR EQUIPMENT DAMAGE.
                          Work which requires disassembly of the mechanism or pole
                          assembly must be performed by qualified electrical workers who
                          have access to appropriate adjustment instructions. See section 10
                          of this manual for these adjustment instructions.
                          When not following these instructions, disassembly and reassembly
                          of this circuit breaker can cause improper operation, resulting in
                          damage to the circuit breaker and injury to the operator. If you have
                          questions, contact the Square D Company, Smyrna service
                          department, at
                          (615) 459-5026.
                          Failure to observe this precaution can result in personal injury
                          or equipment damage!
                                                        Table 1
                                                   Lubrication Chart

                                                                    Method of Lubrication
                      Lubrication Point                           During Maintenance Period

                Gear teeth                                    Wipe clean and apply lubricant.*

                Contact surfaces on guide cams                Wipe clean and apply lubricant.*
                and trip latch

                Motor eccentric and eccentric roller          Wipe clean and apply lubricant to the slot
                                                              in the ratchet arm.*

                Silver-plated primary disconnect              Wipe clean and apply an extreme
                contacts and grounding contacts               pressure grease, such as Mobilux EP 1,
                                                              Square D part number 1615-100790.

              * Use Mobilgrease 28, Square D part number 1615-100950, or equivalent.


                    © 1993 Square D Company All Rights Reserved                                            21
Bulletin 6055-11
October, 1993


SECTION 10 — REPLACEMENT PARTS

Minimum Requirements                  Maintain sufficient replacement parts in stock to ensure prompt
                                      replacement of worn, broken, or damaged parts.
                                      Tables 2 and 3 list factory-recommended replacement parts. Each
                                      replacement part is shipped with complete assembly and adjustment
                                      instructions.
                                      Because of wide variation in operating uses and environments, the
                                      recommended parts are presented only as a minimum requirement. Each
                                      operating company should develop its own parts stock, based on operating
                                      experience, to maintain proper circuit breaker condition.

Ordering Instructions                 When ordering replacement parts:
                                      • Always specify the complete rating information and circuit breaker
                                        serial number.
                                      • Specify part number, description of part, and the catalog from which this
                                        information is taken.
                                     Table 2                                           Table 3
                                Replacement Parts                      Pole Assembly Replacement Parts
                                                           Rated                      Circuit
               Description                Part No.        Voltage                     Breaker            Part No.

        Charging Motor                 44068-505-50        48    Vdc        4.76 kV   29 kA   1200 A    44068-514-50
                                       44068-505-51       125    Vdc        4.76 kV   29 kA    2000A    44068-515-50
                                       44068-505-52       250    Vdc        4.76 kV   41 kA    1200A    44068-514-51
                                       44068-505-51       120    Vac        4.76 kV   41 kA    2000A    44068-515-51
                                       44068-505-52       240    Vac        8.25 kV   33 kA 1200A       44068-514-52
        Motor Relay                    44068-506-50        48    Vdc        8.25 kV   33 kA 2000A       44068-515-52
                                       44068-506-51       125    Vdc        15.0 kV   18 kA     1200A   44068-514-53
                                       44068-506-52       250    Vdc        15.0 kV   18 kA     2000A   44068-515-53
                                       44068-506-53       120    Vac        15.0 kV   28 kA     1200A   44068-514-54
                                       44068-506-54       240    Vac        15.0 kV   28 kA     2000A   44068-515-54
        Anti-Pump Relay                44068-507-50        48    Vdc        15.0 kV   37 kA     1200A   44068-514-55
                                       44068-507-51       125    Vdc        15.0 kV   37 kA     2000A   44068-515-55
                                       44068-507-52       250    Vdc
                                       44068-507-53       120    Vac
                                       44068-507-54       240    Vac
        Closing Solenoid               44068-508-50        48    Vdc
                                       44068-508-51       125    Vdc
                                       44068-508-52       250    Vdc
                                       44068-508-53       120    Vac
                                       44068-508-54       240    Vac
        Trip Solenoid                  44068-509-50        24    Vdc
                                       44068-509-51        48    Vdc
                                       44068-509-52       125    Vdc
                                       44068-509-53       250    Vdc
                                       44068-509-54       120    Vac
                                       44068-509-55       240    Vac
        Main Contact (1200A)           44068-516-50             —
        Main Contact (2000A)           44068-516-51             —
        Ground Contact                 44068-510-50             —
        Latch Check Switch             44068-511-50             —
        Control Power Plug Ass’y       44068-503-50             —
        Auxiliary Switch               44068-512-50             —
        Closing Spring Limit Switch    44068-513-50             —

22                                     © 1993 Square D Company All Rights Reserved
Bulletin 6055-11
                                                                    October, 1993


SECTION 11— INSTALLATION AND MAINTENANCE LOG


                     © 1993 Square D Company All Rights Reserved                23
Square D Company
330 Weakley Road
Smyrna, TN 37167 U.S.A.

Order No. 6055IM9207           FP 5M 10/93    Printed in U.S.A.
Replaces bulletin dated 4/90                 Part No. 6055-11

Mais conteúdo relacionado

Mais procurados

Ac drive altivar 11 user manual
Ac drive altivar 11 user manualAc drive altivar 11 user manual
Ac drive altivar 11 user manualToàn Huỳnh
 
Manual 770 extreme3
Manual 770 extreme3Manual 770 extreme3
Manual 770 extreme3luisbes
 
Kollmorgen urs catalog
Kollmorgen urs catalogKollmorgen urs catalog
Kollmorgen urs catalogElectromate
 
Crown ws2000 series forklift service repair manual
Crown ws2000 series forklift service repair manualCrown ws2000 series forklift service repair manual
Crown ws2000 series forklift service repair manualfjsekkdmme
 
Perkins 1200 series 1206 e e70tta industrial engine service repair manual
Perkins 1200 series 1206 e e70tta industrial engine service repair manualPerkins 1200 series 1206 e e70tta industrial engine service repair manual
Perkins 1200 series 1206 e e70tta industrial engine service repair manualfujsekfksmemer
 
Perkins 4000 series 4016 61 trg industrial engine (s16 engine) service repair...
Perkins 4000 series 4016 61 trg industrial engine (s16 engine) service repair...Perkins 4000 series 4016 61 trg industrial engine (s16 engine) service repair...
Perkins 4000 series 4016 61 trg industrial engine (s16 engine) service repair...fjsefksemmm
 
Thomson clutches brakes_catalog
Thomson clutches brakes_catalogThomson clutches brakes_catalog
Thomson clutches brakes_catalogElectromate
 
New holland cr960 combine harvesters service repair manual
New holland cr960 combine harvesters service repair manualNew holland cr960 combine harvesters service repair manual
New holland cr960 combine harvesters service repair manualuudfjjjskkemmd
 

Mais procurados (15)

Ac drive altivar 11 user manual
Ac drive altivar 11 user manualAc drive altivar 11 user manual
Ac drive altivar 11 user manual
 
Manual 770 extreme3
Manual 770 extreme3Manual 770 extreme3
Manual 770 extreme3
 
Kollmorgen urs catalog
Kollmorgen urs catalogKollmorgen urs catalog
Kollmorgen urs catalog
 
Crown ws2000 series forklift service repair manual
Crown ws2000 series forklift service repair manualCrown ws2000 series forklift service repair manual
Crown ws2000 series forklift service repair manual
 
Asrock
AsrockAsrock
Asrock
 
Perkins 1200 series 1206 e e70tta industrial engine service repair manual
Perkins 1200 series 1206 e e70tta industrial engine service repair manualPerkins 1200 series 1206 e e70tta industrial engine service repair manual
Perkins 1200 series 1206 e e70tta industrial engine service repair manual
 
N68 c s ucc
N68 c s uccN68 c s ucc
N68 c s ucc
 
Sr1128-manual+ultisolar-new-energy-co-ltd-solar-water-heaters-controllers-woo...
Sr1128-manual+ultisolar-new-energy-co-ltd-solar-water-heaters-controllers-woo...Sr1128-manual+ultisolar-new-energy-co-ltd-solar-water-heaters-controllers-woo...
Sr1128-manual+ultisolar-new-energy-co-ltd-solar-water-heaters-controllers-woo...
 
Manual de PLC Micrologix 1100
Manual de PLC Micrologix 1100Manual de PLC Micrologix 1100
Manual de PLC Micrologix 1100
 
Level radar measurement in liquids-Micropilot FMR50
Level radar measurement in liquids-Micropilot FMR50Level radar measurement in liquids-Micropilot FMR50
Level radar measurement in liquids-Micropilot FMR50
 
lg
lglg
lg
 
High accuracy liquid level measurement-Proservo NMS5
High accuracy liquid level measurement-Proservo NMS5High accuracy liquid level measurement-Proservo NMS5
High accuracy liquid level measurement-Proservo NMS5
 
Perkins 4000 series 4016 61 trg industrial engine (s16 engine) service repair...
Perkins 4000 series 4016 61 trg industrial engine (s16 engine) service repair...Perkins 4000 series 4016 61 trg industrial engine (s16 engine) service repair...
Perkins 4000 series 4016 61 trg industrial engine (s16 engine) service repair...
 
Thomson clutches brakes_catalog
Thomson clutches brakes_catalogThomson clutches brakes_catalog
Thomson clutches brakes_catalog
 
New holland cr960 combine harvesters service repair manual
New holland cr960 combine harvesters service repair manualNew holland cr960 combine harvesters service repair manual
New holland cr960 combine harvesters service repair manual
 

Semelhante a breaker[1]

2007 johnson evinrude outboard 90 hp service repair manual
2007 johnson evinrude outboard 90 hp service repair manual2007 johnson evinrude outboard 90 hp service repair manual
2007 johnson evinrude outboard 90 hp service repair manualfujsjefjskemm
 
2007 johnson evinrude outboard 90 hp service repair manual
2007 johnson evinrude outboard 90 hp service repair manual2007 johnson evinrude outboard 90 hp service repair manual
2007 johnson evinrude outboard 90 hp service repair manualfjeskfksmefmm
 
2007 johnson evinrude outboard 75 hp service repair manual
2007 johnson evinrude outboard 75 hp service repair manual2007 johnson evinrude outboard 75 hp service repair manual
2007 johnson evinrude outboard 75 hp service repair manualfjkseksmefmm
 
2007 johnson evinrude outboard 75 hp service repair manual
2007 johnson evinrude outboard 75 hp service repair manual2007 johnson evinrude outboard 75 hp service repair manual
2007 johnson evinrude outboard 75 hp service repair manualfujsjfejkskem
 
Service Manual 2007 Evinrude E-tec 115-150-175-200 Hp 60° V.pdf
Service Manual 2007 Evinrude E-tec 115-150-175-200 Hp 60° V.pdfService Manual 2007 Evinrude E-tec 115-150-175-200 Hp 60° V.pdf
Service Manual 2007 Evinrude E-tec 115-150-175-200 Hp 60° V.pdfHannuLeinonen5
 
2007 Johnson Evinrude Outboard 60Hp Service Repair Manual
2007 Johnson Evinrude Outboard 60Hp Service Repair Manual2007 Johnson Evinrude Outboard 60Hp Service Repair Manual
2007 Johnson Evinrude Outboard 60Hp Service Repair Manualfujfdjjsjkkmee
 
2007 johnson evinrude outboard 40 hp service repair manual
2007 johnson evinrude outboard 40 hp service repair manual2007 johnson evinrude outboard 40 hp service repair manual
2007 johnson evinrude outboard 40 hp service repair manualfjkekfmefmm
 
2007 johnson evinrude outboard 60 hp service repair manual
2007 johnson evinrude outboard 60 hp service repair manual2007 johnson evinrude outboard 60 hp service repair manual
2007 johnson evinrude outboard 60 hp service repair manualfujsjefjskemm
 
2007 johnson evinrude outboard 40 hp service repair manual
2007 johnson evinrude outboard 40 hp service repair manual2007 johnson evinrude outboard 40 hp service repair manual
2007 johnson evinrude outboard 40 hp service repair manualfjsjjfkskeme
 
2007 Johnson Evinrude Outboard 40Hp Service Repair Manual
2007 Johnson Evinrude Outboard 40Hp Service Repair Manual2007 Johnson Evinrude Outboard 40Hp Service Repair Manual
2007 Johnson Evinrude Outboard 40Hp Service Repair Manualujfjjsjefksekm
 
2007 johnson evinrude outboard 60 hp service repair manual
2007 johnson evinrude outboard 60 hp service repair manual2007 johnson evinrude outboard 60 hp service repair manual
2007 johnson evinrude outboard 60 hp service repair manualfjeskfksmefmm
 
2007 johnson evinrude outboard 50 hp service repair manual
2007 johnson evinrude outboard 50 hp service repair manual2007 johnson evinrude outboard 50 hp service repair manual
2007 johnson evinrude outboard 50 hp service repair manualfujsjefjsekkem
 
2007 johnson evinrude outboard 50 hp service repair manual
2007 johnson evinrude outboard 50 hp service repair manual2007 johnson evinrude outboard 50 hp service repair manual
2007 johnson evinrude outboard 50 hp service repair manualfjufksefmme
 
Rotary Screw Compressors - Operating Instructions Manual
Rotary Screw Compressors - Operating Instructions ManualRotary Screw Compressors - Operating Instructions Manual
Rotary Screw Compressors - Operating Instructions ManualOlivia Grey
 
Daewoo doosan solar 290 lc v excavator service repair manual
Daewoo doosan solar 290 lc v excavator service repair manualDaewoo doosan solar 290 lc v excavator service repair manual
Daewoo doosan solar 290 lc v excavator service repair manualjkskjdkm
 
2007 johnson evinrude outboard 9.9 hp service repair manual
2007 johnson evinrude outboard 9.9 hp service repair manual2007 johnson evinrude outboard 9.9 hp service repair manual
2007 johnson evinrude outboard 9.9 hp service repair manualfjskeksmemedc
 
2007 johnson evinrude outboard 9.9 hp service repair manual
2007 johnson evinrude outboard 9.9 hp service repair manual2007 johnson evinrude outboard 9.9 hp service repair manual
2007 johnson evinrude outboard 9.9 hp service repair manualfujdjfjjskekmm
 
2007 johnson evinrude outboard 9.9 hp service repair manual
2007 johnson evinrude outboard 9.9 hp service repair manual2007 johnson evinrude outboard 9.9 hp service repair manual
2007 johnson evinrude outboard 9.9 hp service repair manualfujsjefjkskekfm
 
2007 johnson evinrude outboard 15 hp service repair manual
2007 johnson evinrude outboard 15 hp service repair manual2007 johnson evinrude outboard 15 hp service repair manual
2007 johnson evinrude outboard 15 hp service repair manualfjkekfmefmm
 

Semelhante a breaker[1] (20)

Instruction manual SMC IDFA
Instruction manual SMC IDFAInstruction manual SMC IDFA
Instruction manual SMC IDFA
 
2007 johnson evinrude outboard 90 hp service repair manual
2007 johnson evinrude outboard 90 hp service repair manual2007 johnson evinrude outboard 90 hp service repair manual
2007 johnson evinrude outboard 90 hp service repair manual
 
2007 johnson evinrude outboard 90 hp service repair manual
2007 johnson evinrude outboard 90 hp service repair manual2007 johnson evinrude outboard 90 hp service repair manual
2007 johnson evinrude outboard 90 hp service repair manual
 
2007 johnson evinrude outboard 75 hp service repair manual
2007 johnson evinrude outboard 75 hp service repair manual2007 johnson evinrude outboard 75 hp service repair manual
2007 johnson evinrude outboard 75 hp service repair manual
 
2007 johnson evinrude outboard 75 hp service repair manual
2007 johnson evinrude outboard 75 hp service repair manual2007 johnson evinrude outboard 75 hp service repair manual
2007 johnson evinrude outboard 75 hp service repair manual
 
Service Manual 2007 Evinrude E-tec 115-150-175-200 Hp 60° V.pdf
Service Manual 2007 Evinrude E-tec 115-150-175-200 Hp 60° V.pdfService Manual 2007 Evinrude E-tec 115-150-175-200 Hp 60° V.pdf
Service Manual 2007 Evinrude E-tec 115-150-175-200 Hp 60° V.pdf
 
2007 Johnson Evinrude Outboard 60Hp Service Repair Manual
2007 Johnson Evinrude Outboard 60Hp Service Repair Manual2007 Johnson Evinrude Outboard 60Hp Service Repair Manual
2007 Johnson Evinrude Outboard 60Hp Service Repair Manual
 
2007 johnson evinrude outboard 40 hp service repair manual
2007 johnson evinrude outboard 40 hp service repair manual2007 johnson evinrude outboard 40 hp service repair manual
2007 johnson evinrude outboard 40 hp service repair manual
 
2007 johnson evinrude outboard 60 hp service repair manual
2007 johnson evinrude outboard 60 hp service repair manual2007 johnson evinrude outboard 60 hp service repair manual
2007 johnson evinrude outboard 60 hp service repair manual
 
2007 johnson evinrude outboard 40 hp service repair manual
2007 johnson evinrude outboard 40 hp service repair manual2007 johnson evinrude outboard 40 hp service repair manual
2007 johnson evinrude outboard 40 hp service repair manual
 
2007 Johnson Evinrude Outboard 40Hp Service Repair Manual
2007 Johnson Evinrude Outboard 40Hp Service Repair Manual2007 Johnson Evinrude Outboard 40Hp Service Repair Manual
2007 Johnson Evinrude Outboard 40Hp Service Repair Manual
 
2007 johnson evinrude outboard 60 hp service repair manual
2007 johnson evinrude outboard 60 hp service repair manual2007 johnson evinrude outboard 60 hp service repair manual
2007 johnson evinrude outboard 60 hp service repair manual
 
2007 johnson evinrude outboard 50 hp service repair manual
2007 johnson evinrude outboard 50 hp service repair manual2007 johnson evinrude outboard 50 hp service repair manual
2007 johnson evinrude outboard 50 hp service repair manual
 
2007 johnson evinrude outboard 50 hp service repair manual
2007 johnson evinrude outboard 50 hp service repair manual2007 johnson evinrude outboard 50 hp service repair manual
2007 johnson evinrude outboard 50 hp service repair manual
 
Rotary Screw Compressors - Operating Instructions Manual
Rotary Screw Compressors - Operating Instructions ManualRotary Screw Compressors - Operating Instructions Manual
Rotary Screw Compressors - Operating Instructions Manual
 
Daewoo doosan solar 290 lc v excavator service repair manual
Daewoo doosan solar 290 lc v excavator service repair manualDaewoo doosan solar 290 lc v excavator service repair manual
Daewoo doosan solar 290 lc v excavator service repair manual
 
2007 johnson evinrude outboard 9.9 hp service repair manual
2007 johnson evinrude outboard 9.9 hp service repair manual2007 johnson evinrude outboard 9.9 hp service repair manual
2007 johnson evinrude outboard 9.9 hp service repair manual
 
2007 johnson evinrude outboard 9.9 hp service repair manual
2007 johnson evinrude outboard 9.9 hp service repair manual2007 johnson evinrude outboard 9.9 hp service repair manual
2007 johnson evinrude outboard 9.9 hp service repair manual
 
2007 johnson evinrude outboard 9.9 hp service repair manual
2007 johnson evinrude outboard 9.9 hp service repair manual2007 johnson evinrude outboard 9.9 hp service repair manual
2007 johnson evinrude outboard 9.9 hp service repair manual
 
2007 johnson evinrude outboard 15 hp service repair manual
2007 johnson evinrude outboard 15 hp service repair manual2007 johnson evinrude outboard 15 hp service repair manual
2007 johnson evinrude outboard 15 hp service repair manual
 

Último

ClimART Action | eTwinning Project
ClimART Action    |    eTwinning ProjectClimART Action    |    eTwinning Project
ClimART Action | eTwinning Projectjordimapav
 
Q4-PPT-Music9_Lesson-1-Romantic-Opera.pptx
Q4-PPT-Music9_Lesson-1-Romantic-Opera.pptxQ4-PPT-Music9_Lesson-1-Romantic-Opera.pptx
Q4-PPT-Music9_Lesson-1-Romantic-Opera.pptxlancelewisportillo
 
Active Learning Strategies (in short ALS).pdf
Active Learning Strategies (in short ALS).pdfActive Learning Strategies (in short ALS).pdf
Active Learning Strategies (in short ALS).pdfPatidar M
 
Congestive Cardiac Failure..presentation
Congestive Cardiac Failure..presentationCongestive Cardiac Failure..presentation
Congestive Cardiac Failure..presentationdeepaannamalai16
 
BIOCHEMISTRY-CARBOHYDRATE METABOLISM CHAPTER 2.pptx
BIOCHEMISTRY-CARBOHYDRATE METABOLISM CHAPTER 2.pptxBIOCHEMISTRY-CARBOHYDRATE METABOLISM CHAPTER 2.pptx
BIOCHEMISTRY-CARBOHYDRATE METABOLISM CHAPTER 2.pptxSayali Powar
 
Grade Three -ELLNA-REVIEWER-ENGLISH.pptx
Grade Three -ELLNA-REVIEWER-ENGLISH.pptxGrade Three -ELLNA-REVIEWER-ENGLISH.pptx
Grade Three -ELLNA-REVIEWER-ENGLISH.pptxkarenfajardo43
 
Man or Manufactured_ Redefining Humanity Through Biopunk Narratives.pptx
Man or Manufactured_ Redefining Humanity Through Biopunk Narratives.pptxMan or Manufactured_ Redefining Humanity Through Biopunk Narratives.pptx
Man or Manufactured_ Redefining Humanity Through Biopunk Narratives.pptxDhatriParmar
 
Q-Factor HISPOL Quiz-6th April 2024, Quiz Club NITW
Q-Factor HISPOL Quiz-6th April 2024, Quiz Club NITWQ-Factor HISPOL Quiz-6th April 2024, Quiz Club NITW
Q-Factor HISPOL Quiz-6th April 2024, Quiz Club NITWQuiz Club NITW
 
Expanded definition: technical and operational
Expanded definition: technical and operationalExpanded definition: technical and operational
Expanded definition: technical and operationalssuser3e220a
 
4.11.24 Poverty and Inequality in America.pptx
4.11.24 Poverty and Inequality in America.pptx4.11.24 Poverty and Inequality in America.pptx
4.11.24 Poverty and Inequality in America.pptxmary850239
 
ROLES IN A STAGE PRODUCTION in arts.pptx
ROLES IN A STAGE PRODUCTION in arts.pptxROLES IN A STAGE PRODUCTION in arts.pptx
ROLES IN A STAGE PRODUCTION in arts.pptxVanesaIglesias10
 
MS4 level being good citizen -imperative- (1) (1).pdf
MS4 level   being good citizen -imperative- (1) (1).pdfMS4 level   being good citizen -imperative- (1) (1).pdf
MS4 level being good citizen -imperative- (1) (1).pdfMr Bounab Samir
 
Measures of Position DECILES for ungrouped data
Measures of Position DECILES for ungrouped dataMeasures of Position DECILES for ungrouped data
Measures of Position DECILES for ungrouped dataBabyAnnMotar
 
Textual Evidence in Reading and Writing of SHS
Textual Evidence in Reading and Writing of SHSTextual Evidence in Reading and Writing of SHS
Textual Evidence in Reading and Writing of SHSMae Pangan
 
ICS2208 Lecture6 Notes for SL spaces.pdf
ICS2208 Lecture6 Notes for SL spaces.pdfICS2208 Lecture6 Notes for SL spaces.pdf
ICS2208 Lecture6 Notes for SL spaces.pdfVanessa Camilleri
 
Beauty Amidst the Bytes_ Unearthing Unexpected Advantages of the Digital Wast...
Beauty Amidst the Bytes_ Unearthing Unexpected Advantages of the Digital Wast...Beauty Amidst the Bytes_ Unearthing Unexpected Advantages of the Digital Wast...
Beauty Amidst the Bytes_ Unearthing Unexpected Advantages of the Digital Wast...DhatriParmar
 
Reading and Writing Skills 11 quarter 4 melc 1
Reading and Writing Skills 11 quarter 4 melc 1Reading and Writing Skills 11 quarter 4 melc 1
Reading and Writing Skills 11 quarter 4 melc 1GloryAnnCastre1
 
Scientific Writing :Research Discourse
Scientific  Writing :Research  DiscourseScientific  Writing :Research  Discourse
Scientific Writing :Research DiscourseAnita GoswamiGiri
 

Último (20)

ClimART Action | eTwinning Project
ClimART Action    |    eTwinning ProjectClimART Action    |    eTwinning Project
ClimART Action | eTwinning Project
 
Q4-PPT-Music9_Lesson-1-Romantic-Opera.pptx
Q4-PPT-Music9_Lesson-1-Romantic-Opera.pptxQ4-PPT-Music9_Lesson-1-Romantic-Opera.pptx
Q4-PPT-Music9_Lesson-1-Romantic-Opera.pptx
 
Active Learning Strategies (in short ALS).pdf
Active Learning Strategies (in short ALS).pdfActive Learning Strategies (in short ALS).pdf
Active Learning Strategies (in short ALS).pdf
 
Congestive Cardiac Failure..presentation
Congestive Cardiac Failure..presentationCongestive Cardiac Failure..presentation
Congestive Cardiac Failure..presentation
 
Mattingly "AI & Prompt Design: Large Language Models"
Mattingly "AI & Prompt Design: Large Language Models"Mattingly "AI & Prompt Design: Large Language Models"
Mattingly "AI & Prompt Design: Large Language Models"
 
prashanth updated resume 2024 for Teaching Profession
prashanth updated resume 2024 for Teaching Professionprashanth updated resume 2024 for Teaching Profession
prashanth updated resume 2024 for Teaching Profession
 
BIOCHEMISTRY-CARBOHYDRATE METABOLISM CHAPTER 2.pptx
BIOCHEMISTRY-CARBOHYDRATE METABOLISM CHAPTER 2.pptxBIOCHEMISTRY-CARBOHYDRATE METABOLISM CHAPTER 2.pptx
BIOCHEMISTRY-CARBOHYDRATE METABOLISM CHAPTER 2.pptx
 
Grade Three -ELLNA-REVIEWER-ENGLISH.pptx
Grade Three -ELLNA-REVIEWER-ENGLISH.pptxGrade Three -ELLNA-REVIEWER-ENGLISH.pptx
Grade Three -ELLNA-REVIEWER-ENGLISH.pptx
 
Man or Manufactured_ Redefining Humanity Through Biopunk Narratives.pptx
Man or Manufactured_ Redefining Humanity Through Biopunk Narratives.pptxMan or Manufactured_ Redefining Humanity Through Biopunk Narratives.pptx
Man or Manufactured_ Redefining Humanity Through Biopunk Narratives.pptx
 
Q-Factor HISPOL Quiz-6th April 2024, Quiz Club NITW
Q-Factor HISPOL Quiz-6th April 2024, Quiz Club NITWQ-Factor HISPOL Quiz-6th April 2024, Quiz Club NITW
Q-Factor HISPOL Quiz-6th April 2024, Quiz Club NITW
 
Expanded definition: technical and operational
Expanded definition: technical and operationalExpanded definition: technical and operational
Expanded definition: technical and operational
 
4.11.24 Poverty and Inequality in America.pptx
4.11.24 Poverty and Inequality in America.pptx4.11.24 Poverty and Inequality in America.pptx
4.11.24 Poverty and Inequality in America.pptx
 
ROLES IN A STAGE PRODUCTION in arts.pptx
ROLES IN A STAGE PRODUCTION in arts.pptxROLES IN A STAGE PRODUCTION in arts.pptx
ROLES IN A STAGE PRODUCTION in arts.pptx
 
MS4 level being good citizen -imperative- (1) (1).pdf
MS4 level   being good citizen -imperative- (1) (1).pdfMS4 level   being good citizen -imperative- (1) (1).pdf
MS4 level being good citizen -imperative- (1) (1).pdf
 
Measures of Position DECILES for ungrouped data
Measures of Position DECILES for ungrouped dataMeasures of Position DECILES for ungrouped data
Measures of Position DECILES for ungrouped data
 
Textual Evidence in Reading and Writing of SHS
Textual Evidence in Reading and Writing of SHSTextual Evidence in Reading and Writing of SHS
Textual Evidence in Reading and Writing of SHS
 
ICS2208 Lecture6 Notes for SL spaces.pdf
ICS2208 Lecture6 Notes for SL spaces.pdfICS2208 Lecture6 Notes for SL spaces.pdf
ICS2208 Lecture6 Notes for SL spaces.pdf
 
Beauty Amidst the Bytes_ Unearthing Unexpected Advantages of the Digital Wast...
Beauty Amidst the Bytes_ Unearthing Unexpected Advantages of the Digital Wast...Beauty Amidst the Bytes_ Unearthing Unexpected Advantages of the Digital Wast...
Beauty Amidst the Bytes_ Unearthing Unexpected Advantages of the Digital Wast...
 
Reading and Writing Skills 11 quarter 4 melc 1
Reading and Writing Skills 11 quarter 4 melc 1Reading and Writing Skills 11 quarter 4 melc 1
Reading and Writing Skills 11 quarter 4 melc 1
 
Scientific Writing :Research Discourse
Scientific  Writing :Research  DiscourseScientific  Writing :Research  Discourse
Scientific Writing :Research Discourse
 

breaker[1]

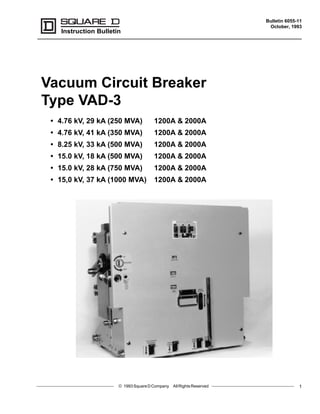
  • 1. Bulletin 6055-11 October, 1993 Instruction Bulletin Vacuum Circuit Breaker Type VAD-3 • 4.76 kV, 29 kA (250 MVA) 1200A & 2000A • 4.76 kV, 41 kA (350 MVA) 1200A & 2000A • 8.25 kV, 33 kA (500 MVA) 1200A & 2000A • 15.0 kV, 18 kA (500 MVA) 1200A & 2000A • 15.0 kV, 28 kA (750 MVA) 1200A & 2000A • 15,0 kV, 37 kA (1000 MVA) 1200A & 2000A © 1993 Square D Company All Rights Reserved 1
  • 2. Bulletin 6055-11 October, 1993 NOTICE Read these instructions carefully and look at the equipment to become familiar with the device before trying to install, operate, or maintain it. The following special messages may appear throughout this bulletin to warn of potential hazards and to call attention to additional information which clarifies or simplifies a procedure. ! DANGER Used where there is a hazard of severe bodily injury or death. Failure to follow a “DANGER” instruction will result in severe bodily injury or death. ! WARNING Used where there is a hazard of bodily injury or death. Failure to follow a “WARNING” instruction may result in bodily injury or death. ! CAUTION Used where there is a hazard of equipment damage. Failure to follow a “CAUTION” instruction may result in damage to equipment. NOTE Provides additional information to clarify or simplify a procedure. Square D and are Registered Trademarks of Square D Company. © 1993 Square D Company, all rights reserved. This bulletin may not be copied in whole or in part, or transferred to any other media, without the written permission of Square D Company. 2 © 1993 Square D Company All Rights Reserved
  • 3. Bulletin 6055-11 October, 1993 CONTENTS PAGE 1. INTRODUCTION ................................................................................................... 1 Surge Protection For VAD-3 Circuit Breakers — Statement Of Use ........... 1 2. SAFETY PRECAUTIONS ...................................................................................... 2 3. RECEIVING, HANDLING, AND STORAGE .................................................... 3 Receiving .............................................................................................................. 3 Handling .............................................................................................................. 3 Storage .................................................................................................................. 3 4. INITIAL CIRCUIT BREAKER PREPARATION ................................................ 4 Performing A Hi-Pot Test ................................................................................. 4 5. INSTALLATION .................................................................................................... 5 Site Preparation And Circuit Breaker Installation ........................................ 5 6. VACUUM CIRCUIT BREAKER DESCRIPTION ............................................... 6 Vacuum Interrupters .......................................................................................... 6 Primary Disconnects .......................................................................................... 6 Operating Mechanism ....................................................................................... 6 Control Circuit .................................................................................................... 6 Auxiliary Switch ................................................................................................. 8 Motor Limit Switch ............................................................................................ 8 Motor Relay ......................................................................................................... 8 Anti-Pump Relay ................................................................................................ 9 Latch Check Switch ............................................................................................ 9 Closing Spring Interlock .................................................................................... 9 Indicators ............................................................................................................. 9 7. OPERATING THE CIRCUIT BREAKER .......................................................... 10 Manual Charging .............................................................................................. 10 Slow Closing Feature ....................................................................................... 10 Drawout Operation .......................................................................................... 11 Racking In Procedure ....................................................................................... 11 Racking Out Procedure ................................................................................... 12 Locking Provision ............................................................................................. 12 Test Position Operation ................................................................................... 12 8. OPERATING MECHANISM .............................................................................. 13 Drive Spring Charging .................................................................................... 13 Closing Operation ............................................................................................ 14 Opening Operation .......................................................................................... 15 9. MAINTENANCE .................................................................................................. 16 Vacuum Interrupters ........................................................................................ 16 Insulating Surfaces ........................................................................................... 16 Mechanism ......................................................................................................... 17 Lubrication ......................................................................................................... 17 Electrical ............................................................................................................. 17 10. REPLACEMENT PARTS ..................................................................................... 18 Minimum Requirements ................................................................................. 18 Ordering Instructions ...................................................................................... 18 11. INSTALLATION AND MAINTENANCE LOG ............................................. 19 © 1993 Square D Company All Rights Reserved 3
  • 4. Bulletin 6055-11 October, 1993 ILLUSTRATIONS PAGE 1. Circuit breaker, front view .................................................................................... 5 2. Circuit breaker, rear view ..................................................................................... 6 3. Contact circuit schematic ...................................................................................... 7 4. Circuit breaker, left front view without cover (18 kA, 28 kA, and 29 kA) .... 8 5. Circuit breaker, right front view without cover (18 kA, 28 kA, and 29 kA) ....... 8 6. Circuit breaker, front view without cover (37 kA and 41 kA) ........................ 9 7. Charging the drive springs ................................................................................... 9 8. Removing the closing spring .............................................................................. 10 9. Slow close feature ................................................................................................. 10 10. Racking mechanism in test position .................................................................. 11 11. Racking mechanism in operating (connected) position ................................. 11 12. Racking mechanism padlock provision ............................................................ 12 13. Circuit breaker mechanism, two views ............................................................ 13 14. Mainshaft mechanism .......................................................................................... 14 15. Contact erosion measurement ............................................................................ 14 TABLES PAGE 1. Lubrication Chart ................................................................................................. 17 2. Replacement Parts ................................................................................................ 18 3. Pole Assembly Replacement Parts ..................................................................... 18 4 © 1993 Square D Company All Rights Reserved
  • 5. Bulletin 6055-11 October, 1993 SECTION 1— INTRODUCTION This manual provides installation, operation, and maintenance instructions for the type VAD-3 series of horizontal drawout vacuum circuit breakers. Surge Protection For VAD-3 medium voltage vacuum circuit breakers are designed and tested VAD-3 Circuit Breakers — in accordance with ANSI/IEEE C37.04, .06, and .09. Used in conjunction with Statement Of Use switchgear designed and tested to ANSI/IEEE C37.20.2, circuit breakers can be applied as general purpose devices. VAD-3 circuit breakers may be installed over a wide range of applications and system parameters. Several IEEE publications are available to provide guidance for use in industry practices (IEEE Color Book Series). Distribution systems can be exposed to lightning or switching surges. Older systems, with aging insulation or out-of-date standards, may be more susceptible to damage. For this reason, consider adding metal oxide surge arrestors to the circuitry on the load side of the terminals of VAD-3 circuit breakers used in retro-fit applications. Place the surge protection in the switchgear or at the equipment being protected, but not on the circuit breaker. Metal oxide arrestors limit the magnitude of prospective overvoltages, but do not affect the rate of rise (di/dt) of surge transients. Consider using surge capacitors for this additional protection. © 1993 Square D Company All Rights Reserved 5
  • 6. Bulletin 6055-11 October, 1993 SECTION 2 — SAFETY PRECAUTIONS ! DANGER HAZARD OF ELECTRICAL SHOCK OR BURN. • Only qualified electrical workers with training and experience on high voltage circuits should perform work described in this set of instructions. These workers must understand the hazards involved in working with or near high voltage equipment. Perform such work only after reading this complete set of instructions. • The successful operation of circuit breakers depends upon proper handling, installation, operation, and maintenance. Neglecting fundamental installation and maintenance requirements may lead to personal injury, as well as damage to electrical equipment or other property. • VAD-3 circuit breakers have features designed to direct proper operation, but it is not possible to eliminate every hazard with these features. Therefore, the person using this device is responsible for recognizing the potential hazards, wearing protective equipment, and taking adequate safety precautions. • Do not make any modifications to the equipment or operate the system with safety features removed. Contact your local Square D representative for additional instructions if the VAD-3 circuit breaker does not function as described in this manual. • Before performing visual inspections, tests, or maintenance on this device, disconnect all sources of electric power. Assume all circuits are live until they are completely de-energized, tested, grounded, and tagged. Pay particular attention to the design of the power system. Consider all sources of power, including the possibility of backfeeding. • Before replacing covers, carefully inspect the circuit breaker work area for tools and objects left inside the equipment. • All maintenance must be performed by qualified personnel in accordance with local codes and ordinances, and under the following conditions: – The circuit breaker must be removed from its cell and isolated from the high voltage. – Control voltage must be removed from the controls. – The circuit breaker must be in the open position. – All circuit breaker springs must be discharged. All instructions in this manual assume the customer has taken the above steps to obtain safe conditions before performing maintenance or testing. Failure to observe these precautions will result in severe personal injury or death! 6 © 1993 Square D Company All Rights Reserved
  • 7. Bulletin 6055-11 October, 1993 SECTION 3 — RECEIVING, HANDLING, AND STORAGE Receiving Upon receipt, inspect the entire circuit breaker for damage that may have occurred in transit. Check all items against the packing list provided. Notify the transportation company and Square D immediately if there are damages or shortages. Handling Use care when uncrating and handling the circuit breaker. Roll and maneuver the circuit breaker by the handle on the front mechanism cover or by grasping the top edge of the front mechanism cover. When using a hoist, lift the circuit breaker by the holes in the frame to prevent damage. ! CAUTION HAZARD OF EQUIPMENT DAMAGE. Never lift the circuit breaker by placing forklift bars beneath the circuit breaker frame. Never use racking arms or primary disconnects as handles. Failure to observe this precaution can result in equipment damage. Storage If the circuit breaker must be stored before it is put into operation, keep it in a clean, dry, corrosion-free area where it is protected from damage. Place the circuit breaker in its permanent location as soon as possible. If the circuit breaker will be used in switchgear employing space heaters, install it only after the heaters are operating. When circuit breakers are stored for prolonged periods, inspect them regularly for rusting and overall condition. Lubricate when necessary. © 1993 Square D Company All Rights Reserved 7
  • 8. Bulletin 6055-11 October, 1993 SECTION 4 — INITIAL CIRCUIT BREAKER PREPARATION Follow these steps to prepare the circuit breaker for installation in its enclosure: 1) Examine the entire circuit breaker for damage, dirt, and moisture. 2) Use a clean, dry cloth to remove dirt and moisture that may have collected on the insulating parts. 3) Operate the circuit breaker several times to check for proper operation. Performing A Hi-Pot Test 4) To ensure no damage has occurred during shipment, perform a hi-pot test across the open contacts of each vacuum interrupter. Then, with the circuit breaker in the closed position, perform a phase-to-ground and phase-to-phase hi-pot test for each pole. Gradually increase the voltage to the proper level. The hi-pot test voltage should be 27 kV rms or 38 kVdc for 15.0 kV, and 14 kV rms or 20 kVdc for 4.76 kV switchgear. The circuit breaker should sustain this potential for one minute. ! WARNING HAZARD OF PERSONAL INJURY OR EQUIPMENT DAMAGE. Observe the following instructions when performing the hi-pot test: • Do not exceed the voltages specified in step 4 above. • Keep all people at least six feet away from the circuit breaker being tested. • Perform tests only after all insulating parts are installed. • Discharge to ground the primary disconnects before handling. These areas can retain a static charge after a hi-pot test. Failure to observe these precautions can result in severe personal injury or death! 5) To insert the circuit breaker into its enclosure, follow the applicable directions provided in the switchgear instruction manual. 6) With the main power off, cycle the circuit breaker several times and check forproper operation. The circuit breaker is now ready for normal operation. 8 © 1993 Square D Company All Rights Reserved
  • 9. Bulletin 6055-11 October, 1993 SECTION 5— INSTALLATION Site Preparation And Refer to the metal-enclosed switchgear instruction bulletin that was shipped Circuit Breaker Installation with your equipment; follow the site preparation and installation instructions found in that manual. “ ∆  ” Œ Racking Port Œ  Front Mechanism Cover Ž Open Lever √ Close Lever  Secondary Disconnect • Handle ≈ Manual Charging Arm Port ∆ Racking Arm ≈ “ Counter ” Open-Close Indicator • Spring Charge-Discharge Indicator • 11 Test Position Interlock √  • 11 Ž Figure 1: Circuit breaker, front view © 1993 Square D Company All Rights Reserved 9
  • 10. Bulletin 6055-11 October, 1993 SECTION 6 — VACUUM CIRCUIT BREAKER DESCRIPTION Vacuum Interrupters Vacuum interrupters (figure 2), mounted vertically within the circuit breaker frame, perform the circuit breaker interruption. Consisting of a pair of butt contacts, one movable and one fixed, interrupters require only a short contact gap for circuit interruption. The resulting high-speed operation allows the entire operating sequence, from fault to clear, to be consistently performed in three cycles or less. Primary Disconnects The primary connection to the associated switchgear is through the six primary disconnects (figure 2) mounted horizontally at the rear of the circuit breaker. Do not subject the primary disconnects to rough treatment. Never use the primary disconnects as handles when maneuvering the breaker. Operating Mechanism The operating mechanism is of the stored energy type. It uses charged springs to perform breaker opening and closing functions. The operating mechanism contains all necessary controls and interlocks. It is mounted at the front of the circuit breaker for easy access during inspection and maintenance. Control Circuit Figure 3 shows a typical schematic diagram for the control circuit. The following paragraphs discuss operation of the control circuit components. The control circuit design may vary, depending upon customer requirements. Always refer to the schematic diagram for the specific equipment in question. Œ ∆ ≈  Œ Primary Disconnect  Shutter Roller Ž Secondary Disconnect √ Code Plate  Ground Contact  ≈ Vacuum Interrupter √ Ž ∆ Racking Arm Figure 2: Circuit breaker, rear view 10 © 1993 Square D Company All Rights Reserved
  • 11. Bulletin 6055-11 October, 1993 1 3 4 7 10 12 14 16 21 23 9 52Y 11 5 7 202 52/a 13 51 53 55 57 59 61 21 12 205 52/b 4 22 203 52/a 52/M 52MR 52Y 3 52/CC 210 52/TC 5 15 9 19 13 23 17 201 209 207 200 52/LC 206 52/b 52/a 52/b 52/a 52/b 52/a 52/b 52MR 52/LS 52Y 52MR 204 8 6 16 10 20 14 24 18 52/a 52MR 7 10 14 52 54 56 58 60 62 2 6 5 9 11 13 15 17 22 24 Charging/Closing Trip Auxiliary Circuit Circuit Contacts Legend Note: Circuit breaker shown in open 52/M Spring Charging Motor position with closing 52MR Motor Relay springs charged 52/LS Closing Springs Limit Switch; Closed When Springs Are Discharged 52Y Anti-Pump Relay 52/CC Closing Coil (Spring Release Coil) 52/TC Tripping Coil 52/a Auxiliary Switch Contact; Open When Circuit Breaker Is In Tripped (Open) Position 52/b Auxiliary Switch Contact; Closed When Circuit Breaker Is In Tripped (Open) Position 52/LC Latch Check Switch Rear View Of Circuit Breaker Control Plug 1 2 3 4 5 6 7 8 9 10 11 12 5 6 7 9 10 — 13 — 14 51 52 53 54 55 56 57 58 — — — 59 60 61 62 13 14 15 16 17 18 19 20 21 22 23 24 Figure 3: Control circuit schematic © 1993 Square D Company All Rights Reserved 11
  • 12. Bulletin 6055-11 October, 1993 Auxiliary Switch The auxiliary switch (figure 4) is a multi-stage switch used to operate circuits that depend on the position of the circuit breaker contacts. The schematic diagram in figure 3 (page 7) illustrates how each auxiliary switch stage interconnects with the circuit breaker circuitry. The stages function as follows: • Three a-type auxiliary contacts connect in series with the trip coil. Because these stages are open when the circuit breaker is in the open position, the auxiliary contacts de-energize the trip coil when the breaker is in the open position. • The b-type contact, connected in series with the closing coil, de-energizes the closing coil when the circuit breaker contacts are in the closed position. • As shown, several a-type and b-type contacts are provided for optional use. Motor Limit Switch The motor limit switch (figure 4) energizes the motor relay (figure 4) when a drive spring charging operation is required. The motor limit switch de-energizes the motor relay when the drive springs (figure 5) reach the fully charged position. As shown in the schematic diagram (figure 3), the motor limit switch is connected in the normally open position. When the drive springs are not in the fully charged position, the motor limit switch is closed. Motor Relay When energized by the closing of the motor limit switch, the motor relay energizes the spring charging motor (figure 4) through a pair of normally open contacts. The motor relay disables the closing coil (figure 5) through a pair of normally closed contacts. ∆ ≈ “ ≈ ∆   ”  Œ Œ Ž Ž √  √ Œ MOC Operator ≈ Motor Relay Œ Return Spring (2 places)  Ratchet Arm  Motor Limit Switch ∆ Anti-Pump Relay  Shock Absorber ≈ Drive Spring (2 places) Ž Opening Coil “ Spring Charging Motor Ž Manual Charging Arm ∆ Closing Coil √ Latch Check Switch ” Return Spring √ Crank Arm (2 places)  Auxiliary Switch Figure 4: Circuit breaker, left front view without Figure 5: Circuit breaker, right front view cover (18 kA, 28 kA, and 29 kA) without cover (18 kA, 28 kA, and 29 kA) 12 © 1993 Square D Company All Rights Reserved
  • 13. Bulletin 6055-11 October, 1993 Anti-Pump Relay If the closing coil circuit (52/CC, figure 3, page 7) is continuously energized, the anti-pump relay (figure 4) ensures that the circuit breaker does not “pump” open and closed in the event that a trip signal is also present. The anti-pump relay performs this function by allowing the closing coil to activate only if: • the circuit is energized • the drive springs are fully charged, and • the motor relay is de-energized The anti-pump relay activates when the close circuit and motor relay are energized. If the close circuit is energized continuously, the anti-pump relay will be latched in the energized position after the motor relay is de-energized by a pair of its own normally open contacts. When the anti-pump relay is energized, a pair of its normally closed contacts, in series with the closing coil, ensure that the closing coil cannot be energized. The closing coil activates only when the closing circuit is de-energized (de-energizing the anti-pump relay), then closed again. Latch Check Switch The latch check switch (figure 4) allows the circuit breaker to be used for instantaneous reclosing. The contacts of the latch check switch connect in series with the closing coil. When the guide cam moves out of its normal position, it activates the latch check switch. The closing circuit cannot be energized until the guide cam fully returns to its normal position and the mechanism is in position to allow a close operation. Closing Spring Interlock An interlock located between the manual trip and close lever at the bottom of the circuit breaker prevents the closing springs from “dumping” when the circuit breaker is closed. An interlock bar slides under the closing lever after the circuit breaker closes and prevents the closing lever from being pushed down. Indicators There are two indicators on the operating mechanism. The open-close indicator (figure 7) designates whether the vacuum interrupter contacts are open or closed. The charge-discharge indicator (figure 7) displays the state (charged or discharged) of the drive springs. Œ Ž  Œ Open-Close Indicator  Manual Charging Arm Ž Charge-Discharge Indicator Figure 6: Circuit breaker, front view without Figure 7: Charging the drive springs cover (37 kA and 41 kA) © 1993 Square D Company All Rights Reserved 13
  • 14. Bulletin 6055-11 October, 1993 SECTION 7 — OPERATING THE CIRCUIT BREAKER Manual Charging To manually charge the drive springs (figure 7, page 9), use the handle supplied with the circuit breaker to move the manual charging arm (figure 7) up and down until the drive springs are fully charged. The drive springs are fully charged when the charge-discharge indicator (figure 7) reads charged and the manual charging arm no longer advances the gear. Slow Closing Feature Occasionally, it may be necessary to manually slow close the circuit breaker. The operating mechanism has a built-in feature for this purpose. Follow the steps below to manually slow close. ! WARNING HAZARD OF BODILY INJURY. Only qualified personnel should perform this operation. Stored energy in springs and sudden operation of mechanisms can cause serious bodily injury if a person touches or comes in close proximity of the mechanism. Failure to observe this precaution can result in personal injury! 1. With the circuit breaker in the open position and the drive springs discharged, slide the manual charging handle onto one of the drive spring brackets (figure 8). Press up on the manual charging handle just enough to off-load the drive spring; remove the upper 1/2" bolt (figure 8). Release the drive spring pressure; remove the spring. Repeat with the other drive spring. 2. Using the manual charging handle as described in the Manual Charging section above, advance the gear until the drive pawl (figure 13, page 13) rides up on the lift cam. Remove the manual charging handle. Œ Manual Charging Handle  1/2" Bolt Ž Drive Spring Œ  Ž  Œ Close Lever  1" Open-End Wrench Œ Figure 8: Removing the closing spring Figure 9: Slow close feature 14 © 1993 Square D Company All Rights Reserved
  • 15. Bulletin 6055-11 October, 1993 Slow Closing Feature (cont.) 3. While pressing down on the close lever (figure 9), use a 1" open-end wrench to rotate the drive shaft until the drive pawl clears the lift cam and once again engages the gear. See figure 9 for use of the wrench. Press down on the wrench to achieve the correct direction of rotation. 4. Release the close lever. Remove the 1" wrench. 5. Continue using the manual charging handle to perform manual charging. The circuit breaker slowly closes with each advance of the gear. Drawout Operation The circuit breaker must be in the open position when it is racked in or out of its cubicle. The racking mechanism (figures 10 and 11) interlocks with the circuit breaker mechanism. This prevents the racking shaft from being turned when the circuit breaker is in the closed position. Racking In Procedure 1. The racking arms (figure 10) must be in the drawout position before inserting the breaker into the cell. In the drawout position, the racking arms extend toward the rear of the breaker and are just below the horizontal. 2. If required, move the racking arms to the drawout position. Follow these steps: a. Open the circuit breaker. b. Insert the racking handle into the racking port (figure 10). c. Rotate the racking handle counterclockwise until the racking mechanism comes to a stop. Do not over-torque. ! WARNING HAZARD OF BODILY INJURY OR EQUIPMENT DAMAGE. When the switchgear is energized, always open and close the circuit breaker and rack the circuit breaker from one position to another with the door closed. Never use force to move the circuit breaker inside the circuit breaker cell. Failure to observe these precautions can result in severe personal injury or death!  Œ Ž Œ Racking Arm Œ Œ Roller In Operating Position  Roller In Test Position Ž Racking Port Figure 10: Racking mechanism in test position Figure 11: Racking mechanism in operating (connected) position © 1993 Square D Company All Rights Reserved 15
  • 16. Bulletin 6055-11 October, 1993 Racking In Procedure (cont.) 3. Insert the circuit breaker into the cell until the rollers on the racking arms come into contact with the channels on the sides of the cell. 4. Rotate the racking handle clockwise until the racking mechanism stops. Do not over-torque. Racking Out Procedure 1. Open the circuit breaker. 2. Insert the racking handle into the racking port. 3. Rotate the racking handle counterclockwise until the racking mechanism stops. Do not over-torque. 4. Press down on the test position interlock (figure 1, page 5) at the lower left front of the circuit breaker; roll the circuit breaker out of the cell. Locking Provision The racking mechanism of the circuit breaker can be locked in either the test or the operating position with a multiple padlock hasp and a padlock, as shown in figure 12. Test Position Operation The secondary disconnect (figure 2, page 6) mounts on a retractable slide so that it can connect to the control circuit of the cell while the cell shutters are down and the primary connections have not been made. This provides a convenient and safe method for electrically testing the operation of the circuit breaker mechanism and control circuit. Test position operation is achieved by following these steps: 1. Insert the circuit breaker into the test position of the cell by following steps 1through 3 of the Racking In Procedure section on page 11. (Do not rack the circuit breaker into the cell.) 2. Pull the secondary disconnect handle (figure 2, page 6) out of its retaining clip; rotate it down so that it protrudes straight out from the circuit breaker. 3. Lift slightly on the secondary disconnect handle and push it into the circuit breaker until the control circuits connect. 4. The control circuit of the circuit breaker is now connected with that of the cell. 5. Retract the secondary disconnect by reversing the above procedure. Figure 12: Racking mechanism padlock provision 16 © 1993 Square D Company All Rights Reserved
  • 17. Bulletin 6055-11 October, 1993 SECTION 8— OPERATING MECHANISM Drive Spring Charging Place the interrupter contacts in the open position; ensure that the drive springs (figure 13) and return springs (figure 5, page 8) are discharged. When power is supplied to the circuit breaker control circuit, the charging motor (figure 13) is energized. The eccentric, mounted on the charging motor shaft, drives the ratchet arm (figure 13) backward and forward. With each forward stroke of the ratchet arm, the spring-loaded drive pawl (figure 13) mounted on the ratchet arm engages a tooth on the gear (figure 13). The gear advances a few degrees clockwise. The drive pawl (figure 13) holds the gear in position while the drive pawl makes its reverse stroke to engage another tooth. The gear is free to rotate on the drive shaft (figure 13). As the gear advances, the drive pin mounted on the gear face engages and rotates the lift cam (figure 13). Because the lift cam is keyed to the drive shaft, the drive shaft rotates with the lift cam. The crank arms (figure 13) rotate with the drive shaft and pull the drive springs to the charged position. As the springloads pass top dead center and attempt to discharge, the closing roller on the drive cam contacts the close cam (figure 14, page 14). The drive springs stay in this charged position until closing is initiated. When the drive springs are fully charged, the charging motor limit switch contacts open, de-energizing the charging motor. Simultaneously, the raised • • 11 “ “ ”  Œ Ž Œ Ratchet Arm   Drive Pawl Ž Lift Cam √ Gear  Drive Shaft ≈ √ ≈ Manual Charging Arm ∆ Mainshaft “ Drive Springs  ” Crank Arm • Closing Coil • 11 Charging Motor ∆ ≈ Figure 13: Circuit breaker mechanism, two views © 1993 Square D Company All Rights Reserved 17
  • 18. Bulletin 6055-11 October, 1993 Drive Spring Charging (cont.) surface on the lift cam lifts the drive pawl above the gear. This allows the charging motor and ratchet arm to coast smoothly to a stop. Closing Operation Once the drive springs are charged, close the circuit breaker by energizing the closing coil (figure 13) or by manually pressing the close lever (figure 9, page 10). ! WARNING HAZARD OF BODILY INJURY OR EQUIPMENT DAMAGE. The manual closing lever should be used only in the test position, or if the power to the circuit breaker has been removed. Failure to observe this precaution can result in personal injury or equipment damage! This disengages the close cam (figure 14) from the closing roller and allows the drive springs to discharge. The discharging drive springs rotate the drive shaft (figure 13) counterclockwise. This rotation also gives the drive cam (figure 14) a counterclockwise rotation. The rotation of the drive cam pushes the drive cam follower (figure 14) down. Linkage with the mainshaft (figure 13) causes a downward motion of the racking arms (figure 14). The resulting upward motion of the rear of the racking arms closes the vacuum interrupter contacts and charges the bias springs (figure 15). √ Œ Œ  Ž ≈  ∆  Œ Close Cam  Drive Cam Ž Drive Cam Roller ” “ √ Guide Cam •  Trip Cam ≈ Drive Cam Follower “E” ∆ Main Link “ Cross Bar Pivot Œ Vacuum Interrupter ” Cross Bar  Bias Spring • Racking Arm Figure 14: Mainshaft mechanism Figure 15: Contact erosion measurement 18 © 1993 Square D Company All Rights Reserved
  • 19. Bulletin 6055-11 October, 1993 Closing Operation (cont.) The counterclockwise rotation of the drive shaft also rotates the lift cam out of contact with the drive pin. Because the gear rotates freely on the drive shaft, the gear remains stationary. The rotation of the lift cam allows the drive pawl to engage the gear. The motor limit switch (figure 4, page 8) energizes the charging motor which once again charges the drive springs. Opening Operation With the return springs charged and the circuit breaker closed, the operating mechanism is ready to perform an opening operation. If the open lever (figure 1, page 5) is pushed or if the opening coil (figure 4, page 8) is energized, the trip cam rotates counterclockwise away from the guide cam (figure 14). The force of the charged return springs pulling up on the mainshaft causes the guide cam to move out toward the front of the mechanism. This allows the drive cam follower to collapse off the top of the drive cam. The mainshaft is pulled up, pulling the front of the racking arms up. The resulting downward motion of the rear of the racking arms opens the vacuum interrupter contacts (figure 15). © 1993 Square D Company All Rights Reserved 19
  • 20. Bulletin 6055-11 October, 1993 SECTION 9 — MAINTENANCE Because of wide variations in operating uses and environments, each operating company should develop a maintenance schedule, based on operating experience, which will ensure proper circuit breaker condition. Until such a schedule is determined, inspect circuit breakers after three years or every 3,000 operations, whichever occurs first. Also inspect circuit breakers after severe fault operations and record any contact erosion. The following paragraphs discuss proper inspection and maintenance procedures. ! WARNING HAZARD OF PERSONAL INJURY OR EQUIPMENT DAMAGE. Always remove the circuit breaker from its cubicle, and discharge the drive springs and return springs, before performing any maintenance or repair work. Failure to observe these precautions could result in personal injury or death, or equipment damage! Vacuum Interrupters To ensure reliable interruption, perform the following two checks: 1. Contact erosion: Any contact erosion results in a reduction of spring overtravel. Contact erosion can be determined by closing the circuit breaker and measuring spring overtravel. Spring overtravel is represented by dimension “E” in figure 15. The difference between this measurement and the original spring overtravel, measured when the interrupter was first put into service, represents contact erosion. Spring overtravel is factory set at 0.210" (5.3 mm) for a new circuit breaker rated 23 kA or less maximum interrupting. For a new circuit breaker rated above 23 kA maximum interrupting, spring overtravel is 0.188" (4.8 mm). The vacuum interrupter reaches the end of its life when spring overtravel has been reduced to 0.085" (2.2 mm) on a circuit breaker rated 23 kA or less maximum interrupting, or 0.060" (1.5 mm) on a circuit breaker rated above 23 kA maximum interrupting. 2. Hi-pot test: Hi-pot test the circuit breaker in accordance with the instructions provided in the Initial Breaker Preparation section, page 4, item 4. If, because of contact erosion or hi-pot test failure, a vacuum bottle must be replaced, order a complete pole assembly (see table 3 on page 16). Vacuum interrupter contacts are sealed using fragile metal bellows and are sensitive to excessive torque and handling. See the caution on page 16. Insulating Surfaces Using a clean, dry cloth, remove all dirt and moisture from insulating parts. 20 © 1993 Square D Company All Rights Reserved
  • 21. Bulletin 6055-11 October, 1993 Mechanism Inspect the entire circuit breaker and operating mechanism for loose hardware and worn or broken parts. Check all wiring for loose connections and damaged insulation. Inspect all bearings and contact surfaces for damage or excessive wear. Lubrication All ball and roller bearings used in these circuit breakers are sealed; they do not require lubrication. The lubrication chart in table 1 gives the location of each lubrication point and the method of lubrication required. Lubricate after 3,000 operations or three years, whichever occurs first. Severe operating conditions may warrant different lubrication intervals and procedures. Variations should be based on the experience of the operating company. Electrical Ensure that all electrical connections are tight and clean. ! WARNING HAZARD OF BODILY INJURY OR EQUIPMENT DAMAGE. Work which requires disassembly of the mechanism or pole assembly must be performed by qualified electrical workers who have access to appropriate adjustment instructions. See section 10 of this manual for these adjustment instructions. When not following these instructions, disassembly and reassembly of this circuit breaker can cause improper operation, resulting in damage to the circuit breaker and injury to the operator. If you have questions, contact the Square D Company, Smyrna service department, at (615) 459-5026. Failure to observe this precaution can result in personal injury or equipment damage! Table 1 Lubrication Chart Method of Lubrication Lubrication Point During Maintenance Period Gear teeth Wipe clean and apply lubricant.* Contact surfaces on guide cams Wipe clean and apply lubricant.* and trip latch Motor eccentric and eccentric roller Wipe clean and apply lubricant to the slot in the ratchet arm.* Silver-plated primary disconnect Wipe clean and apply an extreme contacts and grounding contacts pressure grease, such as Mobilux EP 1, Square D part number 1615-100790. * Use Mobilgrease 28, Square D part number 1615-100950, or equivalent. © 1993 Square D Company All Rights Reserved 21
  • 22. Bulletin 6055-11 October, 1993 SECTION 10 — REPLACEMENT PARTS Minimum Requirements Maintain sufficient replacement parts in stock to ensure prompt replacement of worn, broken, or damaged parts. Tables 2 and 3 list factory-recommended replacement parts. Each replacement part is shipped with complete assembly and adjustment instructions. Because of wide variation in operating uses and environments, the recommended parts are presented only as a minimum requirement. Each operating company should develop its own parts stock, based on operating experience, to maintain proper circuit breaker condition. Ordering Instructions When ordering replacement parts: • Always specify the complete rating information and circuit breaker serial number. • Specify part number, description of part, and the catalog from which this information is taken. Table 2 Table 3 Replacement Parts Pole Assembly Replacement Parts Rated Circuit Description Part No. Voltage Breaker Part No. Charging Motor 44068-505-50 48 Vdc 4.76 kV 29 kA 1200 A 44068-514-50 44068-505-51 125 Vdc 4.76 kV 29 kA 2000A 44068-515-50 44068-505-52 250 Vdc 4.76 kV 41 kA 1200A 44068-514-51 44068-505-51 120 Vac 4.76 kV 41 kA 2000A 44068-515-51 44068-505-52 240 Vac 8.25 kV 33 kA 1200A 44068-514-52 Motor Relay 44068-506-50 48 Vdc 8.25 kV 33 kA 2000A 44068-515-52 44068-506-51 125 Vdc 15.0 kV 18 kA 1200A 44068-514-53 44068-506-52 250 Vdc 15.0 kV 18 kA 2000A 44068-515-53 44068-506-53 120 Vac 15.0 kV 28 kA 1200A 44068-514-54 44068-506-54 240 Vac 15.0 kV 28 kA 2000A 44068-515-54 Anti-Pump Relay 44068-507-50 48 Vdc 15.0 kV 37 kA 1200A 44068-514-55 44068-507-51 125 Vdc 15.0 kV 37 kA 2000A 44068-515-55 44068-507-52 250 Vdc 44068-507-53 120 Vac 44068-507-54 240 Vac Closing Solenoid 44068-508-50 48 Vdc 44068-508-51 125 Vdc 44068-508-52 250 Vdc 44068-508-53 120 Vac 44068-508-54 240 Vac Trip Solenoid 44068-509-50 24 Vdc 44068-509-51 48 Vdc 44068-509-52 125 Vdc 44068-509-53 250 Vdc 44068-509-54 120 Vac 44068-509-55 240 Vac Main Contact (1200A) 44068-516-50 — Main Contact (2000A) 44068-516-51 — Ground Contact 44068-510-50 — Latch Check Switch 44068-511-50 — Control Power Plug Ass’y 44068-503-50 — Auxiliary Switch 44068-512-50 — Closing Spring Limit Switch 44068-513-50 — 22 © 1993 Square D Company All Rights Reserved
  • 23. Bulletin 6055-11 October, 1993 SECTION 11— INSTALLATION AND MAINTENANCE LOG © 1993 Square D Company All Rights Reserved 23
  • 24. Square D Company 330 Weakley Road Smyrna, TN 37167 U.S.A. Order No. 6055IM9207 FP 5M 10/93 Printed in U.S.A. Replaces bulletin dated 4/90 Part No. 6055-11