1. Installation of Oracle Client 10.2.0.1 on Windows 32 bit Machine
Senthilkumaran Thangavelu
How to install Oracle Client in Windows 32 bit Machine?
You can download Oracle Client (Version which will be compatible to Windows 32 bit machine) from
Oracle Web Site.
Note: I downloaded (10.2.0.1) 10201_client_win32.zip from Oracle website
Steps to be followed,
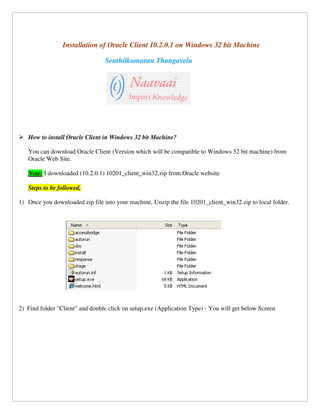
1) Once you downloaded zip file into your machine, Unzip the file 10201_client_win32.zip to local folder.
2) Find folder "Client" and double click on setup.exe (Application Type) - You will get below Screen
2. 3) Choose directory for keeping installer files. This directory is called “Inventory Directory”
Note: Default path will be C:Program FilesOracleInventory
4) You will get below screen for choosing installation type of Oracle Client
We need to choose installation type according to our requirement.
Note: I have chosen Administrator option for installation.
3. 5) You need to specify the OracleHome Name and path details in this screen
Key name for Oracle Home and key Path (Directory where it need to be installed)
Note: I did not change name and path and left it as default
6) This step will do the product specific pre-requisite check
4. This attached file shows what all checks completed.
C:Documents and
SettingsthangaveluDesktopProduct_spec_pre_req_chk.txt
7) Once the "product specific pre-requisite check” is successful , click on Next Button
You will get summary of all above steps as summary window. Click on "Install" button now and it will
kick off installation of Oracle Client on the machine.
5. 8) You will get "Oracle Net Configuration Assistant: Welcome" window during the installation and Oracle
Net configuration Assistant needs to be installed as part of the client installation.
Note: I chose "Typical" Configuration by selecting "Perform Typical Configuration"
6.
7. 9) Once Net Configuration Assistant Successfully installed and Oracle Client installation continues to run.
You will get below window once Oracle Client installation completed.
8. 10) You need to click on "Exit" once Oracle Client installation is done.