SlideShare a Scribd company logo
1 of 6
Download to read offline
TELT Training: Blackboard Fundamentals
Purpose
This document outlines key tasks that instructors new to Blackboard will need to know to get
started in the system, including where to find Blackboard, using common tools and functions,
and how to open up the course to students.

For a video version of this guide, watch: http://www.youtube.com/watch?v=S54vkmSIpBY

I. Getting Started
A. Accessing Blackboard
You can access Blackboard via MyUNSW (http://my.unsw.edu.au). Immediately after
login you will see a Blackboard Logo in the upper right-hand corner of the screen (see
screenshot). Clicking on the logo will take you directly into the system.


B. Accessing Your Courses
Once inside Blackboard you should see a “My Courses List” in the upper right hand corner of
the screen. This area provides links to all the courses to which you have access.


If you do not see courses in this list that should be present, you’ll need to speak
with your school’s TELT Administrator to arrange access. A list of the current TELT
Administrators is available in PDF form at the bottom of this page:

https://my.unsw.edu.au/student/Staff/TELTadministration.html

If you see “Unavailable” listed next to one of your courses, it indicates the course site
has not been released to students yet. This relates to a setting within the course that you as


                                                                                             1
an Instructor have the ability to change. It does NOT reflect an error or problem; instructors
and Tutors are still able to access the course site. For instructions on opening up your
course site, please see Page 6 of this document.

II. Working with Your Course
A. Parts of the Course
Blackboard courses are comprised of a few areas:

   ●   Left Menu (upper left) - Used by students to navigate around the site;
   ●   Control Panel / Course Management Menu (lower left) - Used by Instructors and
       Tutors to administer the course and control settings; not visible to students.
   ●   Main Body (centre) - Portion of the screen where the information/content appears;
       additional tool options/menus are sometimes available here.


Menu Items
The upper-left menu can contain a variety of different items, ranging from pages and tools, to
links, dividers and sub-headings

Types of Pages
Blackboard offers several different types of pages:

   ●   Content Areas - Used to post content, onscreen text, images/videos, and/or links to
       activities or assessments;
   ●   Blank Pages - Used to add a single large block of text or HTML code;
   ●   Module Pages - Allow for use of modules/widgets - such as calendar, tasks, or to-do
       lists - each of which performs a unique function;
   ●   Tool Areas - Performs a specific function, such as a forum or submission box.

External or Internal Links
Links may also be included that reference external sites, such as the Library or the course’s
Lectopia recordings, or internal links to other parts of the course site.


                                                                                                 2
Dividers and Sub-Headings
Dividers and Sub-Headings can be used to add more organisation to the left menu. This can
be especially useful if there are many menu items, or pages of particular importance.

B. Customising Your Course
Edit Mode
In order to make any changes to your course site, you must first activate Edit Mode. This
option is displayed as a switch in the upper right hand corner of the screen. To activate Edit
Mode, toggle the switch to the ON position.


Adding New Pages and Links to the Left Menu
Once Edit Mode has been activated you will see additional options displayed onscreen.
Notably this includes a Blue Plus (+) displayed atop the left-menu. When you hover your
mouse cursor over this button you will be given a list of options you may add to the menu.


Item/Page Visibility
Occasionally you will see symbols displayed beside a menu item. These are important to
note as they mean the pages are not visible to students.


                                                                                             3
●   A square with a slash through it indicates the page is hidden and therefore NOT
    visible to students. In the above screen shot, “Hidden Menu Item” features this icon.

    To release a hidden page, first turn Edit Mode On. Next look for the drop down
    arrows to the right of the link text in the left-menu. Click on it and choose Show Link.

    To make menu items immediately available after creation, tick the Available to Users
    box found on the pop-up.


●   A grey box indicates there is no content in the page. To release a blank page,
    simply add content to it. In the above screen shot, the “Blank Content Area” menu
    item features this icon. Information on adding information to a content area is
    available in the following section of this document.

●   A menu item that displays neither symbol is visible to students.


                                                                                           4
Uploading Course Content and Adding Weblinks
Once you have added a Content Area to the menu, click on the menu item to open the page.
Turn Edit Mode On and you should see a tool bar displayed in the main page that looks like
this:


Uploading Files
To upload a file, hover over Build Content and click on Create Item. On the following screen
assign the item a title and add a description. Then in Section 2 click “Browse My Computer”
and locate the file on your local computer that you wish to upload. If you wish to limit the
time period in which the file is available to students, you may do so in Section 3. Otherwise
leave this information unchanged and the file will become available as soon as you click
Submit.


Editing Files
To make changes to an existing file, turn Edit Mode On and look for the drop down arrows
beside the Item’s Name in the Main Page (see screenshot below). From the drop down list
select Edit, and you will be shown the same form you completed initially. Make any changes
on this page and click Submit.


Adding Weblinks
The option to add a weblink is also found under Build Content. Hover over Build Content
and select URL. On the following page add the weblink and title of the web page. If desired
you may also add a description (Section 2) and/or control the time period in which the link is
visible to students (Section 4). Click Submit when finished and the link will be added to the
page.

This method can be used to distribute links to Lectopia recordings. When you use
Lectopia you should be emailed a system notifications after recordings are available. Simply
copy the link from the email and use it as the URL.


                                                                                             5
III. Course Settings
A. Opening Up Your Course To Students
When you have finished building your course the last and final step is to open the site up to
students. Prior to this students will be unable to access the course area. The course will
also be listed as “unavailable” in the My Courses list on the Blackboard homepage.

To make a course available to students, complete the following steps. For a video
demonstration of this process, see: http://www.youtube.com/watch?v=HJkHW5xu0g0

   1. Login to Blackboard and enter the course;
   2. In the Course Management Menu, expand Customisation and click on Properties;
   3. In “Set Availability” (Section 3), set “Make Course Available” to “Yes.”
   4. In “Course Duration” (Section 4), either select Continuous, or “Select Dates.”
   5. If using Select Dates, designate a Start Date that has already occurred and be sure
      to nominate an End Date. Failing to include both a start date and end date can
      cause major problems, including locking you out of the course.
   6. Click Submit when complete.


IV. Issues or Problems

In the event of any problems or issues with Blackboard, the first point of contact is the IT
Service Desk on 9385 1333 or servicedesk@unsw.edu.au. If possible capture any screen
shots of the issue and/or note any error messages you receive.

Comments or Corrections regarding this document can be emailed to Mike Bogle at
m.bogle@unsw.edu.au


                                                                                                6

More Related Content

More from Mike Bogle

ARTS1091 Wiki Training Session Notes
ARTS1091 Wiki Training Session Notes  ARTS1091 Wiki Training Session Notes
ARTS1091 Wiki Training Session Notes Mike Bogle
 
Hub Summer 2010 Brochure
Hub Summer 2010 BrochureHub Summer 2010 Brochure
Hub Summer 2010 BrochureMike Bogle
 
Session Agenda: Open Learning Frameworks
Session Agenda: Open Learning FrameworksSession Agenda: Open Learning Frameworks
Session Agenda: Open Learning FrameworksMike Bogle
 
Open Education
Open EducationOpen Education
Open EducationMike Bogle
 
Bridging The Divide
Bridging The DivideBridging The Divide
Bridging The DivideMike Bogle
 
Comparative Matrix Of Learning Technologies
Comparative Matrix Of Learning TechnologiesComparative Matrix Of Learning Technologies
Comparative Matrix Of Learning TechnologiesMike Bogle
 
CCK08 Presentation for UNFED
CCK08 Presentation for UNFEDCCK08 Presentation for UNFED
CCK08 Presentation for UNFEDMike Bogle
 
Making SlideShare Slidecasts
Making SlideShare SlidecastsMaking SlideShare Slidecasts
Making SlideShare SlidecastsMike Bogle
 
Reflection On The NMC Virtual Symposium
Reflection On The NMC Virtual SymposiumReflection On The NMC Virtual Symposium
Reflection On The NMC Virtual SymposiumMike Bogle
 
Lively By Google
Lively By GoogleLively By Google
Lively By GoogleMike Bogle
 

More from Mike Bogle (10)

ARTS1091 Wiki Training Session Notes
ARTS1091 Wiki Training Session Notes  ARTS1091 Wiki Training Session Notes
ARTS1091 Wiki Training Session Notes
 
Hub Summer 2010 Brochure
Hub Summer 2010 BrochureHub Summer 2010 Brochure
Hub Summer 2010 Brochure
 
Session Agenda: Open Learning Frameworks
Session Agenda: Open Learning FrameworksSession Agenda: Open Learning Frameworks
Session Agenda: Open Learning Frameworks
 
Open Education
Open EducationOpen Education
Open Education
 
Bridging The Divide
Bridging The DivideBridging The Divide
Bridging The Divide
 
Comparative Matrix Of Learning Technologies
Comparative Matrix Of Learning TechnologiesComparative Matrix Of Learning Technologies
Comparative Matrix Of Learning Technologies
 
CCK08 Presentation for UNFED
CCK08 Presentation for UNFEDCCK08 Presentation for UNFED
CCK08 Presentation for UNFED
 
Making SlideShare Slidecasts
Making SlideShare SlidecastsMaking SlideShare Slidecasts
Making SlideShare Slidecasts
 
Reflection On The NMC Virtual Symposium
Reflection On The NMC Virtual SymposiumReflection On The NMC Virtual Symposium
Reflection On The NMC Virtual Symposium
 
Lively By Google
Lively By GoogleLively By Google
Lively By Google
 

Recently uploaded

TeamStation AI System Report LATAM IT Salaries 2024
TeamStation AI System Report LATAM IT Salaries 2024TeamStation AI System Report LATAM IT Salaries 2024
TeamStation AI System Report LATAM IT Salaries 2024Lonnie McRorey
 
The Ultimate Guide to Choosing WordPress Pros and Cons
The Ultimate Guide to Choosing WordPress Pros and ConsThe Ultimate Guide to Choosing WordPress Pros and Cons
The Ultimate Guide to Choosing WordPress Pros and ConsPixlogix Infotech
 
How to write a Business Continuity Plan
How to write a Business Continuity PlanHow to write a Business Continuity Plan
How to write a Business Continuity PlanDatabarracks
 
Tampa BSides - Chef's Tour of Microsoft Security Adoption Framework (SAF)
Tampa BSides - Chef's Tour of Microsoft Security Adoption Framework (SAF)Tampa BSides - Chef's Tour of Microsoft Security Adoption Framework (SAF)
Tampa BSides - Chef's Tour of Microsoft Security Adoption Framework (SAF)Mark Simos
 
Gen AI in Business - Global Trends Report 2024.pdf
Gen AI in Business - Global Trends Report 2024.pdfGen AI in Business - Global Trends Report 2024.pdf
Gen AI in Business - Global Trends Report 2024.pdfAddepto
 
From Family Reminiscence to Scholarly Archive .
From Family Reminiscence to Scholarly Archive .From Family Reminiscence to Scholarly Archive .
From Family Reminiscence to Scholarly Archive .Alan Dix
 
Time Series Foundation Models - current state and future directions
Time Series Foundation Models - current state and future directionsTime Series Foundation Models - current state and future directions
Time Series Foundation Models - current state and future directionsNathaniel Shimoni
 
"Debugging python applications inside k8s environment", Andrii Soldatenko
"Debugging python applications inside k8s environment", Andrii Soldatenko"Debugging python applications inside k8s environment", Andrii Soldatenko
"Debugging python applications inside k8s environment", Andrii SoldatenkoFwdays
 
Digital Identity is Under Attack: FIDO Paris Seminar.pptx
Digital Identity is Under Attack: FIDO Paris Seminar.pptxDigital Identity is Under Attack: FIDO Paris Seminar.pptx
Digital Identity is Under Attack: FIDO Paris Seminar.pptxLoriGlavin3
 
What is Artificial Intelligence?????????
What is Artificial Intelligence?????????What is Artificial Intelligence?????????
What is Artificial Intelligence?????????blackmambaettijean
 
Sample pptx for embedding into website for demo
Sample pptx for embedding into website for demoSample pptx for embedding into website for demo
Sample pptx for embedding into website for demoHarshalMandlekar2
 
New from BookNet Canada for 2024: BNC CataList - Tech Forum 2024
New from BookNet Canada for 2024: BNC CataList - Tech Forum 2024New from BookNet Canada for 2024: BNC CataList - Tech Forum 2024
New from BookNet Canada for 2024: BNC CataList - Tech Forum 2024BookNet Canada
 
Use of FIDO in the Payments and Identity Landscape: FIDO Paris Seminar.pptx
Use of FIDO in the Payments and Identity Landscape: FIDO Paris Seminar.pptxUse of FIDO in the Payments and Identity Landscape: FIDO Paris Seminar.pptx
Use of FIDO in the Payments and Identity Landscape: FIDO Paris Seminar.pptxLoriGlavin3
 
A Deep Dive on Passkeys: FIDO Paris Seminar.pptx
A Deep Dive on Passkeys: FIDO Paris Seminar.pptxA Deep Dive on Passkeys: FIDO Paris Seminar.pptx
A Deep Dive on Passkeys: FIDO Paris Seminar.pptxLoriGlavin3
 
SIP trunking in Janus @ Kamailio World 2024
SIP trunking in Janus @ Kamailio World 2024SIP trunking in Janus @ Kamailio World 2024
SIP trunking in Janus @ Kamailio World 2024Lorenzo Miniero
 
How AI, OpenAI, and ChatGPT impact business and software.
How AI, OpenAI, and ChatGPT impact business and software.How AI, OpenAI, and ChatGPT impact business and software.
How AI, OpenAI, and ChatGPT impact business and software.Curtis Poe
 
"Subclassing and Composition – A Pythonic Tour of Trade-Offs", Hynek Schlawack
"Subclassing and Composition – A Pythonic Tour of Trade-Offs", Hynek Schlawack"Subclassing and Composition – A Pythonic Tour of Trade-Offs", Hynek Schlawack
"Subclassing and Composition – A Pythonic Tour of Trade-Offs", Hynek SchlawackFwdays
 
WordPress Websites for Engineers: Elevate Your Brand
WordPress Websites for Engineers: Elevate Your BrandWordPress Websites for Engineers: Elevate Your Brand
WordPress Websites for Engineers: Elevate Your Brandgvaughan
 
New from BookNet Canada for 2024: Loan Stars - Tech Forum 2024
New from BookNet Canada for 2024: Loan Stars - Tech Forum 2024New from BookNet Canada for 2024: Loan Stars - Tech Forum 2024
New from BookNet Canada for 2024: Loan Stars - Tech Forum 2024BookNet Canada
 
The Fit for Passkeys for Employee and Consumer Sign-ins: FIDO Paris Seminar.pptx
The Fit for Passkeys for Employee and Consumer Sign-ins: FIDO Paris Seminar.pptxThe Fit for Passkeys for Employee and Consumer Sign-ins: FIDO Paris Seminar.pptx
The Fit for Passkeys for Employee and Consumer Sign-ins: FIDO Paris Seminar.pptxLoriGlavin3
 

Recently uploaded (20)

TeamStation AI System Report LATAM IT Salaries 2024
TeamStation AI System Report LATAM IT Salaries 2024TeamStation AI System Report LATAM IT Salaries 2024
TeamStation AI System Report LATAM IT Salaries 2024
 
The Ultimate Guide to Choosing WordPress Pros and Cons
The Ultimate Guide to Choosing WordPress Pros and ConsThe Ultimate Guide to Choosing WordPress Pros and Cons
The Ultimate Guide to Choosing WordPress Pros and Cons
 
How to write a Business Continuity Plan
How to write a Business Continuity PlanHow to write a Business Continuity Plan
How to write a Business Continuity Plan
 
Tampa BSides - Chef's Tour of Microsoft Security Adoption Framework (SAF)
Tampa BSides - Chef's Tour of Microsoft Security Adoption Framework (SAF)Tampa BSides - Chef's Tour of Microsoft Security Adoption Framework (SAF)
Tampa BSides - Chef's Tour of Microsoft Security Adoption Framework (SAF)
 
Gen AI in Business - Global Trends Report 2024.pdf
Gen AI in Business - Global Trends Report 2024.pdfGen AI in Business - Global Trends Report 2024.pdf
Gen AI in Business - Global Trends Report 2024.pdf
 
From Family Reminiscence to Scholarly Archive .
From Family Reminiscence to Scholarly Archive .From Family Reminiscence to Scholarly Archive .
From Family Reminiscence to Scholarly Archive .
 
Time Series Foundation Models - current state and future directions
Time Series Foundation Models - current state and future directionsTime Series Foundation Models - current state and future directions
Time Series Foundation Models - current state and future directions
 
"Debugging python applications inside k8s environment", Andrii Soldatenko
"Debugging python applications inside k8s environment", Andrii Soldatenko"Debugging python applications inside k8s environment", Andrii Soldatenko
"Debugging python applications inside k8s environment", Andrii Soldatenko
 
Digital Identity is Under Attack: FIDO Paris Seminar.pptx
Digital Identity is Under Attack: FIDO Paris Seminar.pptxDigital Identity is Under Attack: FIDO Paris Seminar.pptx
Digital Identity is Under Attack: FIDO Paris Seminar.pptx
 
What is Artificial Intelligence?????????
What is Artificial Intelligence?????????What is Artificial Intelligence?????????
What is Artificial Intelligence?????????
 
Sample pptx for embedding into website for demo
Sample pptx for embedding into website for demoSample pptx for embedding into website for demo
Sample pptx for embedding into website for demo
 
New from BookNet Canada for 2024: BNC CataList - Tech Forum 2024
New from BookNet Canada for 2024: BNC CataList - Tech Forum 2024New from BookNet Canada for 2024: BNC CataList - Tech Forum 2024
New from BookNet Canada for 2024: BNC CataList - Tech Forum 2024
 
Use of FIDO in the Payments and Identity Landscape: FIDO Paris Seminar.pptx
Use of FIDO in the Payments and Identity Landscape: FIDO Paris Seminar.pptxUse of FIDO in the Payments and Identity Landscape: FIDO Paris Seminar.pptx
Use of FIDO in the Payments and Identity Landscape: FIDO Paris Seminar.pptx
 
A Deep Dive on Passkeys: FIDO Paris Seminar.pptx
A Deep Dive on Passkeys: FIDO Paris Seminar.pptxA Deep Dive on Passkeys: FIDO Paris Seminar.pptx
A Deep Dive on Passkeys: FIDO Paris Seminar.pptx
 
SIP trunking in Janus @ Kamailio World 2024
SIP trunking in Janus @ Kamailio World 2024SIP trunking in Janus @ Kamailio World 2024
SIP trunking in Janus @ Kamailio World 2024
 
How AI, OpenAI, and ChatGPT impact business and software.
How AI, OpenAI, and ChatGPT impact business and software.How AI, OpenAI, and ChatGPT impact business and software.
How AI, OpenAI, and ChatGPT impact business and software.
 
"Subclassing and Composition – A Pythonic Tour of Trade-Offs", Hynek Schlawack
"Subclassing and Composition – A Pythonic Tour of Trade-Offs", Hynek Schlawack"Subclassing and Composition – A Pythonic Tour of Trade-Offs", Hynek Schlawack
"Subclassing and Composition – A Pythonic Tour of Trade-Offs", Hynek Schlawack
 
WordPress Websites for Engineers: Elevate Your Brand
WordPress Websites for Engineers: Elevate Your BrandWordPress Websites for Engineers: Elevate Your Brand
WordPress Websites for Engineers: Elevate Your Brand
 
New from BookNet Canada for 2024: Loan Stars - Tech Forum 2024
New from BookNet Canada for 2024: Loan Stars - Tech Forum 2024New from BookNet Canada for 2024: Loan Stars - Tech Forum 2024
New from BookNet Canada for 2024: Loan Stars - Tech Forum 2024
 
The Fit for Passkeys for Employee and Consumer Sign-ins: FIDO Paris Seminar.pptx
The Fit for Passkeys for Employee and Consumer Sign-ins: FIDO Paris Seminar.pptxThe Fit for Passkeys for Employee and Consumer Sign-ins: FIDO Paris Seminar.pptx
The Fit for Passkeys for Employee and Consumer Sign-ins: FIDO Paris Seminar.pptx
 

Telt Training: Blackboard Fundamentals

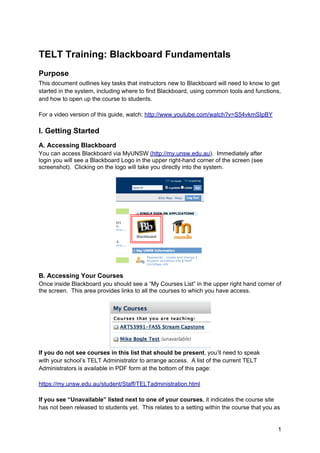
  • 1. TELT Training: Blackboard Fundamentals Purpose This document outlines key tasks that instructors new to Blackboard will need to know to get started in the system, including where to find Blackboard, using common tools and functions, and how to open up the course to students. For a video version of this guide, watch: http://www.youtube.com/watch?v=S54vkmSIpBY I. Getting Started A. Accessing Blackboard You can access Blackboard via MyUNSW (http://my.unsw.edu.au). Immediately after login you will see a Blackboard Logo in the upper right-hand corner of the screen (see screenshot). Clicking on the logo will take you directly into the system. B. Accessing Your Courses Once inside Blackboard you should see a “My Courses List” in the upper right hand corner of the screen. This area provides links to all the courses to which you have access. If you do not see courses in this list that should be present, you’ll need to speak with your school’s TELT Administrator to arrange access. A list of the current TELT Administrators is available in PDF form at the bottom of this page: https://my.unsw.edu.au/student/Staff/TELTadministration.html If you see “Unavailable” listed next to one of your courses, it indicates the course site has not been released to students yet. This relates to a setting within the course that you as 1
  • 2. an Instructor have the ability to change. It does NOT reflect an error or problem; instructors and Tutors are still able to access the course site. For instructions on opening up your course site, please see Page 6 of this document. II. Working with Your Course A. Parts of the Course Blackboard courses are comprised of a few areas: ● Left Menu (upper left) - Used by students to navigate around the site; ● Control Panel / Course Management Menu (lower left) - Used by Instructors and Tutors to administer the course and control settings; not visible to students. ● Main Body (centre) - Portion of the screen where the information/content appears; additional tool options/menus are sometimes available here. Menu Items The upper-left menu can contain a variety of different items, ranging from pages and tools, to links, dividers and sub-headings Types of Pages Blackboard offers several different types of pages: ● Content Areas - Used to post content, onscreen text, images/videos, and/or links to activities or assessments; ● Blank Pages - Used to add a single large block of text or HTML code; ● Module Pages - Allow for use of modules/widgets - such as calendar, tasks, or to-do lists - each of which performs a unique function; ● Tool Areas - Performs a specific function, such as a forum or submission box. External or Internal Links Links may also be included that reference external sites, such as the Library or the course’s Lectopia recordings, or internal links to other parts of the course site. 2
  • 3. Dividers and Sub-Headings Dividers and Sub-Headings can be used to add more organisation to the left menu. This can be especially useful if there are many menu items, or pages of particular importance. B. Customising Your Course Edit Mode In order to make any changes to your course site, you must first activate Edit Mode. This option is displayed as a switch in the upper right hand corner of the screen. To activate Edit Mode, toggle the switch to the ON position. Adding New Pages and Links to the Left Menu Once Edit Mode has been activated you will see additional options displayed onscreen. Notably this includes a Blue Plus (+) displayed atop the left-menu. When you hover your mouse cursor over this button you will be given a list of options you may add to the menu. Item/Page Visibility Occasionally you will see symbols displayed beside a menu item. These are important to note as they mean the pages are not visible to students. 3
  • 4. A square with a slash through it indicates the page is hidden and therefore NOT visible to students. In the above screen shot, “Hidden Menu Item” features this icon. To release a hidden page, first turn Edit Mode On. Next look for the drop down arrows to the right of the link text in the left-menu. Click on it and choose Show Link. To make menu items immediately available after creation, tick the Available to Users box found on the pop-up. ● A grey box indicates there is no content in the page. To release a blank page, simply add content to it. In the above screen shot, the “Blank Content Area” menu item features this icon. Information on adding information to a content area is available in the following section of this document. ● A menu item that displays neither symbol is visible to students. 4
  • 5. Uploading Course Content and Adding Weblinks Once you have added a Content Area to the menu, click on the menu item to open the page. Turn Edit Mode On and you should see a tool bar displayed in the main page that looks like this: Uploading Files To upload a file, hover over Build Content and click on Create Item. On the following screen assign the item a title and add a description. Then in Section 2 click “Browse My Computer” and locate the file on your local computer that you wish to upload. If you wish to limit the time period in which the file is available to students, you may do so in Section 3. Otherwise leave this information unchanged and the file will become available as soon as you click Submit. Editing Files To make changes to an existing file, turn Edit Mode On and look for the drop down arrows beside the Item’s Name in the Main Page (see screenshot below). From the drop down list select Edit, and you will be shown the same form you completed initially. Make any changes on this page and click Submit. Adding Weblinks The option to add a weblink is also found under Build Content. Hover over Build Content and select URL. On the following page add the weblink and title of the web page. If desired you may also add a description (Section 2) and/or control the time period in which the link is visible to students (Section 4). Click Submit when finished and the link will be added to the page. This method can be used to distribute links to Lectopia recordings. When you use Lectopia you should be emailed a system notifications after recordings are available. Simply copy the link from the email and use it as the URL. 5
  • 6. III. Course Settings A. Opening Up Your Course To Students When you have finished building your course the last and final step is to open the site up to students. Prior to this students will be unable to access the course area. The course will also be listed as “unavailable” in the My Courses list on the Blackboard homepage. To make a course available to students, complete the following steps. For a video demonstration of this process, see: http://www.youtube.com/watch?v=HJkHW5xu0g0 1. Login to Blackboard and enter the course; 2. In the Course Management Menu, expand Customisation and click on Properties; 3. In “Set Availability” (Section 3), set “Make Course Available” to “Yes.” 4. In “Course Duration” (Section 4), either select Continuous, or “Select Dates.” 5. If using Select Dates, designate a Start Date that has already occurred and be sure to nominate an End Date. Failing to include both a start date and end date can cause major problems, including locking you out of the course. 6. Click Submit when complete. IV. Issues or Problems In the event of any problems or issues with Blackboard, the first point of contact is the IT Service Desk on 9385 1333 or servicedesk@unsw.edu.au. If possible capture any screen shots of the issue and/or note any error messages you receive. Comments or Corrections regarding this document can be emailed to Mike Bogle at m.bogle@unsw.edu.au 6