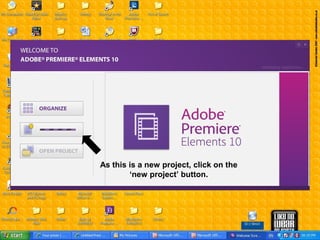
1. As this is a new project, click on the
‘new project’ button.
2. After Premiere has loaded it will ask for
the name of the project as well as
information regarding the quality of the
video and where the video will be saved.
3. To upload media for the
project, click on the “Get
Media” button.
4. It is easier to download media
when it is already saved on
the computer.
5. Select the file(s) you want to use in this
animation/video and click on ‘open’.
6. Once uploading is complete, the
selected file(s) will appear under
“Project”.
7. Drag the clip from the project
board to the “sceneline”.
8. To select the time at which your
video/animation starts, drag the “in-
point/marker” to the time that you
want the file to start playing.
9. You can also choose the time at
which the film ends by dragging the
“end-point/marker” in towards the
clip.
10. If you want to divide the clip into
to two separate clips, the “split
clip” tool can be used to divide the
clip into two at the preferred time.
11. If you click the “properties”
button, a list of effects
terminology will appear.
12. Motion controls the movement within
the clip frame, i.e. the size of the
frame (zoom in and zoom out) and
how the frame moves (left, right,
diagonal, etc.) This is not to be
confused with the actual subjects in
13. Opacity controls the contrast of picture and
is useful for Fade Ins and Outs, especially
when creating a stop-frame-animation where
a lot of pictures are involved and the option of
clicking on the “fade in’ button, is not
possible.
14. Clip Volume sounds self-explanatory,
however, this function is particularly
useful when an individual clip needs to
be louder/softer than the rest. This
function cannot just be achieved by
changing the main video volume.
15. Balance affects the clarity of
subjects/objects in the
image/video, making certain
parts blurry/hazy and other clear.
16. Removing an eye from one of
the effects will hide the effect
and it will no longer be visible
on the clip/image.