SlideShare uma empresa Scribd logo
1 de 12
Baixar para ler offline
FAX-2820
FAX-2910
FAX-2920

                      Before you can use the machine, you must set up the hardware.
                      Please read this “Quick Setup Guide” for the correct setup procedure.
  Quick Setup Guide


                                               Setting Up the Machine


                                               Setup is Complete!

                      Keep this “Quick Setup Guide” and User’s Guide in a convenient place for quick and easy
                      reference at all times.


                                                                                                         Version A
■ Getting Started
        Carton Components
                                                                  11
                        1                                         10
                        2                                         9
                    3                                                                Quick Setup Guide
                                                                  8
                4
                                                                  7
           5                                                      6


                                                                                         User’s Guide
     1. Telephone Handset                  8. Face-down Output Tray
     2. Control Panel Cover                   Support Flap with Extension
     3. ADF Document Output Support        9. Control Panel
     4. Manual Feed Slot                   10. Automatic Document Feeder
     5. Paper Tray                             (ADF)
     6. Power Switch                       11. ADF Document Support
     7. Front Cover                                                                  Telephone Handset


         ADF Document Output                    Drum Unit Assembly                  Curled Handset Cord
               Support                     (including Starter Toner Cartridge)


                Test Sheet                    Accessory Order Form                  Telephone Line Cord
                 (USA only)                       (USA/Canada only)

    Carton components may differ from one country to another.
    Save all packing materials and the carton.


    Warning                       Improper Setup              Note                      User’s Guide
    Indicates warnings that       Alerts you to devices and   Indicates notes and     Indicates reference to the
    must be observed to           operations that are not     useful tips to remember User’s Guide.
    prevent possible              compatible with the         when using the machine.
    personal injury.              machine.

2
Control Panel
FAX-2820, FAX-2910 and FAX-2920 have the same keys.
                               11       10             9       8                         7    6


                                                03/05 15:25   Fax


                       1            2                  3                    4            5
1. One Touch keys                    2. Fax and telephone keys             3. Navigation keys
4. Dial Pad                          5. Start key                          6. Stop/Exit key
7. Reports key                       8. Mode keys                          9. Liquid Crystal Display(LCD)
10. Copy Options key                 11. Shift key

        For the details of the control panel, see "Control panel overview" in Chapter 1 of the User’s Guide.


                                                                                                               3
Setting Up the Machine
      Attach the ADF                                 2 Install the Handset
    1 Document Output                                1   Connect the curled handset cord to the jack
      Support                                            on the machine marked      and the other
                                                         end to the handset.
    1   Pull out the ADF Document Support.


    2   Open the control panel cover by lifting it
        toward the back.
         Control Panel Cover


    3   Attach the ADF Document Output Support.


            ADF Document Output Support


    4   Close the control panel cover.


4
4   Put the drum unit assembly into the
  Install the Drum Unit
3                                                        machine.
  Assembly
1   Open the front cover of the machine.


Front Cover
                                                     5   Close the front cover of the machine.


2   Unpack the drum unit assembly.


3   Gently rock it from side to side several times
    to distribute the toner evenly inside the
    assembly.


                                                                                                 5
Setting Up the Machine
                                                        3   Fan the stack of paper well to avoid paper
      Load Paper in the Paper                               jams and misfeeds.
    4
      Tray
    1   Pull the paper tray completely out of the
        machine.


                                                        4   Put paper in the paper tray.
                                                            Check that the paper is flat in the tray and
                                                            below the maximum paper mark.


                                                                                        Maximum
                                                                                        paper mark
    2   While pressing the paper guide release
        lever, slide the adjusters to fit the paper
        size. Check that the guides are firmly in the
        slots.


                                                        5   Put the paper tray firmly back into the
                                                            machine and unfold the output paper tray
                                                            support flap before you use the machine.


          For Legal size paper, press in the inside
          latches and pull out the back of the paper
          tray.


                                                        Output paper tray
                                                        support flap


                                                               For details on supported paper
                                                               specifications, see “About paper” in Chapter
                                                               1 of the User’s Guide.


6
Install the Power Cord                              If you are sharing one phone line with an
 5                                                     external telephone, connect it as shown
   and Phone Line                                      below.

1    Plug the AC power cord into an AC outlet.
     Turn the power switch on.


2    Connect one end of the telephone line cord
     to the jack on the machine marked LINE
     and the other end to a modular wall jack.


                                                       If you are sharing one phone line with an
                                                       external telephone answering device,
                                                       connect it as shown below.

                                                        Please set the receive mode to External
                                                        TAD.
                                                        For more details, see “Connecting an
                                                        external telephone answering device
                                                        (TAD)” in the Appendix of the User’s
                                                        Guide.


                                                                                           TAD

      Warning
■ The machine must be grounded using a 3-prong
  plug.                                                                                    TAD
■ Since the machine is grounded through the power
  outlet, you can protect yourself from potentially
  hazardous electrical conditions on the telephone
  network by keeping the power cord connected to
  your machine when you connect it to a telephone
  line. Similarly, you can protect yourself when you
  want to move your machine by disconnecting the
  telephone line first and then the power cord.


                                                                                                   7
Setting Up the Machine
     6 Set the Date and Time                                      7 Set your Station ID
    The machine displays the date and time, and if you           You should store your name and fax number to be
    set up the Station ID it will add it to each fax you send.   printed on all fax pages that you send.

    1    Press Menu/Set.                                         1   Press Menu/Set.

    2    Press 0.                                                2   Press 0.

    3    Press 2.                                                3   Press 3.

    4    Enter the last two digits of the year on the            4   Enter your fax number (up to 20 digits) on
         dial pad, and then press Menu/Set.                          the dial pad, and then press Menu/Set.

           Year:2007                                                   Fax:_
         (e.g. Enter 0, 7 for 2007.)
                                                                 5   Enter your telephone number (up to 20
    5    Enter the two digits for the month on the dial              digits) on the dial pad, and then press
         pad, and then press Menu/Set.                               Menu/Set.
                                                                     (If your telephone number and fax number
           Month:03                                                  are the same, enter the same number
         (e.g. Enter 0, 3 for March)                                 again.)

    6    Enter the two digits for the day on the dial
                                                                       Tel:_
         pad, and then press Menu/Set.
                                                                 6   Use the dial pad to enter your name (up to
           Day:01                                                    20 characters), and then press Menu/Set.
         (e.g. Enter 0, 1.)                                            Name:_
    7    Enter the time in 24-hour format on the dial            7   Press Stop/Exit.
         pad, and then press Menu/Set.

           Time:15:25                                                   ■ Refer to the following chart for entering
                                                                          your name.
         (e.g. Enter 1, 5, 2, 5 for 3:25 P.M.)                          ■ If you need to enter a character that is on
                                                                          the same key as the previous character,
    8    Press Stop/Exit.                                                 press     to move the cursor to the right.

            If you make a mistake, press Stop/Exit to
                                                                   Press       One         Two      Three       Four
            start from Step 1.
                                                                    key        time       times     times      times
                                                                     2           A          B         C           2
                                                                     3           D          E         F           3
                                                                     4           G          H          I          4
                                                                     5           J          K          L          5
                                                                     6           M          N         O           6
                                                                     7           P          Q         R          S
                                                                     8           T          U         V           8
                                                                     9           W          X         Y          Z

                                                                           For more details, see “Entering Text” in
                                                                           Appendix B of the User's Guide.


8
8 Select a Receive Mode                                             Select Your Language
                                                                9
There are four possible receive modes: Fax Only,                     (Canada only)
Fax/Tel, Manual and External TAD.
                                                               1    Press Menu/Set.
 Do you use a Distinctive
 Ring subscriber service?
                            Yes
                                     See Distinctive Ring
                                     in Appendix A-1 of
                                                               2    Press 0.
       No                            the User's Guide.
                                                               3    Press 0.
 Are you connecting an external telephone or external
 TAD (telephone answering device) to the machine?              4    Select your language (English or French)
       Yes                                          No              by using       or      , and then press
 Are you using the voice                                            Menu/Set.
 message function of your
 external TAD (telephone                                             Language:English
 answering device)?
        No                                                     5    Press Stop/Exit.
    Do you want the machine to answer fax and
    telephone calls automatically?
                  Yes
        Do you want to use the machine for fax only?
                                                               10 Set the LCD Contrast
                                  Fax Only                     You can change the contrast to help the LCD look
                        Yes       Your machine                 lighter or darker.
                                  automatically answers
                                  every call as a fax.         1    Press Menu/Set.
                 No
                                  Fax/Tel
                                  Your machine controls
                                                               2    Press 1.
                                  the line and
                                  automatically answers        3    Press 7.
                                  every call. If the call is
                                  not a fax, the phone will    4    Press      or         to Light or Dark.
                                  ring for you to pick up           Press Menu/Set.
                                  the call.
                 No
                                  Manual                       5    Press Stop/Exit.
                                  You control the phone
                                  line and must answer
                                  every call yourself.
                Yes
                                  External TAD
                                  Your external telephone
                                  answering device (TAD)
                                  automatically answers
                                  every call. Voice
                                  messages are stored on
                                  the external TAD. Fax
                                  messages are printed.

Choose the Receive Mode which best suits your
needs.

1   Press Menu/Set.
2   Press 0.
3   Press 1.
4   Press      or             to select the mode.
    Press Menu/Set.
5   Press Stop/Exit.
        For more details, see “Setup Receive” in
        Chapter 4 of the User's Guide.

                                                                                                                  9
Setting Up the Machine
        Send the Product                                    Using the FAX as a
     11 Registration and Test                               Printer or for PC-FAX
                                                         12
        Sheet (USA Only)                                    Send (FAX-2820 and
     1   Fill out the Product Registration and Test
                                                            FAX-2920 only)
         Sheet.                                          You can download the Brother Printer Driver and
                                                         PC-FAX Send driver from the Brother Solutions
                                                         Center for use with FAX-2820 and FAX-2920.
                                                         Visit us at:


                                                                    http://solutions.brother.com


                                                                ■ Please download and install the software
                                                                  first before connecting the machine to
                                                                  your computer with the USB cable.
     2   Place the sheet face down in the Automatic             ■ You must use the appropriate USB 2.0
         Document Feeder.                                         interface cable. If you don’t have it, please
                                                                  purchase a USB 2.0 interface cable that is
                                                                  no longer than 6 feet long (2 meters).


           Make sure        (Fax) is illuminated in
           Green.

     3   Enter the toll-free fax number:
         1-877-268-9575.

     4   Press Start.

           You will receive a confirmation fax of your
           Product Registration.


           You can also register your product online
           going to www.brother.com/registration


10
■ Consumables
    Replacement Consumables
When the time comes to replace consumables, an error message will be indicated on the LCD.
For more information about the consumables for your printer, visit http://solutions.brother.com
or contact your local Brother re-seller.

                      Drum Unit                                                   Toner

                        DR-350                                                   TN-350


Trademarks
The Brother logo is a registered trademark of Brother Industries, Ltd.
Brother is a registered trademark of Brother Industries, Ltd.
All other brand and product names mentioned in this manual are registered trademarks of their respective
companies.

Compilation and Publication
Under the supervision of Brother Industries Ltd., this manual has been compiled and published, covering the latest
product descriptions and specifications.
The contents of this manual and the specifications of this product are subject to change without notice.
Brother reserves the right to make changes without notice in the specifications and materials contained herein and
shall not be responsible for any damages (including consequential) caused by reliance on the materials presented,
including but not limited to typographical and other errors relating to the publication.
This product is designed for use in a Professional Environment.

©2006 Brother Industries, Ltd. All rights reserved.
                                                                                                                     11
USA/CAN

Mais conteúdo relacionado

Destaque

NCL Trumpeter Dinner: Sponsorship Information
NCL Trumpeter Dinner: Sponsorship InformationNCL Trumpeter Dinner: Sponsorship Information
NCL Trumpeter Dinner: Sponsorship Informationnationalconsumersleague
 
GEOG8260.10, Eliminating chartjunk
GEOG8260.10, Eliminating chartjunkGEOG8260.10, Eliminating chartjunk
GEOG8260.10, Eliminating chartjunkScott St. George
 
Creative Commons and the Department of Labor US$2 Billion Grant Program
Creative Commons and the Department of Labor US$2 Billion Grant ProgramCreative Commons and the Department of Labor US$2 Billion Grant Program
Creative Commons and the Department of Labor US$2 Billion Grant ProgramCable Green
 
Rt11 preliminary conf prog lr
Rt11 preliminary conf prog lrRt11 preliminary conf prog lr
Rt11 preliminary conf prog lrsugarmills
 
Vinhomes Central Park - The Central 1
Vinhomes Central Park - The Central 1Vinhomes Central Park - The Central 1
Vinhomes Central Park - The Central 1Muathuenha
 
Why Social Media Projects Fail?! – A European Perspective
Why Social Media Projects Fail?! – A European PerspectiveWhy Social Media Projects Fail?! – A European Perspective
Why Social Media Projects Fail?! – A European PerspectiveBSI
 

Destaque (7)

NCL Trumpeter Dinner: Sponsorship Information
NCL Trumpeter Dinner: Sponsorship InformationNCL Trumpeter Dinner: Sponsorship Information
NCL Trumpeter Dinner: Sponsorship Information
 
GEOG8260.10, Eliminating chartjunk
GEOG8260.10, Eliminating chartjunkGEOG8260.10, Eliminating chartjunk
GEOG8260.10, Eliminating chartjunk
 
Winter Cover Crops & Vinegar for Weed Control
Winter Cover Crops & Vinegar for Weed ControlWinter Cover Crops & Vinegar for Weed Control
Winter Cover Crops & Vinegar for Weed Control
 
Creative Commons and the Department of Labor US$2 Billion Grant Program
Creative Commons and the Department of Labor US$2 Billion Grant ProgramCreative Commons and the Department of Labor US$2 Billion Grant Program
Creative Commons and the Department of Labor US$2 Billion Grant Program
 
Rt11 preliminary conf prog lr
Rt11 preliminary conf prog lrRt11 preliminary conf prog lr
Rt11 preliminary conf prog lr
 
Vinhomes Central Park - The Central 1
Vinhomes Central Park - The Central 1Vinhomes Central Park - The Central 1
Vinhomes Central Park - The Central 1
 
Why Social Media Projects Fail?! – A European Perspective
Why Social Media Projects Fail?! – A European PerspectiveWhy Social Media Projects Fail?! – A European Perspective
Why Social Media Projects Fail?! – A European Perspective
 

Semelhante a All Sf Fax Qsg Us A

Aerocut Nano Creaser Bindery Equipment Machine Operation Manual - PrintFinish...
Aerocut Nano Creaser Bindery Equipment Machine Operation Manual - PrintFinish...Aerocut Nano Creaser Bindery Equipment Machine Operation Manual - PrintFinish...
Aerocut Nano Creaser Bindery Equipment Machine Operation Manual - PrintFinish...Print Finish
 
SBARCO T4 라벨프린터 열전사 감열 데스크탑 바코드프린터 매뉴얼
SBARCO T4 라벨프린터 열전사 감열 데스크탑 바코드프린터 매뉴얼SBARCO T4 라벨프린터 열전사 감열 데스크탑 바코드프린터 매뉴얼
SBARCO T4 라벨프린터 열전사 감열 데스크탑 바코드프린터 매뉴얼HION IT
 
세우프린터 SEWOO LK-B30 열전사감열 데스크탑 바코드프린터
세우프린터 SEWOO LK-B30 열전사감열 데스크탑 바코드프린터세우프린터 SEWOO LK-B30 열전사감열 데스크탑 바코드프린터
세우프린터 SEWOO LK-B30 열전사감열 데스크탑 바코드프린터HION IT
 
User Manual for ICON G8 Plus
User Manual for ICON G8 PlusUser Manual for ICON G8 Plus
User Manual for ICON G8 PlusTVC Skyshop
 
Toshiba printer Project
Toshiba printer ProjectToshiba printer Project
Toshiba printer ProjectTue Stump
 
Manual (en) max m7 pro
Manual (en) max m7 proManual (en) max m7 pro
Manual (en) max m7 profotbalist1968
 
Vodafone Smart Tab N8 Manual/User Guide
Vodafone Smart Tab N8 Manual/User GuideVodafone Smart Tab N8 Manual/User Guide
Vodafone Smart Tab N8 Manual/User Guidemanualsheet
 
Dukane Airslate AS3A usermanual
Dukane Airslate AS3A  usermanualDukane Airslate AS3A  usermanual
Dukane Airslate AS3A usermanualDukaneAVMarketing
 
Ultimaker original user_manual
Ultimaker original user_manualUltimaker original user_manual
Ultimaker original user_manualFranck Lecluse
 
Audiomonster Manual
Audiomonster ManualAudiomonster Manual
Audiomonster ManualZubair Anjum
 
Plantronics savi office wo200 over the ear headset user guide
Plantronics savi office wo200 over the ear headset user guidePlantronics savi office wo200 over the ear headset user guide
Plantronics savi office wo200 over the ear headset user guidebest4systems
 
Gt i8190 um-dtm_jellybean_eng_rev.1.0_121204
Gt i8190 um-dtm_jellybean_eng_rev.1.0_121204Gt i8190 um-dtm_jellybean_eng_rev.1.0_121204
Gt i8190 um-dtm_jellybean_eng_rev.1.0_121204LostSaint
 
Clmd4 a frontservicesg7_8
Clmd4 a frontservicesg7_8Clmd4 a frontservicesg7_8
Clmd4 a frontservicesg7_8marilynbristol3
 
Topaz Connectivity Pack User Guide
Topaz Connectivity Pack User GuideTopaz Connectivity Pack User Guide
Topaz Connectivity Pack User Guidemhobren
 

Semelhante a All Sf Fax Qsg Us A (20)

Aerocut Nano Creaser Bindery Equipment Machine Operation Manual - PrintFinish...
Aerocut Nano Creaser Bindery Equipment Machine Operation Manual - PrintFinish...Aerocut Nano Creaser Bindery Equipment Machine Operation Manual - PrintFinish...
Aerocut Nano Creaser Bindery Equipment Machine Operation Manual - PrintFinish...
 
SBARCO T4 라벨프린터 열전사 감열 데스크탑 바코드프린터 매뉴얼
SBARCO T4 라벨프린터 열전사 감열 데스크탑 바코드프린터 매뉴얼SBARCO T4 라벨프린터 열전사 감열 데스크탑 바코드프린터 매뉴얼
SBARCO T4 라벨프린터 열전사 감열 데스크탑 바코드프린터 매뉴얼
 
세우프린터 SEWOO LK-B30 열전사감열 데스크탑 바코드프린터
세우프린터 SEWOO LK-B30 열전사감열 데스크탑 바코드프린터세우프린터 SEWOO LK-B30 열전사감열 데스크탑 바코드프린터
세우프린터 SEWOO LK-B30 열전사감열 데스크탑 바코드프린터
 
User Manual for ICON G8 Plus
User Manual for ICON G8 PlusUser Manual for ICON G8 Plus
User Manual for ICON G8 Plus
 
C01124007
C01124007C01124007
C01124007
 
Toshiba printer Project
Toshiba printer ProjectToshiba printer Project
Toshiba printer Project
 
U325u en 7 (1)
U325u en 7 (1)U325u en 7 (1)
U325u en 7 (1)
 
Reloj
RelojReloj
Reloj
 
Reloj
RelojReloj
Reloj
 
Manual (en) max m7 pro
Manual (en) max m7 proManual (en) max m7 pro
Manual (en) max m7 pro
 
Vodafone Smart Tab N8 Manual/User Guide
Vodafone Smart Tab N8 Manual/User GuideVodafone Smart Tab N8 Manual/User Guide
Vodafone Smart Tab N8 Manual/User Guide
 
Dukane Airslate AS3A usermanual
Dukane Airslate AS3A  usermanualDukane Airslate AS3A  usermanual
Dukane Airslate AS3A usermanual
 
Ultimaker original user_manual
Ultimaker original user_manualUltimaker original user_manual
Ultimaker original user_manual
 
Audiomonster Manual
Audiomonster ManualAudiomonster Manual
Audiomonster Manual
 
Plantronics savi office wo200 over the ear headset user guide
Plantronics savi office wo200 over the ear headset user guidePlantronics savi office wo200 over the ear headset user guide
Plantronics savi office wo200 over the ear headset user guide
 
Manual sony-yendo-walkman-w150
Manual sony-yendo-walkman-w150Manual sony-yendo-walkman-w150
Manual sony-yendo-walkman-w150
 
Gt i8190 um-dtm_jellybean_eng_rev.1.0_121204
Gt i8190 um-dtm_jellybean_eng_rev.1.0_121204Gt i8190 um-dtm_jellybean_eng_rev.1.0_121204
Gt i8190 um-dtm_jellybean_eng_rev.1.0_121204
 
Clmd4 a frontservicesg7_8
Clmd4 a frontservicesg7_8Clmd4 a frontservicesg7_8
Clmd4 a frontservicesg7_8
 
Topaz Connectivity Pack User Guide
Topaz Connectivity Pack User GuideTopaz Connectivity Pack User Guide
Topaz Connectivity Pack User Guide
 
ксерокс
ксероксксерокс
ксерокс
 

All Sf Fax Qsg Us A

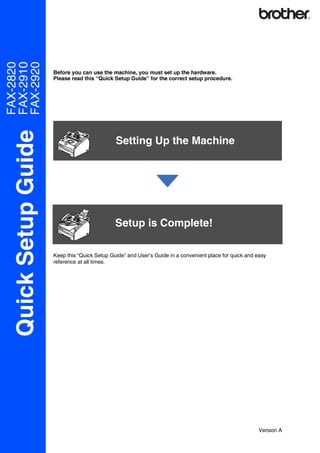
  • 1. FAX-2820 FAX-2910 FAX-2920 Before you can use the machine, you must set up the hardware. Please read this “Quick Setup Guide” for the correct setup procedure. Quick Setup Guide Setting Up the Machine Setup is Complete! Keep this “Quick Setup Guide” and User’s Guide in a convenient place for quick and easy reference at all times. Version A
  • 2. ■ Getting Started Carton Components 11 1 10 2 9 3 Quick Setup Guide 8 4 7 5 6 User’s Guide 1. Telephone Handset 8. Face-down Output Tray 2. Control Panel Cover Support Flap with Extension 3. ADF Document Output Support 9. Control Panel 4. Manual Feed Slot 10. Automatic Document Feeder 5. Paper Tray (ADF) 6. Power Switch 11. ADF Document Support 7. Front Cover Telephone Handset ADF Document Output Drum Unit Assembly Curled Handset Cord Support (including Starter Toner Cartridge) Test Sheet Accessory Order Form Telephone Line Cord (USA only) (USA/Canada only) Carton components may differ from one country to another. Save all packing materials and the carton. Warning Improper Setup Note User’s Guide Indicates warnings that Alerts you to devices and Indicates notes and Indicates reference to the must be observed to operations that are not useful tips to remember User’s Guide. prevent possible compatible with the when using the machine. personal injury. machine. 2
  • 3. Control Panel FAX-2820, FAX-2910 and FAX-2920 have the same keys. 11 10 9 8 7 6 03/05 15:25 Fax 1 2 3 4 5 1. One Touch keys 2. Fax and telephone keys 3. Navigation keys 4. Dial Pad 5. Start key 6. Stop/Exit key 7. Reports key 8. Mode keys 9. Liquid Crystal Display(LCD) 10. Copy Options key 11. Shift key For the details of the control panel, see "Control panel overview" in Chapter 1 of the User’s Guide. 3
  • 4. Setting Up the Machine Attach the ADF 2 Install the Handset 1 Document Output 1 Connect the curled handset cord to the jack Support on the machine marked and the other end to the handset. 1 Pull out the ADF Document Support. 2 Open the control panel cover by lifting it toward the back. Control Panel Cover 3 Attach the ADF Document Output Support. ADF Document Output Support 4 Close the control panel cover. 4
  • 5. 4 Put the drum unit assembly into the Install the Drum Unit 3 machine. Assembly 1 Open the front cover of the machine. Front Cover 5 Close the front cover of the machine. 2 Unpack the drum unit assembly. 3 Gently rock it from side to side several times to distribute the toner evenly inside the assembly. 5
  • 6. Setting Up the Machine 3 Fan the stack of paper well to avoid paper Load Paper in the Paper jams and misfeeds. 4 Tray 1 Pull the paper tray completely out of the machine. 4 Put paper in the paper tray. Check that the paper is flat in the tray and below the maximum paper mark. Maximum paper mark 2 While pressing the paper guide release lever, slide the adjusters to fit the paper size. Check that the guides are firmly in the slots. 5 Put the paper tray firmly back into the machine and unfold the output paper tray support flap before you use the machine. For Legal size paper, press in the inside latches and pull out the back of the paper tray. Output paper tray support flap For details on supported paper specifications, see “About paper” in Chapter 1 of the User’s Guide. 6
  • 7. Install the Power Cord If you are sharing one phone line with an 5 external telephone, connect it as shown and Phone Line below. 1 Plug the AC power cord into an AC outlet. Turn the power switch on. 2 Connect one end of the telephone line cord to the jack on the machine marked LINE and the other end to a modular wall jack. If you are sharing one phone line with an external telephone answering device, connect it as shown below. Please set the receive mode to External TAD. For more details, see “Connecting an external telephone answering device (TAD)” in the Appendix of the User’s Guide. TAD Warning ■ The machine must be grounded using a 3-prong plug. TAD ■ Since the machine is grounded through the power outlet, you can protect yourself from potentially hazardous electrical conditions on the telephone network by keeping the power cord connected to your machine when you connect it to a telephone line. Similarly, you can protect yourself when you want to move your machine by disconnecting the telephone line first and then the power cord. 7
  • 8. Setting Up the Machine 6 Set the Date and Time 7 Set your Station ID The machine displays the date and time, and if you You should store your name and fax number to be set up the Station ID it will add it to each fax you send. printed on all fax pages that you send. 1 Press Menu/Set. 1 Press Menu/Set. 2 Press 0. 2 Press 0. 3 Press 2. 3 Press 3. 4 Enter the last two digits of the year on the 4 Enter your fax number (up to 20 digits) on dial pad, and then press Menu/Set. the dial pad, and then press Menu/Set. Year:2007 Fax:_ (e.g. Enter 0, 7 for 2007.) 5 Enter your telephone number (up to 20 5 Enter the two digits for the month on the dial digits) on the dial pad, and then press pad, and then press Menu/Set. Menu/Set. (If your telephone number and fax number Month:03 are the same, enter the same number (e.g. Enter 0, 3 for March) again.) 6 Enter the two digits for the day on the dial Tel:_ pad, and then press Menu/Set. 6 Use the dial pad to enter your name (up to Day:01 20 characters), and then press Menu/Set. (e.g. Enter 0, 1.) Name:_ 7 Enter the time in 24-hour format on the dial 7 Press Stop/Exit. pad, and then press Menu/Set. Time:15:25 ■ Refer to the following chart for entering your name. (e.g. Enter 1, 5, 2, 5 for 3:25 P.M.) ■ If you need to enter a character that is on the same key as the previous character, 8 Press Stop/Exit. press to move the cursor to the right. If you make a mistake, press Stop/Exit to Press One Two Three Four start from Step 1. key time times times times 2 A B C 2 3 D E F 3 4 G H I 4 5 J K L 5 6 M N O 6 7 P Q R S 8 T U V 8 9 W X Y Z For more details, see “Entering Text” in Appendix B of the User's Guide. 8
  • 9. 8 Select a Receive Mode Select Your Language 9 There are four possible receive modes: Fax Only, (Canada only) Fax/Tel, Manual and External TAD. 1 Press Menu/Set. Do you use a Distinctive Ring subscriber service? Yes See Distinctive Ring in Appendix A-1 of 2 Press 0. No the User's Guide. 3 Press 0. Are you connecting an external telephone or external TAD (telephone answering device) to the machine? 4 Select your language (English or French) Yes No by using or , and then press Are you using the voice Menu/Set. message function of your external TAD (telephone Language:English answering device)? No 5 Press Stop/Exit. Do you want the machine to answer fax and telephone calls automatically? Yes Do you want to use the machine for fax only? 10 Set the LCD Contrast Fax Only You can change the contrast to help the LCD look Yes Your machine lighter or darker. automatically answers every call as a fax. 1 Press Menu/Set. No Fax/Tel Your machine controls 2 Press 1. the line and automatically answers 3 Press 7. every call. If the call is not a fax, the phone will 4 Press or to Light or Dark. ring for you to pick up Press Menu/Set. the call. No Manual 5 Press Stop/Exit. You control the phone line and must answer every call yourself. Yes External TAD Your external telephone answering device (TAD) automatically answers every call. Voice messages are stored on the external TAD. Fax messages are printed. Choose the Receive Mode which best suits your needs. 1 Press Menu/Set. 2 Press 0. 3 Press 1. 4 Press or to select the mode. Press Menu/Set. 5 Press Stop/Exit. For more details, see “Setup Receive” in Chapter 4 of the User's Guide. 9
  • 10. Setting Up the Machine Send the Product Using the FAX as a 11 Registration and Test Printer or for PC-FAX 12 Sheet (USA Only) Send (FAX-2820 and 1 Fill out the Product Registration and Test FAX-2920 only) Sheet. You can download the Brother Printer Driver and PC-FAX Send driver from the Brother Solutions Center for use with FAX-2820 and FAX-2920. Visit us at: http://solutions.brother.com ■ Please download and install the software first before connecting the machine to your computer with the USB cable. 2 Place the sheet face down in the Automatic ■ You must use the appropriate USB 2.0 Document Feeder. interface cable. If you don’t have it, please purchase a USB 2.0 interface cable that is no longer than 6 feet long (2 meters). Make sure (Fax) is illuminated in Green. 3 Enter the toll-free fax number: 1-877-268-9575. 4 Press Start. You will receive a confirmation fax of your Product Registration. You can also register your product online going to www.brother.com/registration 10
  • 11. ■ Consumables Replacement Consumables When the time comes to replace consumables, an error message will be indicated on the LCD. For more information about the consumables for your printer, visit http://solutions.brother.com or contact your local Brother re-seller. Drum Unit Toner DR-350 TN-350 Trademarks The Brother logo is a registered trademark of Brother Industries, Ltd. Brother is a registered trademark of Brother Industries, Ltd. All other brand and product names mentioned in this manual are registered trademarks of their respective companies. Compilation and Publication Under the supervision of Brother Industries Ltd., this manual has been compiled and published, covering the latest product descriptions and specifications. The contents of this manual and the specifications of this product are subject to change without notice. Brother reserves the right to make changes without notice in the specifications and materials contained herein and shall not be responsible for any damages (including consequential) caused by reliance on the materials presented, including but not limited to typographical and other errors relating to the publication. This product is designed for use in a Professional Environment. ©2006 Brother Industries, Ltd. All rights reserved. 11