SlideShare uma empresa Scribd logo
1 de 9
Baixar para ler offline
TECHNIQUE
     ALL LEVELS | METAL


                                      Microfasteners are
                                      manufactured in various
                                      metals and sizes.


             The Nuts & Bolts
           of Threaded Connections
 Learn how to use tap and die tools to make cold connections in jewelry.
                                                                             by Jill L. Erickson


T
        here are times when you want to connect two                                          convenient for you to switch out design elements in a
        components but not necessarily permanently.                                          piece of jewelry, make repairs, and add moveable parts.
        Or, maybe you want to attach a somewhat fragile                                      And, of course, they look cool.
component that wouldn’t withstand the pressure of                                                How do you achieve the nut-and-bolt connection?
a rivet. What you need in these scenarios is a more                                          With tap and die tools. Yes, there’s a learning curve.
forgiving cold connection: the nut-and-bolt connection.                                      You’ll have to master the art of using miniature tap and
Think of the versatility: Threaded connections allow you                                     die tools and reading measurement charts. But it’s worth
to disassemble components, giving you easy access to                                         the effort. There’s nothing quite like the oomph and
them for cleaning. Threaded connections also make it                                         options that nuts and bolts bring to jewelry designs.

                          © 2010 Kalmbach Publishing Co. This material may not be reproduced in any form
64      Art Jewelry   ■   May 2010
                          without permission from the publisher. www.ArtJewelryMag.com
To prevent taps and
                                                                                            threading dies from
Meet the tools                                                                              binding or breaking
                                                                                            as you use them to
In this section, we’ll introduce you to typical tap and die tools and walk you              cut threads, you must
through three basic things you can do with these tools: make a hole without                 keep them lubricated.
threads, “tap” a hole (make a hole with threads), and “thread” a rod (use a die to
make threads on a wire/rod). For more terminology, check out the “Threaded
Connections At-A-Glance Glossary,” page 66.


                                                                                            Threadless holes
                                                                                            You don’t always have to
                                                                                            thread a hole in order to
                                                                                            connect pieces with nuts
                                                                                            and bolts. The hole just

                          +                        +                               =        needs to be the proper
                                                                                            diameter, and you’ll need
                                                                                            to add a washer to each
                                                                                            side of the assembly to
                                                                                            make sure the connec-
                                                                                            tion is secure.
                                  Clearance drill bit
         Flex shaft                                                Nut driver


                                             or                                             Tapped holes
                                                                                            (threaded holes)
                                                                                            Threaded holes engage
                                                                                            the threads of a bolt.
                                                              Tap wrench and tap
                                                                                            You can secure this kind

                      +                      or                                    =        of connection with just
                                                                                            a nut at the back of
                                                                                            your assembly.

                                                                      T-handle tap holder
                                                                      and tap


Flex shaft and
tap drill bit           E-Z Tap and Die Holder and tap


                                                                                            Threaded rods
                               E-Z Tap and Die                                              Making your own
                               Holder and                                                   threaded rods (bolts)
                               threading die
                                                                                            is optional. You can

              +                                   or                                 =      buy premachined bolts
                                                                                            (and corresponding nuts).
                                                                                            If you make your own
                                                                            Die stock and   threaded rod for bolts,
                                                                            threading die   you can customize the
                                                                                            diameter and length to
      Wire/                                                                                 fit your design.
      rod

                                                                                                              65
Terminology                                                                                             Nuts
Threaded connections are all about the functional beauty of the ascending spiral.
When a spiral is cut into a metal hole (tapping) or cut around a piece of rod (thread-
ing), you’ve got the makings of nuts and bolts. First, though, it’s helpful to get
acquainted with the vocabulary and tools associated with these cold connections.
                                                                                                                              Washers
threaded connections
at-a-glance glossary
Back off To turn a tap                Kerf Slit or notch made       Pilot hole Drilled
or threading die counter-             by a saw blade; some bolt     opening made to help
clockwise to allow for the            heads have a slit to accom-   guide a tap as it cuts            Bolts
removal of swarf and to               modate a screwdriver          threads into the metal;
prevent overstressing or                                            pilot holes are smaller
                                      Lubricant Oil used to
breaking the tool                                                   than the tap
                                      help prevent taps and
Bench vise Tool that                  threading dies from           Strip To damage or tear
clamps to a workbench                 binding as they cut metal     the threads of a nut, bolt,        Hex-head               Round
and has two adjustable                                              or threading die
                                      Machinist’s square
jaws for gripping objects
                                      Tool used to measure          Swarf Metal fragments
Bolt Threaded rod with a              a 90° angle                   created when metal is cut
head on one end; paired                                             or ground                                                             Fillister
                                      National Coarse (N/C)
with a nut                                                                                                          Flat
                                      U.S. measurement system       Tap Tool used to cut
Clearance drill bit Cuts              for thread sizes used in      threads into the wall of
a hole that is just large             general-purpose applica-      a hole
enough for a bolt to pass             tions. The “N” relates to
through without the bolt’s            the diameter of the bolt or
                                                                    Tap drill bit Cuts a pilot
                                                                    hole that is proportionate          ordering tools
threads touching the walls            screw; “C” identifies the
of the hole                           number of threads per
                                                                    in size to your selected tap        and supplies
                                      inch. For example, N/C        Tap drill chart Identifies          When you’re ordering tools and
Countersink To set the
                                      10/24 is the same diameter    the measurements of
head of a bolt or screw                                                                                 supplies, make sure to match sizes of
                                      as N/C 10/32, but the         compatible taps, threading
flush with or below the                                                                                 tap drill bits, which make pilot holes,
                                      10/24 has fewer threads       dies, tap drill bits, and wire/
surface of a pilot hole;                                                                                to the taps that cut threads into
                                      than the 10/32.               rod stock
slightly enlarging the                                                                                  the inside walls of pilot holes. Also,
outer edge of a pilot hole            National Fine Series (N/F)    Tap wrench/T-handle
                                                                                                        threading dies, which cut threads on
with a ball or bud bur                U.S. measurement system       tap Devices that hold a
                                                                    tap securely, acting as a           the outside of rod or wire, will need
allows you to countersink             for thread sizes used in
the bolt or screw                     precision applications like   handle during tapping               to fit the gauge of your rod or wire.
                                      jewelry making. The “N”                                               Suppliers that sell taps, dies, tap
Die see threading die                                               Tapping Cutting threads
                                      number can be a relative                                          drill bits, and clearance drill bits can
                                                                    into the walls of a pilot hole
Die stock Tool that holds             number like “0” or “00.”                                          help you select matching sets of
a threading die, acting as a          N/F sizes have more           Threaded rod Rod that’s             tools. Most suppliers have tap and
handle as you cut threads             threads per inch than         had threads cut into it, but
                                                                                                        drill charts to take the guesswork
on wire/rod                           N/C sizes. A typical N/F      does not have a bolt head
                                                                                                        out of selecting compatible tools for
E-Z Tap and Die Holder                size is N/F 0/80. Fasteners   Threading Using a die to            your specific project. It’s also helpful
Dual-use tool that secures            with these high thread        cut threads on wire/rod             to have a B&S wire gauge and a drill
miniature taps and                    counts provide solid
                                                                    Threading die Tool used             bit gauge. Ready-to-use machined
threading dies in sizes               holding power.
                                                                    to cut threads on wire/rod          nuts and bolts are available from
N/F 00/90, 0/80, 1/72, and            Nut Fastener with an
                                                                    Washer Flat, thin ring              some suppliers.
size N/C 2/56                         internal thread that screws
                                                                    used in a nut-and-bolt
Gauge Unit of measure                 onto a bolt to tighten or
                                                                    assembly to ensure a
that describes the thick-             hold something
                                                                    tight connection
ness of wire or metal; a              Nut driver (or socket                                             online extra
tool used in measurement,                                           Wire/rod Metal stock that
                                      wrench) Holds a hex-                                              Download a free PDF of the
such as a B&S gauge                                                 is cut with a threading die
                                      head bolt and/or nut to
                                                                    to make bolts                       “Threaded Connections At-A-Glance
                                      permit tightening
                                                                                                        Glossary” at www.artjewelry
                                                                                                        mag.com/reference.


66       Art Jewelry   ■   May 2010
The assembled pendant is
          E-Z Tap and Die                            21 ⁄4 x 11 ⁄2 in. (57 x 38 mm).
          Holder and tap


Part 1: Tapping
                                                                                             materials
Planning your design                                                                         ■   Copper sheet: 18-gauge (1.0 mm),
I sketched out a design for a pendant with                                                       2 x 2 in. (51 x 51 mm)
interchangeable enamel copper disks. To                                                      ■   N/F 0/80 bolts (choose from): hex,
make the disks interchangeable, I planned                                                        round, flat, or fillister
to use nuts and bolts to attach them to a                                                    ■   N/F 0/80 nuts
backplate. I chose 18-gauge (1.0 mm)                                                         ■   Washers (optional)
copper sheet for the backplate, because
                                                                                                      toolboxes, page 75
it’s an appropriate gauge to use for making
                                                                                             ■   Riveting
threaded holes to fit N/F 0/80 ready-made
                                                                                             ■   Sawing/piercing
nuts and bolts.
                                                                                             additional tools & supplies
  TIP: To make sure that you buy              selected a #52 clearance drill bit to make     ■   Drill-bit gauge (optional)
  bolts that are long enough to fit           holes in the center of my domed copper         ■   Clearance drill bit: #52
  through all the layers of your              disks. After drilling the clearance holes in   ■   Scribe
  finished jewelry piece, measure             the disks, I cleaned them and fused layers     ■   Tap drill bit
  first. Stack your finished compo-           of bright enamels on the concave side of       ■   Tap: 0/80
  nents, any sheet stock that you’ll          the disks .                                    ■   Tap holder (to fit 0/80 tap)
  make into components, and any                                                              ■   Anchor lube
  washers and nuts you plan to use.           NOTE: You don’t need to make tapped            ■   Machinist’s square or level
                                                                                             ■   Sandpaper: various grits
  Then, use a brass gauge to                  (threaded) holes if you plan to use washers
                                                                                             ■   2 nut drivers (for 0/80 hex bolts
  measure the total thickness of the          with your microbolts and nuts. You can
                                                                                                 and nuts)
  stack, and order bolts that are             simply use a clearance bit and bolts in the    ■   Jeweler’s screwdriver
  longer than that.                           appropriate size and assemble your
                                              components with nuts and washers.              optional materials,
Making clearance holes                                                                       tools & supplies
(no threads)                                                                                 ■   Brass rod: 14-gauge (1.6 mm),
I decided to use a clearance drill bit for       online tutorials                                6 in. (15.2 cm)
making holes in the center of my domed           To learn the basic skills required to       ■   Threading die: 0/80
copper disks, because I would not be             make the enameled disks for this            ■   Die stock or die holder
cutting threads in the disks due to my plan      project, go to www.artjewelry                   (for 0/80 die)
to fuse enamel on the metal. (Tapping a          mag.com/videos to watch                     ■   Ring clamp
hole before I enameled the disk made little      demonstrations of the following             ■   Riveting block
                                                 techniques: using a disk cutter,            ■   Pin vise
sense because stray grains of powdered
                                                 doming disks with a dapping                 ■   Loctite or cyanoacrylate glue
enamel could easily fuse to the inside of a
                                                                                             ■   Soldering pen
threaded hole. And trying to tap a hole          block and punches, using a
that’s surrounded by fragile fused enamel        center punch, drilling metal,
                                                                                             Find out where to buy supplies,
didn’t seem too logical either.)                 and enameling basics.                       page 79
    Referencing my supplier’s charts, I                                                      See Safety Basics, page 74

                                                                                                           www.ArtJewelryMag.com      67
E-Z Tap and
                                               Allen wrench          Die Holder


                                         1
                                                Set screw
                                                                                                                                          4
                                                     Bushing                                  Prepare the tap. Secure a tap in a tap
                                                                                              holder. I used an E-Z Tap and Die Holder
                                                                                              [3], because it provides a sensitive touch
                                                                                              for tapping very small holes. Apply a drop
                                                                                              of lubricant to the tap. Using a machinist’s
                                                                                              square, position the tap perpendicular to
                                                                     Tap                      the sheet, above one of the pilot holes
                                                                                              [Figure 2] [4].

                                         2                                              3     Tap the holes. Gently rotate the tap
                                                                                              clockwise one rotation or until you feel
Tapping (threading) holes                     Drill pilot holes in the backplate.             resistance. Back off by rotating the tap
If your design requires you to tap match-     Place the sheet on a bench block, and use       counterclockwise one-half rotation; this
ing holes through a front and back panel,     a center punch to make a dimple at each         removes swarf and prevents the tap from
see “Stacked Tapping,” opposite, for a        mark. Insert the sheet marked-side up in        becoming overstressed. Keeping the tap
quick tutorial.                               a vise; make sure that the sheet is level.      lubricated, repeat these clockwise/
    I decided to tap holes in my backplate                                                    counterclockwise rotations until the tap
so I could use bolts to secure my enameled    NOTE: Securing the metal sheet in a vise        emerges from the bottom of the hole.
disks to the backplate.                       before you drill it is a safety precaution      Carefully back out the tap.
                                              that prevents the metal from becoming
Mark the position of the pilot holes for      a dangerous spinning projectile.                NOTE: Taps are brittle. Using force
the backplate. Use a fine-tip marker or                                                       will result in a snapped tap. Be patient,
scribe to mark the desired location of the        Insert a tap drill bit of the appropriate   use lubricant, and back off when you
pilot holes on 18-gauge (1.0 mm) metal        size into your flex shaft. I used a #55 tap     feel resistance.
sheet [1].                                    drill bit because it’s the size specified for
                                              0/80 taps. Lubricate the bit. Keeping the          Repeat the process to tap the remain-
NOTE: Mark pilot holes on a rectangular or    bit perpendicular to the sheet [Figure 1],      ing holes.
square piece of sheet; later you’ll need to   drill a pilot hole through one of the
secure the sheet in a bench vise, and         dimpled marks [2]. Repeat to drill pilot        Prepare the sheet for assembly. Using a
irregular shapes are hard to secure.          holes through the remaining marks.              jeweler’s saw and a 2/0 blade B , cut the
                                                                                              sheet to your desired backplate shape.
                                                                                              Add your chosen findings. Then file and
                                                                                              sand B the backplate.


                                                                                                suggested reading
                                                  Machinist’s                                   One Good Turn: A Natural History of the
                                                  square                                        Screwdriver and the Screw by Witold
                                                                             Tap                Rybczynski
                                90°
                                                                              90°


                  Figure 1                                             Figure 2

68      Art Jewelry   ■   May 2010
5                                           6                                             7
Assembling components
Use bolts and nuts to attach components.
If you’re using a hex-head bolt to attach        stacked
                                                                tapping
components, use a nut driver to turn the
bolt through the threaded hole [5]. Add
a nut to the end of the bolt [6]. While
holding the nut driver on the bolt head,         If you want to use bolts to connect a
use another nut driver to tighten the nut        piece that has front and back panels,
                                                 you’ll need to keep the panels aligned
at the back of the assembly.
                                                 and stacked as you tap (thread) them.
    Use a jeweler’s screwdriver to drive
bolts that have a slot in the head [7].          [1] Make a metal sheet “sandwich.” Stack two metal
    For tips on how to cut down the              sheets of identical size, and tape them together with
length of a bolt, see “Cutting a Bolt            painter’s tape to make a “sandwich.”
Down to Size,” below.
                                                 [2] Mark and center punch the top sheet. Mark
                                                 the location for holes in the top metal sheet. Use a
                                                 center punch to dimple the marks. Secure the taped,
   Videos & Basics                               marked, and dimpled sandwich in a bench vise with
   Check out these bonus tutorials               the marks facing up.
   for fundamental techniques used
                                                 [3] Drill pilot holes. Starting at one dimple, drill
   in this project:
                                                 through both layers of sheet metal. Insert a piece of
                                                 snug-fitting wire or tubing into the hole; this will
    •   Drilling through metal                   keep the two sheets aligned.
    •   Sawing B
    •   Sanding B                                Repeat to drill and fit wire or tubing into the next hole. Repeat until all the pilot
    •   Setting wire rivets B                    holes are drilled through both layers of sheet.

   B Basics, page 73                             [4] Tap the holes. Remove the wire or tubing from one hole. Lubricate your
     Videos, www.artjewelrymag.                  tap, and tap through both layers of sheet. Thread a bolt through the tapped
   com/videos                                    hole to maintain alignment of the two sheets. Repeat on the remaining holes.


                                 cutting a bolt down to size
                                 When you’re using premade bolts, you might          [2] Use an extra-fine marker to mark the bolt
                                 have to purchase a longer bolt than your            where you want to cut it.
                                 assembly requires. Here’s one way to cut the        [3] Disassemble the components.
                                 bolt to the correct size.                           [4] Screw the nut back in place on the bolt,
                                                                                     using the mark as a guide.
                                 NOTE: Do not use wire cutters to trim a bolt;       [5] Secure the head of the bolt in a ring clamp.
                                 they will deform the bolt and strip the threads.    [6] Use a jeweler’s saw and blade to cut off the
                                                                                     end of the bolt [Photo].
                                 [1] Assemble your components, including             [7] Unscrew the nut; this helps to maintain the
                                 the nut.                                            integrity of the threads at the end of the bolt.


                                                                                                            www.ArtJewelryMag.com        69
E-Z Tap and Die

                                                                                         2
                                                                                                                     Holder and
                                           1                                                                         threading die


Part 2: Threading a rod
                                                                                                making threaded
So, now you’re a threaded-connections           This particular threading die has a ring that   connections
diehard and you want to make your own
bolts. You’ll need a tool called a “threading
                                                slides up and down the shank, allowing
                                                you to adjust the size of the cutting           more
die” and a device called a “die stock,”
which holds the threading die (see
                                                opening. This feature makes it easier to
                                                fit the die to the rod you are threading.
                                                                                                permanent
                                                                                                Maybe you have no intention of
“Threaded Connections At-A-Glance
                                                                                                disassembling threaded connec-
Glossary,” page 66).                            Cut threads into the rod. Add a drop of         tions because you used them for
                                                lubricant to the jaws of the die. Keeping       purely aesthetic reasons. To make
Select the rod and die. Referencing your        the die directly over the rod, turn the die     these connections permanent, you
supplier’s charts, buy a die that corre-        holder or die stock clockwise one rotation      have a couple of options.
sponds to the gauge of rod you want to          or until you feel resistance. Back off, and
cut threads into. I used 14-gauge (1.6 mm)      turn the die counterclockwise one half-         1. Use a riveting hammer to tap
brass rod, which corresponds to my              rotation. Add lubricant and repeat these        the end of the bolt to turn it into
supplier’s 0/80 threading die.                  forward and backward rotations until            a rivet.
                                                you’ve threaded the length of the rod.          2. Apply a tiny drop of Loctite or
Round the end of the rod. Secure the
                                                                                                cyanoacrylate glue to the bolt
                                                                                                threads just before you assemble
rod in a ring clamp. Use a flex shaft and       Make a head on the bolt. Insert the
                                                                                                your piece.
a cup bur to round the end of the rod [1].      threaded rod into a riveting block, leaving
Or, use a needle file to slightly round and     about 1 mm of the rod exposed. Use a            NOTE: If you later decide to
taper the end of the rod.                       riveting hammer to spread the end of the        disassemble the piece, and if it
                                                rod [2], as you would when setting a wire       can safely withstand the heat of
Prepare the rod for threading. Secure           rivet B . Using the flat head of a ball-peen    a soldering pen, you can heat
the rod in a bench vise. Make sure the rod      hammer, strike the spread edges of the          the glue with the pen to break
is perpendicular to the vise [Figure 3].        rod, creating a slightly domed head.            the glue’s bond.

Prepare the die. Secure the threading die       Cut a slit into the head. Secure the non-       3. If your assembly can withstand
[Figure 4] in the die stock or die holder.      hammered end of the rod in a ring clamp
                                                                                                the heat of a torch, solder the nut-
                                                                                                and-bolt connections with a
                                                or a pin vise. Support the clamp against
                                                                                                pallion of easy solder.
                                                your bench pin. Using a jeweler’s saw and
                                                a 1/0 blade, cut a slit into the head. Check
     Threading die                              that your jeweler’s screwdriver fits into the
                                                slit. If necessary, use the saw and blade to
                                                widen the slit. Remove the rod from the         acknowledgements
                                                clamp.                                          A sincere thank you to Frankie
          Wire/rod              90°                                                             Flood, assistant professor and
                                                                                                director of foundations in the
                                                                                                jewelry/metalsmithing department
                                                         Jaws                                   at the University of Wisconsin–
                                                                                                Milwaukee, for his technical advice
                                                                                                during the writing of this article.
                                                                   Adjustable ring
                                                                                                Thanks also to Bill Seeley at
     Threading wire/rod with a die                                 (opens/closes jaws)          Reactive Metals for his expert tips.

                 Figure 3                                         Figure 4

70        Art Jewelry   ■   May 2010
■ contacts & suppliers | where to find it

contacts
When contacting artists via e-mail, please
put “Art Jewelry” in the subject line.

Artist Profile
page 41
■   Amy Roper Lyons,
    www.amyroperlyons.com

GAllery
page 45
■   Colleen Baran,
                                                                                     50
    colleenbaran@hotmail.com
■   Kristin Beeler, akbeeler@gmail.com         Breeze throuGh A wire
■   Maggie Bergman,                            dAisy ChAin
    www.play-design-create.com                 page 50
■   Michelle Dickman, budilia@yahoo.com        ■   Razor flush cutters (Tronex Technology
■   Cheryl Eve, www.cheryleve.com                  Inc., www.tronextools.com)
■   Mary Filapek & Lou Ann Townsend,           ■   Silver-plated ParaWire (Paramount Wire
    www.maryandlouann.com                          Company, www.parawire.com)
■   Mark Lasater, clamshell@cableone.net       ■   Silver-plated copper wire (Artistic Wire,
■   Marina Marioni,                                www.artisticwire.com; Beadalon,
    marinamarioni@hotmail.com                      www.beadalon.com)
■   Tim O’Neill, www.artisangal.com            ■   Gold craft wire (WalMart,
■   So Young Park,                                 www.walmart.com)
    www.soyoungparkstudio.com
■   Marthe Roberts/Shea,                       try
                                               intArsiA:
    www.jewelrybymars.com
    Jan Smith, jan_ssi@hotmail.com
                                               Puzzle                                    60
                                               stone
■


                                               into A
                                               PAttern
    45                                         page 60
                                               ■   Hot Stuff glue,
                                                   Super-T Medium
                                                   (Satellite City Inc.,
                                                   www.caglue.com)
                                               ■   Genie Gem Maker combination
                                                   machine (Diamond Pacific,
                                                   www.diamondpacific.com)
Beyond Jewelry
page 82                                        the nuts And Bolts of
■   Lynette Andreasen,                         threAded ConneCtions
    www.lynetteandreasen.com                   page 64
                                               ■   EZ Tap and Die Holder, taps, dies, micro

suppliers                                          bolts, nuts, drill bits, cup burs, socket
                                                   wrench, threaded rod (Reactive Metals,
For contact information for project authors,       800.876.3434, www.reactivemetals.com)
see Contributors, page 8.                      ■   T-handle tap holder, die stock, taps, dies
                                                   (Micro-Mark, 800.225.1066,
Coreless ConstruCtion:                             www.micromark.com)
rethinkinG the MetAl ClAy                      ■   Stainless steel bolts, threaded rod, nuts
hollow forM                                        (Small Parts Inc., 800.220.4242,
page 34                                            www.smallparts.com)
■   Metal clay, tools (Rio Grande,             ■   Nuts, bolts, washers (Micro Fasteners,
    800.545.6566, www.riogrande.com;               800.892.6917, www.microfasteners.com)
    Whole Lotta Whimsy,
    www.wholelotta
    whimsy.com)


 34                                                                64
                                                                                                www.ArtJewelryMag.com   79
Make it
No matter what kind of jewelry you’d like
to make — or what technique you’d like to
master — you’ll get all the inspiration and advice
you need from leading jewelry artisans in every
issue of Art Jewelry magazine.

Plus, subscribers gain exclusive online access!
Post photos of your work in the Subscriber
Gallery, read reviews of products tested by the
editors, and download free projects.

Art Jewelry covers:
 ■   Metals                       ■   Chain mail
 ■   Metal clay                   ■   Polymer clay
 ■   Stones and gems              ■   Enamel
 ■   Wire                         ■   And more!


Subscribe today to
learn new techniques!
Order online at
www.ArtJewelryMag.com/promo
Enter promotional code: IK87Z
Or call 1-800-533-6644
Monday – Friday, 8:30 a.m. – 4:30 p.m. Central Time.
Outside the U.S. and Canada, call 262-796-8776, ext. 661.   magazine
CIR-ADH-09X1597RH

Mais conteúdo relacionado

Mais de Jose Miguel Lopez Garcia

ORDENANZA PARA LA PRESERVACIÓN, PROTECCIÓN Y FOMENTO AL DESARROLLO DE LA ACTI...
ORDENANZA PARA LA PRESERVACIÓN, PROTECCIÓN Y FOMENTO AL DESARROLLO DE LA ACTI...ORDENANZA PARA LA PRESERVACIÓN, PROTECCIÓN Y FOMENTO AL DESARROLLO DE LA ACTI...
ORDENANZA PARA LA PRESERVACIÓN, PROTECCIÓN Y FOMENTO AL DESARROLLO DE LA ACTI...Jose Miguel Lopez Garcia
 
El Artesano en el Codigo de Comercio de Venezuela / Chang Mora Kimlen y Salas...
El Artesano en el Codigo de Comercio de Venezuela / Chang Mora Kimlen y Salas...El Artesano en el Codigo de Comercio de Venezuela / Chang Mora Kimlen y Salas...
El Artesano en el Codigo de Comercio de Venezuela / Chang Mora Kimlen y Salas...Jose Miguel Lopez Garcia
 
La producción artesanal (Venezuela) / Bustos Flores , Carlos
La producción artesanal (Venezuela) / Bustos Flores , Carlos La producción artesanal (Venezuela) / Bustos Flores , Carlos
La producción artesanal (Venezuela) / Bustos Flores , Carlos Jose Miguel Lopez Garcia
 
Proyecto Ley de fomento y proteccion al desarrollo artesanal
Proyecto Ley de fomento y proteccion al desarrollo artesanalProyecto Ley de fomento y proteccion al desarrollo artesanal
Proyecto Ley de fomento y proteccion al desarrollo artesanalJose Miguel Lopez Garcia
 
Ley de-fomento-y-proteccion-al-desarrollo-artesanal año 93
Ley de-fomento-y-proteccion-al-desarrollo-artesanal año 93Ley de-fomento-y-proteccion-al-desarrollo-artesanal año 93
Ley de-fomento-y-proteccion-al-desarrollo-artesanal año 93Jose Miguel Lopez Garcia
 
Carta adhesion al sistema de Culturas Populares
Carta adhesion al sistema de Culturas PopularesCarta adhesion al sistema de Culturas Populares
Carta adhesion al sistema de Culturas PopularesJose Miguel Lopez Garcia
 
Gaceta oficial 39887 decreto dia del artesano
Gaceta oficial 39887 decreto dia del artesanoGaceta oficial 39887 decreto dia del artesano
Gaceta oficial 39887 decreto dia del artesanoJose Miguel Lopez Garcia
 
Proyecto de Ley de Fomento y Proteccion Artesanal de la republica Bolivariana...
Proyecto de Ley de Fomento y Proteccion Artesanal de la republica Bolivariana...Proyecto de Ley de Fomento y Proteccion Artesanal de la republica Bolivariana...
Proyecto de Ley de Fomento y Proteccion Artesanal de la republica Bolivariana...Jose Miguel Lopez Garcia
 

Mais de Jose Miguel Lopez Garcia (20)

Presentación HUELLA ARTESANAL ccs 2023
Presentación HUELLA ARTESANAL ccs 2023Presentación HUELLA ARTESANAL ccs 2023
Presentación HUELLA ARTESANAL ccs 2023
 
ORDENANZA PARA LA PRESERVACIÓN, PROTECCIÓN Y FOMENTO AL DESARROLLO DE LA ACTI...
ORDENANZA PARA LA PRESERVACIÓN, PROTECCIÓN Y FOMENTO AL DESARROLLO DE LA ACTI...ORDENANZA PARA LA PRESERVACIÓN, PROTECCIÓN Y FOMENTO AL DESARROLLO DE LA ACTI...
ORDENANZA PARA LA PRESERVACIÓN, PROTECCIÓN Y FOMENTO AL DESARROLLO DE LA ACTI...
 
Ordenanza artesanal del municipio Chacao
Ordenanza artesanal del municipio ChacaoOrdenanza artesanal del municipio Chacao
Ordenanza artesanal del municipio Chacao
 
El Artesano en el Codigo de Comercio de Venezuela / Chang Mora Kimlen y Salas...
El Artesano en el Codigo de Comercio de Venezuela / Chang Mora Kimlen y Salas...El Artesano en el Codigo de Comercio de Venezuela / Chang Mora Kimlen y Salas...
El Artesano en el Codigo de Comercio de Venezuela / Chang Mora Kimlen y Salas...
 
La producción artesanal (Venezuela) / Bustos Flores , Carlos
La producción artesanal (Venezuela) / Bustos Flores , Carlos La producción artesanal (Venezuela) / Bustos Flores , Carlos
La producción artesanal (Venezuela) / Bustos Flores , Carlos
 
Proyecto Ley de fomento y proteccion al desarrollo artesanal
Proyecto Ley de fomento y proteccion al desarrollo artesanalProyecto Ley de fomento y proteccion al desarrollo artesanal
Proyecto Ley de fomento y proteccion al desarrollo artesanal
 
Ley de-fomento-y-proteccion-al-desarrollo-artesanal año 93
Ley de-fomento-y-proteccion-al-desarrollo-artesanal año 93Ley de-fomento-y-proteccion-al-desarrollo-artesanal año 93
Ley de-fomento-y-proteccion-al-desarrollo-artesanal año 93
 
Arte sano septiembre 2012
Arte sano septiembre 2012Arte sano septiembre 2012
Arte sano septiembre 2012
 
Carta adhesion al sistema de Culturas Populares
Carta adhesion al sistema de Culturas PopularesCarta adhesion al sistema de Culturas Populares
Carta adhesion al sistema de Culturas Populares
 
Arte sano noviembre 2012
Arte sano noviembre 2012Arte sano noviembre 2012
Arte sano noviembre 2012
 
Arte sano 01 noviembre2011
Arte sano 01 noviembre2011Arte sano 01 noviembre2011
Arte sano 01 noviembre2011
 
Arte sano 02 diciembre2011[1]
Arte sano 02 diciembre2011[1]Arte sano 02 diciembre2011[1]
Arte sano 02 diciembre2011[1]
 
El Artesan@
El Artesan@El Artesan@
El Artesan@
 
Gaceta oficial 39887 decreto dia del artesano
Gaceta oficial 39887 decreto dia del artesanoGaceta oficial 39887 decreto dia del artesano
Gaceta oficial 39887 decreto dia del artesano
 
Proyecto de Ley de Fomento y Proteccion Artesanal de la republica Bolivariana...
Proyecto de Ley de Fomento y Proteccion Artesanal de la republica Bolivariana...Proyecto de Ley de Fomento y Proteccion Artesanal de la republica Bolivariana...
Proyecto de Ley de Fomento y Proteccion Artesanal de la republica Bolivariana...
 
Bases generales Concurso Gran
Bases generales Concurso GranBases generales Concurso Gran
Bases generales Concurso Gran
 
Gran Explosion Bicentenaria Artesana
Gran Explosion Bicentenaria Artesana Gran Explosion Bicentenaria Artesana
Gran Explosion Bicentenaria Artesana
 
Step by step_wire_jewelry_vol.3_no.2_2007
Step by step_wire_jewelry_vol.3_no.2_2007Step by step_wire_jewelry_vol.3_no.2_2007
Step by step_wire_jewelry_vol.3_no.2_2007
 
Step by step_wire_jewelry_vol.1_no1
Step by step_wire_jewelry_vol.1_no1Step by step_wire_jewelry_vol.1_no1
Step by step_wire_jewelry_vol.1_no1
 
Sswf1210 web
Sswf1210 webSswf1210 web
Sswf1210 web
 

Art jewelry-tap-and-die-jill-erickson

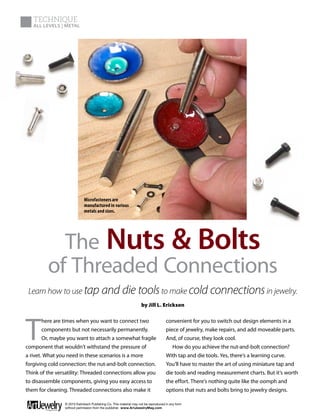
  • 1. TECHNIQUE ALL LEVELS | METAL Microfasteners are manufactured in various metals and sizes. The Nuts & Bolts of Threaded Connections Learn how to use tap and die tools to make cold connections in jewelry. by Jill L. Erickson T here are times when you want to connect two convenient for you to switch out design elements in a components but not necessarily permanently. piece of jewelry, make repairs, and add moveable parts. Or, maybe you want to attach a somewhat fragile And, of course, they look cool. component that wouldn’t withstand the pressure of How do you achieve the nut-and-bolt connection? a rivet. What you need in these scenarios is a more With tap and die tools. Yes, there’s a learning curve. forgiving cold connection: the nut-and-bolt connection. You’ll have to master the art of using miniature tap and Think of the versatility: Threaded connections allow you die tools and reading measurement charts. But it’s worth to disassemble components, giving you easy access to the effort. There’s nothing quite like the oomph and them for cleaning. Threaded connections also make it options that nuts and bolts bring to jewelry designs. © 2010 Kalmbach Publishing Co. This material may not be reproduced in any form 64 Art Jewelry ■ May 2010 without permission from the publisher. www.ArtJewelryMag.com
  • 2. To prevent taps and threading dies from Meet the tools binding or breaking as you use them to In this section, we’ll introduce you to typical tap and die tools and walk you cut threads, you must through three basic things you can do with these tools: make a hole without keep them lubricated. threads, “tap” a hole (make a hole with threads), and “thread” a rod (use a die to make threads on a wire/rod). For more terminology, check out the “Threaded Connections At-A-Glance Glossary,” page 66. Threadless holes You don’t always have to thread a hole in order to connect pieces with nuts and bolts. The hole just + + = needs to be the proper diameter, and you’ll need to add a washer to each side of the assembly to make sure the connec- tion is secure. Clearance drill bit Flex shaft Nut driver or Tapped holes (threaded holes) Threaded holes engage the threads of a bolt. Tap wrench and tap You can secure this kind + or = of connection with just a nut at the back of your assembly. T-handle tap holder and tap Flex shaft and tap drill bit E-Z Tap and Die Holder and tap Threaded rods E-Z Tap and Die Making your own Holder and threaded rods (bolts) threading die is optional. You can + or = buy premachined bolts (and corresponding nuts). If you make your own Die stock and threaded rod for bolts, threading die you can customize the diameter and length to Wire/ fit your design. rod 65
  • 3. Terminology Nuts Threaded connections are all about the functional beauty of the ascending spiral. When a spiral is cut into a metal hole (tapping) or cut around a piece of rod (thread- ing), you’ve got the makings of nuts and bolts. First, though, it’s helpful to get acquainted with the vocabulary and tools associated with these cold connections. Washers threaded connections at-a-glance glossary Back off To turn a tap Kerf Slit or notch made Pilot hole Drilled or threading die counter- by a saw blade; some bolt opening made to help clockwise to allow for the heads have a slit to accom- guide a tap as it cuts Bolts removal of swarf and to modate a screwdriver threads into the metal; prevent overstressing or pilot holes are smaller Lubricant Oil used to breaking the tool than the tap help prevent taps and Bench vise Tool that threading dies from Strip To damage or tear clamps to a workbench binding as they cut metal the threads of a nut, bolt, Hex-head Round and has two adjustable or threading die Machinist’s square jaws for gripping objects Tool used to measure Swarf Metal fragments Bolt Threaded rod with a a 90° angle created when metal is cut head on one end; paired or ground Fillister National Coarse (N/C) with a nut Flat U.S. measurement system Tap Tool used to cut Clearance drill bit Cuts for thread sizes used in threads into the wall of a hole that is just large general-purpose applica- a hole enough for a bolt to pass tions. The “N” relates to through without the bolt’s the diameter of the bolt or Tap drill bit Cuts a pilot hole that is proportionate ordering tools threads touching the walls screw; “C” identifies the of the hole number of threads per in size to your selected tap and supplies inch. For example, N/C Tap drill chart Identifies When you’re ordering tools and Countersink To set the 10/24 is the same diameter the measurements of head of a bolt or screw supplies, make sure to match sizes of as N/C 10/32, but the compatible taps, threading flush with or below the tap drill bits, which make pilot holes, 10/24 has fewer threads dies, tap drill bits, and wire/ surface of a pilot hole; to the taps that cut threads into than the 10/32. rod stock slightly enlarging the the inside walls of pilot holes. Also, outer edge of a pilot hole National Fine Series (N/F) Tap wrench/T-handle threading dies, which cut threads on with a ball or bud bur U.S. measurement system tap Devices that hold a tap securely, acting as a the outside of rod or wire, will need allows you to countersink for thread sizes used in the bolt or screw precision applications like handle during tapping to fit the gauge of your rod or wire. jewelry making. The “N” Suppliers that sell taps, dies, tap Die see threading die Tapping Cutting threads number can be a relative drill bits, and clearance drill bits can into the walls of a pilot hole Die stock Tool that holds number like “0” or “00.” help you select matching sets of a threading die, acting as a N/F sizes have more Threaded rod Rod that’s tools. Most suppliers have tap and handle as you cut threads threads per inch than had threads cut into it, but drill charts to take the guesswork on wire/rod N/C sizes. A typical N/F does not have a bolt head out of selecting compatible tools for E-Z Tap and Die Holder size is N/F 0/80. Fasteners Threading Using a die to your specific project. It’s also helpful Dual-use tool that secures with these high thread cut threads on wire/rod to have a B&S wire gauge and a drill miniature taps and counts provide solid Threading die Tool used bit gauge. Ready-to-use machined threading dies in sizes holding power. to cut threads on wire/rod nuts and bolts are available from N/F 00/90, 0/80, 1/72, and Nut Fastener with an Washer Flat, thin ring some suppliers. size N/C 2/56 internal thread that screws used in a nut-and-bolt Gauge Unit of measure onto a bolt to tighten or assembly to ensure a that describes the thick- hold something tight connection ness of wire or metal; a Nut driver (or socket online extra tool used in measurement, Wire/rod Metal stock that wrench) Holds a hex- Download a free PDF of the such as a B&S gauge is cut with a threading die head bolt and/or nut to to make bolts “Threaded Connections At-A-Glance permit tightening Glossary” at www.artjewelry mag.com/reference. 66 Art Jewelry ■ May 2010
  • 4. The assembled pendant is E-Z Tap and Die 21 ⁄4 x 11 ⁄2 in. (57 x 38 mm). Holder and tap Part 1: Tapping materials Planning your design ■ Copper sheet: 18-gauge (1.0 mm), I sketched out a design for a pendant with 2 x 2 in. (51 x 51 mm) interchangeable enamel copper disks. To ■ N/F 0/80 bolts (choose from): hex, make the disks interchangeable, I planned round, flat, or fillister to use nuts and bolts to attach them to a ■ N/F 0/80 nuts backplate. I chose 18-gauge (1.0 mm) ■ Washers (optional) copper sheet for the backplate, because toolboxes, page 75 it’s an appropriate gauge to use for making ■ Riveting threaded holes to fit N/F 0/80 ready-made ■ Sawing/piercing nuts and bolts. additional tools & supplies TIP: To make sure that you buy selected a #52 clearance drill bit to make ■ Drill-bit gauge (optional) bolts that are long enough to fit holes in the center of my domed copper ■ Clearance drill bit: #52 through all the layers of your disks. After drilling the clearance holes in ■ Scribe finished jewelry piece, measure the disks, I cleaned them and fused layers ■ Tap drill bit first. Stack your finished compo- of bright enamels on the concave side of ■ Tap: 0/80 nents, any sheet stock that you’ll the disks . ■ Tap holder (to fit 0/80 tap) make into components, and any ■ Anchor lube washers and nuts you plan to use. NOTE: You don’t need to make tapped ■ Machinist’s square or level ■ Sandpaper: various grits Then, use a brass gauge to (threaded) holes if you plan to use washers ■ 2 nut drivers (for 0/80 hex bolts measure the total thickness of the with your microbolts and nuts. You can and nuts) stack, and order bolts that are simply use a clearance bit and bolts in the ■ Jeweler’s screwdriver longer than that. appropriate size and assemble your components with nuts and washers. optional materials, Making clearance holes tools & supplies (no threads) ■ Brass rod: 14-gauge (1.6 mm), I decided to use a clearance drill bit for online tutorials 6 in. (15.2 cm) making holes in the center of my domed To learn the basic skills required to ■ Threading die: 0/80 copper disks, because I would not be make the enameled disks for this ■ Die stock or die holder cutting threads in the disks due to my plan project, go to www.artjewelry (for 0/80 die) to fuse enamel on the metal. (Tapping a mag.com/videos to watch ■ Ring clamp hole before I enameled the disk made little demonstrations of the following ■ Riveting block techniques: using a disk cutter, ■ Pin vise sense because stray grains of powdered doming disks with a dapping ■ Loctite or cyanoacrylate glue enamel could easily fuse to the inside of a ■ Soldering pen threaded hole. And trying to tap a hole block and punches, using a that’s surrounded by fragile fused enamel center punch, drilling metal, Find out where to buy supplies, didn’t seem too logical either.) and enameling basics. page 79 Referencing my supplier’s charts, I See Safety Basics, page 74 www.ArtJewelryMag.com 67
  • 5. E-Z Tap and Allen wrench Die Holder 1 Set screw 4 Bushing Prepare the tap. Secure a tap in a tap holder. I used an E-Z Tap and Die Holder [3], because it provides a sensitive touch for tapping very small holes. Apply a drop of lubricant to the tap. Using a machinist’s square, position the tap perpendicular to Tap the sheet, above one of the pilot holes [Figure 2] [4]. 2 3 Tap the holes. Gently rotate the tap clockwise one rotation or until you feel Tapping (threading) holes Drill pilot holes in the backplate. resistance. Back off by rotating the tap If your design requires you to tap match- Place the sheet on a bench block, and use counterclockwise one-half rotation; this ing holes through a front and back panel, a center punch to make a dimple at each removes swarf and prevents the tap from see “Stacked Tapping,” opposite, for a mark. Insert the sheet marked-side up in becoming overstressed. Keeping the tap quick tutorial. a vise; make sure that the sheet is level. lubricated, repeat these clockwise/ I decided to tap holes in my backplate counterclockwise rotations until the tap so I could use bolts to secure my enameled NOTE: Securing the metal sheet in a vise emerges from the bottom of the hole. disks to the backplate. before you drill it is a safety precaution Carefully back out the tap. that prevents the metal from becoming Mark the position of the pilot holes for a dangerous spinning projectile. NOTE: Taps are brittle. Using force the backplate. Use a fine-tip marker or will result in a snapped tap. Be patient, scribe to mark the desired location of the Insert a tap drill bit of the appropriate use lubricant, and back off when you pilot holes on 18-gauge (1.0 mm) metal size into your flex shaft. I used a #55 tap feel resistance. sheet [1]. drill bit because it’s the size specified for 0/80 taps. Lubricate the bit. Keeping the Repeat the process to tap the remain- NOTE: Mark pilot holes on a rectangular or bit perpendicular to the sheet [Figure 1], ing holes. square piece of sheet; later you’ll need to drill a pilot hole through one of the secure the sheet in a bench vise, and dimpled marks [2]. Repeat to drill pilot Prepare the sheet for assembly. Using a irregular shapes are hard to secure. holes through the remaining marks. jeweler’s saw and a 2/0 blade B , cut the sheet to your desired backplate shape. Add your chosen findings. Then file and sand B the backplate. suggested reading Machinist’s One Good Turn: A Natural History of the square Screwdriver and the Screw by Witold Tap Rybczynski 90° 90° Figure 1 Figure 2 68 Art Jewelry ■ May 2010
  • 6. 5 6 7 Assembling components Use bolts and nuts to attach components. If you’re using a hex-head bolt to attach stacked tapping components, use a nut driver to turn the bolt through the threaded hole [5]. Add a nut to the end of the bolt [6]. While holding the nut driver on the bolt head, If you want to use bolts to connect a use another nut driver to tighten the nut piece that has front and back panels, you’ll need to keep the panels aligned at the back of the assembly. and stacked as you tap (thread) them. Use a jeweler’s screwdriver to drive bolts that have a slot in the head [7]. [1] Make a metal sheet “sandwich.” Stack two metal For tips on how to cut down the sheets of identical size, and tape them together with length of a bolt, see “Cutting a Bolt painter’s tape to make a “sandwich.” Down to Size,” below. [2] Mark and center punch the top sheet. Mark the location for holes in the top metal sheet. Use a center punch to dimple the marks. Secure the taped, Videos & Basics marked, and dimpled sandwich in a bench vise with Check out these bonus tutorials the marks facing up. for fundamental techniques used [3] Drill pilot holes. Starting at one dimple, drill in this project: through both layers of sheet metal. Insert a piece of snug-fitting wire or tubing into the hole; this will • Drilling through metal keep the two sheets aligned. • Sawing B • Sanding B Repeat to drill and fit wire or tubing into the next hole. Repeat until all the pilot • Setting wire rivets B holes are drilled through both layers of sheet. B Basics, page 73 [4] Tap the holes. Remove the wire or tubing from one hole. Lubricate your Videos, www.artjewelrymag. tap, and tap through both layers of sheet. Thread a bolt through the tapped com/videos hole to maintain alignment of the two sheets. Repeat on the remaining holes. cutting a bolt down to size When you’re using premade bolts, you might [2] Use an extra-fine marker to mark the bolt have to purchase a longer bolt than your where you want to cut it. assembly requires. Here’s one way to cut the [3] Disassemble the components. bolt to the correct size. [4] Screw the nut back in place on the bolt, using the mark as a guide. NOTE: Do not use wire cutters to trim a bolt; [5] Secure the head of the bolt in a ring clamp. they will deform the bolt and strip the threads. [6] Use a jeweler’s saw and blade to cut off the end of the bolt [Photo]. [1] Assemble your components, including [7] Unscrew the nut; this helps to maintain the the nut. integrity of the threads at the end of the bolt. www.ArtJewelryMag.com 69
  • 7. E-Z Tap and Die 2 Holder and 1 threading die Part 2: Threading a rod making threaded So, now you’re a threaded-connections This particular threading die has a ring that connections diehard and you want to make your own bolts. You’ll need a tool called a “threading slides up and down the shank, allowing you to adjust the size of the cutting more die” and a device called a “die stock,” which holds the threading die (see opening. This feature makes it easier to fit the die to the rod you are threading. permanent Maybe you have no intention of “Threaded Connections At-A-Glance disassembling threaded connec- Glossary,” page 66). Cut threads into the rod. Add a drop of tions because you used them for lubricant to the jaws of the die. Keeping purely aesthetic reasons. To make Select the rod and die. Referencing your the die directly over the rod, turn the die these connections permanent, you supplier’s charts, buy a die that corre- holder or die stock clockwise one rotation have a couple of options. sponds to the gauge of rod you want to or until you feel resistance. Back off, and cut threads into. I used 14-gauge (1.6 mm) turn the die counterclockwise one half- 1. Use a riveting hammer to tap brass rod, which corresponds to my rotation. Add lubricant and repeat these the end of the bolt to turn it into supplier’s 0/80 threading die. forward and backward rotations until a rivet. you’ve threaded the length of the rod. 2. Apply a tiny drop of Loctite or Round the end of the rod. Secure the cyanoacrylate glue to the bolt threads just before you assemble rod in a ring clamp. Use a flex shaft and Make a head on the bolt. Insert the your piece. a cup bur to round the end of the rod [1]. threaded rod into a riveting block, leaving Or, use a needle file to slightly round and about 1 mm of the rod exposed. Use a NOTE: If you later decide to taper the end of the rod. riveting hammer to spread the end of the disassemble the piece, and if it rod [2], as you would when setting a wire can safely withstand the heat of Prepare the rod for threading. Secure rivet B . Using the flat head of a ball-peen a soldering pen, you can heat the rod in a bench vise. Make sure the rod hammer, strike the spread edges of the the glue with the pen to break is perpendicular to the vise [Figure 3]. rod, creating a slightly domed head. the glue’s bond. Prepare the die. Secure the threading die Cut a slit into the head. Secure the non- 3. If your assembly can withstand [Figure 4] in the die stock or die holder. hammered end of the rod in a ring clamp the heat of a torch, solder the nut- and-bolt connections with a or a pin vise. Support the clamp against pallion of easy solder. your bench pin. Using a jeweler’s saw and a 1/0 blade, cut a slit into the head. Check Threading die that your jeweler’s screwdriver fits into the slit. If necessary, use the saw and blade to widen the slit. Remove the rod from the acknowledgements clamp. A sincere thank you to Frankie Wire/rod 90° Flood, assistant professor and director of foundations in the jewelry/metalsmithing department Jaws at the University of Wisconsin– Milwaukee, for his technical advice during the writing of this article. Adjustable ring Thanks also to Bill Seeley at Threading wire/rod with a die (opens/closes jaws) Reactive Metals for his expert tips. Figure 3 Figure 4 70 Art Jewelry ■ May 2010
  • 8. ■ contacts & suppliers | where to find it contacts When contacting artists via e-mail, please put “Art Jewelry” in the subject line. Artist Profile page 41 ■ Amy Roper Lyons, www.amyroperlyons.com GAllery page 45 ■ Colleen Baran, 50 colleenbaran@hotmail.com ■ Kristin Beeler, akbeeler@gmail.com Breeze throuGh A wire ■ Maggie Bergman, dAisy ChAin www.play-design-create.com page 50 ■ Michelle Dickman, budilia@yahoo.com ■ Razor flush cutters (Tronex Technology ■ Cheryl Eve, www.cheryleve.com Inc., www.tronextools.com) ■ Mary Filapek & Lou Ann Townsend, ■ Silver-plated ParaWire (Paramount Wire www.maryandlouann.com Company, www.parawire.com) ■ Mark Lasater, clamshell@cableone.net ■ Silver-plated copper wire (Artistic Wire, ■ Marina Marioni, www.artisticwire.com; Beadalon, marinamarioni@hotmail.com www.beadalon.com) ■ Tim O’Neill, www.artisangal.com ■ Gold craft wire (WalMart, ■ So Young Park, www.walmart.com) www.soyoungparkstudio.com ■ Marthe Roberts/Shea, try intArsiA: www.jewelrybymars.com Jan Smith, jan_ssi@hotmail.com Puzzle 60 stone ■ into A PAttern 45 page 60 ■ Hot Stuff glue, Super-T Medium (Satellite City Inc., www.caglue.com) ■ Genie Gem Maker combination machine (Diamond Pacific, www.diamondpacific.com) Beyond Jewelry page 82 the nuts And Bolts of ■ Lynette Andreasen, threAded ConneCtions www.lynetteandreasen.com page 64 ■ EZ Tap and Die Holder, taps, dies, micro suppliers bolts, nuts, drill bits, cup burs, socket wrench, threaded rod (Reactive Metals, For contact information for project authors, 800.876.3434, www.reactivemetals.com) see Contributors, page 8. ■ T-handle tap holder, die stock, taps, dies (Micro-Mark, 800.225.1066, Coreless ConstruCtion: www.micromark.com) rethinkinG the MetAl ClAy ■ Stainless steel bolts, threaded rod, nuts hollow forM (Small Parts Inc., 800.220.4242, page 34 www.smallparts.com) ■ Metal clay, tools (Rio Grande, ■ Nuts, bolts, washers (Micro Fasteners, 800.545.6566, www.riogrande.com; 800.892.6917, www.microfasteners.com) Whole Lotta Whimsy, www.wholelotta whimsy.com) 34 64 www.ArtJewelryMag.com 79
  • 9. Make it No matter what kind of jewelry you’d like to make — or what technique you’d like to master — you’ll get all the inspiration and advice you need from leading jewelry artisans in every issue of Art Jewelry magazine. Plus, subscribers gain exclusive online access! Post photos of your work in the Subscriber Gallery, read reviews of products tested by the editors, and download free projects. Art Jewelry covers: ■ Metals ■ Chain mail ■ Metal clay ■ Polymer clay ■ Stones and gems ■ Enamel ■ Wire ■ And more! Subscribe today to learn new techniques! Order online at www.ArtJewelryMag.com/promo Enter promotional code: IK87Z Or call 1-800-533-6644 Monday – Friday, 8:30 a.m. – 4:30 p.m. Central Time. Outside the U.S. and Canada, call 262-796-8776, ext. 661. magazine CIR-ADH-09X1597RH