SlideShare uma empresa Scribd logo
1 de 5
Baixar para ler offline
R O O F C U R B I N S TA L L AT I O N I N S T R U C T I O N S :
             H O R I ZO N TA L S TA N D I N G S E A M PA N E L


p: (800) 284-1412   f: (903) 759-3598   www.lmcurbs.com   827 fisher rd longview, tx 75604
ROOF CURB
                                                                                     INSTALLATION INSTRUCTIONS
                                                                               HORIZONTAL STANDING SEAM PANEL

Installation Check List:
  _____Attach Sub-Frames                                                                                                        Step 1
  _____Layout Curb on Roof Panel                                                                                                Step 2
  _____Back-up Channels                                                                                                         Step 3
  _____Apply Sealants & Set Curb in Place                                                                                       Step 4
  _____Fasten Curb to Roof Panel                                                                                                Step 5


                                                                  PARTS LIST
                                   Flat Washer                                              Polyurethane Sealant Caulk

                                                                                            Triple Bead Sealant Tape
                                   Nut

                                                                                            14 Gauge Galvanized Steel Subframe
                                   Bolt                                                     5-1/2” tall
                                                                                            Length is equal to the purlin spacing minus
                                                                                            1-3/8”
                                   Mounting Clip

                                                                                            Back-up Channels( eld notch)
                             #14 - 1 1/8” Neoprene
                                Self-Tap Screw


                                          BEGIN INSTALLATION
     1 ATTACH SUB-FRAMES (framed opening is already installed)
    Attach mounting clips to sub-frame and align the top of the sub-frame under                                                Roof Purlin
                                                                                                 Sub-frame
    vertical box of roof curb and ush to the bottom side of roof sheets. Use the
    mounting clip as a template, mark on purlin where 7/16” holes are to be drilled.
    Once holes are drilled, attach mounting clips to purlins using at washers, nuts,
    and bolts (see drawing 1.1). Finger tighten all hardware, then upset threads to
    secure nuts. Attach sub-frames to mounting clips using at washers, nuts, and                                         Drawing 1.2
    bolts (see drawing 1.2).                               Flat washer
                                                                                           Nut
                                                     3/8” x 1” Bolts


                                                                         Mounting clip


                                                        Drawing 1.1
                                                                                  Roof Purlin
    *NOTICE* Sub-frame max. loading 500 lbs.


     WARNING!                                                                                                                       Page 1
ALWAYS USE FALL PROTECTION WHILE
WORKING AROUND ROOF OPENINGS.
ROOF CURB
                                                                                                  INSTALLATION INSTRUCTIONS
                                                                                            HORIZONTAL STANDING SEAM PANEL
     2 LAYOUT CURB ON ROOF PANEL
    Mark cut lines by setting roof curb(s) in place on roof panel (see
                                                                                                                                                     Cut Line
    drawing 2.1) (DO NOT USE LEAD PENCIL). Upslope cut line will be                                                              s7
                                                                                                                                      ”
                                                                                                                             inu
                                                                                                                           bm
    3” less than outer edge of curb base ange (see drawing 2.2).                                               o   f cu
                                                                                                                       r
                                                                                                           gth
    Downslope cut line will be 4” less than outer edge of base ange                                    Len

    (see drawing 2.2). Remove exterior panel leaving the insulation
    face showing (see drawing 2.3) and cleanup all metal shavings and
    debris.


                                                                                                                                                    Drawing 2.1
                                            Top View                                      Roof Panel

                                                                          Layout throat opening on the insulation                                     Throat Opening
Roof Opening
                                                                          and cut opening (see drawing 2.2).


     Insulation
                                                                                                     Cu
                                                                                                        rb
                                                                                                             Ba
                                                                                                                  se
                                                                                                                     Fla                                                 n   ge
                                                                                                                         ng                                          Fla
                                                                                                                           e                                      se
                                                                                                                                                               Ba
                                                                                                                                                          rb
                                            Drawing 2.3                                                                                                 Cu
                                                                                                              Drawing 2.2
*Notice* Sub-frames and purlins not shown in the above picture.


     3 BACK-UP CHANNELS
    Notch back-up channels (see drawing). Slide back-up channels
    under roof panel on top of sub-frames. Do not screw back-up                                                                           Edge of roof opening
    channels to subframes. They will be secured when curb is
    fastened down.


            Cut leg of channel and fold under to form
            notch for sub-frame (typically 4 places).


                                                             Back-up Channel


                          Ce
                             nte
                     Ou          rL
                                   ine
                                                                                                                                                Drawing 3.1
                       tsid
                           eD          of
                               im         Su
                                             b-F                                    Back-up channels in place
                                  en            ram
                                     sio
                                        no          e
                                           fB
                                              ack
                                                  -up
                                                      Ch
                                                         a   nn
                                                                el


     WARNING!                                                                                                                                                                Page 2
ALWAYS USE FALL PROTECTION WHILE
WORKING AROUND ROOF OPENINGS.
ROOF CURB
                                                                                             INSTALLATION INSTRUCTIONS
                                                                                       HORIZONTAL STANDING SEAM PANEL
     4 APPLY SEALANTS & SET CURB IN PLACE
    Apply a strip of sealant tape and generous bead of caulk on the upslope side of the roof curb and on downslope side of the roof
    panel , apply a generous bead of caulk where the panel overlaps the side of roof curb and where side of roof curb overlaps panel
    (full perimeter) before setting roof curb in place (see drawing 4.1). Position roof curb over roof opening and lower into place,
    shift curb to align with sub-frames and roof panel.


     Prepare Upslope Panel Seams


              /2”                Mark rib for cutting                                                               Fold over rib and
            11                                                               Remove marked
                                                                             section of rib                         crimp tight.

                                                                            Apply caulk
                                                                                                                    Must ll end of standing
           A                                                B
                                                                            before folding
                                                                                                    C               seam with caulk.

     The downslope of curb is to be                                         The upslope of curb is to be
     installed OVER the roof panel.                                         installed UNDER the roof panel.


                                                                                   Roof Curb
                                                                         Caulk
                                                                (full length of curb)


                                                        Roof Panel
                       Caulk                                                                                                     Caulk
                    (apply as shown)                                                                                          (apply as shown)


                                                                                                                                         Caulk
                                                                                                                                (full length of curb)


                                                                                                              Sealant Tape
                                                                     Drawing 4.1


*Notice* Sub-frames and purlins not shown in the above picture.


     WARNING!
ALWAYS USE FALL PROTECTION WHILE                                                                                                                 Page 3
WORKING AROUND ROOF OPENINGS.
ROOF CURB
                                                                                      INSTALLATION INSTRUCTIONS
                                                                                HORIZONTAL STANDING SEAM PANEL

     5 FASTEN CURB TO ROOF PANEL

    Fasten curb to roof panel using #14 - 1 1/8” neoprene self-tap screw                  Roof Panel
    on 4” centers (see drawing 5.1). DO NOT FASTEN CURB OR ROOF
    PANEL TO SUB-FRAMES. Please ensure all self-tap screws are
    properly tightened before moving to the next step.


               Must ll end of
             closure with caulk.


                                                                                                       Self-Tap Screws
                                                                  Drawing 5.1


*Notice* Sub-frames and purlins not shown in the above picture.


     COMPLETED INSTALLATION


      **Clean up installation debris before leaving area.


     WARNING!                                                                                                            Page 4
ALWAYS USE FALL PROTECTION WHILE
WORKING AROUND ROOF OPENINGS.

Mais conteúdo relacionado

Mais procurados (11)

Air Barrier[1]
Air Barrier[1]Air Barrier[1]
Air Barrier[1]
 
850m Manual Web
850m Manual Web850m Manual Web
850m Manual Web
 
Brickhouse Torlift Pp Fdata
Brickhouse Torlift Pp FdataBrickhouse Torlift Pp Fdata
Brickhouse Torlift Pp Fdata
 
BISOL Solar Company: PV Mounting Systems 2011
BISOL Solar Company: PV Mounting Systems 2011BISOL Solar Company: PV Mounting Systems 2011
BISOL Solar Company: PV Mounting Systems 2011
 
95ZJ_13.PDF
95ZJ_13.PDF95ZJ_13.PDF
95ZJ_13.PDF
 
Download
DownloadDownload
Download
 
Fusion™ Flat Panel Mounts
Fusion™ Flat Panel MountsFusion™ Flat Panel Mounts
Fusion™ Flat Panel Mounts
 
Chrislynn Threaded Inserts - Rock Solid
Chrislynn Threaded Inserts - Rock SolidChrislynn Threaded Inserts - Rock Solid
Chrislynn Threaded Inserts - Rock Solid
 
Falk coupling molykote gn plus
Falk coupling molykote gn plusFalk coupling molykote gn plus
Falk coupling molykote gn plus
 
Ideal Platform Lifts - Guide
Ideal Platform Lifts - GuideIdeal Platform Lifts - Guide
Ideal Platform Lifts - Guide
 
Chrislynn Threaded Inserts - Precision
Chrislynn Threaded Inserts - PrecisionChrislynn Threaded Inserts - Precision
Chrislynn Threaded Inserts - Precision
 

Semelhante a LMCurbs Roof Curb Installation Instructions For Horizontal Standing Seam

Blinds First | How to install vertical blinds
Blinds First | How to install vertical blindsBlinds First | How to install vertical blinds
Blinds First | How to install vertical blinds
Blinds First
 
Honeywell 710-install-guide
Honeywell 710-install-guideHoneywell 710-install-guide
Honeywell 710-install-guide
Alarm Grid
 
Elite Om En 988 0180 01 A W
Elite Om En 988 0180 01 A WElite Om En 988 0180 01 A W
Elite Om En 988 0180 01 A W
Marinekauppa
 
Honeywell is216t-cur-install-guide
Honeywell is216t-cur-install-guideHoneywell is216t-cur-install-guide
Honeywell is216t-cur-install-guide
Alarm Grid
 

Semelhante a LMCurbs Roof Curb Installation Instructions For Horizontal Standing Seam (20)

Blinds First | How to install vertical blinds
Blinds First | How to install vertical blindsBlinds First | How to install vertical blinds
Blinds First | How to install vertical blinds
 
Sca 1 manual-headlight-alignment-system
Sca 1 manual-headlight-alignment-systemSca 1 manual-headlight-alignment-system
Sca 1 manual-headlight-alignment-system
 
Honeywell 710-install-guide
Honeywell 710-install-guideHoneywell 710-install-guide
Honeywell 710-install-guide
 
thi cong vach ngan ve sinh compact
thi cong vach ngan ve sinh compactthi cong vach ngan ve sinh compact
thi cong vach ngan ve sinh compact
 
Elite Om En 988 0180 01 A W
Elite Om En 988 0180 01 A WElite Om En 988 0180 01 A W
Elite Om En 988 0180 01 A W
 
Elite Om En 988 0180 01 A W
Elite Om En 988 0180 01 A WElite Om En 988 0180 01 A W
Elite Om En 988 0180 01 A W
 
Elite Om En 988 0180 01 A W
Elite Om En 988 0180 01 A WElite Om En 988 0180 01 A W
Elite Om En 988 0180 01 A W
 
Elite Om En 988 0180 01 A W
Elite Om En 988 0180 01 A WElite Om En 988 0180 01 A W
Elite Om En 988 0180 01 A W
 
Elite Om En 988 0180 01 A W
Elite Om En 988 0180 01 A WElite Om En 988 0180 01 A W
Elite Om En 988 0180 01 A W
 
Elite Om En 988 0180 01 A W
Elite Om En 988 0180 01 A WElite Om En 988 0180 01 A W
Elite Om En 988 0180 01 A W
 
Honeywell is216t-cur-install-guide
Honeywell is216t-cur-install-guideHoneywell is216t-cur-install-guide
Honeywell is216t-cur-install-guide
 
Exj 13
Exj 13Exj 13
Exj 13
 
Basic ShoreMaster Kit Dock Instruction
Basic ShoreMaster Kit Dock InstructionBasic ShoreMaster Kit Dock Instruction
Basic ShoreMaster Kit Dock Instruction
 
11kV Cable Termination Heat Shrink Kits 3 Core 16-25sqmm SPS 3TIS-12X-A
11kV Cable Termination Heat Shrink Kits 3 Core 16-25sqmm SPS 3TIS-12X-A11kV Cable Termination Heat Shrink Kits 3 Core 16-25sqmm SPS 3TIS-12X-A
11kV Cable Termination Heat Shrink Kits 3 Core 16-25sqmm SPS 3TIS-12X-A
 
Screw and Barrel Inspection
Screw and Barrel InspectionScrew and Barrel Inspection
Screw and Barrel Inspection
 
FrameWRX Installation Instructions
FrameWRX Installation InstructionsFrameWRX Installation Instructions
FrameWRX Installation Instructions
 
1. Heat Shrink Cable Termination (HV) - 11kV 33kV 3 Core XLPE BS6622 Cables
1. Heat Shrink Cable Termination (HV) - 11kV 33kV 3 Core XLPE BS6622 Cables1. Heat Shrink Cable Termination (HV) - 11kV 33kV 3 Core XLPE BS6622 Cables
1. Heat Shrink Cable Termination (HV) - 11kV 33kV 3 Core XLPE BS6622 Cables
 
Optex instrukcja-hx80n-am
Optex instrukcja-hx80n-amOptex instrukcja-hx80n-am
Optex instrukcja-hx80n-am
 
Section 13 - Sub-surface Ready Access
Section 13 - Sub-surface Ready AccessSection 13 - Sub-surface Ready Access
Section 13 - Sub-surface Ready Access
 
CS Unitec Air Powered Concrete Cutting Chainsaw
CS Unitec Air Powered Concrete Cutting ChainsawCS Unitec Air Powered Concrete Cutting Chainsaw
CS Unitec Air Powered Concrete Cutting Chainsaw
 

Mais de LMCurbs©

Mais de LMCurbs© (11)

LMCurbs Custom Snow Diverter in Production # 4
LMCurbs Custom Snow Diverter in Production # 4LMCurbs Custom Snow Diverter in Production # 4
LMCurbs Custom Snow Diverter in Production # 4
 
LMCurbs Custom Snow Diverter in Production # 3
LMCurbs Custom Snow Diverter in Production # 3LMCurbs Custom Snow Diverter in Production # 3
LMCurbs Custom Snow Diverter in Production # 3
 
LMCurbs Custom Snow Diverter in Production # 2
LMCurbs Custom Snow Diverter in Production # 2LMCurbs Custom Snow Diverter in Production # 2
LMCurbs Custom Snow Diverter in Production # 2
 
LMCurbs Custom Snow Diverter in Production # 7
LMCurbs Custom Snow Diverter in Production # 7LMCurbs Custom Snow Diverter in Production # 7
LMCurbs Custom Snow Diverter in Production # 7
 
LMCurbs Custom Snow Diverter in Production # 6
LMCurbs Custom Snow Diverter in Production # 6LMCurbs Custom Snow Diverter in Production # 6
LMCurbs Custom Snow Diverter in Production # 6
 
LMCurbs Custom Snow Diverter in Production # 5
LMCurbs Custom Snow Diverter in Production # 5LMCurbs Custom Snow Diverter in Production # 5
LMCurbs Custom Snow Diverter in Production # 5
 
LMCurbs Custom Snow Diverter in Production # 1
LMCurbs Custom Snow Diverter in Production # 1LMCurbs Custom Snow Diverter in Production # 1
LMCurbs Custom Snow Diverter in Production # 1
 
S-5! ColorGard System Installation Instructions
S-5! ColorGard System Installation InstructionsS-5! ColorGard System Installation Instructions
S-5! ColorGard System Installation Instructions
 
S-5! ColorGard System
S-5! ColorGard SystemS-5! ColorGard System
S-5! ColorGard System
 
LMCurbs Company Brochure
LMCurbs Company BrochureLMCurbs Company Brochure
LMCurbs Company Brochure
 
LMCurbs Featured Products
LMCurbs Featured ProductsLMCurbs Featured Products
LMCurbs Featured Products
 

Último

KLINIK BATA Jual obat penggugur kandungan 087776558899 ABORSI JANIN KEHAMILAN...
KLINIK BATA Jual obat penggugur kandungan 087776558899 ABORSI JANIN KEHAMILAN...KLINIK BATA Jual obat penggugur kandungan 087776558899 ABORSI JANIN KEHAMILAN...
KLINIK BATA Jual obat penggugur kandungan 087776558899 ABORSI JANIN KEHAMILAN...
Cara Menggugurkan Kandungan 087776558899
 
the Husband rolesBrown Aesthetic Cute Group Project Presentation
the Husband rolesBrown Aesthetic Cute Group Project Presentationthe Husband rolesBrown Aesthetic Cute Group Project Presentation
the Husband rolesBrown Aesthetic Cute Group Project Presentation
brynpueblos04
 
February 2024 Recommendations for newsletter
February 2024 Recommendations for newsletterFebruary 2024 Recommendations for newsletter
February 2024 Recommendations for newsletter
ssuserdfec6a
 

Último (10)

KLINIK BATA Jual obat penggugur kandungan 087776558899 ABORSI JANIN KEHAMILAN...
KLINIK BATA Jual obat penggugur kandungan 087776558899 ABORSI JANIN KEHAMILAN...KLINIK BATA Jual obat penggugur kandungan 087776558899 ABORSI JANIN KEHAMILAN...
KLINIK BATA Jual obat penggugur kandungan 087776558899 ABORSI JANIN KEHAMILAN...
 
WOMEN EMPOWERMENT women empowerment.pptx
WOMEN EMPOWERMENT women empowerment.pptxWOMEN EMPOWERMENT women empowerment.pptx
WOMEN EMPOWERMENT women empowerment.pptx
 
the Husband rolesBrown Aesthetic Cute Group Project Presentation
the Husband rolesBrown Aesthetic Cute Group Project Presentationthe Husband rolesBrown Aesthetic Cute Group Project Presentation
the Husband rolesBrown Aesthetic Cute Group Project Presentation
 
Dadar West Escorts 🥰 8617370543 Call Girls Offer VIP Hot Girls
Dadar West Escorts 🥰 8617370543 Call Girls Offer VIP Hot GirlsDadar West Escorts 🥰 8617370543 Call Girls Offer VIP Hot Girls
Dadar West Escorts 🥰 8617370543 Call Girls Offer VIP Hot Girls
 
Pokemon Go... Unraveling the Conspiracy Theory
Pokemon Go... Unraveling the Conspiracy TheoryPokemon Go... Unraveling the Conspiracy Theory
Pokemon Go... Unraveling the Conspiracy Theory
 
Call Girls In Mumbai Just Genuine Call ☎ 7738596112✅ Call Girl Andheri East G...
Call Girls In Mumbai Just Genuine Call ☎ 7738596112✅ Call Girl Andheri East G...Call Girls In Mumbai Just Genuine Call ☎ 7738596112✅ Call Girl Andheri East G...
Call Girls In Mumbai Just Genuine Call ☎ 7738596112✅ Call Girl Andheri East G...
 
March 2023 Recommendations for newsletter
March 2023 Recommendations for newsletterMarch 2023 Recommendations for newsletter
March 2023 Recommendations for newsletter
 
SIKP311 Sikolohiyang Pilipino - Ginhawa.pptx
SIKP311 Sikolohiyang Pilipino - Ginhawa.pptxSIKP311 Sikolohiyang Pilipino - Ginhawa.pptx
SIKP311 Sikolohiyang Pilipino - Ginhawa.pptx
 
2023 - Between Philosophy and Practice: Introducing Yoga
2023 - Between Philosophy and Practice: Introducing Yoga2023 - Between Philosophy and Practice: Introducing Yoga
2023 - Between Philosophy and Practice: Introducing Yoga
 
February 2024 Recommendations for newsletter
February 2024 Recommendations for newsletterFebruary 2024 Recommendations for newsletter
February 2024 Recommendations for newsletter
 

LMCurbs Roof Curb Installation Instructions For Horizontal Standing Seam

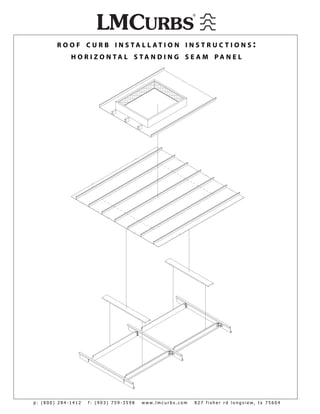
  • 1. R O O F C U R B I N S TA L L AT I O N I N S T R U C T I O N S : H O R I ZO N TA L S TA N D I N G S E A M PA N E L p: (800) 284-1412 f: (903) 759-3598 www.lmcurbs.com 827 fisher rd longview, tx 75604
  • 2. ROOF CURB INSTALLATION INSTRUCTIONS HORIZONTAL STANDING SEAM PANEL Installation Check List: _____Attach Sub-Frames Step 1 _____Layout Curb on Roof Panel Step 2 _____Back-up Channels Step 3 _____Apply Sealants & Set Curb in Place Step 4 _____Fasten Curb to Roof Panel Step 5 PARTS LIST Flat Washer Polyurethane Sealant Caulk Triple Bead Sealant Tape Nut 14 Gauge Galvanized Steel Subframe Bolt 5-1/2” tall Length is equal to the purlin spacing minus 1-3/8” Mounting Clip Back-up Channels( eld notch) #14 - 1 1/8” Neoprene Self-Tap Screw BEGIN INSTALLATION 1 ATTACH SUB-FRAMES (framed opening is already installed) Attach mounting clips to sub-frame and align the top of the sub-frame under Roof Purlin Sub-frame vertical box of roof curb and ush to the bottom side of roof sheets. Use the mounting clip as a template, mark on purlin where 7/16” holes are to be drilled. Once holes are drilled, attach mounting clips to purlins using at washers, nuts, and bolts (see drawing 1.1). Finger tighten all hardware, then upset threads to secure nuts. Attach sub-frames to mounting clips using at washers, nuts, and Drawing 1.2 bolts (see drawing 1.2). Flat washer Nut 3/8” x 1” Bolts Mounting clip Drawing 1.1 Roof Purlin *NOTICE* Sub-frame max. loading 500 lbs. WARNING! Page 1 ALWAYS USE FALL PROTECTION WHILE WORKING AROUND ROOF OPENINGS.
  • 3. ROOF CURB INSTALLATION INSTRUCTIONS HORIZONTAL STANDING SEAM PANEL 2 LAYOUT CURB ON ROOF PANEL Mark cut lines by setting roof curb(s) in place on roof panel (see Cut Line drawing 2.1) (DO NOT USE LEAD PENCIL). Upslope cut line will be s7 ” inu bm 3” less than outer edge of curb base ange (see drawing 2.2). o f cu r gth Downslope cut line will be 4” less than outer edge of base ange Len (see drawing 2.2). Remove exterior panel leaving the insulation face showing (see drawing 2.3) and cleanup all metal shavings and debris. Drawing 2.1 Top View Roof Panel Layout throat opening on the insulation Throat Opening Roof Opening and cut opening (see drawing 2.2). Insulation Cu rb Ba se Fla n ge ng Fla e se Ba rb Drawing 2.3 Cu Drawing 2.2 *Notice* Sub-frames and purlins not shown in the above picture. 3 BACK-UP CHANNELS Notch back-up channels (see drawing). Slide back-up channels under roof panel on top of sub-frames. Do not screw back-up Edge of roof opening channels to subframes. They will be secured when curb is fastened down. Cut leg of channel and fold under to form notch for sub-frame (typically 4 places). Back-up Channel Ce nte Ou rL ine Drawing 3.1 tsid eD of im Su b-F Back-up channels in place en ram sio no e fB ack -up Ch a nn el WARNING! Page 2 ALWAYS USE FALL PROTECTION WHILE WORKING AROUND ROOF OPENINGS.
  • 4. ROOF CURB INSTALLATION INSTRUCTIONS HORIZONTAL STANDING SEAM PANEL 4 APPLY SEALANTS & SET CURB IN PLACE Apply a strip of sealant tape and generous bead of caulk on the upslope side of the roof curb and on downslope side of the roof panel , apply a generous bead of caulk where the panel overlaps the side of roof curb and where side of roof curb overlaps panel (full perimeter) before setting roof curb in place (see drawing 4.1). Position roof curb over roof opening and lower into place, shift curb to align with sub-frames and roof panel. Prepare Upslope Panel Seams /2” Mark rib for cutting Fold over rib and 11 Remove marked section of rib crimp tight. Apply caulk Must ll end of standing A B before folding C seam with caulk. The downslope of curb is to be The upslope of curb is to be installed OVER the roof panel. installed UNDER the roof panel. Roof Curb Caulk (full length of curb) Roof Panel Caulk Caulk (apply as shown) (apply as shown) Caulk (full length of curb) Sealant Tape Drawing 4.1 *Notice* Sub-frames and purlins not shown in the above picture. WARNING! ALWAYS USE FALL PROTECTION WHILE Page 3 WORKING AROUND ROOF OPENINGS.
  • 5. ROOF CURB INSTALLATION INSTRUCTIONS HORIZONTAL STANDING SEAM PANEL 5 FASTEN CURB TO ROOF PANEL Fasten curb to roof panel using #14 - 1 1/8” neoprene self-tap screw Roof Panel on 4” centers (see drawing 5.1). DO NOT FASTEN CURB OR ROOF PANEL TO SUB-FRAMES. Please ensure all self-tap screws are properly tightened before moving to the next step. Must ll end of closure with caulk. Self-Tap Screws Drawing 5.1 *Notice* Sub-frames and purlins not shown in the above picture. COMPLETED INSTALLATION **Clean up installation debris before leaving area. WARNING! Page 4 ALWAYS USE FALL PROTECTION WHILE WORKING AROUND ROOF OPENINGS.