كيف أصمم كتابا ناطقا
•
0 gostou•632 visualizações

هذا الملف يحتوي على شرح مفصل وبسيط لكيفية تصميم كتاب ناطق

Recomendados
Mais conteúdo relacionado
Mais procurados
Mais procurados (20)
Semelhante a كيف أصمم كتابا ناطقا
Semelhante a كيف أصمم كتابا ناطقا (20)
Mais de Listen to me
Último
Último (20)
كيف أصمم كتابا ناطقا
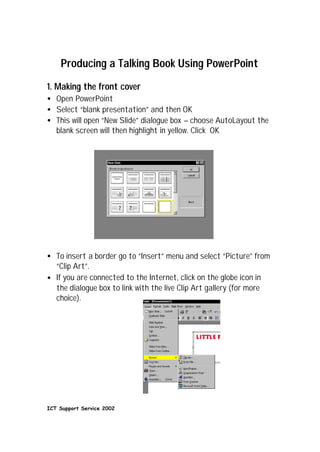
- 1. Producing a Talking Book Using PowerPoint 1. Making the front cover • Open PowerPoint • Select “blank presentation” and then OK • This will open “New Slide” dialogue box – choose AutoLayout the blank screen will then highlight in yellow. Click OK • To insert a border go to “Insert” menu and select “Picture” from “Clip Art”. • If you are connected to the Internet, click on the globe icon in the dialogue box to link with the live Clip Art gallery (for more choice). ICT Support Service 2002
- 2. • Type in your search to find an appropriate border. Click on “Go”. • When you find a suitable border, click on the small red arrow at the bottom of the thumb print to download the graphic • Select “Insert” menu and then position and size the graphic accordingly (make sure the graphic is highlighted) • Select “Insert” menu and duplicate slide to insert a new slide with the border 2. Adding the text • Select text box tool and click inside the text box to begin typing the title in the first slide • Left click and drag to highlight text in order to change the font/size/colour • Add text to each slide in this way to build up the book 3. Action Buttons • To insert an action button to turn pages of the book go to “Slide Show” menu and select “Action Button”. Click on right ICT Support Service 2002
- 3. arrow to insert into slide. Make sure it is selected and size and drag to position on the slide. • Go to “Slide Show” menu and select “Action Settings” click on hyper link to next slide and OK Inserting a new slide • Go to “Insert” menu and select “duplicate slide”. This will open a new slide with the border and action button. • You will need to adjust the text box and type in the new text accordingly. • You may also need to adjust the position of the action button. Transition between slides • To animate the slide show you will need to decide on the most appropriate animation effect between the slides. • Select “Slide Show” menu and click on “Slide transition” ICT Support Service 2002
- 4. • This will open a dialogue box with a range of options. Select the desired effect and preview. If you are happy then click on “apply to all”. This will keep the page turns of the book consistent. Adding the narraration: • Go to “Insert “menu and select “ movies and sounds select “record sound” ICT Support Service 2002
- 5. • A record dialogue box will open. When you are ready to begin the narration click on the red record button. Click on the stop button when you have finished. • To check the recording click on the right arrow button to play back the narration. Click OK when you are happy. • Drag the sound icon off to the grey area so that it will not appear on the slide • Select “Slide Show” menu and click on “custom Animation” • Click on the media (sound) file and drag in to the “animation order” box and use the arrows on the side to select the correct running order (i.e. you will want the sound to run after the appropriate text has appeared) ICT Support Service 2002
- 6. • Go to “start animation” box and click “automatically” to hear the narration on the “page turn”. Click OK. • Don’t forget to save the slide show • To check the running order of the Talking Book go to “slide show” menu and click on “view show” ICT Support Service 2002