SlideShare uma empresa Scribd logo
1 de 15
Baixar para ler offline
The Rule of Thirds
The basic principle behind the rule of        The theory is that if you
thirds is to imagine breaking an image        place points of interest in the
down into thirds (both horizontally and       intersections or along the lines
vertically) so that you have 9 parts. As      that your photo becomes more
follows.                                      balanced and will enable a viewer
                                              of the image to interact with it
                                              more naturally. Studies have
                                              shown that when viewing images
                                              that people’s eyes usually go to
                                              one of the intersection points
                                              most naturally rather than the
                                              centre of the shot – using the rule
                                              of thirds works with this natural
                                              way of viewing an image rather             In learning how to use the rule of
                                              than working against it.                thirds (and then to break it) the most
                                                                                       important questions to be asking of
                                                                                                    yourself are:
                                                                                      What are the points of interest in this
                                                                                                       shot?
                                                                                    Where am I intentionally placing them?
                                                                                     Once again – remember that breaking
As you’re taking an image you would                                                     the rule can result in some striking
have done this in your mind through your                                                  shots – so once you’ve learnt it
viewfinder or in the LCD display that you                                           experiment with purposely breaking it to
use to frame your shot.                                                                        see what you discover.
With this grid in mind the ‘rule of thirds’                                          Lastly – keep the rule of thirds in mind
now identifies four important parts of the                                            as you edit your photos later on. Post
image that you should consider placing                                                  production editing tools today have
points of interest in as you frame your       Using the Rule of Thirds comes         good tools for cropping and re-framing
image.                                        naturally to some photographers        images so that they fit within the rules.
Not only this – but it also gives you four    but for many of us takes a little     Experiment with some of your old shots
‘lines’ that are also useful positions for    time and practice for it to become       to see what impact it might have on
elements in your photo.                       second nature.                                        your photos.


                            Photography
                          Composition Tips
  composition.indd 1                                                                                            10/11/2012 22:24:28
Working the Lines in Your
When
               Photography
             considering         the
composition of an image one
of the elements that I suggest
digital camera owners look for         Learning how to use lines in photography doesn’t just happen. It takes time
are ‘Lines’.                         and practice to become good at it.
The lines that can be found                                                      A good way to practice is to go back
in images are very powerful                                                    through older images that you’ve taken
elements that with a little practice                                           and look for lines that worked well and
can add dynamic impact to a                                                                 those that didn’t.
photograph in terms of mood as
well as how they lead an image’s                                                 Then next time you go out with your
viewer into a photo.                                                             camera, before you frame your shot
                                                                               consciously ask yourself what lines are
                                                                                in front of you and how you might use
                                                                              them to add something to your next shot
                                                                             by working with them rather than against
                                                                           them.

                                    Also ask yourself whether the lines form any interesting patterns that you might be
                                    able to accentuate to add a further layer of interest to the shot.

                                     (How to use horizontal, vertical and diagonal lines)
                                    Horizons are the most common horizontal line to be found in photographs and they
                                      often act as a dividing point in a photograph – in effect an anchor that the rest of
There are three types of                                          the image is formed around.
lines,  ‘horizontal’,  ‘vertical’     Horizons should generally not be placed in the middle of your frame. This leaves
and ‘diagonal’. Each one has         an image feeling unsettled compositionally. A much more effective technique is to
a different impact upon a                            place them in the upper or lower third of your frame.
photograph and should be looked         Layers of horizontal lines can create rhythm or patterns in an image that can
for as you frame your shots.                             become the focus of an image in and of itself.
                                    Vertical lines have the ability to convey a variety of different moods in a photograph
                                      ranging from power and strength (think of skyscrapers) to growth (think of trees).
                                       As horizontal lines can be accentuated by shooting in horizontal format vertical
                                    lines can be used very effectively by swapping the way you hold your camera into a
                                      vertical framing. This lengthens the vertical subject further which can emphasize
                                                                           it’s height.
                                    Diagonal lines generally work well to draw the eye of an image’s viewer through the
                                       photograph. They create points of interest as they intersect with other lines and
                                                      often give images depth by suggesting perspective.
                                     Different studies have been done into how people view images and many of them
                                      say that a natural way into an image is by traveling left to right and so a diagonal
                                    line starting at the bottom left and moving to the top right of an image can be quite
                                                                       useful and natural.


                           Photography
                         Composition Tips
 composition.indd 2                                                                                         10/11/2012 22:24:28
Finding Fresh Angles to
                       Shoot From
                                              One of the most effective ways to
                                              make your digital images more
                                              interesting to the eye is to change
                                              the angle that you’re shooting
                                              from.


           Changing the angle that you shoot from impact the feeling of size of your subject but it can have a real
                                    effect upon the light and shade and patterns on it.


                                                                                    The variety of perspectives that you can
                                                                                    shoot images from is only limited by your
                                                                                    imagination. In addition to standing in
                                                                                    front of your subject you might like to try:
                                                                                         Lying or crouching in front of it,
                                                                                                Climbing above it,
                                                                                    Putting the camera on the ground and
                                                                                    chancing it (some cameras with swing
                                                                                    out LCD displays make this particularly
                                                                                    easy as you can frame your shots rather
                                                                                                 than chancing it)

                              Photography
                            Composition Tips
composition.indd 3                                                                                                  10/11/2012 22:24:29
Photographing Children
                       Composition
  Getting on your hands and knees                                                      The same principle of getting
  or crouching down before you                                                         down low applies with older
  take a shot of a child takes you                                                     children although you do have a
  into their world and helps you to                                                    little less lying on the floor with
  engage with them through the                                                         them when they are at an age of
          images you take.                                                                            walking.


                                            If your camera has a continuous
                                               shooting mode it might also
                                              be worth keeping that on with
                                              bigger kids who tend to move
                                                      around more.


Benefit of continuous shooting is that you can end up with a great series of shots that might go nicely together to tell a
                                                              story.
 Taking pictures with a wide angle focal length can be particularly effective when getting in close to children. It opens
    up the angles and gives all kinds of interesting perspectives. I use a 17-40mm zoom lens on my DSLR which is
                brilliant for this. It still allows me to zoom in a little but at 17mm the impact is amazing.
A zoom lens allows you to take photos from further afield and will particularly be useful if the child is distracted by you
      taking photos. I use a 70-200mm zoom (the third image above was taken with it) which I find very useful.


                            Photography
                          Composition Tips
  composition.indd 4                                                                                          10/11/2012 22:24:29
Getting Horizons Horizontal
         Experiment with holding your camera at different kinds of angles and put your horizon purposely offline.
         My rule of thumb is to either make it perfectly flat or very obviously off line. ‘Slightly’ off horizontal does
           nothing except make your photos viewers feel dizzy or lean their heads when they view your shots.


           The simplest way to get your horizon horizontal simply line it up with the top or bottom of your view
           finder. Keep in mind that the edge of your frame in your viewfinder or LCD screen will be the edges
          of the actual image and will be the reference point for the eventual viewers of your shots to work out
                                           whether your shot is straight or not.
         Many cameras also have markers in their view finder (often a rectangle or set of focussing spots). These
                               can often be used to help line up your horizons mid frame.


             Some cameras have a ‘rule of thirds’ mode where they overlay a grid in your LCD/viewfinder to show
              you where to place your points of interest. While they’re not intended to help you get your images
                          straight – they can be helpful markers to show you where a level line is.

           A lot of photo editing software these days comes with a ‘straighten’ or ‘rotate’ feature so if this tip has
           made you go back through your old photos and you’ve shots that are crooked you might want to learn
                                                   how to use these tools.


                              Photography
                            Composition Tips
composition.indd 5                                                                                                10/11/2012 22:24:29
Getting Images Straight
                             Some common mistakes in all kinds of photography are crooked lines.


                The same principle applies to many other types of photographs. Another common type is shots of
                       building which in most cases are built to be level and have lots of straight lines.


                                                                   While it is often difficult to get all the lines perfectly
                                                                   straight when taking a shot of a building looking up
                                                                 (you’ll find unless you’re perfectly straight on and at a
                                                                 height that is even with the middle of the building that
                                                                 your vertical lines will taper towards the top) this shot
                                                                is obviously off line if you look at how the bottom of the
                                                                 painting slopes towards the right in comparison to the
                                                                               bottom edge of the view finder.
                                                                   While the tapering effect would have remained the
                                                                    image would have been vastly improved with the
                                                                                camera straightened slightly.


So the rule of thumb – unless you’re going for real effect
(and if you are, angle the camera on a greater angle than
 above) take a moment before you take your shots to ask
  yourself a question about what lines there are in your
                        view finder.
  Don’t just consider the horizon but also look at other
 horizontal lines and the vertical lines. Use the edges on
the edges of your view finder as a gauge and once you’ve
 got them lined up make sure you don’t move around too
 much and you’ll be much more likely to get things right.


                                Photography
                              Composition Tips
 composition.indd 6                                                                                              10/11/2012 22:24:29
Fill Your Frame
Use your Optical Zoom – most point and shoot digital cameras these days come with a zoom lens and all DSLRs are
                                           able to be fitted with one. Use them.
Use your Legs – most photographers have a built in zoom in the form of their legs. Don’t just rely upon your cameras
                              zoom but actually position yourself effectively for close in shots.
Crop your Shots – the other option is to zoom in manually at home after you’ve taken your shots. This is a handy option
to have but I personally prefer to use one of the first two options where I can because cropping shots later means if you
want a large image that you’ll find that it becomes more pix-elated. This is a good option if you’re just trimming shots
                            but any major cropping will result in a loss of quality of your image.
Digital Zooms – Another option that many digital camera owners use is to utilize their ‘digital zoom’. Most digital
cameras these days have boast about having digital zooms but don’t tell you that to use them will decrease the quality
of your shots in a similar way that cropping your shots can. In essence a digital zoom fills your frame by increasing the
size of pixels in your shots when can leave you with a grainy impact. I would highly recommend switching off your digital
zoom feature and relying upon option 1 and 2 above. If you still need to get in closer you can always crop your shots and
                                   achieve the same results as using your digital zoom.


              While empty spaces can be used effectively in photos to create stunning results, you’re much more
                   likely to get a ‘wow’ from those looking at your photos if your shots are filled with interest.


                       This technique is particularly important when taking pictures of people whose
                       facial features tend to disappear when you move more than a few meters
                                                       away from them.


                       While it can be appropriate to take shots that put a person in context with the
                       environment that they are in, if they get lost in the picture you might as well
                                   just take a shot of the scene and leave them out of it.


                               Photography
                             Composition Tips
 composition.indd 7                                                                                            10/11/2012 22:24:29
The Importance of Focal
                       Points
                               “What is the Focal Point in this Picture?”


Some other ways to ask                                                                         the same question might
include – What is the                                                                          central point of interest?
What will draw the eye of                                                                      the viewers of this picture?
What in this image will                                                                        make it stand out from
others? What is my subject?
The reason a focal point                                                                       is important is that when
you look at an image your                                                                      eye will generally need a
‘resting place’ or something                                                                   of interest to really hold
it. Without it you’ll find                                                                     people will simply glance
at your shots and then                                                                         move on to the next one.
Once you’ve identified                                                                         a point of interest or
focal point you then                                                                           should ask yourself how
you can enhance it.


                      6 Techniques to Enhance the Focal Point in an Image
  A focal point can be virtually anything ranging from a person, to a building, to a mountain, to a flower etc. Obviously
the more interesting the focal point the better – but there are other things you can do to enhance it’s power including:
       Position – Place it in a prominent position – you might want to start with the rule of thirds for some ideas.
             Focus – Learn to use Depth of Field to blur out other aspects in front or behind your focal point.
 Blur – If you really want to get tricky you might want to play with slower shutter speeds if your main subject is still and
                                                things around it are moving.
        Size – making your focal point large is not the only way to make it prominent – but it definitely can help.
   Colour – using contrasting colours can also be a way of setting your point of interest apart from it’s surroundings.
    Shape – similarly contrasting shapes and textures can make a subject stand out – especially patterns that are
                                                 repeated around a subject.
                       Keep in mind that a combination of above elements can work well together.
 Lastly – don’t confuse the viewer with too many competing focal points which might overwhelm the main focal point.
   Secondary points of interest can be helpful to lead the eye but too many strong ones will just clutter and confuse.


                            Photography
                          Composition Tips
 composition.indd 8                                                                                            10/11/2012 22:24:29
Creating Active Space -
                     Photographing Moving
                            Subjects
                                                  A tip for action photography is to give moving
                                                  subjects space to ‘move into.

                                                  Some call the space in front of a moving
                                                  subject the ‘active space‘ in a photograph.
                                                  Alternatively the space behind your subject is
                                                  often called ‘dead space’.

                                                  The reason that this compositional technique
                                                  is used is that when someone views an image
                                                  and spots that your subject is moving in a
                                                  direction – their eye naturally moves in that
                                                  direction too. It’s quite instinctive.


      Working with the way your viewer will
  instinctively view your image helps to create
 balance, drama and anticipation in your shot.


  This technique of creating active spaces in
   action shots can be applied in many types
 of photography including sports (cars, bikes,
 people etc), wildlife (photographing a running
  animal) or virtually any other subject matter
                 that is moving.


                          Photography
                        Composition Tips
composition.indd 9                                                                    10/11/2012 22:24:30
Getting Backgrounds Right
                        1. Check your Background Before Hitting the Shutter Release
Always scan the background of your shots before taking a shot. Look for colours that don’t fit with the rest
of the image, bright patches that might distract the eye, lines that clash, people that don’t belong etc.
                                                    2. Move Your Subject
This is once again a fairly simple technique but is probably the first thing you should consider. Quite often asking a portrait
subject to take a step to the left or right will fix things either by putting the distraction behind them or by putting it out of frame.
                                             3. Change your Shooting Angle
If you have distracting elements in the background of a shot but can’t move your subject another strategy is to move yourself
and shoot from a new angle. This might mean rotating around your subject but could also include getting down low to make
the sky the background or even getting up high and shooting down onto your subject to make the background the ground.
                                       4. Using Aperture to Blur Backgrounds
One of the most useful things to learn as a way to combat distractions in backgrounds (and foregrounds) is
to use the power of your lens to throw the background out of focus using depth of field. What you’re trying to
achieve with this technique is a nice blurred background where you can’t really make out what’s going on there.
The easiest way to do this is to use a wide aperture (the smaller the number the wider
the aperture). The wider your aperture the more blurry your background should become.
The quickest way to see the impact of this strategy is to switch your camera into aperture priority mode and to take
a number of shots at different apertures. Start with an aperture of f/20 and work your way down – one stop at a
time. Once you get down to under f/4 you’ll start seeing the background in your shots getting blurrier and blurrier.
                                    5. Using Focal Length to Blur Backgrounds
Another way to help get your backgrounds nice and blurry is to use a lens with a long focal length. Longer
telephoto do help a little to get narrower depth of field (although the amount is less than many think). In actual
fact the impact is smaller than it seems and the main reason for the change is that with a longer focal length
the subject actually takes up more space in the frame. Lots of arguments have been had over whether focal
length impacts this – you can read more about it here and here – I’ll leave it to the experts to discuss the finer
points but will say that using longer focal lengths does seem to have some impact and is worth experimenting with.
                                    6. Place Subjects In front of Open Spaces
Placing your subject a long way in front of other objects will also help to make those objects more blurry. For example if you
have the choice between shooting your subject standing right in front of a brick wall or standing in front of an open field –
the open field shot will have a much more blurred background simply because the brick wall is just centimetres from your
subject and inside the focal range whereas an open field stretches off into the distance where everything will be out of focus.
                                          7. Fill your frame with your subject
One of the most effective ways of removing distractions from backgrounds is to remove the background
altogether by totally filling the frame with your subject. Get up close and/or use your zoom lens to tightly
frame the shot and you’ll not only remove distractions but could end up with a high impact shot as well.
                                             8. Make your Own Background
Sometimes there just isn’t any suitable background and so you might want to consider making your own. This
could range from buying a purpose built studio background or simply buying some cloth to do the job for you.
I know of one keep photographer who goes out shooting photographic portraits and
carries large coloured sheets of card with him to put up on walls to act as a background.
The other thing to keep in mind is that in many instances you can move things around in the background of
your shots (especially if you’re shooting indoors). For example I was recently photographed in my home for
a newspaper and the photographer had me move a number of pieces of furniture during the shoot because
they were distracting in the shots. It took a little effort but the impact in the shots was quite incredible.
                                                      9. Post Processing
I’m no expert in using photo editing software but there are numerous ways of editing a shot after you’ve taken it
to get rid of distracting elements. These can include blurring techniques, actual removing of elements and
replacing them and techniques such as selective colouring (i.e. making your subject stand out by making your

                              Photography
Background                                                black                                              and
White                                                                             (or                          at
Least          sucking          some           of         the        colour           out          of         it).

                            Composition Tips
  composition.indd 10                                                                                                    10/11/2012 22:24:30
Framing Your Shots
           Framing is the technique of drawing attention to the subject of your image by blocking other parts of the
                                                image with something in the scene.
                                             The benefits of framing pictures include:
           1. Giving the photo context (for example framing a scene with an archway can tell you something about
           the place you are by the architecture of the archway or including some foliage in the foreground of a shot
                                            can convey a sense of being out in nature).
           2. giving images a sense of depth and layers (in essence framing a shot generally puts something in the
                                      foreground which adds an extra dimension to the shot).
           3. leading the eye towards your main focal point (some ‘frames’ can draw your photo’s viewer into the
           picture just by their shape). Some also believe that a frame can not only draw the eye into a picture but
                that it keeps it there longer – giving a barrier between your subject and the outside of the shot.
           4. intriguing your viewer. Sometimes it’s what you can’t see in an image that draws you into it as much as
           (if not more than) what you can see in the picture. Clever framing that leaves those viewing your image
           wondering a little or imagining what is behind your frame can be quite effective (get it wrong and it can
                                                      also be quite annoying!).


   Frames for photographs come in all shapes and sizes and can include shooting through overhanging branches,
shooting through windows, using tunnels, arches or doorways – you can even use people (for example shooting over
                                           shoulders or between heads) etc.
 Your frame doesn’t need to go completely around the edges of your image – they might just be on one or two edges
                                                      of your shot.
  My rule of thumb when considering framing is to ask the question – ‘will this add to or take away from the image?’
    Sometimes framing can just add clutter to a shot and make it feel cramped – but at other times it can be the
                               difference between an ordinary shot and a stunning one.
  Lastly – if you do use framing techniques you also need to consider whether you want your frame to be in focus or
  not. In some instances a nicely blurred frame will really add a sense of mood and depth to your shots (in this case
use a large aperture) but in other cases to have your frame in focus can help with adding context to the scene (in this
                                            case choose a narrow aperture.


                               Photography
                             Composition Tips
 composition.indd 11                                                                                           10/11/2012 22:24:30
How to Use Converging
                        Lines to Enhance Your
                            Photography
                                       4 Tips Regarding Converging Lines
1. Experiment with Positioning is that you’ll end up with a more dynamic shot. Symmetrical and vertical placement of
the lines can be powerful but diagonal lines tend to convey movement.
Alternatively stepping away from the start of the lines can give another perspective – as can holding your camera on
an angle to give another                                                                        diagonal framing of the
lines.

2. Wide Angle Lenses                                                                           – different lenses
can totally change the                                                                         impact of a shot with
converging lines. I find                                                                       that a wide angle
lens can be particularly                                                                       useful – especially
when positioning yourself                                                                      between the two lines.
This will help to give the                                                                     perception that the
distance between the                                                                           lines at the starting
point of the image is                                                                          wider than it is. This
exaggeration of the width                                                                      of your lines can have
a powerful impact upon                                                                         your shot.

3. Positioning the                                                                             ‘convergence’ - one
thing to consider when                                                                         you have converging
lines in an image is that                                                                      they draw the eye into
a shot – towards the point                                                                     that they converge –
this becomes one of the                                                                        most important parts
of this image – a focal                                                                        point.
As you’re framing your                                                                         shot ask yourself
– ‘where is the most                                                                           effective position to
frame this?”
Keep in mind rules like                                                                        the Rule of Thirds that
says that the intersecting                                                                     points of imaginary
lines a third of the way                                                                       into an image are key
points for positioning                                                                         points of interest.
Also know that if the                                                                          point of convergence
is outside the frame of                                                                        the shot that you are
leading the eye out of                                                                         your shot. This could
leave a shot unbalanced                                                                        and with tension –
alternatively it could                                                                         enhance the shot
and leave your viewers                                                                         wondering about the
place that they converge.
4. Adding Interest at the                                                                      Point of Convergence
– Sometimes it is worth                                                                        enhancing the point
of convergence with                                                                            something of interest
(for example waiting until                                                                     a train appears in the
distance on the tracks –
at the top of stairs) – on
                            Photography                                                        or positioning a person
                                                                                               other occasions the
composition of the shot is
adding an extra subject.  Composition Tips                                                     strong enough without


  composition.indd 12                                                                                     10/11/2012 22:24:30
4 Rules of Composition for
        Landscape Photography
                                                 1. Diagonal Lines
Using diagonal lines can be a very effective way of drawing the eye of those viewing an image into it and to the main
                                                        focal point.
The ‘lines’ need not be actual lines – they could be the shape of a path, a line of trees, a fence, river or any other feature
                                                       in an image.
Converging lines (two or more lines coming from different parts of an image to a single point) can be all the more
                                                         effective.


                                              2. Geometric Shapes

By positioning key aspects of a landscape on points of a geometric shape you can help create a balanced composition. Perhaps
the most common and easiest way to do this is to use a ‘triangle’ shape between objects in an image with three objects in a
                                 frame positioned with one to each side and one more central.
 Using Geometric Shapes in this way isn’t something that I’ve done a lot of – but it is one technique to get balance in a shot.


                                              3. The Rule of Thirds

The Rule of Thirds gets trotted out more often than any other in all types of photography and is one of the first rules
of composition taught to most photography students. While sometimes it can feel a little cliché it can also be a very
effective technique in landscapes (although keep in mind that breaking this (and other rules) can also produce dramatic
                                                  and interesting shots).
Position key points of interest in a landscape on the intersecting point between imaginary ‘third’ points in an image and
               you’ll help give your image balance and help those focal points to really capture attention.


                                                4. Framing Images
While adding points of interest to a foreground is an important technique for adding interest to landscape shots – a
          similar technique is to ‘frame’ the shot by adding interest to other parts of the edges of an image.
Perhaps the most common way of framing a landscape shot is to include an overhanging branch in the upper section of
                               a shot. Similarly framing a shot with a bridge might work.


                             Photography
                           Composition Tips
  composition.indd 13                                                                                            10/11/2012 22:24:30
How to Break the ‘Rules’ of
            Photography
Hold Your Camera on an Angle                                       Ignore the ‘Active Space’ Rule for Moving
                                                                   Subjects
One of the ‘rules’ of photography that I talked about very
early in the development of Digital Photography School was         The idea is that if you are photographing a subject that
to do everything you can to keep your images ‘straight’ (and       is moving you should place more empty space in front
your horizons horizontal).                                         of it than behind it. This gives the viewer of the image
There are a lot of instances when you’d want to follow this        a sense of where the subject is moving and creates a
rule pretty carefully (like in most landscapes where a horizon     sense of anticipation.
should probably be straight) – but breaking it can lead to         While following this rule can produce some excellent
images with drama, a feeling of energy and action and fun.         results, breaking it can add a little tension and intrigue
The key with breaking this rule is to not to ‘slightly break it’   to your images.
(or you’ll have people wondering if you meant it or not) but       It can also convey a sense of speed and/or give the
to give your wrist a real twist and to break it obviously.         viewer a sense of where the subject has been rather
                                                                   than where they are headed.
                                                                   For instance – the image to the left would not have
Break the Rule of Thirds
                                                                   been as dramatic without the trailing smoke behind the
                                                                   place. The fact that it’s approaching the top edge of the
The good old ‘rule of thirds‘ makes a lot of sense in many         frame also gives a sense of speed as it almost bursts
types of photography (if you don’t know what the rule of           out of the frame (not to mention the clever mirroring
thirds is see out tutorial on it).                                 and contrasts in the image).
The Rule of Thirds does work well as a compositional rule in
many situations – however placing your subject dead centre
in an image can also produce powerful and confronting
images – particularly portraits where the subject is looking
directly down the barrel or where you are presented with a
scene with real symmetry like the one to the left.
Next time you’re out with your camera experiment with
composing shots both to follow and break the rule of thirds –
you’ll find in doing so you can end up with two very different
interpretations of the same scene.


                             Photography
                           Composition Tips
  composition.indd 14                                                                                           10/11/2012 22:24:30
How to Break the ‘Rules’ of
           Photography        Experiment with Different Framings with Portraits

 In a similar way to our previous post on breaking the rule of ‘Active Space’ when photographing moving
                   subjects – a similar technique can be used when photographing people.
 When taking portraits it is customary to position your subject with more space on the side of their head
                           where they are facing (or give them space to look into).
  If your subject is looking off to one side you would generally give them a little extra room to look into.
        This creates balance and gives viewers of the shot a sense of where your subject is looking.
  However, as we’ve found with other broken rules in this series of posts, breaking this rule can produce
                                          some eye catching shots also.
  So next time you’re doing some portrait work experiment with different poses and framing. Take some
  shots with your subject looking directly at the camera, some with them looking to one side with more
                              space to look into and some the other way around.
       You’ll find that you’ll end up with three quite different moods in the three different framings.
                                             Taking Unfocused Photos

               There are two main strategies if you’re wanting to explore purposely ‘unfocused’ images:
1. You might choose to focus on a seemingly unimportant element of the scene (do this by choosing a wide aperture
        which will give a narrow depth of field and focus on something in front of or behind your main subject).
 2. The other option is to make your full image out of focus but choosing to focus well beyond or in front of your main
 subject. Again, a wide aperture will help here and you will probably need to switch your camera to manual focusing
                                mode or it will attempt to find something to focus upon.
  This second option will take a little experimentation. Get things too unfocused and you’ll end up with a completely
unrecognisable subject – the key is to have enough focus for it to be recognizable but out of focus enough to create a
                                                 wonderful dreamy mood.

                                      Use a High ISO to Create Grainy Shots

While not really a ‘rule’ of photography – it is generally accepted in most photographic tutorials that you should avoid
noise in your images at all costs by choosing the lowest ISO possible for the light situation that you’re shooting in. This
   will leave you with shots that are as smooth, clean and sharp as possible for the lighting conditions that you’re in.
 While this is a recommended practice in most shooting circumstances – there are times where ramping up your ISO
                                setting to it’s maximum can create some interesting effects.
   Grainy or noisy shots can give your image a gritty and raw quality that creates a completely different mood in your
                                                           shots.
 I should say in concluding that this technique is getting more and more difficult as an in camera technique because
 manufacturers are getting better and better at eliminating noise and grain from high ISO settings. In the ‘old day’s of
  film this was a lot easier to do as high ISO films naturally had lovely gritty grain to them. Some cameras will end up
with muddy/murky shots instead. A better route is probably to take a shot at a lower ISO and do some post production
work to get the grainy effect that you’re after – however sometimes it’s more fun to try to get these effects in camera.


                            Photography
                          Composition Tips
 composition.indd 15                                                                                          10/11/2012 22:24:30

Mais conteúdo relacionado

Semelhante a Composition

Semelhante a Composition (20)

Rule of thirds
Rule of thirdsRule of thirds
Rule of thirds
 
Rule of thirds power point
Rule of thirds power pointRule of thirds power point
Rule of thirds power point
 
Rule of thirds & Composition
Rule of thirds & CompositionRule of thirds & Composition
Rule of thirds & Composition
 
Lesson 3 photography
Lesson 3 photographyLesson 3 photography
Lesson 3 photography
 
Photography powerpoint
Photography powerpointPhotography powerpoint
Photography powerpoint
 
Rule of Thirds
Rule of ThirdsRule of Thirds
Rule of Thirds
 
Camera compostion
Camera compostionCamera compostion
Camera compostion
 
Photography rules powerp
Photography rules powerpPhotography rules powerp
Photography rules powerp
 
Rules of composition
Rules of compositionRules of composition
Rules of composition
 
Composing a good photograph
Composing a good photographComposing a good photograph
Composing a good photograph
 
Photography rules powerp
Photography rules powerpPhotography rules powerp
Photography rules powerp
 
Placement of objects
Placement of objectsPlacement of objects
Placement of objects
 
Lesson 3 photographic composition
Lesson 3 photographic compositionLesson 3 photographic composition
Lesson 3 photographic composition
 
Photographic Techniques
Photographic TechniquesPhotographic Techniques
Photographic Techniques
 
Rule of thirds
Rule of thirdsRule of thirds
Rule of thirds
 
Photography rules
Photography rulesPhotography rules
Photography rules
 
Critique Presentation
Critique PresentationCritique Presentation
Critique Presentation
 
Photography unit 1 rule of thirds
Photography unit 1   rule of thirdsPhotography unit 1   rule of thirds
Photography unit 1 rule of thirds
 
Depth of field
Depth of fieldDepth of field
Depth of field
 
In Control Of The Image
In Control Of The ImageIn Control Of The Image
In Control Of The Image
 

Mais de Webmaster

Our Color Wheel
Our Color WheelOur Color Wheel
Our Color WheelWebmaster
 
Ba color wheel
Ba color wheelBa color wheel
Ba color wheelWebmaster
 
Google's next plan
Google's next planGoogle's next plan
Google's next planWebmaster
 
SAVE OUR SUPPLY
SAVE OUR SUPPLYSAVE OUR SUPPLY
SAVE OUR SUPPLYWebmaster
 
Corporate Identity Letterhead
Corporate Identity LetterheadCorporate Identity Letterhead
Corporate Identity LetterheadWebmaster
 
Corporate Identity Business card
Corporate Identity Business card Corporate Identity Business card
Corporate Identity Business card Webmaster
 
Border security
Border securityBorder security
Border securityWebmaster
 
Oxfam great gifts with real rewards unwrapped catalogue
Oxfam great gifts with real rewards unwrapped catalogueOxfam great gifts with real rewards unwrapped catalogue
Oxfam great gifts with real rewards unwrapped catalogueWebmaster
 
Oxfam shop christmas catalogue 2012
Oxfam shop  christmas catalogue 2012Oxfam shop  christmas catalogue 2012
Oxfam shop christmas catalogue 2012Webmaster
 
Typography dos and don’ts
Typography dos and don’tsTypography dos and don’ts
Typography dos and don’tsWebmaster
 
16 page imposition method
16 page imposition method16 page imposition method
16 page imposition methodWebmaster
 
national broadband network
national broadband networknational broadband network
national broadband networkWebmaster
 
Highspeed Broadband Checklist
Highspeed Broadband ChecklistHighspeed Broadband Checklist
Highspeed Broadband ChecklistWebmaster
 
Triple bottom line
Triple bottom lineTriple bottom line
Triple bottom lineWebmaster
 

Mais de Webmaster (20)

Our Color Wheel
Our Color WheelOur Color Wheel
Our Color Wheel
 
Ba color wheel
Ba color wheelBa color wheel
Ba color wheel
 
Emilios
EmiliosEmilios
Emilios
 
Google's next plan
Google's next planGoogle's next plan
Google's next plan
 
SAVE OUR SUPPLY
SAVE OUR SUPPLYSAVE OUR SUPPLY
SAVE OUR SUPPLY
 
Impositions
ImpositionsImpositions
Impositions
 
Corporate Identity Letterhead
Corporate Identity LetterheadCorporate Identity Letterhead
Corporate Identity Letterhead
 
Corporate Identity Business card
Corporate Identity Business card Corporate Identity Business card
Corporate Identity Business card
 
Border security
Border securityBorder security
Border security
 
Oxfam grow
Oxfam growOxfam grow
Oxfam grow
 
Oxfam great gifts with real rewards unwrapped catalogue
Oxfam great gifts with real rewards unwrapped catalogueOxfam great gifts with real rewards unwrapped catalogue
Oxfam great gifts with real rewards unwrapped catalogue
 
Oxfam shop christmas catalogue 2012
Oxfam shop  christmas catalogue 2012Oxfam shop  christmas catalogue 2012
Oxfam shop christmas catalogue 2012
 
Be humankind
Be humankindBe humankind
Be humankind
 
Brand audit
Brand auditBrand audit
Brand audit
 
Typography dos and don’ts
Typography dos and don’tsTypography dos and don’ts
Typography dos and don’ts
 
16 page imposition method
16 page imposition method16 page imposition method
16 page imposition method
 
national broadband network
national broadband networknational broadband network
national broadband network
 
Highspeed Broadband Checklist
Highspeed Broadband ChecklistHighspeed Broadband Checklist
Highspeed Broadband Checklist
 
Target
TargetTarget
Target
 
Triple bottom line
Triple bottom lineTriple bottom line
Triple bottom line
 

Último

Visit to a blind student's school🧑‍🦯🧑‍🦯(community medicine)
Visit to a blind student's school🧑‍🦯🧑‍🦯(community medicine)Visit to a blind student's school🧑‍🦯🧑‍🦯(community medicine)
Visit to a blind student's school🧑‍🦯🧑‍🦯(community medicine)lakshayb543
 
Inclusivity Essentials_ Creating Accessible Websites for Nonprofits .pdf
Inclusivity Essentials_ Creating Accessible Websites for Nonprofits .pdfInclusivity Essentials_ Creating Accessible Websites for Nonprofits .pdf
Inclusivity Essentials_ Creating Accessible Websites for Nonprofits .pdfTechSoup
 
ECONOMIC CONTEXT - PAPER 1 Q3: NEWSPAPERS.pptx
ECONOMIC CONTEXT - PAPER 1 Q3: NEWSPAPERS.pptxECONOMIC CONTEXT - PAPER 1 Q3: NEWSPAPERS.pptx
ECONOMIC CONTEXT - PAPER 1 Q3: NEWSPAPERS.pptxiammrhaywood
 
ISYU TUNGKOL SA SEKSWLADIDA (ISSUE ABOUT SEXUALITY
ISYU TUNGKOL SA SEKSWLADIDA (ISSUE ABOUT SEXUALITYISYU TUNGKOL SA SEKSWLADIDA (ISSUE ABOUT SEXUALITY
ISYU TUNGKOL SA SEKSWLADIDA (ISSUE ABOUT SEXUALITYKayeClaireEstoconing
 
Incoming and Outgoing Shipments in 3 STEPS Using Odoo 17
Incoming and Outgoing Shipments in 3 STEPS Using Odoo 17Incoming and Outgoing Shipments in 3 STEPS Using Odoo 17
Incoming and Outgoing Shipments in 3 STEPS Using Odoo 17Celine George
 
Karra SKD Conference Presentation Revised.pptx
Karra SKD Conference Presentation Revised.pptxKarra SKD Conference Presentation Revised.pptx
Karra SKD Conference Presentation Revised.pptxAshokKarra1
 
Music 9 - 4th quarter - Vocal Music of the Romantic Period.pptx
Music 9 - 4th quarter - Vocal Music of the Romantic Period.pptxMusic 9 - 4th quarter - Vocal Music of the Romantic Period.pptx
Music 9 - 4th quarter - Vocal Music of the Romantic Period.pptxleah joy valeriano
 
How to do quick user assign in kanban in Odoo 17 ERP
How to do quick user assign in kanban in Odoo 17 ERPHow to do quick user assign in kanban in Odoo 17 ERP
How to do quick user assign in kanban in Odoo 17 ERPCeline George
 
What is Model Inheritance in Odoo 17 ERP
What is Model Inheritance in Odoo 17 ERPWhat is Model Inheritance in Odoo 17 ERP
What is Model Inheritance in Odoo 17 ERPCeline George
 
ROLES IN A STAGE PRODUCTION in arts.pptx
ROLES IN A STAGE PRODUCTION in arts.pptxROLES IN A STAGE PRODUCTION in arts.pptx
ROLES IN A STAGE PRODUCTION in arts.pptxVanesaIglesias10
 
Full Stack Web Development Course for Beginners
Full Stack Web Development Course  for BeginnersFull Stack Web Development Course  for Beginners
Full Stack Web Development Course for BeginnersSabitha Banu
 
Virtual-Orientation-on-the-Administration-of-NATG12-NATG6-and-ELLNA.pdf
Virtual-Orientation-on-the-Administration-of-NATG12-NATG6-and-ELLNA.pdfVirtual-Orientation-on-the-Administration-of-NATG12-NATG6-and-ELLNA.pdf
Virtual-Orientation-on-the-Administration-of-NATG12-NATG6-and-ELLNA.pdfErwinPantujan2
 
Field Attribute Index Feature in Odoo 17
Field Attribute Index Feature in Odoo 17Field Attribute Index Feature in Odoo 17
Field Attribute Index Feature in Odoo 17Celine George
 
Daily Lesson Plan in Mathematics Quarter 4
Daily Lesson Plan in Mathematics Quarter 4Daily Lesson Plan in Mathematics Quarter 4
Daily Lesson Plan in Mathematics Quarter 4JOYLYNSAMANIEGO
 
Activity 2-unit 2-update 2024. English translation
Activity 2-unit 2-update 2024. English translationActivity 2-unit 2-update 2024. English translation
Activity 2-unit 2-update 2024. English translationRosabel UA
 
Integumentary System SMP B. Pharm Sem I.ppt
Integumentary System SMP B. Pharm Sem I.pptIntegumentary System SMP B. Pharm Sem I.ppt
Integumentary System SMP B. Pharm Sem I.pptshraddhaparab530
 
How to Add Barcode on PDF Report in Odoo 17
How to Add Barcode on PDF Report in Odoo 17How to Add Barcode on PDF Report in Odoo 17
How to Add Barcode on PDF Report in Odoo 17Celine George
 
4.16.24 21st Century Movements for Black Lives.pptx
4.16.24 21st Century Movements for Black Lives.pptx4.16.24 21st Century Movements for Black Lives.pptx
4.16.24 21st Century Movements for Black Lives.pptxmary850239
 

Último (20)

Visit to a blind student's school🧑‍🦯🧑‍🦯(community medicine)
Visit to a blind student's school🧑‍🦯🧑‍🦯(community medicine)Visit to a blind student's school🧑‍🦯🧑‍🦯(community medicine)
Visit to a blind student's school🧑‍🦯🧑‍🦯(community medicine)
 
Inclusivity Essentials_ Creating Accessible Websites for Nonprofits .pdf
Inclusivity Essentials_ Creating Accessible Websites for Nonprofits .pdfInclusivity Essentials_ Creating Accessible Websites for Nonprofits .pdf
Inclusivity Essentials_ Creating Accessible Websites for Nonprofits .pdf
 
ECONOMIC CONTEXT - PAPER 1 Q3: NEWSPAPERS.pptx
ECONOMIC CONTEXT - PAPER 1 Q3: NEWSPAPERS.pptxECONOMIC CONTEXT - PAPER 1 Q3: NEWSPAPERS.pptx
ECONOMIC CONTEXT - PAPER 1 Q3: NEWSPAPERS.pptx
 
ISYU TUNGKOL SA SEKSWLADIDA (ISSUE ABOUT SEXUALITY
ISYU TUNGKOL SA SEKSWLADIDA (ISSUE ABOUT SEXUALITYISYU TUNGKOL SA SEKSWLADIDA (ISSUE ABOUT SEXUALITY
ISYU TUNGKOL SA SEKSWLADIDA (ISSUE ABOUT SEXUALITY
 
Incoming and Outgoing Shipments in 3 STEPS Using Odoo 17
Incoming and Outgoing Shipments in 3 STEPS Using Odoo 17Incoming and Outgoing Shipments in 3 STEPS Using Odoo 17
Incoming and Outgoing Shipments in 3 STEPS Using Odoo 17
 
Karra SKD Conference Presentation Revised.pptx
Karra SKD Conference Presentation Revised.pptxKarra SKD Conference Presentation Revised.pptx
Karra SKD Conference Presentation Revised.pptx
 
LEFT_ON_C'N_ PRELIMS_EL_DORADO_2024.pptx
LEFT_ON_C'N_ PRELIMS_EL_DORADO_2024.pptxLEFT_ON_C'N_ PRELIMS_EL_DORADO_2024.pptx
LEFT_ON_C'N_ PRELIMS_EL_DORADO_2024.pptx
 
Music 9 - 4th quarter - Vocal Music of the Romantic Period.pptx
Music 9 - 4th quarter - Vocal Music of the Romantic Period.pptxMusic 9 - 4th quarter - Vocal Music of the Romantic Period.pptx
Music 9 - 4th quarter - Vocal Music of the Romantic Period.pptx
 
How to do quick user assign in kanban in Odoo 17 ERP
How to do quick user assign in kanban in Odoo 17 ERPHow to do quick user assign in kanban in Odoo 17 ERP
How to do quick user assign in kanban in Odoo 17 ERP
 
What is Model Inheritance in Odoo 17 ERP
What is Model Inheritance in Odoo 17 ERPWhat is Model Inheritance in Odoo 17 ERP
What is Model Inheritance in Odoo 17 ERP
 
ROLES IN A STAGE PRODUCTION in arts.pptx
ROLES IN A STAGE PRODUCTION in arts.pptxROLES IN A STAGE PRODUCTION in arts.pptx
ROLES IN A STAGE PRODUCTION in arts.pptx
 
Full Stack Web Development Course for Beginners
Full Stack Web Development Course  for BeginnersFull Stack Web Development Course  for Beginners
Full Stack Web Development Course for Beginners
 
Virtual-Orientation-on-the-Administration-of-NATG12-NATG6-and-ELLNA.pdf
Virtual-Orientation-on-the-Administration-of-NATG12-NATG6-and-ELLNA.pdfVirtual-Orientation-on-the-Administration-of-NATG12-NATG6-and-ELLNA.pdf
Virtual-Orientation-on-the-Administration-of-NATG12-NATG6-and-ELLNA.pdf
 
Field Attribute Index Feature in Odoo 17
Field Attribute Index Feature in Odoo 17Field Attribute Index Feature in Odoo 17
Field Attribute Index Feature in Odoo 17
 
Daily Lesson Plan in Mathematics Quarter 4
Daily Lesson Plan in Mathematics Quarter 4Daily Lesson Plan in Mathematics Quarter 4
Daily Lesson Plan in Mathematics Quarter 4
 
Activity 2-unit 2-update 2024. English translation
Activity 2-unit 2-update 2024. English translationActivity 2-unit 2-update 2024. English translation
Activity 2-unit 2-update 2024. English translation
 
Integumentary System SMP B. Pharm Sem I.ppt
Integumentary System SMP B. Pharm Sem I.pptIntegumentary System SMP B. Pharm Sem I.ppt
Integumentary System SMP B. Pharm Sem I.ppt
 
How to Add Barcode on PDF Report in Odoo 17
How to Add Barcode on PDF Report in Odoo 17How to Add Barcode on PDF Report in Odoo 17
How to Add Barcode on PDF Report in Odoo 17
 
4.16.24 21st Century Movements for Black Lives.pptx
4.16.24 21st Century Movements for Black Lives.pptx4.16.24 21st Century Movements for Black Lives.pptx
4.16.24 21st Century Movements for Black Lives.pptx
 
Raw materials used in Herbal Cosmetics.pptx
Raw materials used in Herbal Cosmetics.pptxRaw materials used in Herbal Cosmetics.pptx
Raw materials used in Herbal Cosmetics.pptx
 

Composition

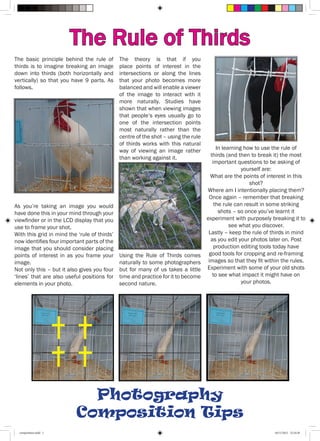
  • 1. The Rule of Thirds The basic principle behind the rule of The theory is that if you thirds is to imagine breaking an image place points of interest in the down into thirds (both horizontally and intersections or along the lines vertically) so that you have 9 parts. As that your photo becomes more follows. balanced and will enable a viewer of the image to interact with it more naturally. Studies have shown that when viewing images that people’s eyes usually go to one of the intersection points most naturally rather than the centre of the shot – using the rule of thirds works with this natural way of viewing an image rather In learning how to use the rule of than working against it. thirds (and then to break it) the most important questions to be asking of yourself are: What are the points of interest in this shot? Where am I intentionally placing them? Once again – remember that breaking As you’re taking an image you would the rule can result in some striking have done this in your mind through your shots – so once you’ve learnt it viewfinder or in the LCD display that you experiment with purposely breaking it to use to frame your shot. see what you discover. With this grid in mind the ‘rule of thirds’ Lastly – keep the rule of thirds in mind now identifies four important parts of the as you edit your photos later on. Post image that you should consider placing production editing tools today have points of interest in as you frame your Using the Rule of Thirds comes good tools for cropping and re-framing image. naturally to some photographers images so that they fit within the rules. Not only this – but it also gives you four but for many of us takes a little Experiment with some of your old shots ‘lines’ that are also useful positions for time and practice for it to become to see what impact it might have on elements in your photo. second nature. your photos. Photography Composition Tips composition.indd 1 10/11/2012 22:24:28
  • 2. Working the Lines in Your When Photography considering the composition of an image one of the elements that I suggest digital camera owners look for Learning how to use lines in photography doesn’t just happen. It takes time are ‘Lines’. and practice to become good at it. The lines that can be found A good way to practice is to go back in images are very powerful through older images that you’ve taken elements that with a little practice and look for lines that worked well and can add dynamic impact to a those that didn’t. photograph in terms of mood as well as how they lead an image’s Then next time you go out with your viewer into a photo. camera, before you frame your shot consciously ask yourself what lines are in front of you and how you might use them to add something to your next shot by working with them rather than against them. Also ask yourself whether the lines form any interesting patterns that you might be able to accentuate to add a further layer of interest to the shot. (How to use horizontal, vertical and diagonal lines) Horizons are the most common horizontal line to be found in photographs and they often act as a dividing point in a photograph – in effect an anchor that the rest of There are three types of the image is formed around. lines, ‘horizontal’, ‘vertical’ Horizons should generally not be placed in the middle of your frame. This leaves and ‘diagonal’. Each one has an image feeling unsettled compositionally. A much more effective technique is to a different impact upon a place them in the upper or lower third of your frame. photograph and should be looked Layers of horizontal lines can create rhythm or patterns in an image that can for as you frame your shots. become the focus of an image in and of itself. Vertical lines have the ability to convey a variety of different moods in a photograph ranging from power and strength (think of skyscrapers) to growth (think of trees). As horizontal lines can be accentuated by shooting in horizontal format vertical lines can be used very effectively by swapping the way you hold your camera into a vertical framing. This lengthens the vertical subject further which can emphasize it’s height. Diagonal lines generally work well to draw the eye of an image’s viewer through the photograph. They create points of interest as they intersect with other lines and often give images depth by suggesting perspective. Different studies have been done into how people view images and many of them say that a natural way into an image is by traveling left to right and so a diagonal line starting at the bottom left and moving to the top right of an image can be quite useful and natural. Photography Composition Tips composition.indd 2 10/11/2012 22:24:28
  • 3. Finding Fresh Angles to Shoot From One of the most effective ways to make your digital images more interesting to the eye is to change the angle that you’re shooting from. Changing the angle that you shoot from impact the feeling of size of your subject but it can have a real effect upon the light and shade and patterns on it. The variety of perspectives that you can shoot images from is only limited by your imagination. In addition to standing in front of your subject you might like to try: Lying or crouching in front of it, Climbing above it, Putting the camera on the ground and chancing it (some cameras with swing out LCD displays make this particularly easy as you can frame your shots rather than chancing it) Photography Composition Tips composition.indd 3 10/11/2012 22:24:29
  • 4. Photographing Children Composition Getting on your hands and knees The same principle of getting or crouching down before you down low applies with older take a shot of a child takes you children although you do have a into their world and helps you to little less lying on the floor with engage with them through the them when they are at an age of images you take. walking. If your camera has a continuous shooting mode it might also be worth keeping that on with bigger kids who tend to move around more. Benefit of continuous shooting is that you can end up with a great series of shots that might go nicely together to tell a story. Taking pictures with a wide angle focal length can be particularly effective when getting in close to children. It opens up the angles and gives all kinds of interesting perspectives. I use a 17-40mm zoom lens on my DSLR which is brilliant for this. It still allows me to zoom in a little but at 17mm the impact is amazing. A zoom lens allows you to take photos from further afield and will particularly be useful if the child is distracted by you taking photos. I use a 70-200mm zoom (the third image above was taken with it) which I find very useful. Photography Composition Tips composition.indd 4 10/11/2012 22:24:29
  • 5. Getting Horizons Horizontal Experiment with holding your camera at different kinds of angles and put your horizon purposely offline. My rule of thumb is to either make it perfectly flat or very obviously off line. ‘Slightly’ off horizontal does nothing except make your photos viewers feel dizzy or lean their heads when they view your shots. The simplest way to get your horizon horizontal simply line it up with the top or bottom of your view finder. Keep in mind that the edge of your frame in your viewfinder or LCD screen will be the edges of the actual image and will be the reference point for the eventual viewers of your shots to work out whether your shot is straight or not. Many cameras also have markers in their view finder (often a rectangle or set of focussing spots). These can often be used to help line up your horizons mid frame. Some cameras have a ‘rule of thirds’ mode where they overlay a grid in your LCD/viewfinder to show you where to place your points of interest. While they’re not intended to help you get your images straight – they can be helpful markers to show you where a level line is. A lot of photo editing software these days comes with a ‘straighten’ or ‘rotate’ feature so if this tip has made you go back through your old photos and you’ve shots that are crooked you might want to learn how to use these tools. Photography Composition Tips composition.indd 5 10/11/2012 22:24:29
  • 6. Getting Images Straight Some common mistakes in all kinds of photography are crooked lines. The same principle applies to many other types of photographs. Another common type is shots of building which in most cases are built to be level and have lots of straight lines. While it is often difficult to get all the lines perfectly straight when taking a shot of a building looking up (you’ll find unless you’re perfectly straight on and at a height that is even with the middle of the building that your vertical lines will taper towards the top) this shot is obviously off line if you look at how the bottom of the painting slopes towards the right in comparison to the bottom edge of the view finder. While the tapering effect would have remained the image would have been vastly improved with the camera straightened slightly. So the rule of thumb – unless you’re going for real effect (and if you are, angle the camera on a greater angle than above) take a moment before you take your shots to ask yourself a question about what lines there are in your view finder. Don’t just consider the horizon but also look at other horizontal lines and the vertical lines. Use the edges on the edges of your view finder as a gauge and once you’ve got them lined up make sure you don’t move around too much and you’ll be much more likely to get things right. Photography Composition Tips composition.indd 6 10/11/2012 22:24:29
  • 7. Fill Your Frame Use your Optical Zoom – most point and shoot digital cameras these days come with a zoom lens and all DSLRs are able to be fitted with one. Use them. Use your Legs – most photographers have a built in zoom in the form of their legs. Don’t just rely upon your cameras zoom but actually position yourself effectively for close in shots. Crop your Shots – the other option is to zoom in manually at home after you’ve taken your shots. This is a handy option to have but I personally prefer to use one of the first two options where I can because cropping shots later means if you want a large image that you’ll find that it becomes more pix-elated. This is a good option if you’re just trimming shots but any major cropping will result in a loss of quality of your image. Digital Zooms – Another option that many digital camera owners use is to utilize their ‘digital zoom’. Most digital cameras these days have boast about having digital zooms but don’t tell you that to use them will decrease the quality of your shots in a similar way that cropping your shots can. In essence a digital zoom fills your frame by increasing the size of pixels in your shots when can leave you with a grainy impact. I would highly recommend switching off your digital zoom feature and relying upon option 1 and 2 above. If you still need to get in closer you can always crop your shots and achieve the same results as using your digital zoom. While empty spaces can be used effectively in photos to create stunning results, you’re much more likely to get a ‘wow’ from those looking at your photos if your shots are filled with interest. This technique is particularly important when taking pictures of people whose facial features tend to disappear when you move more than a few meters away from them. While it can be appropriate to take shots that put a person in context with the environment that they are in, if they get lost in the picture you might as well just take a shot of the scene and leave them out of it. Photography Composition Tips composition.indd 7 10/11/2012 22:24:29
  • 8. The Importance of Focal Points “What is the Focal Point in this Picture?” Some other ways to ask the same question might include – What is the central point of interest? What will draw the eye of the viewers of this picture? What in this image will make it stand out from others? What is my subject? The reason a focal point is important is that when you look at an image your eye will generally need a ‘resting place’ or something of interest to really hold it. Without it you’ll find people will simply glance at your shots and then move on to the next one. Once you’ve identified a point of interest or focal point you then should ask yourself how you can enhance it. 6 Techniques to Enhance the Focal Point in an Image A focal point can be virtually anything ranging from a person, to a building, to a mountain, to a flower etc. Obviously the more interesting the focal point the better – but there are other things you can do to enhance it’s power including: Position – Place it in a prominent position – you might want to start with the rule of thirds for some ideas. Focus – Learn to use Depth of Field to blur out other aspects in front or behind your focal point. Blur – If you really want to get tricky you might want to play with slower shutter speeds if your main subject is still and things around it are moving. Size – making your focal point large is not the only way to make it prominent – but it definitely can help. Colour – using contrasting colours can also be a way of setting your point of interest apart from it’s surroundings. Shape – similarly contrasting shapes and textures can make a subject stand out – especially patterns that are repeated around a subject. Keep in mind that a combination of above elements can work well together. Lastly – don’t confuse the viewer with too many competing focal points which might overwhelm the main focal point. Secondary points of interest can be helpful to lead the eye but too many strong ones will just clutter and confuse. Photography Composition Tips composition.indd 8 10/11/2012 22:24:29
  • 9. Creating Active Space - Photographing Moving Subjects A tip for action photography is to give moving subjects space to ‘move into. Some call the space in front of a moving subject the ‘active space‘ in a photograph. Alternatively the space behind your subject is often called ‘dead space’. The reason that this compositional technique is used is that when someone views an image and spots that your subject is moving in a direction – their eye naturally moves in that direction too. It’s quite instinctive. Working with the way your viewer will instinctively view your image helps to create balance, drama and anticipation in your shot. This technique of creating active spaces in action shots can be applied in many types of photography including sports (cars, bikes, people etc), wildlife (photographing a running animal) or virtually any other subject matter that is moving. Photography Composition Tips composition.indd 9 10/11/2012 22:24:30
  • 10. Getting Backgrounds Right 1. Check your Background Before Hitting the Shutter Release Always scan the background of your shots before taking a shot. Look for colours that don’t fit with the rest of the image, bright patches that might distract the eye, lines that clash, people that don’t belong etc. 2. Move Your Subject This is once again a fairly simple technique but is probably the first thing you should consider. Quite often asking a portrait subject to take a step to the left or right will fix things either by putting the distraction behind them or by putting it out of frame. 3. Change your Shooting Angle If you have distracting elements in the background of a shot but can’t move your subject another strategy is to move yourself and shoot from a new angle. This might mean rotating around your subject but could also include getting down low to make the sky the background or even getting up high and shooting down onto your subject to make the background the ground. 4. Using Aperture to Blur Backgrounds One of the most useful things to learn as a way to combat distractions in backgrounds (and foregrounds) is to use the power of your lens to throw the background out of focus using depth of field. What you’re trying to achieve with this technique is a nice blurred background where you can’t really make out what’s going on there. The easiest way to do this is to use a wide aperture (the smaller the number the wider the aperture). The wider your aperture the more blurry your background should become. The quickest way to see the impact of this strategy is to switch your camera into aperture priority mode and to take a number of shots at different apertures. Start with an aperture of f/20 and work your way down – one stop at a time. Once you get down to under f/4 you’ll start seeing the background in your shots getting blurrier and blurrier. 5. Using Focal Length to Blur Backgrounds Another way to help get your backgrounds nice and blurry is to use a lens with a long focal length. Longer telephoto do help a little to get narrower depth of field (although the amount is less than many think). In actual fact the impact is smaller than it seems and the main reason for the change is that with a longer focal length the subject actually takes up more space in the frame. Lots of arguments have been had over whether focal length impacts this – you can read more about it here and here – I’ll leave it to the experts to discuss the finer points but will say that using longer focal lengths does seem to have some impact and is worth experimenting with. 6. Place Subjects In front of Open Spaces Placing your subject a long way in front of other objects will also help to make those objects more blurry. For example if you have the choice between shooting your subject standing right in front of a brick wall or standing in front of an open field – the open field shot will have a much more blurred background simply because the brick wall is just centimetres from your subject and inside the focal range whereas an open field stretches off into the distance where everything will be out of focus. 7. Fill your frame with your subject One of the most effective ways of removing distractions from backgrounds is to remove the background altogether by totally filling the frame with your subject. Get up close and/or use your zoom lens to tightly frame the shot and you’ll not only remove distractions but could end up with a high impact shot as well. 8. Make your Own Background Sometimes there just isn’t any suitable background and so you might want to consider making your own. This could range from buying a purpose built studio background or simply buying some cloth to do the job for you. I know of one keep photographer who goes out shooting photographic portraits and carries large coloured sheets of card with him to put up on walls to act as a background. The other thing to keep in mind is that in many instances you can move things around in the background of your shots (especially if you’re shooting indoors). For example I was recently photographed in my home for a newspaper and the photographer had me move a number of pieces of furniture during the shoot because they were distracting in the shots. It took a little effort but the impact in the shots was quite incredible. 9. Post Processing I’m no expert in using photo editing software but there are numerous ways of editing a shot after you’ve taken it to get rid of distracting elements. These can include blurring techniques, actual removing of elements and replacing them and techniques such as selective colouring (i.e. making your subject stand out by making your Photography Background black and White (or at Least sucking some of the colour out of it). Composition Tips composition.indd 10 10/11/2012 22:24:30
  • 11. Framing Your Shots Framing is the technique of drawing attention to the subject of your image by blocking other parts of the image with something in the scene. The benefits of framing pictures include: 1. Giving the photo context (for example framing a scene with an archway can tell you something about the place you are by the architecture of the archway or including some foliage in the foreground of a shot can convey a sense of being out in nature). 2. giving images a sense of depth and layers (in essence framing a shot generally puts something in the foreground which adds an extra dimension to the shot). 3. leading the eye towards your main focal point (some ‘frames’ can draw your photo’s viewer into the picture just by their shape). Some also believe that a frame can not only draw the eye into a picture but that it keeps it there longer – giving a barrier between your subject and the outside of the shot. 4. intriguing your viewer. Sometimes it’s what you can’t see in an image that draws you into it as much as (if not more than) what you can see in the picture. Clever framing that leaves those viewing your image wondering a little or imagining what is behind your frame can be quite effective (get it wrong and it can also be quite annoying!). Frames for photographs come in all shapes and sizes and can include shooting through overhanging branches, shooting through windows, using tunnels, arches or doorways – you can even use people (for example shooting over shoulders or between heads) etc. Your frame doesn’t need to go completely around the edges of your image – they might just be on one or two edges of your shot. My rule of thumb when considering framing is to ask the question – ‘will this add to or take away from the image?’ Sometimes framing can just add clutter to a shot and make it feel cramped – but at other times it can be the difference between an ordinary shot and a stunning one. Lastly – if you do use framing techniques you also need to consider whether you want your frame to be in focus or not. In some instances a nicely blurred frame will really add a sense of mood and depth to your shots (in this case use a large aperture) but in other cases to have your frame in focus can help with adding context to the scene (in this case choose a narrow aperture. Photography Composition Tips composition.indd 11 10/11/2012 22:24:30
  • 12. How to Use Converging Lines to Enhance Your Photography 4 Tips Regarding Converging Lines 1. Experiment with Positioning is that you’ll end up with a more dynamic shot. Symmetrical and vertical placement of the lines can be powerful but diagonal lines tend to convey movement. Alternatively stepping away from the start of the lines can give another perspective – as can holding your camera on an angle to give another diagonal framing of the lines. 2. Wide Angle Lenses – different lenses can totally change the impact of a shot with converging lines. I find that a wide angle lens can be particularly useful – especially when positioning yourself between the two lines. This will help to give the perception that the distance between the lines at the starting point of the image is wider than it is. This exaggeration of the width of your lines can have a powerful impact upon your shot. 3. Positioning the ‘convergence’ - one thing to consider when you have converging lines in an image is that they draw the eye into a shot – towards the point that they converge – this becomes one of the most important parts of this image – a focal point. As you’re framing your shot ask yourself – ‘where is the most effective position to frame this?” Keep in mind rules like the Rule of Thirds that says that the intersecting points of imaginary lines a third of the way into an image are key points for positioning points of interest. Also know that if the point of convergence is outside the frame of the shot that you are leading the eye out of your shot. This could leave a shot unbalanced and with tension – alternatively it could enhance the shot and leave your viewers wondering about the place that they converge. 4. Adding Interest at the Point of Convergence – Sometimes it is worth enhancing the point of convergence with something of interest (for example waiting until a train appears in the distance on the tracks – at the top of stairs) – on Photography or positioning a person other occasions the composition of the shot is adding an extra subject. Composition Tips strong enough without composition.indd 12 10/11/2012 22:24:30
  • 13. 4 Rules of Composition for Landscape Photography 1. Diagonal Lines Using diagonal lines can be a very effective way of drawing the eye of those viewing an image into it and to the main focal point. The ‘lines’ need not be actual lines – they could be the shape of a path, a line of trees, a fence, river or any other feature in an image. Converging lines (two or more lines coming from different parts of an image to a single point) can be all the more effective. 2. Geometric Shapes By positioning key aspects of a landscape on points of a geometric shape you can help create a balanced composition. Perhaps the most common and easiest way to do this is to use a ‘triangle’ shape between objects in an image with three objects in a frame positioned with one to each side and one more central. Using Geometric Shapes in this way isn’t something that I’ve done a lot of – but it is one technique to get balance in a shot. 3. The Rule of Thirds The Rule of Thirds gets trotted out more often than any other in all types of photography and is one of the first rules of composition taught to most photography students. While sometimes it can feel a little cliché it can also be a very effective technique in landscapes (although keep in mind that breaking this (and other rules) can also produce dramatic and interesting shots). Position key points of interest in a landscape on the intersecting point between imaginary ‘third’ points in an image and you’ll help give your image balance and help those focal points to really capture attention. 4. Framing Images While adding points of interest to a foreground is an important technique for adding interest to landscape shots – a similar technique is to ‘frame’ the shot by adding interest to other parts of the edges of an image. Perhaps the most common way of framing a landscape shot is to include an overhanging branch in the upper section of a shot. Similarly framing a shot with a bridge might work. Photography Composition Tips composition.indd 13 10/11/2012 22:24:30
  • 14. How to Break the ‘Rules’ of Photography Hold Your Camera on an Angle Ignore the ‘Active Space’ Rule for Moving Subjects One of the ‘rules’ of photography that I talked about very early in the development of Digital Photography School was The idea is that if you are photographing a subject that to do everything you can to keep your images ‘straight’ (and is moving you should place more empty space in front your horizons horizontal). of it than behind it. This gives the viewer of the image There are a lot of instances when you’d want to follow this a sense of where the subject is moving and creates a rule pretty carefully (like in most landscapes where a horizon sense of anticipation. should probably be straight) – but breaking it can lead to While following this rule can produce some excellent images with drama, a feeling of energy and action and fun. results, breaking it can add a little tension and intrigue The key with breaking this rule is to not to ‘slightly break it’ to your images. (or you’ll have people wondering if you meant it or not) but It can also convey a sense of speed and/or give the to give your wrist a real twist and to break it obviously. viewer a sense of where the subject has been rather than where they are headed. For instance – the image to the left would not have Break the Rule of Thirds been as dramatic without the trailing smoke behind the place. The fact that it’s approaching the top edge of the The good old ‘rule of thirds‘ makes a lot of sense in many frame also gives a sense of speed as it almost bursts types of photography (if you don’t know what the rule of out of the frame (not to mention the clever mirroring thirds is see out tutorial on it). and contrasts in the image). The Rule of Thirds does work well as a compositional rule in many situations – however placing your subject dead centre in an image can also produce powerful and confronting images – particularly portraits where the subject is looking directly down the barrel or where you are presented with a scene with real symmetry like the one to the left. Next time you’re out with your camera experiment with composing shots both to follow and break the rule of thirds – you’ll find in doing so you can end up with two very different interpretations of the same scene. Photography Composition Tips composition.indd 14 10/11/2012 22:24:30
  • 15. How to Break the ‘Rules’ of Photography Experiment with Different Framings with Portraits In a similar way to our previous post on breaking the rule of ‘Active Space’ when photographing moving subjects – a similar technique can be used when photographing people. When taking portraits it is customary to position your subject with more space on the side of their head where they are facing (or give them space to look into). If your subject is looking off to one side you would generally give them a little extra room to look into. This creates balance and gives viewers of the shot a sense of where your subject is looking. However, as we’ve found with other broken rules in this series of posts, breaking this rule can produce some eye catching shots also. So next time you’re doing some portrait work experiment with different poses and framing. Take some shots with your subject looking directly at the camera, some with them looking to one side with more space to look into and some the other way around. You’ll find that you’ll end up with three quite different moods in the three different framings. Taking Unfocused Photos There are two main strategies if you’re wanting to explore purposely ‘unfocused’ images: 1. You might choose to focus on a seemingly unimportant element of the scene (do this by choosing a wide aperture which will give a narrow depth of field and focus on something in front of or behind your main subject). 2. The other option is to make your full image out of focus but choosing to focus well beyond or in front of your main subject. Again, a wide aperture will help here and you will probably need to switch your camera to manual focusing mode or it will attempt to find something to focus upon. This second option will take a little experimentation. Get things too unfocused and you’ll end up with a completely unrecognisable subject – the key is to have enough focus for it to be recognizable but out of focus enough to create a wonderful dreamy mood. Use a High ISO to Create Grainy Shots While not really a ‘rule’ of photography – it is generally accepted in most photographic tutorials that you should avoid noise in your images at all costs by choosing the lowest ISO possible for the light situation that you’re shooting in. This will leave you with shots that are as smooth, clean and sharp as possible for the lighting conditions that you’re in. While this is a recommended practice in most shooting circumstances – there are times where ramping up your ISO setting to it’s maximum can create some interesting effects. Grainy or noisy shots can give your image a gritty and raw quality that creates a completely different mood in your shots. I should say in concluding that this technique is getting more and more difficult as an in camera technique because manufacturers are getting better and better at eliminating noise and grain from high ISO settings. In the ‘old day’s of film this was a lot easier to do as high ISO films naturally had lovely gritty grain to them. Some cameras will end up with muddy/murky shots instead. A better route is probably to take a shot at a lower ISO and do some post production work to get the grainy effect that you’re after – however sometimes it’s more fun to try to get these effects in camera. Photography Composition Tips composition.indd 15 10/11/2012 22:24:30