SlideShare uma empresa Scribd logo
1 de 11
Computer Graphics Application and Systems Project
                           Politecnico Di Milano
                        Como Campus, Como, Italy

                   Name: Jalal Uddin Surname : Ahammad
                                 ID: 722869

                 Project – Chess Game Animation using Blender

Objectives:
   1. Board is designed using mesh objects.
   2. Material and texture is also applied in Chessboard.
   3. All chess pieces are created individually using various mesh objects.
   4. Rendering is applied for different sets (Camera and light).
   5. Animation is performed for producing quick time video.


Chessboard modelling:

   1.   The default cube is deleted.
   1.   An plane is taken using the following command
   2.   Add > Mesh > plane.
   3.   View chosen to work with is top view.
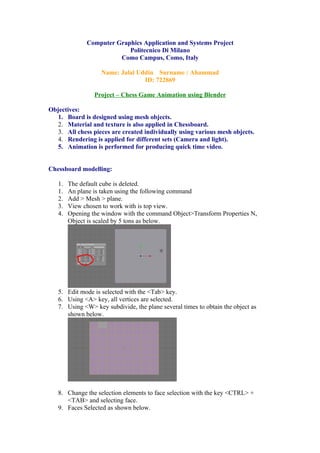
   4.   Opening the window with the command Object>Transform Properties N,
        Object is scaled by 5 tons as below.


   5. Edit mode is selected with the <Tab> key.
   6. Using <A> key, all vertices are selected.
   7. Using <W> key subdivide, the plane several times to obtain the object as
      shown below.


   8. Change the selection elements to face selection with the key <CTRL> +
      <TAB> and selecting face.
   9. Faces Selected as shown below.
10. Hitting <P> key the selected faces are separated using separate command from
    the pop-up menu.
11. The board is now separated in two parts as shown below.


12. Two separate objects can be toggled in object mode as below.


13. With the object above selected, the material is set with the colour black as
    below.


14. The object obtained is something like below:
15. The other object is also selected and set the material with white colour.
   16. The object is made as below using extrude function. For precise extrude,
       <CTRL> key is used.


   17. Lamp is set and camera is placed to get the rendered image as below.


Chess Pieces Modelling:

   Making Chess Pawn:
   1. The default cube is deleted.
   2. An UVSphere is taken using the following command
       Add > Mesh > UVsphere.
   3.     View chosen to work with is front view.
   4. "Subsurf" option under “Modifiers” tab is selcted and set levels to 2 and
   renders levels to 3.
5. Pressing <A>, all vertices are deselected. Vertices are selected as showing
below pressing <B>.


6. Selected vertices are deleted by pressing <D> key.
7. Vertices are selected as shown in the image.


8. Extrude tool is used to make the shape something like the image below.


9. <S> key is used to scale selected vertices as shown below.
10. Extrude is used to get the object like below.


11. The step 10 is repeated again.


12. Scaling is performed.


13. Lowest ring of vertices are selected and extruded down.
14. Faces are cut using the command <Ctrl> + <R> and <LMB> click.


15. Repeat previous process to get the following.


16. Select vertices like on image below.


17. Scale to get something like this:


18. Select vertices like on image below.
19. Scaling is performed to get this:


20. Select vertices like on previous image and scale to get this:


21. Repeat previous process to get this:


22. A little extrude is done and scaled it down to zero.

23. Pawn is made smooth with the command "Set Smooth" button under "Link
and Materials" tab.


24. Lower portion is scaled to fix the proportions.
25. Material tab is selected and the colour of the object is set as shown below.


   28. Light source in the scene is put and the camera is positioned.
   29. Rendering is performed using the key <F12> which yield something below.


Other chess pieces:
The remaining chess pieces are also made using the same technique used for creating
pawn. The rendered images for knight, bishop, queen and rook are shown below.
Chess peices Animation

1. The initial instance for the first frame is set as below.
2. Camera is set so that the animation can be seen from top angle view.


   2. The location of the object (White Bishop) is set pressing <I> key and then loc
      command.
   3. In 6th frame, the object “Pawn” is placed forward as below.


   4. Step 2 is repeated.
   5. In frame 13, Black Bishop is moved forward as below.


   6. Step 2 is repeated.
   7. In frame 18, White Bishop is moved forward as below.
8. Step 2 is repeated.
9. Similarly several moves are done and set the location and rotation.
10. In frame 50, the final move of Knight and Queen is set as below.


11. Scene panel (F10) is selected and Start and end frame are set to 1 and 50
    respectively since the default end frame is 250 but we make the animation
    with 50 frames only.
12. Preview button is chosen.
13. File type is chosen as Quick time and 8 frames/ second is set.
14. Output folder is also chosen as default one which is c:/tmp.


   N.B. Animated video file as well as blender file is included in CD.
Conclusion:
The animation is done with a few moves to give the flavour of a complete game
simulation. Moreover, few steps of the project are shown to make the document
precise and short. However, it is possible to provide the complete tutorial in order to
clarify the project work. It may be concluded that this project can lead to a complete
3D Chess Game.

Mais conteúdo relacionado

Semelhante a Animation Chess Game

Solid_Modeling_Project_Reverse engineering of a computer mouse and documentat...
Solid_Modeling_Project_Reverse engineering of a computer mouse and documentat...Solid_Modeling_Project_Reverse engineering of a computer mouse and documentat...
Solid_Modeling_Project_Reverse engineering of a computer mouse and documentat...Mehmet Bariskan
 
Macromedia Flash Player Practical file
Macromedia Flash Player Practical file Macromedia Flash Player Practical file
Macromedia Flash Player Practical file varun arora
 
BB Drac - Unreal Tournament UED2 guide Tutorial DM part 1.pdf
BB Drac - Unreal Tournament UED2 guide Tutorial DM part 1.pdfBB Drac - Unreal Tournament UED2 guide Tutorial DM part 1.pdf
BB Drac - Unreal Tournament UED2 guide Tutorial DM part 1.pdfTomHodgson19
 
ITS488 Lecture 4: Google VR Cardboard Game Development: Basket Ball Game #2
ITS488 Lecture 4: Google VR Cardboard Game Development: Basket Ball Game #2ITS488 Lecture 4: Google VR Cardboard Game Development: Basket Ball Game #2
ITS488 Lecture 4: Google VR Cardboard Game Development: Basket Ball Game #2Kobkrit Viriyayudhakorn
 
Quick Step by Step Flash Tutorial
Quick Step by Step Flash TutorialQuick Step by Step Flash Tutorial
Quick Step by Step Flash TutorialSu Yuen Chin
 
Introduction to Game Programming: Using C# and Unity 3D - Chapter 2 (Preview)
Introduction to Game Programming: Using C# and Unity 3D - Chapter 2 (Preview)Introduction to Game Programming: Using C# and Unity 3D - Chapter 2 (Preview)
Introduction to Game Programming: Using C# and Unity 3D - Chapter 2 (Preview)noorcon
 
A graphic library and an application for simple curve manipolation
A graphic library and an application for simple curve manipolationA graphic library and an application for simple curve manipolation
A graphic library and an application for simple curve manipolationgraphitech
 
Flash cs4 tutorials_2009
Flash cs4 tutorials_2009Flash cs4 tutorials_2009
Flash cs4 tutorials_2009techbed
 
Practical work 4
Practical work 4Practical work 4
Practical work 4wkhairil80
 
Practical work 6
Practical work 6Practical work 6
Practical work 6wkhairil80
 
simple exercises in Macromedia flash 8
simple exercises in Macromedia flash 8simple exercises in Macromedia flash 8
simple exercises in Macromedia flash 8srividhyasowrirajan
 
Unity - Create a structure with primitives
Unity - Create a structure with primitivesUnity - Create a structure with primitives
Unity - Create a structure with primitivesNexusEdgesupport
 

Semelhante a Animation Chess Game (20)

Maya
MayaMaya
Maya
 
Solid_Modeling_Project_Reverse engineering of a computer mouse and documentat...
Solid_Modeling_Project_Reverse engineering of a computer mouse and documentat...Solid_Modeling_Project_Reverse engineering of a computer mouse and documentat...
Solid_Modeling_Project_Reverse engineering of a computer mouse and documentat...
 
Make a match3
Make a match3Make a match3
Make a match3
 
Cad cam lab 2016 2017
Cad cam lab 2016 2017Cad cam lab 2016 2017
Cad cam lab 2016 2017
 
Macromedia Flash Player Practical file
Macromedia Flash Player Practical file Macromedia Flash Player Practical file
Macromedia Flash Player Practical file
 
BB Drac - Unreal Tournament UED2 guide Tutorial DM part 1.pdf
BB Drac - Unreal Tournament UED2 guide Tutorial DM part 1.pdfBB Drac - Unreal Tournament UED2 guide Tutorial DM part 1.pdf
BB Drac - Unreal Tournament UED2 guide Tutorial DM part 1.pdf
 
Surface machining
Surface machiningSurface machining
Surface machining
 
Ermapper stitch
Ermapper stitchErmapper stitch
Ermapper stitch
 
ITS488 Lecture 4: Google VR Cardboard Game Development: Basket Ball Game #2
ITS488 Lecture 4: Google VR Cardboard Game Development: Basket Ball Game #2ITS488 Lecture 4: Google VR Cardboard Game Development: Basket Ball Game #2
ITS488 Lecture 4: Google VR Cardboard Game Development: Basket Ball Game #2
 
Flash
FlashFlash
Flash
 
Quick Step by Step Flash Tutorial
Quick Step by Step Flash TutorialQuick Step by Step Flash Tutorial
Quick Step by Step Flash Tutorial
 
Introduction to Game Programming: Using C# and Unity 3D - Chapter 2 (Preview)
Introduction to Game Programming: Using C# and Unity 3D - Chapter 2 (Preview)Introduction to Game Programming: Using C# and Unity 3D - Chapter 2 (Preview)
Introduction to Game Programming: Using C# and Unity 3D - Chapter 2 (Preview)
 
Tutorial flash
Tutorial flashTutorial flash
Tutorial flash
 
A graphic library and an application for simple curve manipolation
A graphic library and an application for simple curve manipolationA graphic library and an application for simple curve manipolation
A graphic library and an application for simple curve manipolation
 
Flash cs4 tutorials_2009
Flash cs4 tutorials_2009Flash cs4 tutorials_2009
Flash cs4 tutorials_2009
 
HOW TO use PENCIL
HOW TO use PENCILHOW TO use PENCIL
HOW TO use PENCIL
 
Practical work 4
Practical work 4Practical work 4
Practical work 4
 
Practical work 6
Practical work 6Practical work 6
Practical work 6
 
simple exercises in Macromedia flash 8
simple exercises in Macromedia flash 8simple exercises in Macromedia flash 8
simple exercises in Macromedia flash 8
 
Unity - Create a structure with primitives
Unity - Create a structure with primitivesUnity - Create a structure with primitives
Unity - Create a structure with primitives
 

Animation Chess Game

  • 1. Computer Graphics Application and Systems Project Politecnico Di Milano Como Campus, Como, Italy Name: Jalal Uddin Surname : Ahammad ID: 722869 Project – Chess Game Animation using Blender Objectives: 1. Board is designed using mesh objects. 2. Material and texture is also applied in Chessboard. 3. All chess pieces are created individually using various mesh objects. 4. Rendering is applied for different sets (Camera and light). 5. Animation is performed for producing quick time video. Chessboard modelling: 1. The default cube is deleted. 1. An plane is taken using the following command 2. Add > Mesh > plane. 3. View chosen to work with is top view. 4. Opening the window with the command Object>Transform Properties N, Object is scaled by 5 tons as below. 5. Edit mode is selected with the <Tab> key. 6. Using <A> key, all vertices are selected. 7. Using <W> key subdivide, the plane several times to obtain the object as shown below. 8. Change the selection elements to face selection with the key <CTRL> + <TAB> and selecting face. 9. Faces Selected as shown below.
  • 2. 10. Hitting <P> key the selected faces are separated using separate command from the pop-up menu. 11. The board is now separated in two parts as shown below. 12. Two separate objects can be toggled in object mode as below. 13. With the object above selected, the material is set with the colour black as below. 14. The object obtained is something like below:
  • 3. 15. The other object is also selected and set the material with white colour. 16. The object is made as below using extrude function. For precise extrude, <CTRL> key is used. 17. Lamp is set and camera is placed to get the rendered image as below. Chess Pieces Modelling: Making Chess Pawn: 1. The default cube is deleted. 2. An UVSphere is taken using the following command Add > Mesh > UVsphere. 3. View chosen to work with is front view. 4. "Subsurf" option under “Modifiers” tab is selcted and set levels to 2 and renders levels to 3.
  • 4. 5. Pressing <A>, all vertices are deselected. Vertices are selected as showing below pressing <B>. 6. Selected vertices are deleted by pressing <D> key. 7. Vertices are selected as shown in the image. 8. Extrude tool is used to make the shape something like the image below. 9. <S> key is used to scale selected vertices as shown below.
  • 5. 10. Extrude is used to get the object like below. 11. The step 10 is repeated again. 12. Scaling is performed. 13. Lowest ring of vertices are selected and extruded down.
  • 6. 14. Faces are cut using the command <Ctrl> + <R> and <LMB> click. 15. Repeat previous process to get the following. 16. Select vertices like on image below. 17. Scale to get something like this: 18. Select vertices like on image below.
  • 7. 19. Scaling is performed to get this: 20. Select vertices like on previous image and scale to get this: 21. Repeat previous process to get this: 22. A little extrude is done and scaled it down to zero. 23. Pawn is made smooth with the command "Set Smooth" button under "Link and Materials" tab. 24. Lower portion is scaled to fix the proportions.
  • 8. 25. Material tab is selected and the colour of the object is set as shown below. 28. Light source in the scene is put and the camera is positioned. 29. Rendering is performed using the key <F12> which yield something below. Other chess pieces: The remaining chess pieces are also made using the same technique used for creating pawn. The rendered images for knight, bishop, queen and rook are shown below.
  • 9. Chess peices Animation 1. The initial instance for the first frame is set as below. 2. Camera is set so that the animation can be seen from top angle view. 2. The location of the object (White Bishop) is set pressing <I> key and then loc command. 3. In 6th frame, the object “Pawn” is placed forward as below. 4. Step 2 is repeated. 5. In frame 13, Black Bishop is moved forward as below. 6. Step 2 is repeated. 7. In frame 18, White Bishop is moved forward as below.
  • 10. 8. Step 2 is repeated. 9. Similarly several moves are done and set the location and rotation. 10. In frame 50, the final move of Knight and Queen is set as below. 11. Scene panel (F10) is selected and Start and end frame are set to 1 and 50 respectively since the default end frame is 250 but we make the animation with 50 frames only. 12. Preview button is chosen. 13. File type is chosen as Quick time and 8 frames/ second is set. 14. Output folder is also chosen as default one which is c:/tmp. N.B. Animated video file as well as blender file is included in CD.
  • 11. Conclusion: The animation is done with a few moves to give the flavour of a complete game simulation. Moreover, few steps of the project are shown to make the document precise and short. However, it is possible to provide the complete tutorial in order to clarify the project work. It may be concluded that this project can lead to a complete 3D Chess Game.