SlideShare uma empresa Scribd logo
1 de 46
Baixar para ler offline
MEMBANGUN WEB SERVER, E-MAIL SERVER DAN FTP SERVER,
 SHARING INTERNET, PROXY SERVER, MENGGUNAKAN LINUX RHEL 4
                   DALAM JARINGAN LOKAL


INSTALASI

Persiapan Instalasi

   •   PC untuk menginstal linux
   •   CD instalasi Linux RHEL4 (4 CD)
   •   NIC (kalau anda mau setting sharing internet, proxy server dan dhcp server maka
       kita butuhkan minal 2 NIC, kalau untuk server layanan seperti webserver, dns
       server, mail server dan FTP digunakan 1 buah NIC)

1. Setting BIOS pada komputer, agar booting pertama dari CD-Drive. Kemudian
   masukan cd I tunggu beberapa saat akan muncul seperti tampilan di bawah,
   selajutnya anda tekan tombol ENTER untuk melanjutkan Instalasi
2. Pada bagian ini dengan menggunakan tombol panah anda pilih skip, kemudia anda
   tekan tombol ENTER


3. Welcome to Red Hat Enterprise Linux AS , klik tombol NEXT


4. Menu Bahasa yang dipakai selama proses instalasi secara default bahasa yang
   digunakan adalah Bahasa Inggris, Tekan Tombol NEXT
5. Menu Konfigurasi Keyboard, pilih tombol NEXT


6. Membuat Partisi Automatically Partition atau Manually Partition with Disk Druid,
   pada modul ini kita buat tiga partisi yaitu /boot, swap dan /, dimana besaran setiap
   partisi adalah sbb
            1 . /boot——-> 100 MB
           2. 2 x jumlah memori yang terpasang pada komputer
           3. / ————–>Sisa Dari partisi /boot dan swap
     Selajut kita pilih menu Manually Partition with Disk Druid karena akan creat
     partisi secara manual
Pilih Menu New untuk creat partisi


Creat Partisi /boot dan kemudian tekan tombol OK


Creat Partisi SWAP dan kemudian tekan tombol OK
Creat Partisi / dan kemudian tekan tombol OK


     Hasil Dari parsiti akan muncul seperti gambar dibawah ini


7. Bagian Booot Loader, pada ini kita menuntukan Boot Loader dan password, pada
   bagian ini penulis ambil defaulnya dari Redhat jadi penulis cukup tekan tombol
   NEXT
8. Bagian Konfigurasi Network (NIC) yang di sudah aktif, di bagian ini bisa kita
   langsung IP Pubic kita dan IP Local dengan mengklik tombol EDIT dan jaga lupa
   masukan IP Gateway dan IP DNS, pada modul ini penulis masih setting IP DHCP,
   setelah kita setting IP Static atau IP DHCP Klik tombol NEXT


9. Setting Firewall bagian ini harus diperhatikan karena pada bagian ini berfungsi untuk
   membuka port
            • ssh (23) digunakan untuk mengakses Server cara jauh (Remote)
            • HTTP (80), HTTPS(443) digunakan untuk layanan WEBServer
            • FTP(21) digunakan untuk layana FTP Server
            • Mail Server (25) digunakan untuk layanan Mail Server
   Pada modul ini penulis hanya membuka port untuk ssh dan Webserver kerena linux
   setting sebagai sharing internet, Bagian SElinux nya kita Pilih Disable, kemudian
   klik tombol NEXT untuk melajutkan prose selanjutnya
10. Menentukan Bahasa yang di pakai Oleh redhat disini kita pilih bahasa Inggis, Tekan
          Tombol NEXT untuk melajutkan proses


11.      Setting Waktu, sudah kita pilih waktu Tekan Tombol NEXT


      12. Setting Password root yang merupakan super user, Masukan password anda ,
          kemudian klik tombol NEXT untuk melanjutkan proses
13. Pemilihan Paket pada bagian ini pilih paket yang sesuai dengan layanan yang akan
    kita buat
            • Sharing Internet pilih paket webserver, DNS dan DHCP
            • Mail Sever pilih paket webserver, DNS, mail server dan mysql
            • Webserver pilih paket webserver, DNS dan mysql (mysql di gunakan
               untuk databases)


     Karena penulis tidak menampilkan grafis maka bagian X windows System dan
     GNOME Desktop Environment tanda contengan di lepas, seperti di gambar


     Pada bagian menu sever penulis pilih webserver, dns dan dhcp seperti di gambar
Pilih Paket untuk DHCP Server , Klik Detail kemudian anda pilih paket dhcp
       seperti di gambar


14.   Proses Instalasi Pilih NEXT
Klik Tombol Continue


15. Masukan CD 2 untuk melanjutkan Proses instalasi


16. Proses Instalasi
17. Masukan CD 4 untuk melanjutkan Proses instalasi
18. Masukan CD 1 untuk melanjutkan Proses instalasi


19. Klik Tombol Reboot


20. Tunggu Proses Loading sampai muncul tampilan Login Seperti gambar dibawah ini,
    masukan login dengan root dan password root yang telah anda buat saat instalasi
DNS dan Web Server

    Sebelum penyetingan DNS server terlebih dahulu anda harus mengecek installasi
    paket Bind yang ada pada system operasi linux, sebab tanpa paket bind ini DNS
    server anda tidak akan berjalan sesuai dengan fungsinya. adapun untuk mengecek
    paket bind dengan perintah berikut:
    #rpm –qa |grep bind
    Jika semua paket diatas sudah ada, berarti paket DNS server anda telah terinstall
    dengan baik. Jika belum ada anda bisa mendownload file tersebut dari internet. dan
    cara menginstallnya adalah sebagai berikut
       1. Masukan cd 2
       2. Mounting ke CDROM dengan cara
                     # mount /media/cdroom
                     #cd /media/cdrooom
                     # cd /Redhat/RPMS
                     #rpm –ivh bind-9.2.4-2 –nodeps
       3. Setting IP ADDRESS
             #cd /ect/sysconfig/network-scripts
             # vi ifcg-eth0
             Edit file tersebut
             DEVICE=eth0
             BOOTPROTO=static
             HWADDR=00:0C:29:DD:47:E0
ONBOOT=yes
     TYPE=Ethernet
     IPADDR=10.100.112.4
     NETMASK=255.255.255.0
   setelah itu anda simpan dengan perintah Esc kemudian :wq
     Kemudian aktifkan service network dengan perintah
     #service network restart


4. Pertama anda setting dahulu hosts anda pada file /etc/hosts dengan cara
   seperti dibawah ini
            #vi /etc/hosts
            Kemudian tambahkan
            10.100.112.4           ns.dipkom.ilkom.unsri.ac.id         ns
   ns.dipkom.ilkom.unsri.ac.id merupakan nama host serta user anda serta no
   IP yang ada sebelah kiri merupakan no IP yang anda gunakan. Setelah itu
   anda simpan dengan perintah Esc kemudian :wq


5. Setelah itu anda setting domain anda dengan cara anda setting domain anda
   di file /etc/resolv.conf dengan cara seperti dibawah ini.
            #vi /etc/resolv.conf
            Kemudian isikan data seperti di bawah ini
            ======================================
            search dipkom.ilkom.unsri.ac.id
            nameserver 10.100.112.4
            =======================================
   search merupakan nama domain, nameserver merupakan no IP yang anda
   gunakan, setelah itu anda simpan dengan perintah Esc kemudian :wq
6. Setelah itu anda diminta untuk mengedit file /etc/named.conf anda
   tambahkan baris seperti dibawah ini:
            # vi /etc/named.conf
   *******************************************************
zone “dipkom.ilkom.unsri.ac.id” IN {
          type master;
          file “dipkom.zone”;
   };


   zone “112.100.10.in-addr.arpa” IN {
          type master;
          file “dipkom.arpa”;
   };

   include "/etc/rndc.key";
   ***********************************************************************
   setelah itu anda simpan dengan perintah Esc kemudian :wq
7. Langkah selanjutnya file zone dan file arpa, anda masuk dahulu ke
   dorectory /var/named /chroot/var/named setelah itu anda mencopy
   named.local ke dipkom.zone dan dipkom.arpa dengan perintah
     # cp named.local dipkom.zone
     # cp named.local dipkom.arpa
     Edit file dipkom.zone
     $TTL 86400
     @      IN SOA          ns.dipkom.ilkom.unsri.ac.id.
     root.dipkom.ilkom.unsri.ac.id. (
                           1997022700 ; Serial
                           28800      ; Refresh
                           14400      ; Retry
                           3600000 ; Expire
                           86400 ) ; Minimum
             IN      NS     ns.dipkom.ilkom.unsri.ac.id.
             IN      MX     0 ns.dipkom.ilkom.unsri.ac.id.
             IN      A      10.100.112.4
     ns      IN      A      10.100.112.4
     Mail IN         A      10.100.112.4
     ftp     IN      A      10.100.112.4
     jarkom IN       A      10.100.112.4
   setelah itu anda simpan dengan perintah Esc kemudian :wq
   Edit file dipkom.zone
     TTL 86400
     @      IN SOA          ns.dipkom.ilkom.unsri.ac.id.
     root.dipkom.ilkom.unsri.ac.id. (
                           1997022700 ; Serial
                           28800      ; Refresh
                           14400      ; Retry
3600000 ; Expire
                                      86400 ) ; Minimum
                        IN      NS     ns.dipkom.ilkom.unsri.ac.id.
              4         IN      PTR    ns.dipkom.ilkom.unsri.ac.id.
             setelah itu anda simpan dengan perintah Esc kemudian :wq

        8. Menjalankan DNS
              #service named restart
              # nslookup
              > dipkom.ilkom.unsri.ac.id
              Server:        10.100.112.4
              Address:       10.100.112.4#53
              Name: dipkom.ilkom.unsri.ac.id
              Address: 10.100.112.4


              > mail.dipkom.ilkom.unsri.ac.id
              Server:        10.100.112.4
              Address:       10.100.112.4#53
              Name: mail.dipkom.ilkom.unsri.ac.id
              Address: 10.100.112.4


              > ftp.dipkom.ilkom.unsri.ac.id
              Server:        10.100.112.4
              Address:       10.100.112.4#53
              Name: ftp.dipkom.ilkom.unsri.ac.id
              Address: 10.100.112.4
Web server
    Seperti sebelumnya, sebelum penyetingan WEB server terlebih dahulu anda harus
    mengecek installasi paket httpd yang ada pada system operasi linux, sebab tanpa
    paket ini WEB server anda tidak akan berjalan sesuai dengan fungsinya. adapun
    untuk mengecek paket httpd dengan perintah berikut:
              #rpm –qa|grep httpd
      Apabila sudah terinstall anda setting file httpd.conf pada file
       /etc/httpd/conf/httpd.conf dengan perintah dibawah ini.
              #vi /etc/httpd/conf/httpd.conf
Userdir disable                         #Userdir disable
             #Userdir public_html                    Userdir public_html
             Setelah itu anda edit juga pada bagian :
             NameVirtualHost 10.100.112.4:80

             <VirtualHost 10.100.112.4:80>
                ServerAdmin webmaster@dipkom.ilkom.unsri.ac.id
                DocumentRoot /home/dipkom/public_html
                ServerName dipkom.ilkom.unsri.ac.id
             </VirtualHost>

             <VirtualHost 10.100.112.4:80>
                ServerAdmin webmaster@dipkom.ilkom.unsri.ac.id
                DocumentRoot /usr/share/squierrelmail/
                ServerName mail.dipkom.ilkom.unsri.ac.id                              Digunakan untuk
             </VirtualHost>                                                           aplikasi mail server

              setelah itu anda simpan dengan perintah Esc kemudian :wq
Di RHEL default direktory file indexnya ada di dalam /var/www/html, tapi dalam kasus
ini kita akan buat direktorynya di arahkan ke user ini digunakan pada saat user mau
upload file webnya cukup menggunakan user masing-masing, adapun langkah-langkah
untuk membuat user dan password adalah sebagai berikut
              #adduser fasilkom
              #passwd fasilkom
               Masukan password untuk user fasilkom


              Kemudian kita Buat directory public_html di directory fasilkom dengan
              perintah
                      #mkdir –p public_html
              Setelah itu kita ubah permision dari user fasilkom dengan perintah
                      # chmod –R 45 fasilkom
              Selanjutnya kita buat file index.php or index.html dengan perintah sebagai
              berikut (pastikan kita berda dalam directory /home/fasilkom/public_html)
              # vi index.php
                      <?
                               Echo “ Selamat datang di Dipkom”;
?>
               setelah itu anda simpan dengan perintah Esc kemudian :wq


              Setelah itu anda test konfigurasi mail server anda dengan menggunakan web
              browser anda dengan ketikkan dipkom.ilkom.unsri.ac.id maka akan
              muncul layar seperti pada gambar dibawah ini.


Mail Server
 1.    Konfigurasi Mail Server
      Sebelum penyetingan Mail server terlebih dahulu anda harus mengecek installasi
      paket postfix dan sqiurrelmail yang ada pada system operasi linux, sebab tanpa
      paket ini Mail server anda tidak akan berjalan sesuai dengan fungsinya. adapun
      untuk mengecek paket tersebut dengan perintah berikut:
      #rpm –qa |grep postfix
      #rpm –qa |grep squirrelmail
      Jika semua paket diatas sudah ada, berarti paket Mail server anda telah terinstall
      dengan baik. Jika belum ada anda bisa mendownload dari internet file postfix dan
      suirrelmail ini, jika sudah terinstall maka anda hanya perlu menyetting seperti pada
      langkah – langkah dibawah ini.


       •   Langkah pertama anda setting file /etc/postfix/main.cf dengan perintah seperti
           dibawah ini.
              #vi /etc/postfix/main.cf
anda edit pada bagian seperti dibawah ini.(yang harus kita edit adalah
             bagian yang telah diberi tanda lingkaran)
             *******************************************************
#   Global Postfix configuration file. This file lists only a subset
#   of all 300+ parameters. See the postconf(5) manual page for a
#   complete list.
#
#   The general format of each line is: parameter = value. Lines
#   that begin with whitespace continue the previous line. A value can
#   contain references to other $names or ${name}s.
#
#   NOTE - CHANGE NO MORE THAN 2-3 PARAMETERS AT A TIME, AND TEST IF
#   POSTFIX STILL WORKS AFTER EVERY CHANGE.

# SOFT BOUNCE
#
# The soft_bounce parameter provides a limited safety net for
# testing. When soft_bounce is enabled, mail will remain queued that
# would otherwise bounce. This parameter disables locally-generated
# bounces, and prevents the SMTP server from rejecting mail permanently
# (by changing 5xx replies into 4xx replies). However, soft_bounce
# is no cure for address rewriting mistakes or mail routing mistakes.
#
#soft_bounce = no

# LOCAL PATHNAME INFORMATION
#
# The queue_directory specifies the location of the Postfix queue.
# This is also the root directory of Postfix daemons that run chrooted.
# See the files in examples/chroot-setup for setting up Postfix chroot
# environments on different UNIX systems.
#
queue_directory = /var/spool/postfix

# The command_directory parameter specifies the location of all
# postXXX commands.
#
command_directory = /usr/sbin

# The daemon_directory parameter specifies the location of all Postfix
# daemon programs (i.e. programs listed in the master.cf file). This
# directory must be owned by root.
#
daemon_directory = /usr/libexec/postfix

# QUEUE AND PROCESS OWNERSHIP
#
# The mail_owner parameter specifies the owner of the Postfix queue
# and of most Postfix daemon processes. Specify the name of a user
# account THAT DOES NOT SHARE ITS USER OR GROUP ID WITH OTHER ACCOUNTS
# AND THAT OWNS NO OTHER FILES OR PROCESSES ON THE SYSTEM. In
# particular, don't specify nobody or daemon. PLEASE USE A DEDICATED
# USER.
#
mail_owner = postfix

#   The default_privs parameter specifies the default rights used by
#   the local delivery agent for delivery to external file or command.
#   These rights are used in the absence of a recipient user context.
#   DO NOT SPECIFY A PRIVILEGED USER OR THE POSTFIX OWNER.
#
#default_privs = nobody

# INTERNET HOST AND DOMAIN NAMES
#
# The myhostname parameter specifies the internet hostname of this
# mail system. The default is to use the fully-qualified domain name
# from gethostname(). $myhostname is used as a default value for many
# other configuration parameters.
#
#myhostname = host.domain.tld
#myhostname = virtual.domain.tld

myhostname = ns.mail.dipkom.ilkom.unsri.ac.id


# The mydomain parameter specifies the local internet domain name.
# The default is to use $myhostname minus the first component.
# $mydomain is used as a default value for many other configuration
# parameters.
#
#mydomain = domain.tld

mydomain = dipkom.ilkom.unsri.ac.id

# SENDING MAIL
#
# The myorigin parameter specifies the domain that locally-posted
# mail appears to come from. The default is to append $myhostname,
# which is fine for small sites. If you run a domain with multiple
# machines, you should (1) change this to $mydomain and (2) set up
# a domain-wide alias database that aliases each user to
# user@that.users.mailhost.
#
# For the sake of consistency between sender and recipient addresses,
# myorigin also specifies the default domain name that is appended
# to recipient addresses that have no @domain part.
#
#myorigin = $myhostname

myorigin = $mydomain

# RECEIVING MAIL

# The inet_interfaces parameter specifies the network interface
# addresses that this mail system receives mail on. By default,
# the software claims all active interfaces on the machine. The
# parameter also controls delivery of mail to user@[ip.address].
#
# See also the proxy_interfaces parameter, for network addresses that
# are forwarded to us via a proxy or network address translator.
#
# Note: you need to stop/start Postfix when this parameter changes.
#
inet_interfaces = all

#inet_interfaces = $myhostname
#inet_interfaces = $myhostname, localhost

inet_interfaces = localhost

# The proxy_interfaces parameter specifies the network interface
# addresses that this mail system receives mail on by way of a
# proxy or network address translation unit. This setting extends
# the address list specified with the inet_interfaces parameter.
#
# You must specify your proxy/NAT addresses when your system is a
# backup MX host for other domains, otherwise mail delivery loops
# will happen when the primary MX host is down.
#
#proxy_interfaces =
#proxy_interfaces = 1.2.3.4

# The mydestination parameter specifies the list of domains that this
# machine considers itself the final destination for.
#
# These domains are routed to the delivery agent specified with the
# local_transport parameter setting. By default, that is the UNIX
# compatible delivery agent that lookups all recipients in /etc/passwd
# and /etc/aliases or their equivalent.
#
# The default is $myhostname + localhost.$mydomain. On a mail domain
# gateway, you should also include $mydomain.
#
# Do not specify the names of virtual domains - those domains are
# specified elsewhere (see VIRTUAL_README).
#
# Do not specify the names of domains that this machine is backup MX
# host for. Specify those names via the relay_domains settings for
# the SMTP server, or use permit_mx_backup if you are lazy (see
# STANDARD_CONFIGURATION_README).
#
# The local machine is always the final destination for mail addressed
# to user@[the.net.work.address] of an interface that the mail system
# receives mail on (see the inet_interfaces parameter).
#
# Specify a list of host or domain names, /file/name or type:table
# patterns, separated by commas and/or whitespace. A /file/name
# pattern is replaced by its contents; a type:table is matched when
# a name matches a lookup key (the right-hand side is ignored).
# Continue long lines by starting the next line with whitespace.
#
# See also below, section "REJECTING MAIL FOR UNKNOWN LOCAL USERS".
#
#mydestination = $myhostname, localhost.$mydomain, localhost

mydestination = $myhostname, localhost.$mydomain

#mydestination = $myhostname, localhost.$mydomain, localhost, $mydomain
#mydestination = $myhostname, localhost.$mydomain, localhost, $mydomain,
#      mail.$mydomain, www.$mydomain, ftp.$mydomain

#   REJECTING MAIL FOR UNKNOWN LOCAL USERS
#
#   The local_recipient_maps parameter specifies optional lookup tables
#   with all names or addresses of users that are local with respect
#   to $mydestination, $inet_interfaces or $proxy_interfaces.
#
#   If this parameter is defined, then the SMTP server will reject
#   mail for unknown local users. This parameter is defined by default.
#
#   To turn off local recipient checking in the SMTP server, specify
#   local_recipient_maps = (i.e. empty).
#
#   The default setting assumes that you use the default Postfix local
#   delivery agent for local delivery. You need to update the
# local_recipient_maps setting if:
#
# - You define $mydestination domain recipients in files other than
#   /etc/passwd, /etc/aliases, or the $virtual_alias_maps files.
#   For example, you define $mydestination domain recipients in
#   the $virtual_mailbox_maps files.
#
# - You redefine the local delivery agent in master.cf.
#
# - You redefine the "local_transport" setting in main.cf.
#
# - You use the "luser_relay", "mailbox_transport", or "fallback_transport"
#   feature of the Postfix local delivery agent (see local(8)).
#
# Details are described in the LOCAL_RECIPIENT_README file.
#
# Beware: if the Postfix SMTP server runs chrooted, you probably have
# to access the passwd file via the proxymap service, in order to
# overcome chroot restrictions. The alternative, having a copy of
# the system passwd file in the chroot jail is just not practical.
#
# The right-hand side of the lookup tables is conveniently ignored.
# In the left-hand side, specify a bare username, an @domain.tld
# wild-card, or specify a user@domain.tld address.
#
#local_recipient_maps = unix:passwd.byname $alias_maps
#local_recipient_maps = proxy:unix:passwd.byname $alias_maps
#local_recipient_maps =

# The unknown_local_recipient_reject_code specifies the SMTP server
# response code when a recipient domain matches $mydestination or
# ${proxy,inet}_interfaces, while $local_recipient_maps is non-empty
# and the recipient address or address local-part is not found.
#
# The default setting is 550 (reject mail) but it is safer to start
# with 450 (try again later) until you are certain that your
# local_recipient_maps settings are OK.
#
unknown_local_recipient_reject_code = 550

# TRUST AND RELAY CONTROL

#   The mynetworks parameter specifies the list of "trusted" SMTP
#   clients that have more privileges than "strangers".
#
#   In particular, "trusted" SMTP clients are allowed to relay mail
#   through Postfix. See the smtpd_recipient_restrictions parameter
#   in postconf(5).
#
#   You can specify the list of "trusted" network addresses by hand
#   or you can let Postfix do it for you (which is the default).
#
#   By default (mynetworks_style = subnet), Postfix "trusts" SMTP
#   clients in the same IP subnetworks as the local machine.
#   On Linux, this does works correctly only with interfaces specified
#   with the "ifconfig" command.
#
#   Specify "mynetworks_style = class" when Postfix should "trust" SMTP
#   clients in the same IP class A/B/C networks as the local machine.
#   Don't do this with a dialup site - it would cause Postfix to "trust"
#   your entire provider's network. Instead, specify an explicit
#   mynetworks list by hand, as described below.
#
# Specify "mynetworks_style = host" when Postfix should "trust"
# only the local machine.
#
#mynetworks_style = class
#mynetworks_style = subnet
#mynetworks_style = host

# Alternatively, you can specify the mynetworks list by hand, in
# which case Postfix ignores the mynetworks_style setting.
#
# Specify an explicit list of network/netmask patterns, where the
# mask specifies the number of bits in the network part of a host
# address.
#
# You can also specify the absolute pathname of a pattern file instead
# of listing the patterns here. Specify type:table for table-based lookups
# (the value on the table right-hand side is not used).
#
mynetworks = 10.100.112.0/24, 127.0.0.0/8

#mynetworks = 168.100.189.0/28, 127.0.0.0/8
#mynetworks = $config_directory/mynetworks
#mynetworks = hash:/etc/postfix/network_table

# The relay_domains parameter restricts what destinations this system will
# relay mail to. See the smtpd_recipient_restrictions description in
# postconf(5) for detailed information.
#
# By default, Postfix relays mail
# - from "trusted" clients (IP address matches $mynetworks) to any destination,
# - from "untrusted" clients to destinations that match $relay_domains or
#   subdomains thereof, except addresses with sender-specified routing.
# The default relay_domains value is $mydestination.
#
# In addition to the above, the Postfix SMTP server by default accepts mail
# that Postfix is final destination for:
# - destinations that match $inet_interfaces or $proxy_interfaces,
# - destinations that match $mydestination
# - destinations that match $virtual_alias_domains,
# - destinations that match $virtual_mailbox_domains.
# These destinations do not need to be listed in $relay_domains.
#
# Specify a list of hosts or domains, /file/name patterns or type:name
# lookup tables, separated by commas and/or whitespace. Continue
# long lines by starting the next line with whitespace. A file name
# is replaced by its contents; a type:name table is matched when a
# (parent) domain appears as lookup key.
#
# NOTE: Postfix will not automatically forward mail for domains that
# list this system as their primary or backup MX host. See the
# permit_mx_backup restriction description in postconf(5).
#
#relay_domains = $mydestination

# INTERNET OR INTRANET

#   The relayhost parameter specifies the default host to send mail to
#   when no entry is matched in the optional transport(5) table. When
#   no relayhost is given, mail is routed directly to the destination.
#
#   On an intranet, specify the organizational domain name. If your
#   internal DNS uses no MX records, specify the name of the intranet
#   gateway host instead.
#
# In the case of SMTP, specify a domain, host, host:port, [host]:port,
# [address] or [address]:port; the form [host] turns off MX lookups.
#
# If you're connected via UUCP, see also the default_transport parameter.
#
#relayhost = $mydomain
#relayhost = [gateway.my.domain]
#relayhost = [mailserver.isp.tld]
#relayhost = uucphost
#relayhost = [an.ip.add.ress]

# REJECTING UNKNOWN RELAY USERS
#
# The relay_recipient_maps parameter specifies optional lookup tables
# with all addresses in the domains that match $relay_domains.
#
# If this parameter is defined, then the SMTP server will reject
# mail for unknown relay users. This feature is off by default.
#
# The right-hand side of the lookup tables is conveniently ignored.
# In the left-hand side, specify an @domain.tld wild-card, or specify
# a user@domain.tld address.
#
#relay_recipient_maps = hash:/etc/postfix/relay_recipients

# INPUT RATE CONTROL
#
# The in_flow_delay configuration parameter implements mail input
# flow control. This feature is turned on by default, although it
# still needs further development (it's disabled on SCO UNIX due
# to an SCO bug).
#
# A Postfix process will pause for $in_flow_delay seconds before
# accepting a new message, when the message arrival rate exceeds the
# message delivery rate. With the default 100 SMTP server process
# limit, this limits the mail inflow to 100 messages a second more
# than the number of messages delivered per second.
#
# Specify 0 to disable the feature. Valid delays are 0..10.
#
#in_flow_delay = 1s

#   ADDRESS REWRITING
#
#   The ADDRESS_REWRITING_README document gives information about
#   address masquerading or other forms of address rewriting including
#   username->Firstname.Lastname mapping.

# ADDRESS REDIRECTION (VIRTUAL DOMAIN)
#
# The VIRTUAL_README document gives information about the many forms
# of domain hosting that Postfix supports.

# "USER HAS MOVED" BOUNCE MESSAGES
#
# See the discussion in the ADDRESS_REWRITING_README document.

# TRANSPORT MAP
#
# See the discussion in the ADDRESS_REWRITING_README document.

# ALIAS DATABASE
#
# The alias_maps parameter specifies the list of alias databases used
# by the local delivery agent. The default list is system dependent.
#
# On systems with NIS, the default is to search the local alias
# database, then the NIS alias database. See aliases(5) for syntax
# details.
#
# If you change the alias database, run "postalias /etc/aliases" (or
# wherever your system stores the mail alias file), or simply run
# "newaliases" to build the necessary DBM or DB file.
#
# It will take a minute or so before changes become visible. Use
# "postfix reload" to eliminate the delay.
#
#alias_maps = dbm:/etc/aliases

alias_maps = hash:/etc/aliases

#alias_maps = hash:/etc/aliases, nis:mail.aliases
#alias_maps = netinfo:/aliases

# The alias_database parameter specifies the alias database(s) that
# are built with "newaliases" or "sendmail -bi". This is a separate
# configuration parameter, because alias_maps (see above) may specify
# tables that are not necessarily all under control by Postfix.
#
#alias_database = dbm:/etc/aliases
#alias_database = dbm:/etc/mail/aliases

alias_database = hash:/etc/aliases

#alias_database = hash:/etc/aliases, hash:/opt/majordomo/aliases

# ADDRESS EXTENSIONS (e.g., user+foo)
#
# The recipient_delimiter parameter specifies the separator between
# user names and address extensions (user+foo). See canonical(5),
# local(8), relocated(5) and virtual(5) for the effects this has on
# aliases, canonical, virtual, relocated and .forward file lookups.
# Basically, the software tries user+foo and .forward+foo before
# trying user and .forward.
#
#recipient_delimiter = +

# DELIVERY TO MAILBOX
#
# The home_mailbox parameter specifies the optional pathname of a
# mailbox file relative to a user's home directory. The default
# mailbox file is /var/spool/mail/user or /var/mail/user. Specify
# "Maildir/" for qmail-style delivery (the / is required).
#
#home_mailbox = Mailbox
#home_mailbox = Maildir/

# The mail_spool_directory parameter specifies the directory where
# UNIX-style mailboxes are kept. The default setting depends on the
# system type.
#
#mail_spool_directory = /var/mail
#mail_spool_directory = /var/spool/mail

# The mailbox_command parameter specifies the optional external
# command to use instead of mailbox delivery. The command is run as
# the recipient with proper HOME, SHELL and LOGNAME environment settings.
# Exception: delivery for root is done as $default_user.
#
# Other environment variables of interest: USER (recipient username),
# EXTENSION (address extension), DOMAIN (domain part of address),
# and LOCAL (the address localpart).
#
# Unlike other Postfix configuration parameters, the mailbox_command
# parameter is not subjected to $parameter substitutions. This is to
# make it easier to specify shell syntax (see example below).
#
# Avoid shell meta characters because they will force Postfix to run
# an expensive shell process. Procmail alone is expensive enough.
#
# IF YOU USE THIS TO DELIVER MAIL SYSTEM-WIDE, YOU MUST SET UP AN
# ALIAS THAT FORWARDS MAIL FOR ROOT TO A REAL USER.
#
#mailbox_command = /some/where/procmail
#mailbox_command = /some/where/procmail -a "$EXTENSION"

# The mailbox_transport specifies the optional transport in master.cf
# to use after processing aliases and .forward files. This parameter
# has precedence over the mailbox_command, fallback_transport and
# luser_relay parameters.
#
# Specify a string of the form transport:nexthop, where transport is
# the name of a mail delivery transport defined in master.cf. The
# :nexthop part is optional. For more details see the sample transport
# configuration file.
#
# NOTE: if you use this feature for accounts not in the UNIX password
# file, then you must update the "local_recipient_maps" setting in
# the main.cf file, otherwise the SMTP server will reject mail for
# non-UNIX accounts with "User unknown in local recipient table".
#
#mailbox_transport = lmtp:unix:/file/name
#mailbox_transport = cyrus

# The fallback_transport specifies the optional transport in master.cf
# to use for recipients that are not found in the UNIX passwd database.
# This parameter has precedence over the luser_relay parameter.
#
# Specify a string of the form transport:nexthop, where transport is
# the name of a mail delivery transport defined in master.cf. The
# :nexthop part is optional. For more details see the sample transport
# configuration file.
#
# NOTE: if you use this feature for accounts not in the UNIX password
# file, then you must update the "local_recipient_maps" setting in
# the main.cf file, otherwise the SMTP server will reject mail for
# non-UNIX accounts with "User unknown in local recipient table".
#
#fallback_transport = lmtp:unix:/file/name
#fallback_transport = cyrus
#fallback_transport =

#   The luser_relay parameter specifies an optional destination address
#   for unknown recipients. By default, mail for unknown@$mydestination,
#   unknown@[$inet_interfaces] or unknown@[$proxy_interfaces] is returned
#   as undeliverable.
#
#   The following expansions are done on luser_relay: $user (recipient
# username), $shell (recipient shell), $home (recipient home directory),
# $recipient (full recipient address), $extension (recipient address
# extension), $domain (recipient domain), $local (entire recipient
# localpart), $recipient_delimiter. Specify ${name?value} or
# ${name:value} to expand value only when $name does (does not) exist.
#
# luser_relay works only for the default Postfix local delivery agent.
#
# NOTE: if you use this feature for accounts not in the UNIX password
# file, then you must specify "local_recipient_maps =" (i.e. empty) in
# the main.cf file, otherwise the SMTP server will reject mail for
# non-UNIX accounts with "User unknown in local recipient table".
#
#luser_relay = $user@other.host
#luser_relay = $local@other.host
#luser_relay = admin+$local

# JUNK MAIL CONTROLS
#
# The controls listed here are only a very small subset. The file
# SMTPD_ACCESS_README provides an overview.

# The header_checks parameter specifies an optional table with patterns
# that each logical message header is matched against, including
# headers that span multiple physical lines.
#
# By default, these patterns also apply to MIME headers and to the
# headers of attached messages. With older Postfix versions, MIME and
# attached message headers were treated as body text.
#
# For details, see "man header_checks".
#
#header_checks = regexp:/etc/postfix/header_checks

# FAST ETRN SERVICE
#
# Postfix maintains per-destination logfiles with information about
# deferred mail, so that mail can be flushed quickly with the SMTP
# "ETRN domain.tld" command, or by executing "sendmail -qRdomain.tld".
# See the ETRN_README document for a detailed description.
#
# The fast_flush_domains parameter controls what destinations are
# eligible for this service. By default, they are all domains that
# this server is willing to relay mail to.
#
#fast_flush_domains = $relay_domains

# SHOW SOFTWARE VERSION OR NOT
#
# The smtpd_banner parameter specifies the text that follows the 220
# code in the SMTP server's greeting banner. Some people like to see
# the mail version advertised. By default, Postfix shows no version.
#
# You MUST specify $myhostname at the start of the text. That is an
# RFC requirement. Postfix itself does not care.
#
#smtpd_banner = $myhostname ESMTP $mail_name
#smtpd_banner = $myhostname ESMTP $mail_name ($mail_version)

# PARALLEL DELIVERY TO THE SAME DESTINATION
#
# How many parallel deliveries to the same user or domain? With local
# delivery, it does not make sense to do massively parallel delivery
#   to the same user, because mailbox updates must happen sequentially,
#   and expensive pipelines in .forward files can cause disasters when
#   too many are run at the same time. With SMTP deliveries, 10
#   simultaneous connections to the same domain could be sufficient to
#   raise eyebrows.
#
#   Each message delivery transport has its XXX_destination_concurrency_limit
#   parameter. The default is $default_destination_concurrency_limit for
#   most delivery transports. For the local delivery agent the default is 2.

#local_destination_concurrency_limit = 2
#default_destination_concurrency_limit = 20

# DEBUGGING CONTROL
#
# The debug_peer_level parameter specifies the increment in verbose
# logging level when an SMTP client or server host name or address
# matches a pattern in the debug_peer_list parameter.
#
debug_peer_level = 2

# The debug_peer_list parameter specifies an optional list of domain
# or network patterns, /file/name patterns or type:name tables. When
# an SMTP client or server host name or address matches a pattern,
# increase the verbose logging level by the amount specified in the
# debug_peer_level parameter.
#
#debug_peer_list = 127.0.0.1
#debug_peer_list = some.domain

# The debugger_command specifies the external command that is executed
# when a Postfix daemon program is run with the -D option.
#
# Use "command .. & sleep 5" so that the debugger can attach before
# the process marches on. If you use an X-based debugger, be sure to
# set up your XAUTHORITY environment variable before starting Postfix.
#
debugger_command =
        PATH=/bin:/usr/bin:/usr/local/bin:/usr/X11R6/bin
        xxgdb $daemon_directory/$process_name $process_id & sleep 5

# If you don't have X installed on the Postfix machine, try:
# debugger_command =
#      PATH=/bin:/usr/bin:/usr/local/bin; export PATH; (echo cont;
#      echo where) | gdb $daemon_directory/$process_name $process_id 2>&1
#      >$config_directory/$process_name.$process_id.log & sleep 5

# INSTALL-TIME CONFIGURATION INFORMATION
#
# The following parameters are used when installing a new Postfix version.
#
# sendmail_path: The full pathname of the Postfix sendmail command.
# This is the Sendmail-compatible mail posting interface.
#
sendmail_path = /usr/sbin/sendmail.postfix

# newaliases_path: The full pathname of the Postfix newaliases command.
# This is the Sendmail-compatible command to build alias databases.
#
newaliases_path = /usr/bin/newaliases.postfix

# mailq_path: The full pathname of the Postfix mailq command.   This
# is the Sendmail-compatible mail queue listing command.
#
mailq_path = /usr/bin/mailq.postfix

# setgid_group: The group for mail submission and queue management
# commands. This must be a group name with a numerical group ID that
# is not shared with other accounts, not even with the Postfix account.
#
setgid_group = postdrop

# html_directory: The location of the Postfix HTML documentation.
#
html_directory = no

# manpage_directory: The location of the Postfix on-line manual pages.
#
manpage_directory = /usr/share/man

# sample_directory: The location of the Postfix sample configuration files.
# This parameter is obsolete as of Postfix 2.1.
#
sample_directory = /usr/share/doc/postfix-2.1.5/samples

# readme_directory: The location of the Postfix README files.
#
readme_directory = /usr/share/doc/postfix-2.1.5/README_FILES

**********************************************************************
setelah itu anda simpan dengan perintah Esc kemudian :wq
        • Setelah itu jalankan service postfix anda, serta anda lihat status dari postfix
           anda dengan perintah seperti dibawah ini.
             #service postfix restart
       •   Selanjutnya kita buat file /etc/xinetd.d/ipop3 dan /etc/xinetd.d/imap seperti
           dibawah ini
           #cd /etc/xinetd.d/
           #vi ipop3
               service pop3
               {
                     socket_type = stream
                     wait        = no
                     user        = root
                     server         = /usr/libexec/dovecot/pop3-login
                     log_on_success    += HOST DURATION
                     log_on_failure    += HOST
                     disable     = no
               }
           setelah itu anda simpan dengan perintah Esc kemudian :wq
           # vi imap
               service imap
               {
                     socket_type = stream
                     wait        = no
user        = root
                         server         = /usr/libexec/dovecot/imap-login
                         log_on_success    += HOST DURATION
                         log_on_failure    += HOST
                         disable     = no
                }
      setelah itu anda simpan dengan perintah Esc kemudian :wq
      •     Setelah itu anda restart service xinetd anda dengan perintah seperti dibawah
            ini :
              # service xinetd restart
      •     Setelah cek paket squirrelmail yang ada pada system operasi linux redhat anda
            dengan cara seperti dibawah ini :
              #rpm –qa|grep squirrelmain
              Apabila paket squirrelmail sudah terinstall, mengedit file yang ada pada
              directory /etc/squirrelmail/config.php dengan perintah :
              #vi /etc/squirrelmail/config.php
                edit pada bagian dibawah ini
      ****************************************************************
      <?php

/**
 * SquirrelMail Configuration File
 * Created using the configure script, conf.pl
 */

global $version;
$config_version = '1.4.0';
$config_use_color = 1;

$org_name           = "dipkom.ilkom";

$org_logo      =     SM_PATH . 'images/sm_logo.png';
$org_logo_width      = '308';
$org_logo_height     = '111';
$org_title     =     "SquirrelMail $version";
$signout_page =      '';
$frame_top     =     '_top';

$provider_uri         = 'http://www.squirrelmail.org/';

$provider_name         = 'SquirrelMail';

$motd = "";

$squirrelmail_default_language = 'en_US';

$domain                     = 'dipkom.ilkom.unsri.ac.id';

$imapServerAddress          = 'mail.dipkom.ilkom.unsri.ac.id';
$imapPort                = 143;
$useSendmail             = true;

$smtpServerAddress       = 'mail.dipkom.ilkom.unsri.ac.id';

$smtpPort                =   25;
$sendmail_path           =   '/usr/sbin/sendmail';
$pop_before_smtp         =   false;
$imap_server_type        =   'uw';
$invert_time             =   false;
$optional_delimiter      =   '/';

$default_folder_prefix              =   'mail/';
$trash_folder                       =   'Trash';
$sent_folder                        =   'Sent';
$draft_folder                       =   'Drafts';
$default_move_to_trash              =   true;
$default_move_to_sent               =   true;
$default_save_as_draft              =   true;
$show_prefix_option                 =   true;
$list_special_folders_first         =   true;
$use_special_folder_color           =   true;
$auto_expunge                       =   true;
$default_sub_of_inbox               =   false;
$show_contain_subfolders_option     =   true;
$default_unseen_notify              =   2;
$default_unseen_type                =   1;
$auto_create_special                =   true;
$delete_folder                      =   false;
$noselect_fix_enable                =   false;

$default_charset             =   'iso-8859-1';
$data_dir                    =   '/var/lib/squirrelmail/prefs/';
$attachment_dir              =   '/var/spool/squirrelmail/attach/';
$dir_hash_level              =   0;
$default_left_size           =   '150';
$force_username_lowercase    =   false;
$default_use_priority        =   true;
$hide_sm_attributions        =   false;
$default_use_mdn             =   true;
$edit_identity               =   true;
$edit_name                   =   true;
$allow_thread_sort           =   true;
$allow_server_sort           =   true;
$allow_charset_search        =   true;
$uid_support                 =   true;

$plugins[0] = 'delete_move_next';
$plugins[1] = 'squirrelspell';
$plugins[2] = 'newmail';

$theme_css = '';
$theme_default = 0;
$theme[0]['PATH'] =   SM_PATH . 'themes/default_theme.php';
$theme[0]['NAME'] =   'Default';
$theme[1]['PATH'] =   SM_PATH . 'themes/plain_blue_theme.php';
$theme[1]['NAME'] =   'Plain Blue';
$theme[2]['PATH'] =   SM_PATH . 'themes/sandstorm_theme.php';
$theme[2]['NAME'] =   'Sand Storm';
$theme[3]['PATH'] =   SM_PATH . 'themes/deepocean_theme.php';
$theme[3]['NAME'] =   'Deep Ocean';
$theme[4]['PATH'] =   SM_PATH . 'themes/slashdot_theme.php';
$theme[4]['NAME'] =   'Slashdot';
$theme[5]['PATH'] = SM_PATH . 'themes/purple_theme.php';
$theme[5]['NAME'] = 'Purple';
$theme[6]['PATH'] = SM_PATH . 'themes/forest_theme.php';
$theme[6]['NAME'] = 'Forest';
$theme[7]['PATH'] = SM_PATH . 'themes/ice_theme.php';
$theme[7]['NAME'] = 'Ice';
$theme[8]['PATH'] = SM_PATH . 'themes/seaspray_theme.php';
$theme[8]['NAME'] = 'Sea Spray';
$theme[9]['PATH'] = SM_PATH . 'themes/bluesteel_theme.php';
$theme[9]['NAME'] = 'Blue Steel';
$theme[10]['PATH'] = SM_PATH . 'themes/dark_grey_theme.php';
$theme[10]['NAME'] = 'Dark Grey';
$theme[11]['PATH'] = SM_PATH . 'themes/high_contrast_theme.php';
$theme[11]['NAME'] = 'High Contrast';
$theme[12]['PATH'] = SM_PATH . 'themes/black_bean_burrito_theme.php';
$theme[12]['NAME'] = 'Black Bean Burrito';
$theme[13]['PATH'] = SM_PATH . 'themes/servery_theme.php';
$theme[13]['NAME'] = 'Servery';
$theme[14]['PATH'] = SM_PATH . 'themes/maize_theme.php';
$theme[14]['NAME'] = 'Maize';
$theme[15]['PATH'] = SM_PATH . 'themes/bluesnews_theme.php';
$theme[15]['NAME'] = 'BluesNews';
$theme[16]['PATH'] = SM_PATH . 'themes/deepocean2_theme.php';
$theme[16]['NAME'] = 'Deep Ocean 2';
$theme[17]['PATH'] = SM_PATH . 'themes/blue_grey_theme.php';
$theme[17]['NAME'] = 'Blue Grey';
$theme[18]['PATH'] = SM_PATH . 'themes/dompie_theme.php';
$theme[18]['NAME'] = 'Dompie';
$theme[19]['PATH'] = SM_PATH . 'themes/methodical_theme.php';
$theme[19]['NAME'] = 'Methodical';
$theme[20]['PATH'] = SM_PATH . 'themes/greenhouse_effect.php';
$theme[20]['NAME'] = 'Greenhouse Effect (Changes)';
$theme[21]['PATH'] = SM_PATH . 'themes/in_the_pink.php';
$theme[21]['NAME'] = 'In The Pink (Changes)';
$theme[22]['PATH'] = SM_PATH . 'themes/kind_of_blue.php';
$theme[22]['NAME'] = 'Kind of Blue (Changes)';
$theme[23]['PATH'] = SM_PATH . 'themes/monostochastic.php';
$theme[23]['NAME'] = 'Monostochastic (Changes)';
$theme[24]['PATH'] = SM_PATH . 'themes/shades_of_grey.php';
$theme[24]['NAME'] = 'Shades of Grey (Changes)';
$theme[25]['PATH'] = SM_PATH . 'themes/spice_of_life.php';
$theme[25]['NAME'] = 'Spice of Life (Changes)';
$theme[26]['PATH'] = SM_PATH . 'themes/spice_of_life_lite.php';
$theme[26]['NAME'] = 'Spice of Life - Lite (Changes)';
$theme[27]['PATH'] = SM_PATH . 'themes/spice_of_life_dark.php';
$theme[27]['NAME'] = 'Spice of Life - Dark (Changes)';
$theme[28]['PATH'] = SM_PATH . 'themes/christmas.php';
$theme[28]['NAME'] = 'Holiday - Christmas';
$theme[29]['PATH'] = SM_PATH . 'themes/darkness.php';
$theme[29]['NAME'] = 'Darkness (Changes)';
$theme[30]['PATH'] = SM_PATH . 'themes/random.php';
$theme[30]['NAME'] = 'Random (Changes every login)';
$theme[31]['PATH'] = SM_PATH . 'themes/midnight.php';
$theme[31]['NAME'] = 'Midnight';
$theme[32]['PATH'] = SM_PATH . 'themes/alien_glow.php';
$theme[32]['NAME'] = 'Alien Glow';
$theme[33]['PATH'] = SM_PATH . 'themes/dark_green.php';
$theme[33]['NAME'] = 'Dark Green';
$theme[34]['PATH'] = SM_PATH . 'themes/penguin.php';
$theme[34]['NAME'] = 'Penguin';

$default_use_javascript_addr_book = false;
$addrbook_dsn = '';
$addrbook_table = 'address';

$prefs_dsn = '';
$prefs_table = 'userprefs';
$prefs_user_field = 'user';
$prefs_key_field = 'prefkey';
$prefs_val_field = 'prefval';
$no_list_for_subscribe = false;
$smtp_auth_mech = 'none';
$imap_auth_mech = 'login';
$use_imap_tls = false;
$use_smtp_tls = false;
$session_name = 'SQMSESSID';

@include SM_PATH . 'config/config_local.php';

/**
 * Make sure there are no characters after the PHP closing
 * tag below (including newline characters and whitespace).
 * Otherwise, that character will cause the headers to be
 * sent and regular output to begin, which will majorly screw
 * things up when we try to send more headers later.
 */
?>

***********************************************************************
setelah itu anda simpan dengan perintah Esc kemudian :wq
       •   Restart paket xinetd anda dengan perintah seperti dibawah ini :
             # service xinetd restart
             Setelah itu anda test konfigurasi mail server anda dengan menggunakan web
             browser anda dengan ketikkan mail.dipkom.ilkom.unsri.ac.id maka akan
             muncul layar seperti pada gambar dibawah ini.
•    Apabila muncul layar seperti diatas maka Mailserver anda sudah selesai dan
              berhasil dibuat.
         •    Dan untuk membuka atau masuk tinggal masukkan user dan password saja.


Konfigurasi FTP Server
     Sebelum penyetingan FTP server terlebih dahulu anda harus mengecek installasi
     paket FTP yang ada pada system operasi linux, pada modul kali ini kitaa
     menggunakan type FTP vsftpd. Untuk mengechek apakah paket ini sudah terinstall
     atau belum anda cuma cukup mengetikkan perintah seperti dibawah ini.
     #rpm –qa|grep vsftpd
     Jika paket diatas sudah ada, berarti anda cukup mengkonfigurasi file vsftpd.conf
     •       Pertama – tama anda edit file /etc/vsftpd/vsftpd.conf dengan perintah.
             # vi /etc/vsftpd/vsftpd.conf
***********************************************************************
# Example config file /etc/vsftpd/vsftpd.conf
#
# The default compiled in settings are fairly paranoid. This sample file
# loosens things up a bit, to make the ftp daemon more usable.
# Please see vsftpd.conf.5 for all compiled in defaults.
#
# READ THIS: This example file is NOT an exhaustive list of vsftpd options.
# Please read the vsftpd.conf.5 manual page to get a full idea of vsftpd's
# capabilities.
#
# Allow anonymous FTP? (Beware - allowed by default if you comment this out).
anonymous_enable=YES
#
# Uncomment this to allow local users to log in.
local_enable=YES
#
# Uncomment this to enable any form of FTP write command.
write_enable=YES
#
# Default umask for local users is 077. You may wish to change this to 022,
# if your users expect that (022 is used by most other ftpd's)
local_umask=022
#
# Uncomment this to allow the anonymous FTP user to upload files. This only
# has an effect if the above global write enable is activated. Also, you will
# obviously need to create a directory writable by the FTP user.
#anon_upload_enable=YES
#
# Uncomment this if you want the anonymous FTP user to be able to create
# new directories.
#anon_mkdir_write_enable=YES
#
# Activate directory messages - messages given to remote users when they
# go into a certain directory.
dirmessage_enable=YES
#
# Activate logging of uploads/downloads.
xferlog_enable=YES
#
# Make sure PORT transfer connections originate from port 20 (ftp-data).
connect_from_port_20=YES
#
# If you want, you can arrange for uploaded anonymous files to be owned by
# a different user. Note! Using "root" for uploaded files is not
# recommended!
#chown_uploads=YES
#chown_username=whoever
#
# You may override where the log file goes if you like. The default is shown
# below.
#xferlog_file=/var/log/vsftpd.log
#
# If you want, you can have your log file in standard ftpd xferlog format
xferlog_std_format=YES
#
# You may change the default value for timing out an idle session.
#idle_session_timeout=600
#
# You may change the default value for timing out a data connection.
#data_connection_timeout=120
#
# It is recommended that you define on your system a unique user which the
# ftp server can use as a totally isolated and unprivileged user.
#nopriv_user=ftpsecure
#
# Enable this and the server will recognise asynchronous ABOR requests. Not
# recommended for security (the code is non-trivial). Not enabling it,
# however, may confuse older FTP clients.
#async_abor_enable=YES
#
# By default the server will pretend to allow ASCII mode but in fact ignore
# the request. Turn on the below options to have the server actually do ASCII
# mangling on files when in ASCII mode.
# Beware that turning on ascii_download_enable enables malicious remote parties
# to consume your I/O resources, by issuing the command "SIZE /big/file" in
# ASCII mode.
# These ASCII options are split into upload and download because you may wish
# to enable ASCII uploads (to prevent uploaded scripts etc. from breaking),
# without the DoS risk of SIZE and ASCII downloads. ASCII mangling should be
# on the client anyway..
#ascii_upload_enable=YES
#ascii_download_enable=YES
#
# You may fully customise the login banner string:
#ftpd_banner=Welcome to blah FTP service.
#
# You may specify a file of disallowed anonymous e-mail addresses. Apparently
# useful for combatting certain DoS attacks.
#deny_email_enable=YES
# (default follows)
#banned_email_file=/etc/vsftpd.banned_emails
#
# You may specify an explicit list of local users to chroot() to their home
# directory. If chroot_local_user is YES, then this list becomes a list of
# users to NOT chroot().
#chroot_list_enable=YES
# (default follows)
#chroot_list_file=/etc/vsftpd.chroot_list
#
# You may activate the "-R" option to the builtin ls. This is disabled by
# default to avoid remote users being able to cause excessive I/O on large
# sites. However, some broken FTP clients such as "ncftp" and "mirror" assume
# the presence of the "-R" option, so there is a strong case for enabling it.
#ls_recurse_enable=YES

pam_service_name=vsftpd
userlist_enable=YES
#enable for standalone mode
listen=YES
tcp_wrappers=YES


***********************************************************************
Simpan file konfigurasi anda dengan cara tekan Esc kemudian anda tekan : wq
       •   Restart paket xinetd anda dengan perintah seperti dibawah ini :
             # service vsftpd restart
     Setelah itu anda test konfigurasi mail server anda dengan menggunakan web
     browser anda dengan ketikkan ftp.dipkom.ilkom.unsri.ac.id maka akan muncul
     layar seperti pada gambar dibawah ini
Sharing Internet dan Proxy Server

Sebelum Setting mintalah IP publik ke ISP lengkap dengan netmask, broadcast dan dns-
nya. Kemudian tentukan juga IP Lokal yang akan digunakan pada komputer client. Misal
pada modul ini ip yang di dapat adalah

               IP              : 10.100.112.15/24
               GATEWAY         : 10.100.112.1
               DNS             : 10.100.112.1

•    Settinglah IP pada ethernet-0.

# vi /etc/sysconfig/network-scripts/ifcfg-eth0
         DEVICE=eth0
         BOOTPROTO=static
         IPADDR=10.100.112.15
         NETMASK=255.255.255.0
         BROADCAST=10.100.112.255
         NETWORK=10.100.112.0
         ONBOOT=yes
         Simpan file konfigurasi anda dengan cara tekan Esc kemudian anda tekan : wq
•     Settinglah IP pada ethernet-1
# vi /etc/sysconfig/network-scripts/ifcfg-eth1,
       DEVICE=eth1
       BOOTPROTO=static
       IPADDR=192.168.10.1
       NETMASK=255.255.255.0
       BROADCAST=192.168.10.255
       NETWORK=192.168.10.0
       Simpan file konfigurasi anda dengan cara tekan Esc kemudian anda tekan : wq
       Restart paket xinetd anda dengan perintah seperti dibawah ini :
# service network restart

•   Settinglah HostName, Gateway

               # vi /etc/sysconfig/network
               NETWORKING=yes
               HOSTNAME=jarkom
               GATEWAY=10.100.112.1

        Simpan file konfigurasi anda dengan cara tekan Esc kemudian anda tekan : wq

•   Setting DNS Resolv

                # vi /etc/resolv.conf
                nameserver 10.100.112.1
                nameserver 192.168.10.1
    •   Simpan file konfigurasi anda dengan cara tekan Esc kemudian anda tekan : wq
    •   Restart paket named anda dengan perintah seperti dibawah ini :
          # service named restart

•   Setting IP Forwarding, agar paket dari jaringan client dapat berjalan ke jaringan di
    luarnya melalui gateway.

     # vi /etc/sysctl.conf
     rubah net.ipv4.ip_forward = 0 menjadi net.ipv4.ip_forward = 1
    • Simpan file konfigurasi anda dengan cara tekan Esc kemudian anda tekan : wq
    • Restart paket xinetd anda dengan perintah seperti dibawah ini :
          # service network restart

•   Sekarang lakukan testing dengan ngeping ke:gateway dan website (google.com)

        # ping 10.100.112.1

        PING 10.100.112.1 (10.100.112.1) 56(84) bytes of data.
        64 bytes from 10.100.112.1: icmp_seq=0 ttl=64 time=0.811 ms
        64 bytes from 10.100.112.1: icmp_seq=1 ttl=64 time=0.822 ms
        64 bytes from 10.100.112.1: icmp_seq=2 ttl=64 time=0.828 ms
        64 bytes from 10.100.112.1: icmp_seq=3 ttl=64 time=0.820 ms

        # ping www.google.com

        PING google.com (66.94.234.13) 56(84) bytes of data.
        64 bytes from w2.rc.vip.scd.google.com (66.94.234.13): icmp_seq=1 ttl=50
        time=778 ms
        64 bytes from w2.rc.vip.scd.google.com (66.94.234.13): icmp_seq=2 ttl=49
        time=769 ms6
Jika hasilnya Reply berarti settingnya sudah berhasil.

•       Agar client atau jaringan lokal (LAN) yang terhubung dengan sistem linux anda (ke
        eth1) dapat mengakses internet, maka settinglah NAT IPTables dan Forwarding.

          # /etc/init.d/iptables stop

         # vi /etc/rc.d/rc.nat

        Kemudian ketikan sbb

        #!/bin/sh
        #
        # This script will be executed *after* all the other init scripts.
        # You can put your own initialization stuff in here if you don't
        # want to do the full Sys V style init stuff.

        #Hapus aturan default
        /sbin/iptables -F
        /sbin/iptables -F INPUT
        /sbin/iptables -F OUTPUT
        /sbin/iptables -F FORWARD
        /sbin/iptables -t mangle -F
        /sbin/iptables -t nat -F
        /sbin/iptables -t filter -F

        #-----INPUT dan LoopBack----#
        # Allow unlimited traffic on the loopback interface
        iptables -A INPUT -i lo -j ACCEPT
        iptables -A FORWARD -i lo -j ACCEPT
        iptables -A OUTPUT -o lo -j ACCEPT

        # Set default policies/buat jalur tutup semua dan nantinya baru policy open
        iptables -t nat -P PREROUTING ACCEPT
        iptables -t nat -P POSTROUTING ACCEPT
        iptables -t nat -P OUTPUT ACCEPT

        iptables -t nat -A POSTROUTING -s 192.168.50.0/27 -j MASQUERADE

    •     Simpan file konfigurasi anda dengan cara tekan Esc kemudian anda tekan : wq
    •     Ubah Permision file rc.nat
          # chmod +x /etc/rc.d/rc.nat

    •     Simpanlah semua hasil konfigurasi di /etc/rc.local, sehingga Anda tidak perlu
          harus melakukan command-command sebelumnya setiap kali sistem di on-kan
          atau di-restart. Lakukan langkah berikut
# vi /etc/rc.local
      :-- Tambahkan script berikut --:
        /etc/rc.d/rc.nat
    • Restart paket iptables anda dengan perintah seperti dibawah ini :
         # service iptables restart
        #/etc/rc.local
•    Konfigurasikan IP untuk klien, yaitu 192.168.10.2


•    Setelah itu anda test konfigurasi sharing server anda dengan menggunakan ping
     dengan menggunakan cmd (ping ke alamat 10.100.112.1)


               Kalau hasilnya seperti diatas maka NAT anda sudah berhasil

     Test konfigurasi menggunakan web browser di sisi klient anda dengan ketikkan
     google.com maka akan muncul layar seperti pada gambar dibawah ini
DHCP SERVER – LINUX

         # rpm -qa|grep dhcp

      Jika program DHCP belum ada, installah dengan cara sbb. Masukkan CD Rom
      Redhat #2 dan ketiklah perintah berikut ini.

                       # mount /media/cdrom
                       # cd RedHat
                       # ls –l
                       # cd RPMS
                       # ls –l dhcp*
                       # rpm –ivh dhcp*


      Di REDHAT secara default file dhcpd.conf berada di dalam direktori
      /usr/share/doc/dhcp-3.0.1
           #cd /usr/share/doc/dhcp-3.0.1
           #ls
           Pada saat gunakan perintah ls maka akan tampil file dhcpd.conf.sample.
           File ini harus kita copy ke directori /etc
           #cp dhcpd.conf.sample /etc/dhcpd.conf
           Kemudian Edit file dhcpd.conf
           # cd /etc
           # vi dhcpd.conf
Kita edit bagian disini (bagian ini sebuah bagian penulis berikan tanda #
agar perintah di file dhcp menjadi komentar)
ddns-update-style interim;
ignore client-updates;


#subnet 192.168.0.0 netmask 255.255.255.0 {


# --- default gateway
#         option routers             192.168.0.1;
 #           option subnet-mask            255.255.255.0;


    #        option nis-domain            "domain.org";
     # option domain-name                   "domain.org";
     # option domain-name-servers             192.168.1.1;


         # option time-offset            -18000; # Eastern Standard Time
#         option ntp-servers             192.168.1.1;
#         option netbios-name-servers        192.168.1.1;
# --- Selects point-to-point node (default is hybrid). Don't change this
unless
# -- you understand Netbios very well
#         option netbios-node-type 2;


# range dynamic-bootp 192.168.0.128 192.168.0.254;
 #           default-lease-time 21600;
     #       max-lease-time 43200;


         # we want the nameserver to appear at a fixed address
     # host ns {
         #       next-server marvin.redhat.com;
          #      hardware ethernet 12:34:56:78:AB:CD;
# fixed-address 207.175.42.254;
                      #}
                 #}
                 Tambahkan perintah sebagai berikut
                 subnet 192.168.10.0 netmask 255.255.255.0 {
                           range 192.168.10.2 192.168.10.20;
                           option domain-name "ilkom.unsri.ac.id";
                           option domain-name-servers 192.168.10.1;
                           option broadcast-address 192.168.10.255;
                           option routers 192.168.10.1;
                           option subnet-mask 255.255.255.0;
                 }
    •    Simpan file konfigurasi anda dengan cara tekan Esc kemudian anda tekan : wq
    •    Restart paket iptables anda dengan perintah seperti dibawah ini :
           # service dhcpd restart


Proxy Server


Setting untuk proxy awalnya hampir sama dengan setting untuk sharing internet tetapi di
bagian NAT nya kita direct ke port yang kita tuju dan juga kita harus mengaktifkan squid
di linux

•       Settinglah IP pada ethernet-0.

# vi /etc/sysconfig/network-scripts/ifcfg-eth0
DEVICE=eth0
         BOOTPROTO=static
         IPADDR=10.100.112.15
         NETMASK=255.255.255.0
         BROADCAST=10.100.112.255
         NETWORK=10.100.112.0
         ONBOOT=yes
         Simpan file konfigurasi anda dengan cara tekan Esc kemudian anda tekan : wq
•       Settinglah IP pada ethernet-1
# vi /etc/sysconfig/network-scripts/ifcfg-eth1,
         DEVICE=eth1
         BOOTPROTO=static
         IPADDR=192.168.10.1
         NETMASK=255.255.255.0
         BROADCAST=192.168.10.255
         NETWORK=192.168.10.0

         Simpan file konfigurasi anda dengan cara tekan Esc kemudian anda tekan : wq
         Restart paket xinetd anda dengan perintah seperti dibawah ini :
               # service network restart


•   Settinglah HostName, Gateway

                # vi /etc/sysconfig/network
                NETWORKING=yes
                HOSTNAME=jarkom
                GATEWAY=10.100.112.1

         Simpan file konfigurasi anda dengan cara tekan Esc kemudian anda tekan : wq

•   Setting DNS Resolv

                # vi /etc/resolv.conf
                nameserver 10.100.112.1
                nameserver 192.168.10.1
    •    Simpan file konfigurasi anda dengan cara tekan Esc kemudian anda tekan : wq
    •    Restart paket named anda dengan perintah seperti dibawah ini :
           # service named restart

•   Setting IP Forwarding, agar paket dari jaringan client dapat berjalan ke jaringan di
    luarnya melalui gateway.

        # vi /etc/sysctl.conf
        rubah net.ipv4.ip_forward = 0 menjadi net.ipv4.ip_forward = 1
    •    Simpan file konfigurasi anda dengan cara tekan Esc kemudian anda tekan : wq
    •    Restart paket xinetd anda dengan perintah seperti dibawah ini :
              # service network restart
•   Sekarang lakukan testing dengan ngeping ke:gateway dan website (google.com)

       # ping 10.100.112.1

       PING 10.100.112.1 (10.100.112.1) 56(84) bytes            of data.
       64 bytes from 10.100.112.1: icmp_seq=0 ttl=64            time=0.811   ms
       64 bytes from 10.100.112.1: icmp_seq=1 ttl=64            time=0.822   ms
       64 bytes from 10.100.112.1: icmp_seq=2 ttl=64            time=0.828   ms
       64 bytes from 10.100.112.1: icmp_seq=3 ttl=64            time=0.820   ms

       # ping www.google.com

       PING google.com (66.94.234.13) 56(84) bytes of data.
       64 bytes from w2.rc.vip.scd.google.com (66.94.234.13): icmp_seq=1
       ttl=50 time=778 ms
       64 bytes from w2.rc.vip.scd.google.com (66.94.234.13): icmp_seq=2
       ttl=49 time=769 ms6

       Jika hasilnya Reply berarti settingnya sudah berhasil.

•    Agar client atau jaringan lokal (LAN) yang terhubung dengan sistem linux anda (ke
     eth1) dapat mengakses internet, maka settinglah NAT IPTables dan Forwarding.

       # /etc/init.d/iptables stop
       # vi /etc/rc.d/rc.nat

     Kemudian ketikan sbb
     #!/bin/sh
     #
     # This script will be executed *after* all the other init scripts.
     # You can put your own initialization stuff in here if you don't
     # want to do the full Sys V style init stuff.

     #Hapus aturan default
     /sbin/iptables -F
     /sbin/iptables -F INPUT
     /sbin/iptables -F OUTPUT
     /sbin/iptables -F FORWARD
     /sbin/iptables -t mangle -F
     /sbin/iptables -t nat -F
     /sbin/iptables -t filter -F

     #-----INPUT dan LoopBack----#
     # Allow unlimited traffic on the loopback interface
     iptables -A INPUT -i lo -j ACCEPT
     iptables -A FORWARD -i lo -j ACCEPT
     iptables -A OUTPUT -o lo -j ACCEPT

    # Set default policies/buat jalur tutup semua dan nantinya baru
policy open
    iptables -t nat -P PREROUTING ACCEPT
    iptables -t nat -P POSTROUTING ACCEPT
    iptables -t nat -P OUTPUT ACCEPT
iptables -t nat -A POSTROUTING -s 192.168.50.0/27 -j MASQUERADE
    iptables -t nat -A PREROUTING -p tcp -i eth1 --dport 80 -j REDIRECT
--to-port 3128

  •   Simpan file konfigurasi anda dengan cara tekan Esc kemudian anda tekan : wq
  •   Ubah Permision file rc.nat
      # chmod +x /etc/rc.d/rc.nat

  •   Simpanlah semua hasil konfigurasi di /etc/rc.local, sehingga Anda tidak perlu
      harus melakukan command-command sebelumnya setiap kali sistem di on-kan
      atau di-restart. Lakukan langkah berikut

      # vi /etc/rc.local
      :-- Tambahkan script berikut --:
        /etc/rc.d/rc.nat

  •   Restart paket iptables anda dengan perintah seperti dibawah ini :
        # service iptables restart
       #/etc/rc.local

  •   Setting Squid
      Sebelum kita setting sebaik kita ganti dulu file squid.conf dengan perintah
      #/etc/squid/mv squid.conf squid_lamo.conf

      Kemudian kita buat file squid.conf dengan perintah
      #/etc/squid/vi squid.conf

      Kemudian ketikan isi di file squid seperti di bawah ini
      (Pada kasus ini kita hanya membuat rule klient tidak bisa membuka /mengkases
      situs atau kata kunci yang sudah kita list)

      #Redirect port 80 ke port 3128
      http_port 3128

      #Alokasi memori penyimpanan data sementara (perhatikan nial ram
      anda)
      cache_mem 64 MB

      #Data yang > 4MB tidak di simpan di hardisk
      maximum_object_size 4096 KB

      #Lokasi penyimpanan cache
      maximum_object_size 4096 KB

      #Hak Akses
      acl all src 0.0.0.0/0.0.0.0
      acl manager proto cache_object
      acl localhost src 127.0.0.1/255.255.255.255
      acl lan src 192.168.60.0/255.255.255.0
acl   domain_terlarang dstdomain "/etc/squid/domain_terlarang.txt"
     acl   kata_blacklist url_regex -i "/etc/squid/kata_blacklist.txt"
     acl   SSL_ports port 443 563
     acl   Safe_ports port 80 81 21 20 443 563 70 210 1025-65535
     acl   Safe_ports port 280    # http-mgmt
     acl   Safe_ports port 488    # gss-http
     acl   Safe_ports port 591    # filemaker
     acl   Safe_ports port 777    # multiling http
     acl   icq_ports port 5190    # ICQ login port
     acl   irc_ports port 6667-7007 # mIRC port


     http_access    deny !Safe_ports
     http_access    deny lan domain_terlarang
     http_access    deny lan kata_blacklist
     http_access    allow lan
     http_access    allow manager localhost
     http_access    deny manager

     cache_mgr admin.ilkom@unsri.ac.id
     visible_hostname admin.ilkom.unsri.ac.id
     httpd_accel_host virtual
     httpd_accel_port 80
     httpd_accel_with_proxy on
     httpd_accel_uses_host_header on

•    Simpan file konfigurasi anda dengan cara tekan Esc kemudian anda tekan : wq
•    Buat dile domain_terlarang.txt
             #vi /etc/squid/domain_terlarang.txt
                   17tahun.com
                   www.17tahun.com
                   dll
•    Simpan file konfigurasi anda dengan cara tekan Esc kemudian anda tekan : wq
•    Buat file kata_blacklist.txt
•    #vi /etc/squid/ kata_blacklist.txt
                 sex
                 porno
                 dada
                 dll
•    Simpan file konfigurasi anda dengan cara tekan Esc kemudian anda tekan : wq
•    Kemudian aktifkan squidnya dengan perintah
           #service squid restart


    Test konfigurasi menggunakan web browser di sisi klient anda dengan ketikkan
    google.com, kemudian di kolom search enginenya ketikan kata sex, maka akan
    muncul layar seperti pada gambar dibawah ini

Mais conteúdo relacionado

Mais procurados

Vmware Command Line
Vmware   Command LineVmware   Command Line
Vmware Command Line
lifeit
 
Basic security &amp; info
Basic security &amp; infoBasic security &amp; info
Basic security &amp; info
Tola LENG
 
Squid proxy server
Squid proxy serverSquid proxy server
Squid proxy server
Green Jb
 

Mais procurados (20)

Modul quick debserver
Modul quick debserverModul quick debserver
Modul quick debserver
 
Configuration Firewalld On CentOS 8
Configuration Firewalld On CentOS 8Configuration Firewalld On CentOS 8
Configuration Firewalld On CentOS 8
 
Nfs
NfsNfs
Nfs
 
CentOS Server Gui Initial Configuration
CentOS Server Gui Initial ConfigurationCentOS Server Gui Initial Configuration
CentOS Server Gui Initial Configuration
 
Dns centos
Dns centosDns centos
Dns centos
 
Firewalld LAB
Firewalld LABFirewalld LAB
Firewalld LAB
 
PENYELESAIAN SOAL UKK/UPK TAHUN 2018 Paket 3 oleh Walid Umar
PENYELESAIAN SOAL UKK/UPK TAHUN 2018 Paket 3 oleh Walid UmarPENYELESAIAN SOAL UKK/UPK TAHUN 2018 Paket 3 oleh Walid Umar
PENYELESAIAN SOAL UKK/UPK TAHUN 2018 Paket 3 oleh Walid Umar
 
Vmware Command Line
Vmware   Command LineVmware   Command Line
Vmware Command Line
 
M7 - Manual
M7 - ManualM7 - Manual
M7 - Manual
 
Ubuntu For Intranet Services
Ubuntu For Intranet ServicesUbuntu For Intranet Services
Ubuntu For Intranet Services
 
cara menginstall router
cara menginstall routercara menginstall router
cara menginstall router
 
Configuration of Smtp Server On CentOS 8
Configuration of Smtp Server On CentOS 8Configuration of Smtp Server On CentOS 8
Configuration of Smtp Server On CentOS 8
 
Basic security &amp; info
Basic security &amp; infoBasic security &amp; info
Basic security &amp; info
 
Configuration of SFTP Server on CentOS 8.pdf
Configuration of SFTP Server on CentOS 8.pdfConfiguration of SFTP Server on CentOS 8.pdf
Configuration of SFTP Server on CentOS 8.pdf
 
Squid
SquidSquid
Squid
 
CentOS Server CLI Configuration (Nmcli & Hosts)
CentOS Server CLI Configuration (Nmcli & Hosts)CentOS Server CLI Configuration (Nmcli & Hosts)
CentOS Server CLI Configuration (Nmcli & Hosts)
 
DNS windows server(2008R2) & linux(SLES 11)
DNS windows server(2008R2) & linux(SLES 11)DNS windows server(2008R2) & linux(SLES 11)
DNS windows server(2008R2) & linux(SLES 11)
 
Squid Proxy Server
Squid Proxy ServerSquid Proxy Server
Squid Proxy Server
 
Presentación1
Presentación1Presentación1
Presentación1
 
Squid proxy server
Squid proxy serverSquid proxy server
Squid proxy server
 

Destaque

Program keajaiban sedekah
Program keajaiban sedekahProgram keajaiban sedekah
Program keajaiban sedekah
rheyfan17
 
#BrightonSEO Client Checklist for SEOs with notes
#BrightonSEO Client Checklist for SEOs with notes#BrightonSEO Client Checklist for SEOs with notes
#BrightonSEO Client Checklist for SEOs with notes
Sion O'Connor
 
WP-What-Makes-QlikView-Unique_EN
WP-What-Makes-QlikView-Unique_ENWP-What-Makes-QlikView-Unique_EN
WP-What-Makes-QlikView-Unique_EN
Ibrahim El-zayat
 

Destaque (20)

Curriculum Vitae of Jean Christophe ROBLES (latest update)
Curriculum Vitae of Jean Christophe ROBLES (latest update)Curriculum Vitae of Jean Christophe ROBLES (latest update)
Curriculum Vitae of Jean Christophe ROBLES (latest update)
 
Curso e proinfo
Curso e proinfoCurso e proinfo
Curso e proinfo
 
About Engage
About Engage About Engage
About Engage
 
Dell case study 1
Dell case study 1Dell case study 1
Dell case study 1
 
Resume of Jean Christophe ROBLES
Resume of Jean Christophe ROBLESResume of Jean Christophe ROBLES
Resume of Jean Christophe ROBLES
 
Ipv6
Ipv6Ipv6
Ipv6
 
3
33
3
 
Curso e proinfo
Curso e proinfoCurso e proinfo
Curso e proinfo
 
compuhelp courses information
compuhelp courses informationcompuhelp courses information
compuhelp courses information
 
Psikologi perkembangan
Psikologi perkembanganPsikologi perkembangan
Psikologi perkembangan
 
Program keajaiban sedekah
Program keajaiban sedekahProgram keajaiban sedekah
Program keajaiban sedekah
 
5
55
5
 
Curriculum Vitae of Jean Christophe ROBLES
Curriculum Vitae of Jean Christophe ROBLESCurriculum Vitae of Jean Christophe ROBLES
Curriculum Vitae of Jean Christophe ROBLES
 
#BrightonSEO Client Checklist for SEOs with notes
#BrightonSEO Client Checklist for SEOs with notes#BrightonSEO Client Checklist for SEOs with notes
#BrightonSEO Client Checklist for SEOs with notes
 
Windows phone and azure
Windows phone and azureWindows phone and azure
Windows phone and azure
 
WP-What-Makes-QlikView-Unique_EN
WP-What-Makes-QlikView-Unique_ENWP-What-Makes-QlikView-Unique_EN
WP-What-Makes-QlikView-Unique_EN
 
Career education-review-robert-starks-jr-social-media-strategies-max knowledge
Career education-review-robert-starks-jr-social-media-strategies-max knowledgeCareer education-review-robert-starks-jr-social-media-strategies-max knowledge
Career education-review-robert-starks-jr-social-media-strategies-max knowledge
 
Understanding the Social Shift: How State Associations of Private Postseconda...
Understanding the Social Shift: How State Associations of Private Postseconda...Understanding the Social Shift: How State Associations of Private Postseconda...
Understanding the Social Shift: How State Associations of Private Postseconda...
 
Curriculum Vitae of Jean Christophe ROBLES (latest update)
Curriculum Vitae of Jean Christophe ROBLES (latest update)Curriculum Vitae of Jean Christophe ROBLES (latest update)
Curriculum Vitae of Jean Christophe ROBLES (latest update)
 
Evaluación educativa 04 11-2016
Evaluación educativa 04 11-2016Evaluación educativa 04 11-2016
Evaluación educativa 04 11-2016
 

Semelhante a Membangun web server,_e-mail_server_dan_ftp_server

Lamp Server With Drupal Installation
Lamp Server With Drupal InstallationLamp Server With Drupal Installation
Lamp Server With Drupal Installation
franbow
 
Step by step_linux_guide
Step by step_linux_guideStep by step_linux_guide
Step by step_linux_guide
vinod31dec
 
Configuring apache, php, my sql, ftp, ssl, ip tables phpmyadmin and server mo...
Configuring apache, php, my sql, ftp, ssl, ip tables phpmyadmin and server mo...Configuring apache, php, my sql, ftp, ssl, ip tables phpmyadmin and server mo...
Configuring apache, php, my sql, ftp, ssl, ip tables phpmyadmin and server mo...
Chanaka Lasantha
 
Build your own secure mail server on the cloud using Amazon Web Services
Build your own secure mail server on the cloud using Amazon Web ServicesBuild your own secure mail server on the cloud using Amazon Web Services
Build your own secure mail server on the cloud using Amazon Web Services
ponukumatla joel nishanth
 
Install nagios
Install nagiosInstall nagios
Install nagios
hassandb
 
Install nagios
Install nagiosInstall nagios
Install nagios
hassandb
 

Semelhante a Membangun web server,_e-mail_server_dan_ftp_server (20)

DNS,SMTP and POP3
DNS,SMTP and POP3DNS,SMTP and POP3
DNS,SMTP and POP3
 
main
mainmain
main
 
Kickstart
KickstartKickstart
Kickstart
 
How install nagios in ubuntu 15.04, 16.04
How install nagios in ubuntu 15.04, 16.04How install nagios in ubuntu 15.04, 16.04
How install nagios in ubuntu 15.04, 16.04
 
Free radius billing server with practical vpn exmaple
Free radius billing server with practical vpn exmapleFree radius billing server with practical vpn exmaple
Free radius billing server with practical vpn exmaple
 
Windows 2003 Server
Windows 2003 ServerWindows 2003 Server
Windows 2003 Server
 
Sun raysetup
Sun raysetupSun raysetup
Sun raysetup
 
Lamp Server With Drupal Installation
Lamp Server With Drupal InstallationLamp Server With Drupal Installation
Lamp Server With Drupal Installation
 
Step by step_linux_guide
Step by step_linux_guideStep by step_linux_guide
Step by step_linux_guide
 
Dspace tutorial
Dspace tutorialDspace tutorial
Dspace tutorial
 
DSpace Tutorial : Open Source Digital Library
DSpace Tutorial : Open Source Digital LibraryDSpace Tutorial : Open Source Digital Library
DSpace Tutorial : Open Source Digital Library
 
Configuring apache, php, my sql, ftp, ssl, ip tables phpmyadmin and server mo...
Configuring apache, php, my sql, ftp, ssl, ip tables phpmyadmin and server mo...Configuring apache, php, my sql, ftp, ssl, ip tables phpmyadmin and server mo...
Configuring apache, php, my sql, ftp, ssl, ip tables phpmyadmin and server mo...
 
Build your own secure mail server on the cloud using Amazon Web Services
Build your own secure mail server on the cloud using Amazon Web ServicesBuild your own secure mail server on the cloud using Amazon Web Services
Build your own secure mail server on the cloud using Amazon Web Services
 
How to configure Nagios in Fedora ?
How to configure Nagios in Fedora ?How to configure Nagios in Fedora ?
How to configure Nagios in Fedora ?
 
Oracle 12cR2 Installation On Linux With ASM
Oracle 12cR2 Installation On Linux With ASMOracle 12cR2 Installation On Linux With ASM
Oracle 12cR2 Installation On Linux With ASM
 
2 how to-build_document_management_system
2 how to-build_document_management_system2 how to-build_document_management_system
2 how to-build_document_management_system
 
Free ipa installation and cluster configuration, freeipa client connection
Free ipa installation and cluster configuration, freeipa client connectionFree ipa installation and cluster configuration, freeipa client connection
Free ipa installation and cluster configuration, freeipa client connection
 
mail server
mail servermail server
mail server
 
Install nagios
Install nagiosInstall nagios
Install nagios
 
Install nagios
Install nagiosInstall nagios
Install nagios
 

Mais de Iwan Kurniarasa

implementasi-dan-maintenance
implementasi-dan-maintenanceimplementasi-dan-maintenance
implementasi-dan-maintenance
Iwan Kurniarasa
 
metode-pengujian-whitebox
metode-pengujian-whiteboxmetode-pengujian-whitebox
metode-pengujian-whitebox
Iwan Kurniarasa
 
Contoh penggunaan-iptables
Contoh penggunaan-iptablesContoh penggunaan-iptables
Contoh penggunaan-iptables
Iwan Kurniarasa
 
Algoritma kriptografi klasik
Algoritma kriptografi klasikAlgoritma kriptografi klasik
Algoritma kriptografi klasik
Iwan Kurniarasa
 
6 juliani pras psikologi perkembangan anak
6 juliani pras psikologi perkembangan anak6 juliani pras psikologi perkembangan anak
6 juliani pras psikologi perkembangan anak
Iwan Kurniarasa
 
Object oriented programming ( oop
Object oriented programming ( oopObject oriented programming ( oop
Object oriented programming ( oop
Iwan Kurniarasa
 
Pengajuan judul praktek kerja lapanga1
Pengajuan judul praktek kerja lapanga1Pengajuan judul praktek kerja lapanga1
Pengajuan judul praktek kerja lapanga1
Iwan Kurniarasa
 

Mais de Iwan Kurniarasa (20)

Php mysql
Php mysqlPhp mysql
Php mysql
 
implementasi-dan-maintenance
implementasi-dan-maintenanceimplementasi-dan-maintenance
implementasi-dan-maintenance
 
metode-pengujian-whitebox
metode-pengujian-whiteboxmetode-pengujian-whitebox
metode-pengujian-whitebox
 
metode-pengujian-blackbox
 metode-pengujian-blackbox metode-pengujian-blackbox
metode-pengujian-blackbox
 
Contoh penggunaan-iptables
Contoh penggunaan-iptablesContoh penggunaan-iptables
Contoh penggunaan-iptables
 
Keamanan jaringan
Keamanan jaringanKeamanan jaringan
Keamanan jaringan
 
Sosiologi
SosiologiSosiologi
Sosiologi
 
Data encryption standar
Data encryption standarData encryption standar
Data encryption standar
 
Algoritma kriptografi klasik
Algoritma kriptografi klasikAlgoritma kriptografi klasik
Algoritma kriptografi klasik
 
6 juliani pras psikologi perkembangan anak
6 juliani pras psikologi perkembangan anak6 juliani pras psikologi perkembangan anak
6 juliani pras psikologi perkembangan anak
 
Kebudayaan islam
Kebudayaan islamKebudayaan islam
Kebudayaan islam
 
Dynamic host configuration protokol menggunakan linux
Dynamic host configuration protokol menggunakan linuxDynamic host configuration protokol menggunakan linux
Dynamic host configuration protokol menggunakan linux
 
Konsep dasar jaringan
Konsep dasar jaringanKonsep dasar jaringan
Konsep dasar jaringan
 
Membuat mail server di ubuntu
Membuat mail server di ubuntuMembuat mail server di ubuntu
Membuat mail server di ubuntu
 
Install dan setting xampp ubuntu 12.04
Install dan setting xampp ubuntu 12.04Install dan setting xampp ubuntu 12.04
Install dan setting xampp ubuntu 12.04
 
Object oriented programming ( oop
Object oriented programming ( oopObject oriented programming ( oop
Object oriented programming ( oop
 
Pengantar jaringan komputer1
Pengantar jaringan komputer1Pengantar jaringan komputer1
Pengantar jaringan komputer1
 
Pengajuan judul praktek kerja lapanga1
Pengajuan judul praktek kerja lapanga1Pengajuan judul praktek kerja lapanga1
Pengajuan judul praktek kerja lapanga1
 
Psikologi perkembangan
Psikologi perkembanganPsikologi perkembangan
Psikologi perkembangan
 
Teori teori psikologi perkembangan
Teori teori psikologi perkembanganTeori teori psikologi perkembangan
Teori teori psikologi perkembangan
 

Último

Último (20)

TỔNG ÔN TẬP THI VÀO LỚP 10 MÔN TIẾNG ANH NĂM HỌC 2023 - 2024 CÓ ĐÁP ÁN (NGỮ Â...
TỔNG ÔN TẬP THI VÀO LỚP 10 MÔN TIẾNG ANH NĂM HỌC 2023 - 2024 CÓ ĐÁP ÁN (NGỮ Â...TỔNG ÔN TẬP THI VÀO LỚP 10 MÔN TIẾNG ANH NĂM HỌC 2023 - 2024 CÓ ĐÁP ÁN (NGỮ Â...
TỔNG ÔN TẬP THI VÀO LỚP 10 MÔN TIẾNG ANH NĂM HỌC 2023 - 2024 CÓ ĐÁP ÁN (NGỮ Â...
 
Application orientated numerical on hev.ppt
Application orientated numerical on hev.pptApplication orientated numerical on hev.ppt
Application orientated numerical on hev.ppt
 
This PowerPoint helps students to consider the concept of infinity.
This PowerPoint helps students to consider the concept of infinity.This PowerPoint helps students to consider the concept of infinity.
This PowerPoint helps students to consider the concept of infinity.
 
How to Give a Domain for a Field in Odoo 17
How to Give a Domain for a Field in Odoo 17How to Give a Domain for a Field in Odoo 17
How to Give a Domain for a Field in Odoo 17
 
How to Create and Manage Wizard in Odoo 17
How to Create and Manage Wizard in Odoo 17How to Create and Manage Wizard in Odoo 17
How to Create and Manage Wizard in Odoo 17
 
Micro-Scholarship, What it is, How can it help me.pdf
Micro-Scholarship, What it is, How can it help me.pdfMicro-Scholarship, What it is, How can it help me.pdf
Micro-Scholarship, What it is, How can it help me.pdf
 
HMCS Max Bernays Pre-Deployment Brief (May 2024).pptx
HMCS Max Bernays Pre-Deployment Brief (May 2024).pptxHMCS Max Bernays Pre-Deployment Brief (May 2024).pptx
HMCS Max Bernays Pre-Deployment Brief (May 2024).pptx
 
Towards a code of practice for AI in AT.pptx
Towards a code of practice for AI in AT.pptxTowards a code of practice for AI in AT.pptx
Towards a code of practice for AI in AT.pptx
 
Google Gemini An AI Revolution in Education.pptx
Google Gemini An AI Revolution in Education.pptxGoogle Gemini An AI Revolution in Education.pptx
Google Gemini An AI Revolution in Education.pptx
 
Python Notes for mca i year students osmania university.docx
Python Notes for mca i year students osmania university.docxPython Notes for mca i year students osmania university.docx
Python Notes for mca i year students osmania university.docx
 
How to Manage Global Discount in Odoo 17 POS
How to Manage Global Discount in Odoo 17 POSHow to Manage Global Discount in Odoo 17 POS
How to Manage Global Discount in Odoo 17 POS
 
SOC 101 Demonstration of Learning Presentation
SOC 101 Demonstration of Learning PresentationSOC 101 Demonstration of Learning Presentation
SOC 101 Demonstration of Learning Presentation
 
2024-NATIONAL-LEARNING-CAMP-AND-OTHER.pptx
2024-NATIONAL-LEARNING-CAMP-AND-OTHER.pptx2024-NATIONAL-LEARNING-CAMP-AND-OTHER.pptx
2024-NATIONAL-LEARNING-CAMP-AND-OTHER.pptx
 
FSB Advising Checklist - Orientation 2024
FSB Advising Checklist - Orientation 2024FSB Advising Checklist - Orientation 2024
FSB Advising Checklist - Orientation 2024
 
Accessible Digital Futures project (20/03/2024)
Accessible Digital Futures project (20/03/2024)Accessible Digital Futures project (20/03/2024)
Accessible Digital Futures project (20/03/2024)
 
On National Teacher Day, meet the 2024-25 Kenan Fellows
On National Teacher Day, meet the 2024-25 Kenan FellowsOn National Teacher Day, meet the 2024-25 Kenan Fellows
On National Teacher Day, meet the 2024-25 Kenan Fellows
 
Understanding Accommodations and Modifications
Understanding  Accommodations and ModificationsUnderstanding  Accommodations and Modifications
Understanding Accommodations and Modifications
 
Single or Multiple melodic lines structure
Single or Multiple melodic lines structureSingle or Multiple melodic lines structure
Single or Multiple melodic lines structure
 
Sociology 101 Demonstration of Learning Exhibit
Sociology 101 Demonstration of Learning ExhibitSociology 101 Demonstration of Learning Exhibit
Sociology 101 Demonstration of Learning Exhibit
 
Graduate Outcomes Presentation Slides - English
Graduate Outcomes Presentation Slides - EnglishGraduate Outcomes Presentation Slides - English
Graduate Outcomes Presentation Slides - English
 

Membangun web server,_e-mail_server_dan_ftp_server

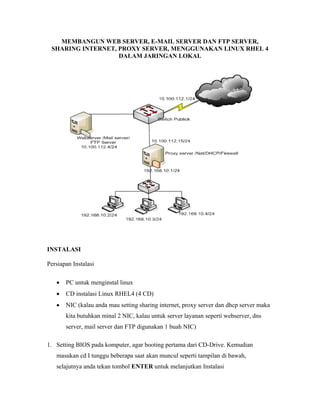
  • 1. MEMBANGUN WEB SERVER, E-MAIL SERVER DAN FTP SERVER, SHARING INTERNET, PROXY SERVER, MENGGUNAKAN LINUX RHEL 4 DALAM JARINGAN LOKAL INSTALASI Persiapan Instalasi • PC untuk menginstal linux • CD instalasi Linux RHEL4 (4 CD) • NIC (kalau anda mau setting sharing internet, proxy server dan dhcp server maka kita butuhkan minal 2 NIC, kalau untuk server layanan seperti webserver, dns server, mail server dan FTP digunakan 1 buah NIC) 1. Setting BIOS pada komputer, agar booting pertama dari CD-Drive. Kemudian masukan cd I tunggu beberapa saat akan muncul seperti tampilan di bawah, selajutnya anda tekan tombol ENTER untuk melanjutkan Instalasi
  • 2. 2. Pada bagian ini dengan menggunakan tombol panah anda pilih skip, kemudia anda tekan tombol ENTER 3. Welcome to Red Hat Enterprise Linux AS , klik tombol NEXT 4. Menu Bahasa yang dipakai selama proses instalasi secara default bahasa yang digunakan adalah Bahasa Inggris, Tekan Tombol NEXT
  • 3. 5. Menu Konfigurasi Keyboard, pilih tombol NEXT 6. Membuat Partisi Automatically Partition atau Manually Partition with Disk Druid, pada modul ini kita buat tiga partisi yaitu /boot, swap dan /, dimana besaran setiap partisi adalah sbb 1 . /boot——-> 100 MB 2. 2 x jumlah memori yang terpasang pada komputer 3. / ————–>Sisa Dari partisi /boot dan swap Selajut kita pilih menu Manually Partition with Disk Druid karena akan creat partisi secara manual
  • 4. Pilih Menu New untuk creat partisi Creat Partisi /boot dan kemudian tekan tombol OK Creat Partisi SWAP dan kemudian tekan tombol OK
  • 5. Creat Partisi / dan kemudian tekan tombol OK Hasil Dari parsiti akan muncul seperti gambar dibawah ini 7. Bagian Booot Loader, pada ini kita menuntukan Boot Loader dan password, pada bagian ini penulis ambil defaulnya dari Redhat jadi penulis cukup tekan tombol NEXT
  • 6. 8. Bagian Konfigurasi Network (NIC) yang di sudah aktif, di bagian ini bisa kita langsung IP Pubic kita dan IP Local dengan mengklik tombol EDIT dan jaga lupa masukan IP Gateway dan IP DNS, pada modul ini penulis masih setting IP DHCP, setelah kita setting IP Static atau IP DHCP Klik tombol NEXT 9. Setting Firewall bagian ini harus diperhatikan karena pada bagian ini berfungsi untuk membuka port • ssh (23) digunakan untuk mengakses Server cara jauh (Remote) • HTTP (80), HTTPS(443) digunakan untuk layanan WEBServer • FTP(21) digunakan untuk layana FTP Server • Mail Server (25) digunakan untuk layanan Mail Server Pada modul ini penulis hanya membuka port untuk ssh dan Webserver kerena linux setting sebagai sharing internet, Bagian SElinux nya kita Pilih Disable, kemudian klik tombol NEXT untuk melajutkan prose selanjutnya
  • 7. 10. Menentukan Bahasa yang di pakai Oleh redhat disini kita pilih bahasa Inggis, Tekan Tombol NEXT untuk melajutkan proses 11. Setting Waktu, sudah kita pilih waktu Tekan Tombol NEXT 12. Setting Password root yang merupakan super user, Masukan password anda , kemudian klik tombol NEXT untuk melanjutkan proses
  • 8. 13. Pemilihan Paket pada bagian ini pilih paket yang sesuai dengan layanan yang akan kita buat • Sharing Internet pilih paket webserver, DNS dan DHCP • Mail Sever pilih paket webserver, DNS, mail server dan mysql • Webserver pilih paket webserver, DNS dan mysql (mysql di gunakan untuk databases) Karena penulis tidak menampilkan grafis maka bagian X windows System dan GNOME Desktop Environment tanda contengan di lepas, seperti di gambar Pada bagian menu sever penulis pilih webserver, dns dan dhcp seperti di gambar
  • 9. Pilih Paket untuk DHCP Server , Klik Detail kemudian anda pilih paket dhcp seperti di gambar 14. Proses Instalasi Pilih NEXT
  • 10. Klik Tombol Continue 15. Masukan CD 2 untuk melanjutkan Proses instalasi 16. Proses Instalasi 17. Masukan CD 4 untuk melanjutkan Proses instalasi
  • 11. 18. Masukan CD 1 untuk melanjutkan Proses instalasi 19. Klik Tombol Reboot 20. Tunggu Proses Loading sampai muncul tampilan Login Seperti gambar dibawah ini, masukan login dengan root dan password root yang telah anda buat saat instalasi
  • 12. DNS dan Web Server Sebelum penyetingan DNS server terlebih dahulu anda harus mengecek installasi paket Bind yang ada pada system operasi linux, sebab tanpa paket bind ini DNS server anda tidak akan berjalan sesuai dengan fungsinya. adapun untuk mengecek paket bind dengan perintah berikut: #rpm –qa |grep bind Jika semua paket diatas sudah ada, berarti paket DNS server anda telah terinstall dengan baik. Jika belum ada anda bisa mendownload file tersebut dari internet. dan cara menginstallnya adalah sebagai berikut 1. Masukan cd 2 2. Mounting ke CDROM dengan cara # mount /media/cdroom #cd /media/cdrooom # cd /Redhat/RPMS #rpm –ivh bind-9.2.4-2 –nodeps 3. Setting IP ADDRESS #cd /ect/sysconfig/network-scripts # vi ifcg-eth0 Edit file tersebut DEVICE=eth0 BOOTPROTO=static HWADDR=00:0C:29:DD:47:E0
  • 13. ONBOOT=yes TYPE=Ethernet IPADDR=10.100.112.4 NETMASK=255.255.255.0 setelah itu anda simpan dengan perintah Esc kemudian :wq Kemudian aktifkan service network dengan perintah #service network restart 4. Pertama anda setting dahulu hosts anda pada file /etc/hosts dengan cara seperti dibawah ini #vi /etc/hosts Kemudian tambahkan 10.100.112.4 ns.dipkom.ilkom.unsri.ac.id ns ns.dipkom.ilkom.unsri.ac.id merupakan nama host serta user anda serta no IP yang ada sebelah kiri merupakan no IP yang anda gunakan. Setelah itu anda simpan dengan perintah Esc kemudian :wq 5. Setelah itu anda setting domain anda dengan cara anda setting domain anda di file /etc/resolv.conf dengan cara seperti dibawah ini. #vi /etc/resolv.conf Kemudian isikan data seperti di bawah ini ====================================== search dipkom.ilkom.unsri.ac.id nameserver 10.100.112.4 ======================================= search merupakan nama domain, nameserver merupakan no IP yang anda gunakan, setelah itu anda simpan dengan perintah Esc kemudian :wq 6. Setelah itu anda diminta untuk mengedit file /etc/named.conf anda tambahkan baris seperti dibawah ini: # vi /etc/named.conf *******************************************************
  • 14. zone “dipkom.ilkom.unsri.ac.id” IN { type master; file “dipkom.zone”; }; zone “112.100.10.in-addr.arpa” IN { type master; file “dipkom.arpa”; }; include "/etc/rndc.key"; *********************************************************************** setelah itu anda simpan dengan perintah Esc kemudian :wq 7. Langkah selanjutnya file zone dan file arpa, anda masuk dahulu ke dorectory /var/named /chroot/var/named setelah itu anda mencopy named.local ke dipkom.zone dan dipkom.arpa dengan perintah # cp named.local dipkom.zone # cp named.local dipkom.arpa Edit file dipkom.zone $TTL 86400 @ IN SOA ns.dipkom.ilkom.unsri.ac.id. root.dipkom.ilkom.unsri.ac.id. ( 1997022700 ; Serial 28800 ; Refresh 14400 ; Retry 3600000 ; Expire 86400 ) ; Minimum IN NS ns.dipkom.ilkom.unsri.ac.id. IN MX 0 ns.dipkom.ilkom.unsri.ac.id. IN A 10.100.112.4 ns IN A 10.100.112.4 Mail IN A 10.100.112.4 ftp IN A 10.100.112.4 jarkom IN A 10.100.112.4 setelah itu anda simpan dengan perintah Esc kemudian :wq Edit file dipkom.zone TTL 86400 @ IN SOA ns.dipkom.ilkom.unsri.ac.id. root.dipkom.ilkom.unsri.ac.id. ( 1997022700 ; Serial 28800 ; Refresh 14400 ; Retry
  • 15. 3600000 ; Expire 86400 ) ; Minimum IN NS ns.dipkom.ilkom.unsri.ac.id. 4 IN PTR ns.dipkom.ilkom.unsri.ac.id. setelah itu anda simpan dengan perintah Esc kemudian :wq 8. Menjalankan DNS #service named restart # nslookup > dipkom.ilkom.unsri.ac.id Server: 10.100.112.4 Address: 10.100.112.4#53 Name: dipkom.ilkom.unsri.ac.id Address: 10.100.112.4 > mail.dipkom.ilkom.unsri.ac.id Server: 10.100.112.4 Address: 10.100.112.4#53 Name: mail.dipkom.ilkom.unsri.ac.id Address: 10.100.112.4 > ftp.dipkom.ilkom.unsri.ac.id Server: 10.100.112.4 Address: 10.100.112.4#53 Name: ftp.dipkom.ilkom.unsri.ac.id Address: 10.100.112.4 Web server Seperti sebelumnya, sebelum penyetingan WEB server terlebih dahulu anda harus mengecek installasi paket httpd yang ada pada system operasi linux, sebab tanpa paket ini WEB server anda tidak akan berjalan sesuai dengan fungsinya. adapun untuk mengecek paket httpd dengan perintah berikut: #rpm –qa|grep httpd Apabila sudah terinstall anda setting file httpd.conf pada file /etc/httpd/conf/httpd.conf dengan perintah dibawah ini. #vi /etc/httpd/conf/httpd.conf
  • 16. Userdir disable #Userdir disable #Userdir public_html Userdir public_html Setelah itu anda edit juga pada bagian : NameVirtualHost 10.100.112.4:80 <VirtualHost 10.100.112.4:80> ServerAdmin webmaster@dipkom.ilkom.unsri.ac.id DocumentRoot /home/dipkom/public_html ServerName dipkom.ilkom.unsri.ac.id </VirtualHost> <VirtualHost 10.100.112.4:80> ServerAdmin webmaster@dipkom.ilkom.unsri.ac.id DocumentRoot /usr/share/squierrelmail/ ServerName mail.dipkom.ilkom.unsri.ac.id Digunakan untuk </VirtualHost> aplikasi mail server setelah itu anda simpan dengan perintah Esc kemudian :wq Di RHEL default direktory file indexnya ada di dalam /var/www/html, tapi dalam kasus ini kita akan buat direktorynya di arahkan ke user ini digunakan pada saat user mau upload file webnya cukup menggunakan user masing-masing, adapun langkah-langkah untuk membuat user dan password adalah sebagai berikut #adduser fasilkom #passwd fasilkom Masukan password untuk user fasilkom Kemudian kita Buat directory public_html di directory fasilkom dengan perintah #mkdir –p public_html Setelah itu kita ubah permision dari user fasilkom dengan perintah # chmod –R 45 fasilkom Selanjutnya kita buat file index.php or index.html dengan perintah sebagai berikut (pastikan kita berda dalam directory /home/fasilkom/public_html) # vi index.php <? Echo “ Selamat datang di Dipkom”;
  • 17. ?> setelah itu anda simpan dengan perintah Esc kemudian :wq Setelah itu anda test konfigurasi mail server anda dengan menggunakan web browser anda dengan ketikkan dipkom.ilkom.unsri.ac.id maka akan muncul layar seperti pada gambar dibawah ini. Mail Server 1. Konfigurasi Mail Server Sebelum penyetingan Mail server terlebih dahulu anda harus mengecek installasi paket postfix dan sqiurrelmail yang ada pada system operasi linux, sebab tanpa paket ini Mail server anda tidak akan berjalan sesuai dengan fungsinya. adapun untuk mengecek paket tersebut dengan perintah berikut: #rpm –qa |grep postfix #rpm –qa |grep squirrelmail Jika semua paket diatas sudah ada, berarti paket Mail server anda telah terinstall dengan baik. Jika belum ada anda bisa mendownload dari internet file postfix dan suirrelmail ini, jika sudah terinstall maka anda hanya perlu menyetting seperti pada langkah – langkah dibawah ini. • Langkah pertama anda setting file /etc/postfix/main.cf dengan perintah seperti dibawah ini. #vi /etc/postfix/main.cf
  • 18. anda edit pada bagian seperti dibawah ini.(yang harus kita edit adalah bagian yang telah diberi tanda lingkaran) ******************************************************* # Global Postfix configuration file. This file lists only a subset # of all 300+ parameters. See the postconf(5) manual page for a # complete list. # # The general format of each line is: parameter = value. Lines # that begin with whitespace continue the previous line. A value can # contain references to other $names or ${name}s. # # NOTE - CHANGE NO MORE THAN 2-3 PARAMETERS AT A TIME, AND TEST IF # POSTFIX STILL WORKS AFTER EVERY CHANGE. # SOFT BOUNCE # # The soft_bounce parameter provides a limited safety net for # testing. When soft_bounce is enabled, mail will remain queued that # would otherwise bounce. This parameter disables locally-generated # bounces, and prevents the SMTP server from rejecting mail permanently # (by changing 5xx replies into 4xx replies). However, soft_bounce # is no cure for address rewriting mistakes or mail routing mistakes. # #soft_bounce = no # LOCAL PATHNAME INFORMATION # # The queue_directory specifies the location of the Postfix queue. # This is also the root directory of Postfix daemons that run chrooted. # See the files in examples/chroot-setup for setting up Postfix chroot # environments on different UNIX systems. # queue_directory = /var/spool/postfix # The command_directory parameter specifies the location of all # postXXX commands. # command_directory = /usr/sbin # The daemon_directory parameter specifies the location of all Postfix # daemon programs (i.e. programs listed in the master.cf file). This # directory must be owned by root. # daemon_directory = /usr/libexec/postfix # QUEUE AND PROCESS OWNERSHIP # # The mail_owner parameter specifies the owner of the Postfix queue # and of most Postfix daemon processes. Specify the name of a user # account THAT DOES NOT SHARE ITS USER OR GROUP ID WITH OTHER ACCOUNTS # AND THAT OWNS NO OTHER FILES OR PROCESSES ON THE SYSTEM. In # particular, don't specify nobody or daemon. PLEASE USE A DEDICATED # USER. # mail_owner = postfix # The default_privs parameter specifies the default rights used by # the local delivery agent for delivery to external file or command. # These rights are used in the absence of a recipient user context. # DO NOT SPECIFY A PRIVILEGED USER OR THE POSTFIX OWNER.
  • 19. # #default_privs = nobody # INTERNET HOST AND DOMAIN NAMES # # The myhostname parameter specifies the internet hostname of this # mail system. The default is to use the fully-qualified domain name # from gethostname(). $myhostname is used as a default value for many # other configuration parameters. # #myhostname = host.domain.tld #myhostname = virtual.domain.tld myhostname = ns.mail.dipkom.ilkom.unsri.ac.id # The mydomain parameter specifies the local internet domain name. # The default is to use $myhostname minus the first component. # $mydomain is used as a default value for many other configuration # parameters. # #mydomain = domain.tld mydomain = dipkom.ilkom.unsri.ac.id # SENDING MAIL # # The myorigin parameter specifies the domain that locally-posted # mail appears to come from. The default is to append $myhostname, # which is fine for small sites. If you run a domain with multiple # machines, you should (1) change this to $mydomain and (2) set up # a domain-wide alias database that aliases each user to # user@that.users.mailhost. # # For the sake of consistency between sender and recipient addresses, # myorigin also specifies the default domain name that is appended # to recipient addresses that have no @domain part. # #myorigin = $myhostname myorigin = $mydomain # RECEIVING MAIL # The inet_interfaces parameter specifies the network interface # addresses that this mail system receives mail on. By default, # the software claims all active interfaces on the machine. The # parameter also controls delivery of mail to user@[ip.address]. # # See also the proxy_interfaces parameter, for network addresses that # are forwarded to us via a proxy or network address translator. # # Note: you need to stop/start Postfix when this parameter changes. # inet_interfaces = all #inet_interfaces = $myhostname #inet_interfaces = $myhostname, localhost inet_interfaces = localhost # The proxy_interfaces parameter specifies the network interface # addresses that this mail system receives mail on by way of a
  • 20. # proxy or network address translation unit. This setting extends # the address list specified with the inet_interfaces parameter. # # You must specify your proxy/NAT addresses when your system is a # backup MX host for other domains, otherwise mail delivery loops # will happen when the primary MX host is down. # #proxy_interfaces = #proxy_interfaces = 1.2.3.4 # The mydestination parameter specifies the list of domains that this # machine considers itself the final destination for. # # These domains are routed to the delivery agent specified with the # local_transport parameter setting. By default, that is the UNIX # compatible delivery agent that lookups all recipients in /etc/passwd # and /etc/aliases or their equivalent. # # The default is $myhostname + localhost.$mydomain. On a mail domain # gateway, you should also include $mydomain. # # Do not specify the names of virtual domains - those domains are # specified elsewhere (see VIRTUAL_README). # # Do not specify the names of domains that this machine is backup MX # host for. Specify those names via the relay_domains settings for # the SMTP server, or use permit_mx_backup if you are lazy (see # STANDARD_CONFIGURATION_README). # # The local machine is always the final destination for mail addressed # to user@[the.net.work.address] of an interface that the mail system # receives mail on (see the inet_interfaces parameter). # # Specify a list of host or domain names, /file/name or type:table # patterns, separated by commas and/or whitespace. A /file/name # pattern is replaced by its contents; a type:table is matched when # a name matches a lookup key (the right-hand side is ignored). # Continue long lines by starting the next line with whitespace. # # See also below, section "REJECTING MAIL FOR UNKNOWN LOCAL USERS". # #mydestination = $myhostname, localhost.$mydomain, localhost mydestination = $myhostname, localhost.$mydomain #mydestination = $myhostname, localhost.$mydomain, localhost, $mydomain #mydestination = $myhostname, localhost.$mydomain, localhost, $mydomain, # mail.$mydomain, www.$mydomain, ftp.$mydomain # REJECTING MAIL FOR UNKNOWN LOCAL USERS # # The local_recipient_maps parameter specifies optional lookup tables # with all names or addresses of users that are local with respect # to $mydestination, $inet_interfaces or $proxy_interfaces. # # If this parameter is defined, then the SMTP server will reject # mail for unknown local users. This parameter is defined by default. # # To turn off local recipient checking in the SMTP server, specify # local_recipient_maps = (i.e. empty). # # The default setting assumes that you use the default Postfix local # delivery agent for local delivery. You need to update the
  • 21. # local_recipient_maps setting if: # # - You define $mydestination domain recipients in files other than # /etc/passwd, /etc/aliases, or the $virtual_alias_maps files. # For example, you define $mydestination domain recipients in # the $virtual_mailbox_maps files. # # - You redefine the local delivery agent in master.cf. # # - You redefine the "local_transport" setting in main.cf. # # - You use the "luser_relay", "mailbox_transport", or "fallback_transport" # feature of the Postfix local delivery agent (see local(8)). # # Details are described in the LOCAL_RECIPIENT_README file. # # Beware: if the Postfix SMTP server runs chrooted, you probably have # to access the passwd file via the proxymap service, in order to # overcome chroot restrictions. The alternative, having a copy of # the system passwd file in the chroot jail is just not practical. # # The right-hand side of the lookup tables is conveniently ignored. # In the left-hand side, specify a bare username, an @domain.tld # wild-card, or specify a user@domain.tld address. # #local_recipient_maps = unix:passwd.byname $alias_maps #local_recipient_maps = proxy:unix:passwd.byname $alias_maps #local_recipient_maps = # The unknown_local_recipient_reject_code specifies the SMTP server # response code when a recipient domain matches $mydestination or # ${proxy,inet}_interfaces, while $local_recipient_maps is non-empty # and the recipient address or address local-part is not found. # # The default setting is 550 (reject mail) but it is safer to start # with 450 (try again later) until you are certain that your # local_recipient_maps settings are OK. # unknown_local_recipient_reject_code = 550 # TRUST AND RELAY CONTROL # The mynetworks parameter specifies the list of "trusted" SMTP # clients that have more privileges than "strangers". # # In particular, "trusted" SMTP clients are allowed to relay mail # through Postfix. See the smtpd_recipient_restrictions parameter # in postconf(5). # # You can specify the list of "trusted" network addresses by hand # or you can let Postfix do it for you (which is the default). # # By default (mynetworks_style = subnet), Postfix "trusts" SMTP # clients in the same IP subnetworks as the local machine. # On Linux, this does works correctly only with interfaces specified # with the "ifconfig" command. # # Specify "mynetworks_style = class" when Postfix should "trust" SMTP # clients in the same IP class A/B/C networks as the local machine. # Don't do this with a dialup site - it would cause Postfix to "trust" # your entire provider's network. Instead, specify an explicit # mynetworks list by hand, as described below. #
  • 22. # Specify "mynetworks_style = host" when Postfix should "trust" # only the local machine. # #mynetworks_style = class #mynetworks_style = subnet #mynetworks_style = host # Alternatively, you can specify the mynetworks list by hand, in # which case Postfix ignores the mynetworks_style setting. # # Specify an explicit list of network/netmask patterns, where the # mask specifies the number of bits in the network part of a host # address. # # You can also specify the absolute pathname of a pattern file instead # of listing the patterns here. Specify type:table for table-based lookups # (the value on the table right-hand side is not used). # mynetworks = 10.100.112.0/24, 127.0.0.0/8 #mynetworks = 168.100.189.0/28, 127.0.0.0/8 #mynetworks = $config_directory/mynetworks #mynetworks = hash:/etc/postfix/network_table # The relay_domains parameter restricts what destinations this system will # relay mail to. See the smtpd_recipient_restrictions description in # postconf(5) for detailed information. # # By default, Postfix relays mail # - from "trusted" clients (IP address matches $mynetworks) to any destination, # - from "untrusted" clients to destinations that match $relay_domains or # subdomains thereof, except addresses with sender-specified routing. # The default relay_domains value is $mydestination. # # In addition to the above, the Postfix SMTP server by default accepts mail # that Postfix is final destination for: # - destinations that match $inet_interfaces or $proxy_interfaces, # - destinations that match $mydestination # - destinations that match $virtual_alias_domains, # - destinations that match $virtual_mailbox_domains. # These destinations do not need to be listed in $relay_domains. # # Specify a list of hosts or domains, /file/name patterns or type:name # lookup tables, separated by commas and/or whitespace. Continue # long lines by starting the next line with whitespace. A file name # is replaced by its contents; a type:name table is matched when a # (parent) domain appears as lookup key. # # NOTE: Postfix will not automatically forward mail for domains that # list this system as their primary or backup MX host. See the # permit_mx_backup restriction description in postconf(5). # #relay_domains = $mydestination # INTERNET OR INTRANET # The relayhost parameter specifies the default host to send mail to # when no entry is matched in the optional transport(5) table. When # no relayhost is given, mail is routed directly to the destination. # # On an intranet, specify the organizational domain name. If your # internal DNS uses no MX records, specify the name of the intranet # gateway host instead.
  • 23. # # In the case of SMTP, specify a domain, host, host:port, [host]:port, # [address] or [address]:port; the form [host] turns off MX lookups. # # If you're connected via UUCP, see also the default_transport parameter. # #relayhost = $mydomain #relayhost = [gateway.my.domain] #relayhost = [mailserver.isp.tld] #relayhost = uucphost #relayhost = [an.ip.add.ress] # REJECTING UNKNOWN RELAY USERS # # The relay_recipient_maps parameter specifies optional lookup tables # with all addresses in the domains that match $relay_domains. # # If this parameter is defined, then the SMTP server will reject # mail for unknown relay users. This feature is off by default. # # The right-hand side of the lookup tables is conveniently ignored. # In the left-hand side, specify an @domain.tld wild-card, or specify # a user@domain.tld address. # #relay_recipient_maps = hash:/etc/postfix/relay_recipients # INPUT RATE CONTROL # # The in_flow_delay configuration parameter implements mail input # flow control. This feature is turned on by default, although it # still needs further development (it's disabled on SCO UNIX due # to an SCO bug). # # A Postfix process will pause for $in_flow_delay seconds before # accepting a new message, when the message arrival rate exceeds the # message delivery rate. With the default 100 SMTP server process # limit, this limits the mail inflow to 100 messages a second more # than the number of messages delivered per second. # # Specify 0 to disable the feature. Valid delays are 0..10. # #in_flow_delay = 1s # ADDRESS REWRITING # # The ADDRESS_REWRITING_README document gives information about # address masquerading or other forms of address rewriting including # username->Firstname.Lastname mapping. # ADDRESS REDIRECTION (VIRTUAL DOMAIN) # # The VIRTUAL_README document gives information about the many forms # of domain hosting that Postfix supports. # "USER HAS MOVED" BOUNCE MESSAGES # # See the discussion in the ADDRESS_REWRITING_README document. # TRANSPORT MAP # # See the discussion in the ADDRESS_REWRITING_README document. # ALIAS DATABASE
  • 24. # # The alias_maps parameter specifies the list of alias databases used # by the local delivery agent. The default list is system dependent. # # On systems with NIS, the default is to search the local alias # database, then the NIS alias database. See aliases(5) for syntax # details. # # If you change the alias database, run "postalias /etc/aliases" (or # wherever your system stores the mail alias file), or simply run # "newaliases" to build the necessary DBM or DB file. # # It will take a minute or so before changes become visible. Use # "postfix reload" to eliminate the delay. # #alias_maps = dbm:/etc/aliases alias_maps = hash:/etc/aliases #alias_maps = hash:/etc/aliases, nis:mail.aliases #alias_maps = netinfo:/aliases # The alias_database parameter specifies the alias database(s) that # are built with "newaliases" or "sendmail -bi". This is a separate # configuration parameter, because alias_maps (see above) may specify # tables that are not necessarily all under control by Postfix. # #alias_database = dbm:/etc/aliases #alias_database = dbm:/etc/mail/aliases alias_database = hash:/etc/aliases #alias_database = hash:/etc/aliases, hash:/opt/majordomo/aliases # ADDRESS EXTENSIONS (e.g., user+foo) # # The recipient_delimiter parameter specifies the separator between # user names and address extensions (user+foo). See canonical(5), # local(8), relocated(5) and virtual(5) for the effects this has on # aliases, canonical, virtual, relocated and .forward file lookups. # Basically, the software tries user+foo and .forward+foo before # trying user and .forward. # #recipient_delimiter = + # DELIVERY TO MAILBOX # # The home_mailbox parameter specifies the optional pathname of a # mailbox file relative to a user's home directory. The default # mailbox file is /var/spool/mail/user or /var/mail/user. Specify # "Maildir/" for qmail-style delivery (the / is required). # #home_mailbox = Mailbox #home_mailbox = Maildir/ # The mail_spool_directory parameter specifies the directory where # UNIX-style mailboxes are kept. The default setting depends on the # system type. # #mail_spool_directory = /var/mail #mail_spool_directory = /var/spool/mail # The mailbox_command parameter specifies the optional external
  • 25. # command to use instead of mailbox delivery. The command is run as # the recipient with proper HOME, SHELL and LOGNAME environment settings. # Exception: delivery for root is done as $default_user. # # Other environment variables of interest: USER (recipient username), # EXTENSION (address extension), DOMAIN (domain part of address), # and LOCAL (the address localpart). # # Unlike other Postfix configuration parameters, the mailbox_command # parameter is not subjected to $parameter substitutions. This is to # make it easier to specify shell syntax (see example below). # # Avoid shell meta characters because they will force Postfix to run # an expensive shell process. Procmail alone is expensive enough. # # IF YOU USE THIS TO DELIVER MAIL SYSTEM-WIDE, YOU MUST SET UP AN # ALIAS THAT FORWARDS MAIL FOR ROOT TO A REAL USER. # #mailbox_command = /some/where/procmail #mailbox_command = /some/where/procmail -a "$EXTENSION" # The mailbox_transport specifies the optional transport in master.cf # to use after processing aliases and .forward files. This parameter # has precedence over the mailbox_command, fallback_transport and # luser_relay parameters. # # Specify a string of the form transport:nexthop, where transport is # the name of a mail delivery transport defined in master.cf. The # :nexthop part is optional. For more details see the sample transport # configuration file. # # NOTE: if you use this feature for accounts not in the UNIX password # file, then you must update the "local_recipient_maps" setting in # the main.cf file, otherwise the SMTP server will reject mail for # non-UNIX accounts with "User unknown in local recipient table". # #mailbox_transport = lmtp:unix:/file/name #mailbox_transport = cyrus # The fallback_transport specifies the optional transport in master.cf # to use for recipients that are not found in the UNIX passwd database. # This parameter has precedence over the luser_relay parameter. # # Specify a string of the form transport:nexthop, where transport is # the name of a mail delivery transport defined in master.cf. The # :nexthop part is optional. For more details see the sample transport # configuration file. # # NOTE: if you use this feature for accounts not in the UNIX password # file, then you must update the "local_recipient_maps" setting in # the main.cf file, otherwise the SMTP server will reject mail for # non-UNIX accounts with "User unknown in local recipient table". # #fallback_transport = lmtp:unix:/file/name #fallback_transport = cyrus #fallback_transport = # The luser_relay parameter specifies an optional destination address # for unknown recipients. By default, mail for unknown@$mydestination, # unknown@[$inet_interfaces] or unknown@[$proxy_interfaces] is returned # as undeliverable. # # The following expansions are done on luser_relay: $user (recipient
  • 26. # username), $shell (recipient shell), $home (recipient home directory), # $recipient (full recipient address), $extension (recipient address # extension), $domain (recipient domain), $local (entire recipient # localpart), $recipient_delimiter. Specify ${name?value} or # ${name:value} to expand value only when $name does (does not) exist. # # luser_relay works only for the default Postfix local delivery agent. # # NOTE: if you use this feature for accounts not in the UNIX password # file, then you must specify "local_recipient_maps =" (i.e. empty) in # the main.cf file, otherwise the SMTP server will reject mail for # non-UNIX accounts with "User unknown in local recipient table". # #luser_relay = $user@other.host #luser_relay = $local@other.host #luser_relay = admin+$local # JUNK MAIL CONTROLS # # The controls listed here are only a very small subset. The file # SMTPD_ACCESS_README provides an overview. # The header_checks parameter specifies an optional table with patterns # that each logical message header is matched against, including # headers that span multiple physical lines. # # By default, these patterns also apply to MIME headers and to the # headers of attached messages. With older Postfix versions, MIME and # attached message headers were treated as body text. # # For details, see "man header_checks". # #header_checks = regexp:/etc/postfix/header_checks # FAST ETRN SERVICE # # Postfix maintains per-destination logfiles with information about # deferred mail, so that mail can be flushed quickly with the SMTP # "ETRN domain.tld" command, or by executing "sendmail -qRdomain.tld". # See the ETRN_README document for a detailed description. # # The fast_flush_domains parameter controls what destinations are # eligible for this service. By default, they are all domains that # this server is willing to relay mail to. # #fast_flush_domains = $relay_domains # SHOW SOFTWARE VERSION OR NOT # # The smtpd_banner parameter specifies the text that follows the 220 # code in the SMTP server's greeting banner. Some people like to see # the mail version advertised. By default, Postfix shows no version. # # You MUST specify $myhostname at the start of the text. That is an # RFC requirement. Postfix itself does not care. # #smtpd_banner = $myhostname ESMTP $mail_name #smtpd_banner = $myhostname ESMTP $mail_name ($mail_version) # PARALLEL DELIVERY TO THE SAME DESTINATION # # How many parallel deliveries to the same user or domain? With local # delivery, it does not make sense to do massively parallel delivery
  • 27. # to the same user, because mailbox updates must happen sequentially, # and expensive pipelines in .forward files can cause disasters when # too many are run at the same time. With SMTP deliveries, 10 # simultaneous connections to the same domain could be sufficient to # raise eyebrows. # # Each message delivery transport has its XXX_destination_concurrency_limit # parameter. The default is $default_destination_concurrency_limit for # most delivery transports. For the local delivery agent the default is 2. #local_destination_concurrency_limit = 2 #default_destination_concurrency_limit = 20 # DEBUGGING CONTROL # # The debug_peer_level parameter specifies the increment in verbose # logging level when an SMTP client or server host name or address # matches a pattern in the debug_peer_list parameter. # debug_peer_level = 2 # The debug_peer_list parameter specifies an optional list of domain # or network patterns, /file/name patterns or type:name tables. When # an SMTP client or server host name or address matches a pattern, # increase the verbose logging level by the amount specified in the # debug_peer_level parameter. # #debug_peer_list = 127.0.0.1 #debug_peer_list = some.domain # The debugger_command specifies the external command that is executed # when a Postfix daemon program is run with the -D option. # # Use "command .. & sleep 5" so that the debugger can attach before # the process marches on. If you use an X-based debugger, be sure to # set up your XAUTHORITY environment variable before starting Postfix. # debugger_command = PATH=/bin:/usr/bin:/usr/local/bin:/usr/X11R6/bin xxgdb $daemon_directory/$process_name $process_id & sleep 5 # If you don't have X installed on the Postfix machine, try: # debugger_command = # PATH=/bin:/usr/bin:/usr/local/bin; export PATH; (echo cont; # echo where) | gdb $daemon_directory/$process_name $process_id 2>&1 # >$config_directory/$process_name.$process_id.log & sleep 5 # INSTALL-TIME CONFIGURATION INFORMATION # # The following parameters are used when installing a new Postfix version. # # sendmail_path: The full pathname of the Postfix sendmail command. # This is the Sendmail-compatible mail posting interface. # sendmail_path = /usr/sbin/sendmail.postfix # newaliases_path: The full pathname of the Postfix newaliases command. # This is the Sendmail-compatible command to build alias databases. # newaliases_path = /usr/bin/newaliases.postfix # mailq_path: The full pathname of the Postfix mailq command. This # is the Sendmail-compatible mail queue listing command.
  • 28. # mailq_path = /usr/bin/mailq.postfix # setgid_group: The group for mail submission and queue management # commands. This must be a group name with a numerical group ID that # is not shared with other accounts, not even with the Postfix account. # setgid_group = postdrop # html_directory: The location of the Postfix HTML documentation. # html_directory = no # manpage_directory: The location of the Postfix on-line manual pages. # manpage_directory = /usr/share/man # sample_directory: The location of the Postfix sample configuration files. # This parameter is obsolete as of Postfix 2.1. # sample_directory = /usr/share/doc/postfix-2.1.5/samples # readme_directory: The location of the Postfix README files. # readme_directory = /usr/share/doc/postfix-2.1.5/README_FILES ********************************************************************** setelah itu anda simpan dengan perintah Esc kemudian :wq • Setelah itu jalankan service postfix anda, serta anda lihat status dari postfix anda dengan perintah seperti dibawah ini. #service postfix restart • Selanjutnya kita buat file /etc/xinetd.d/ipop3 dan /etc/xinetd.d/imap seperti dibawah ini #cd /etc/xinetd.d/ #vi ipop3 service pop3 { socket_type = stream wait = no user = root server = /usr/libexec/dovecot/pop3-login log_on_success += HOST DURATION log_on_failure += HOST disable = no } setelah itu anda simpan dengan perintah Esc kemudian :wq # vi imap service imap { socket_type = stream wait = no
  • 29. user = root server = /usr/libexec/dovecot/imap-login log_on_success += HOST DURATION log_on_failure += HOST disable = no } setelah itu anda simpan dengan perintah Esc kemudian :wq • Setelah itu anda restart service xinetd anda dengan perintah seperti dibawah ini : # service xinetd restart • Setelah cek paket squirrelmail yang ada pada system operasi linux redhat anda dengan cara seperti dibawah ini : #rpm –qa|grep squirrelmain Apabila paket squirrelmail sudah terinstall, mengedit file yang ada pada directory /etc/squirrelmail/config.php dengan perintah : #vi /etc/squirrelmail/config.php edit pada bagian dibawah ini **************************************************************** <?php /** * SquirrelMail Configuration File * Created using the configure script, conf.pl */ global $version; $config_version = '1.4.0'; $config_use_color = 1; $org_name = "dipkom.ilkom"; $org_logo = SM_PATH . 'images/sm_logo.png'; $org_logo_width = '308'; $org_logo_height = '111'; $org_title = "SquirrelMail $version"; $signout_page = ''; $frame_top = '_top'; $provider_uri = 'http://www.squirrelmail.org/'; $provider_name = 'SquirrelMail'; $motd = ""; $squirrelmail_default_language = 'en_US'; $domain = 'dipkom.ilkom.unsri.ac.id'; $imapServerAddress = 'mail.dipkom.ilkom.unsri.ac.id';
  • 30. $imapPort = 143; $useSendmail = true; $smtpServerAddress = 'mail.dipkom.ilkom.unsri.ac.id'; $smtpPort = 25; $sendmail_path = '/usr/sbin/sendmail'; $pop_before_smtp = false; $imap_server_type = 'uw'; $invert_time = false; $optional_delimiter = '/'; $default_folder_prefix = 'mail/'; $trash_folder = 'Trash'; $sent_folder = 'Sent'; $draft_folder = 'Drafts'; $default_move_to_trash = true; $default_move_to_sent = true; $default_save_as_draft = true; $show_prefix_option = true; $list_special_folders_first = true; $use_special_folder_color = true; $auto_expunge = true; $default_sub_of_inbox = false; $show_contain_subfolders_option = true; $default_unseen_notify = 2; $default_unseen_type = 1; $auto_create_special = true; $delete_folder = false; $noselect_fix_enable = false; $default_charset = 'iso-8859-1'; $data_dir = '/var/lib/squirrelmail/prefs/'; $attachment_dir = '/var/spool/squirrelmail/attach/'; $dir_hash_level = 0; $default_left_size = '150'; $force_username_lowercase = false; $default_use_priority = true; $hide_sm_attributions = false; $default_use_mdn = true; $edit_identity = true; $edit_name = true; $allow_thread_sort = true; $allow_server_sort = true; $allow_charset_search = true; $uid_support = true; $plugins[0] = 'delete_move_next'; $plugins[1] = 'squirrelspell'; $plugins[2] = 'newmail'; $theme_css = ''; $theme_default = 0; $theme[0]['PATH'] = SM_PATH . 'themes/default_theme.php'; $theme[0]['NAME'] = 'Default'; $theme[1]['PATH'] = SM_PATH . 'themes/plain_blue_theme.php'; $theme[1]['NAME'] = 'Plain Blue'; $theme[2]['PATH'] = SM_PATH . 'themes/sandstorm_theme.php'; $theme[2]['NAME'] = 'Sand Storm'; $theme[3]['PATH'] = SM_PATH . 'themes/deepocean_theme.php'; $theme[3]['NAME'] = 'Deep Ocean'; $theme[4]['PATH'] = SM_PATH . 'themes/slashdot_theme.php'; $theme[4]['NAME'] = 'Slashdot';
  • 31. $theme[5]['PATH'] = SM_PATH . 'themes/purple_theme.php'; $theme[5]['NAME'] = 'Purple'; $theme[6]['PATH'] = SM_PATH . 'themes/forest_theme.php'; $theme[6]['NAME'] = 'Forest'; $theme[7]['PATH'] = SM_PATH . 'themes/ice_theme.php'; $theme[7]['NAME'] = 'Ice'; $theme[8]['PATH'] = SM_PATH . 'themes/seaspray_theme.php'; $theme[8]['NAME'] = 'Sea Spray'; $theme[9]['PATH'] = SM_PATH . 'themes/bluesteel_theme.php'; $theme[9]['NAME'] = 'Blue Steel'; $theme[10]['PATH'] = SM_PATH . 'themes/dark_grey_theme.php'; $theme[10]['NAME'] = 'Dark Grey'; $theme[11]['PATH'] = SM_PATH . 'themes/high_contrast_theme.php'; $theme[11]['NAME'] = 'High Contrast'; $theme[12]['PATH'] = SM_PATH . 'themes/black_bean_burrito_theme.php'; $theme[12]['NAME'] = 'Black Bean Burrito'; $theme[13]['PATH'] = SM_PATH . 'themes/servery_theme.php'; $theme[13]['NAME'] = 'Servery'; $theme[14]['PATH'] = SM_PATH . 'themes/maize_theme.php'; $theme[14]['NAME'] = 'Maize'; $theme[15]['PATH'] = SM_PATH . 'themes/bluesnews_theme.php'; $theme[15]['NAME'] = 'BluesNews'; $theme[16]['PATH'] = SM_PATH . 'themes/deepocean2_theme.php'; $theme[16]['NAME'] = 'Deep Ocean 2'; $theme[17]['PATH'] = SM_PATH . 'themes/blue_grey_theme.php'; $theme[17]['NAME'] = 'Blue Grey'; $theme[18]['PATH'] = SM_PATH . 'themes/dompie_theme.php'; $theme[18]['NAME'] = 'Dompie'; $theme[19]['PATH'] = SM_PATH . 'themes/methodical_theme.php'; $theme[19]['NAME'] = 'Methodical'; $theme[20]['PATH'] = SM_PATH . 'themes/greenhouse_effect.php'; $theme[20]['NAME'] = 'Greenhouse Effect (Changes)'; $theme[21]['PATH'] = SM_PATH . 'themes/in_the_pink.php'; $theme[21]['NAME'] = 'In The Pink (Changes)'; $theme[22]['PATH'] = SM_PATH . 'themes/kind_of_blue.php'; $theme[22]['NAME'] = 'Kind of Blue (Changes)'; $theme[23]['PATH'] = SM_PATH . 'themes/monostochastic.php'; $theme[23]['NAME'] = 'Monostochastic (Changes)'; $theme[24]['PATH'] = SM_PATH . 'themes/shades_of_grey.php'; $theme[24]['NAME'] = 'Shades of Grey (Changes)'; $theme[25]['PATH'] = SM_PATH . 'themes/spice_of_life.php'; $theme[25]['NAME'] = 'Spice of Life (Changes)'; $theme[26]['PATH'] = SM_PATH . 'themes/spice_of_life_lite.php'; $theme[26]['NAME'] = 'Spice of Life - Lite (Changes)'; $theme[27]['PATH'] = SM_PATH . 'themes/spice_of_life_dark.php'; $theme[27]['NAME'] = 'Spice of Life - Dark (Changes)'; $theme[28]['PATH'] = SM_PATH . 'themes/christmas.php'; $theme[28]['NAME'] = 'Holiday - Christmas'; $theme[29]['PATH'] = SM_PATH . 'themes/darkness.php'; $theme[29]['NAME'] = 'Darkness (Changes)'; $theme[30]['PATH'] = SM_PATH . 'themes/random.php'; $theme[30]['NAME'] = 'Random (Changes every login)'; $theme[31]['PATH'] = SM_PATH . 'themes/midnight.php'; $theme[31]['NAME'] = 'Midnight'; $theme[32]['PATH'] = SM_PATH . 'themes/alien_glow.php'; $theme[32]['NAME'] = 'Alien Glow'; $theme[33]['PATH'] = SM_PATH . 'themes/dark_green.php'; $theme[33]['NAME'] = 'Dark Green'; $theme[34]['PATH'] = SM_PATH . 'themes/penguin.php'; $theme[34]['NAME'] = 'Penguin'; $default_use_javascript_addr_book = false; $addrbook_dsn = '';
  • 32. $addrbook_table = 'address'; $prefs_dsn = ''; $prefs_table = 'userprefs'; $prefs_user_field = 'user'; $prefs_key_field = 'prefkey'; $prefs_val_field = 'prefval'; $no_list_for_subscribe = false; $smtp_auth_mech = 'none'; $imap_auth_mech = 'login'; $use_imap_tls = false; $use_smtp_tls = false; $session_name = 'SQMSESSID'; @include SM_PATH . 'config/config_local.php'; /** * Make sure there are no characters after the PHP closing * tag below (including newline characters and whitespace). * Otherwise, that character will cause the headers to be * sent and regular output to begin, which will majorly screw * things up when we try to send more headers later. */ ?> *********************************************************************** setelah itu anda simpan dengan perintah Esc kemudian :wq • Restart paket xinetd anda dengan perintah seperti dibawah ini : # service xinetd restart Setelah itu anda test konfigurasi mail server anda dengan menggunakan web browser anda dengan ketikkan mail.dipkom.ilkom.unsri.ac.id maka akan muncul layar seperti pada gambar dibawah ini.
  • 33. Apabila muncul layar seperti diatas maka Mailserver anda sudah selesai dan berhasil dibuat. • Dan untuk membuka atau masuk tinggal masukkan user dan password saja. Konfigurasi FTP Server Sebelum penyetingan FTP server terlebih dahulu anda harus mengecek installasi paket FTP yang ada pada system operasi linux, pada modul kali ini kitaa menggunakan type FTP vsftpd. Untuk mengechek apakah paket ini sudah terinstall atau belum anda cuma cukup mengetikkan perintah seperti dibawah ini. #rpm –qa|grep vsftpd Jika paket diatas sudah ada, berarti anda cukup mengkonfigurasi file vsftpd.conf • Pertama – tama anda edit file /etc/vsftpd/vsftpd.conf dengan perintah. # vi /etc/vsftpd/vsftpd.conf *********************************************************************** # Example config file /etc/vsftpd/vsftpd.conf # # The default compiled in settings are fairly paranoid. This sample file # loosens things up a bit, to make the ftp daemon more usable. # Please see vsftpd.conf.5 for all compiled in defaults. # # READ THIS: This example file is NOT an exhaustive list of vsftpd options. # Please read the vsftpd.conf.5 manual page to get a full idea of vsftpd's # capabilities. # # Allow anonymous FTP? (Beware - allowed by default if you comment this out). anonymous_enable=YES # # Uncomment this to allow local users to log in. local_enable=YES
  • 34. # # Uncomment this to enable any form of FTP write command. write_enable=YES # # Default umask for local users is 077. You may wish to change this to 022, # if your users expect that (022 is used by most other ftpd's) local_umask=022 # # Uncomment this to allow the anonymous FTP user to upload files. This only # has an effect if the above global write enable is activated. Also, you will # obviously need to create a directory writable by the FTP user. #anon_upload_enable=YES # # Uncomment this if you want the anonymous FTP user to be able to create # new directories. #anon_mkdir_write_enable=YES # # Activate directory messages - messages given to remote users when they # go into a certain directory. dirmessage_enable=YES # # Activate logging of uploads/downloads. xferlog_enable=YES # # Make sure PORT transfer connections originate from port 20 (ftp-data). connect_from_port_20=YES # # If you want, you can arrange for uploaded anonymous files to be owned by # a different user. Note! Using "root" for uploaded files is not # recommended! #chown_uploads=YES #chown_username=whoever # # You may override where the log file goes if you like. The default is shown # below. #xferlog_file=/var/log/vsftpd.log # # If you want, you can have your log file in standard ftpd xferlog format xferlog_std_format=YES # # You may change the default value for timing out an idle session. #idle_session_timeout=600 # # You may change the default value for timing out a data connection. #data_connection_timeout=120 # # It is recommended that you define on your system a unique user which the # ftp server can use as a totally isolated and unprivileged user. #nopriv_user=ftpsecure # # Enable this and the server will recognise asynchronous ABOR requests. Not # recommended for security (the code is non-trivial). Not enabling it, # however, may confuse older FTP clients. #async_abor_enable=YES # # By default the server will pretend to allow ASCII mode but in fact ignore # the request. Turn on the below options to have the server actually do ASCII # mangling on files when in ASCII mode. # Beware that turning on ascii_download_enable enables malicious remote parties # to consume your I/O resources, by issuing the command "SIZE /big/file" in # ASCII mode. # These ASCII options are split into upload and download because you may wish # to enable ASCII uploads (to prevent uploaded scripts etc. from breaking),
  • 35. # without the DoS risk of SIZE and ASCII downloads. ASCII mangling should be # on the client anyway.. #ascii_upload_enable=YES #ascii_download_enable=YES # # You may fully customise the login banner string: #ftpd_banner=Welcome to blah FTP service. # # You may specify a file of disallowed anonymous e-mail addresses. Apparently # useful for combatting certain DoS attacks. #deny_email_enable=YES # (default follows) #banned_email_file=/etc/vsftpd.banned_emails # # You may specify an explicit list of local users to chroot() to their home # directory. If chroot_local_user is YES, then this list becomes a list of # users to NOT chroot(). #chroot_list_enable=YES # (default follows) #chroot_list_file=/etc/vsftpd.chroot_list # # You may activate the "-R" option to the builtin ls. This is disabled by # default to avoid remote users being able to cause excessive I/O on large # sites. However, some broken FTP clients such as "ncftp" and "mirror" assume # the presence of the "-R" option, so there is a strong case for enabling it. #ls_recurse_enable=YES pam_service_name=vsftpd userlist_enable=YES #enable for standalone mode listen=YES tcp_wrappers=YES *********************************************************************** Simpan file konfigurasi anda dengan cara tekan Esc kemudian anda tekan : wq • Restart paket xinetd anda dengan perintah seperti dibawah ini : # service vsftpd restart Setelah itu anda test konfigurasi mail server anda dengan menggunakan web browser anda dengan ketikkan ftp.dipkom.ilkom.unsri.ac.id maka akan muncul layar seperti pada gambar dibawah ini
  • 36. Sharing Internet dan Proxy Server Sebelum Setting mintalah IP publik ke ISP lengkap dengan netmask, broadcast dan dns- nya. Kemudian tentukan juga IP Lokal yang akan digunakan pada komputer client. Misal pada modul ini ip yang di dapat adalah IP : 10.100.112.15/24 GATEWAY : 10.100.112.1 DNS : 10.100.112.1 • Settinglah IP pada ethernet-0. # vi /etc/sysconfig/network-scripts/ifcfg-eth0 DEVICE=eth0 BOOTPROTO=static IPADDR=10.100.112.15 NETMASK=255.255.255.0 BROADCAST=10.100.112.255 NETWORK=10.100.112.0 ONBOOT=yes Simpan file konfigurasi anda dengan cara tekan Esc kemudian anda tekan : wq • Settinglah IP pada ethernet-1 # vi /etc/sysconfig/network-scripts/ifcfg-eth1, DEVICE=eth1 BOOTPROTO=static IPADDR=192.168.10.1 NETMASK=255.255.255.0 BROADCAST=192.168.10.255 NETWORK=192.168.10.0 Simpan file konfigurasi anda dengan cara tekan Esc kemudian anda tekan : wq Restart paket xinetd anda dengan perintah seperti dibawah ini :
  • 37. # service network restart • Settinglah HostName, Gateway # vi /etc/sysconfig/network NETWORKING=yes HOSTNAME=jarkom GATEWAY=10.100.112.1 Simpan file konfigurasi anda dengan cara tekan Esc kemudian anda tekan : wq • Setting DNS Resolv # vi /etc/resolv.conf nameserver 10.100.112.1 nameserver 192.168.10.1 • Simpan file konfigurasi anda dengan cara tekan Esc kemudian anda tekan : wq • Restart paket named anda dengan perintah seperti dibawah ini : # service named restart • Setting IP Forwarding, agar paket dari jaringan client dapat berjalan ke jaringan di luarnya melalui gateway. # vi /etc/sysctl.conf rubah net.ipv4.ip_forward = 0 menjadi net.ipv4.ip_forward = 1 • Simpan file konfigurasi anda dengan cara tekan Esc kemudian anda tekan : wq • Restart paket xinetd anda dengan perintah seperti dibawah ini : # service network restart • Sekarang lakukan testing dengan ngeping ke:gateway dan website (google.com) # ping 10.100.112.1 PING 10.100.112.1 (10.100.112.1) 56(84) bytes of data. 64 bytes from 10.100.112.1: icmp_seq=0 ttl=64 time=0.811 ms 64 bytes from 10.100.112.1: icmp_seq=1 ttl=64 time=0.822 ms 64 bytes from 10.100.112.1: icmp_seq=2 ttl=64 time=0.828 ms 64 bytes from 10.100.112.1: icmp_seq=3 ttl=64 time=0.820 ms # ping www.google.com PING google.com (66.94.234.13) 56(84) bytes of data. 64 bytes from w2.rc.vip.scd.google.com (66.94.234.13): icmp_seq=1 ttl=50 time=778 ms 64 bytes from w2.rc.vip.scd.google.com (66.94.234.13): icmp_seq=2 ttl=49 time=769 ms6
  • 38. Jika hasilnya Reply berarti settingnya sudah berhasil. • Agar client atau jaringan lokal (LAN) yang terhubung dengan sistem linux anda (ke eth1) dapat mengakses internet, maka settinglah NAT IPTables dan Forwarding. # /etc/init.d/iptables stop # vi /etc/rc.d/rc.nat Kemudian ketikan sbb #!/bin/sh # # This script will be executed *after* all the other init scripts. # You can put your own initialization stuff in here if you don't # want to do the full Sys V style init stuff. #Hapus aturan default /sbin/iptables -F /sbin/iptables -F INPUT /sbin/iptables -F OUTPUT /sbin/iptables -F FORWARD /sbin/iptables -t mangle -F /sbin/iptables -t nat -F /sbin/iptables -t filter -F #-----INPUT dan LoopBack----# # Allow unlimited traffic on the loopback interface iptables -A INPUT -i lo -j ACCEPT iptables -A FORWARD -i lo -j ACCEPT iptables -A OUTPUT -o lo -j ACCEPT # Set default policies/buat jalur tutup semua dan nantinya baru policy open iptables -t nat -P PREROUTING ACCEPT iptables -t nat -P POSTROUTING ACCEPT iptables -t nat -P OUTPUT ACCEPT iptables -t nat -A POSTROUTING -s 192.168.50.0/27 -j MASQUERADE • Simpan file konfigurasi anda dengan cara tekan Esc kemudian anda tekan : wq • Ubah Permision file rc.nat # chmod +x /etc/rc.d/rc.nat • Simpanlah semua hasil konfigurasi di /etc/rc.local, sehingga Anda tidak perlu harus melakukan command-command sebelumnya setiap kali sistem di on-kan atau di-restart. Lakukan langkah berikut
  • 39. # vi /etc/rc.local :-- Tambahkan script berikut --: /etc/rc.d/rc.nat • Restart paket iptables anda dengan perintah seperti dibawah ini : # service iptables restart #/etc/rc.local • Konfigurasikan IP untuk klien, yaitu 192.168.10.2 • Setelah itu anda test konfigurasi sharing server anda dengan menggunakan ping dengan menggunakan cmd (ping ke alamat 10.100.112.1) Kalau hasilnya seperti diatas maka NAT anda sudah berhasil Test konfigurasi menggunakan web browser di sisi klient anda dengan ketikkan google.com maka akan muncul layar seperti pada gambar dibawah ini
  • 40. DHCP SERVER – LINUX # rpm -qa|grep dhcp Jika program DHCP belum ada, installah dengan cara sbb. Masukkan CD Rom Redhat #2 dan ketiklah perintah berikut ini. # mount /media/cdrom # cd RedHat # ls –l # cd RPMS # ls –l dhcp* # rpm –ivh dhcp* Di REDHAT secara default file dhcpd.conf berada di dalam direktori /usr/share/doc/dhcp-3.0.1 #cd /usr/share/doc/dhcp-3.0.1 #ls Pada saat gunakan perintah ls maka akan tampil file dhcpd.conf.sample. File ini harus kita copy ke directori /etc #cp dhcpd.conf.sample /etc/dhcpd.conf Kemudian Edit file dhcpd.conf # cd /etc # vi dhcpd.conf
  • 41. Kita edit bagian disini (bagian ini sebuah bagian penulis berikan tanda # agar perintah di file dhcp menjadi komentar) ddns-update-style interim; ignore client-updates; #subnet 192.168.0.0 netmask 255.255.255.0 { # --- default gateway # option routers 192.168.0.1; # option subnet-mask 255.255.255.0; # option nis-domain "domain.org"; # option domain-name "domain.org"; # option domain-name-servers 192.168.1.1; # option time-offset -18000; # Eastern Standard Time # option ntp-servers 192.168.1.1; # option netbios-name-servers 192.168.1.1; # --- Selects point-to-point node (default is hybrid). Don't change this unless # -- you understand Netbios very well # option netbios-node-type 2; # range dynamic-bootp 192.168.0.128 192.168.0.254; # default-lease-time 21600; # max-lease-time 43200; # we want the nameserver to appear at a fixed address # host ns { # next-server marvin.redhat.com; # hardware ethernet 12:34:56:78:AB:CD;
  • 42. # fixed-address 207.175.42.254; #} #} Tambahkan perintah sebagai berikut subnet 192.168.10.0 netmask 255.255.255.0 { range 192.168.10.2 192.168.10.20; option domain-name "ilkom.unsri.ac.id"; option domain-name-servers 192.168.10.1; option broadcast-address 192.168.10.255; option routers 192.168.10.1; option subnet-mask 255.255.255.0; } • Simpan file konfigurasi anda dengan cara tekan Esc kemudian anda tekan : wq • Restart paket iptables anda dengan perintah seperti dibawah ini : # service dhcpd restart Proxy Server Setting untuk proxy awalnya hampir sama dengan setting untuk sharing internet tetapi di bagian NAT nya kita direct ke port yang kita tuju dan juga kita harus mengaktifkan squid di linux • Settinglah IP pada ethernet-0. # vi /etc/sysconfig/network-scripts/ifcfg-eth0
  • 43. DEVICE=eth0 BOOTPROTO=static IPADDR=10.100.112.15 NETMASK=255.255.255.0 BROADCAST=10.100.112.255 NETWORK=10.100.112.0 ONBOOT=yes Simpan file konfigurasi anda dengan cara tekan Esc kemudian anda tekan : wq • Settinglah IP pada ethernet-1 # vi /etc/sysconfig/network-scripts/ifcfg-eth1, DEVICE=eth1 BOOTPROTO=static IPADDR=192.168.10.1 NETMASK=255.255.255.0 BROADCAST=192.168.10.255 NETWORK=192.168.10.0 Simpan file konfigurasi anda dengan cara tekan Esc kemudian anda tekan : wq Restart paket xinetd anda dengan perintah seperti dibawah ini : # service network restart • Settinglah HostName, Gateway # vi /etc/sysconfig/network NETWORKING=yes HOSTNAME=jarkom GATEWAY=10.100.112.1 Simpan file konfigurasi anda dengan cara tekan Esc kemudian anda tekan : wq • Setting DNS Resolv # vi /etc/resolv.conf nameserver 10.100.112.1 nameserver 192.168.10.1 • Simpan file konfigurasi anda dengan cara tekan Esc kemudian anda tekan : wq • Restart paket named anda dengan perintah seperti dibawah ini : # service named restart • Setting IP Forwarding, agar paket dari jaringan client dapat berjalan ke jaringan di luarnya melalui gateway. # vi /etc/sysctl.conf rubah net.ipv4.ip_forward = 0 menjadi net.ipv4.ip_forward = 1 • Simpan file konfigurasi anda dengan cara tekan Esc kemudian anda tekan : wq • Restart paket xinetd anda dengan perintah seperti dibawah ini : # service network restart
  • 44. Sekarang lakukan testing dengan ngeping ke:gateway dan website (google.com) # ping 10.100.112.1 PING 10.100.112.1 (10.100.112.1) 56(84) bytes of data. 64 bytes from 10.100.112.1: icmp_seq=0 ttl=64 time=0.811 ms 64 bytes from 10.100.112.1: icmp_seq=1 ttl=64 time=0.822 ms 64 bytes from 10.100.112.1: icmp_seq=2 ttl=64 time=0.828 ms 64 bytes from 10.100.112.1: icmp_seq=3 ttl=64 time=0.820 ms # ping www.google.com PING google.com (66.94.234.13) 56(84) bytes of data. 64 bytes from w2.rc.vip.scd.google.com (66.94.234.13): icmp_seq=1 ttl=50 time=778 ms 64 bytes from w2.rc.vip.scd.google.com (66.94.234.13): icmp_seq=2 ttl=49 time=769 ms6 Jika hasilnya Reply berarti settingnya sudah berhasil. • Agar client atau jaringan lokal (LAN) yang terhubung dengan sistem linux anda (ke eth1) dapat mengakses internet, maka settinglah NAT IPTables dan Forwarding. # /etc/init.d/iptables stop # vi /etc/rc.d/rc.nat Kemudian ketikan sbb #!/bin/sh # # This script will be executed *after* all the other init scripts. # You can put your own initialization stuff in here if you don't # want to do the full Sys V style init stuff. #Hapus aturan default /sbin/iptables -F /sbin/iptables -F INPUT /sbin/iptables -F OUTPUT /sbin/iptables -F FORWARD /sbin/iptables -t mangle -F /sbin/iptables -t nat -F /sbin/iptables -t filter -F #-----INPUT dan LoopBack----# # Allow unlimited traffic on the loopback interface iptables -A INPUT -i lo -j ACCEPT iptables -A FORWARD -i lo -j ACCEPT iptables -A OUTPUT -o lo -j ACCEPT # Set default policies/buat jalur tutup semua dan nantinya baru policy open iptables -t nat -P PREROUTING ACCEPT iptables -t nat -P POSTROUTING ACCEPT iptables -t nat -P OUTPUT ACCEPT
  • 45. iptables -t nat -A POSTROUTING -s 192.168.50.0/27 -j MASQUERADE iptables -t nat -A PREROUTING -p tcp -i eth1 --dport 80 -j REDIRECT --to-port 3128 • Simpan file konfigurasi anda dengan cara tekan Esc kemudian anda tekan : wq • Ubah Permision file rc.nat # chmod +x /etc/rc.d/rc.nat • Simpanlah semua hasil konfigurasi di /etc/rc.local, sehingga Anda tidak perlu harus melakukan command-command sebelumnya setiap kali sistem di on-kan atau di-restart. Lakukan langkah berikut # vi /etc/rc.local :-- Tambahkan script berikut --: /etc/rc.d/rc.nat • Restart paket iptables anda dengan perintah seperti dibawah ini : # service iptables restart #/etc/rc.local • Setting Squid Sebelum kita setting sebaik kita ganti dulu file squid.conf dengan perintah #/etc/squid/mv squid.conf squid_lamo.conf Kemudian kita buat file squid.conf dengan perintah #/etc/squid/vi squid.conf Kemudian ketikan isi di file squid seperti di bawah ini (Pada kasus ini kita hanya membuat rule klient tidak bisa membuka /mengkases situs atau kata kunci yang sudah kita list) #Redirect port 80 ke port 3128 http_port 3128 #Alokasi memori penyimpanan data sementara (perhatikan nial ram anda) cache_mem 64 MB #Data yang > 4MB tidak di simpan di hardisk maximum_object_size 4096 KB #Lokasi penyimpanan cache maximum_object_size 4096 KB #Hak Akses acl all src 0.0.0.0/0.0.0.0 acl manager proto cache_object acl localhost src 127.0.0.1/255.255.255.255 acl lan src 192.168.60.0/255.255.255.0
  • 46. acl domain_terlarang dstdomain "/etc/squid/domain_terlarang.txt" acl kata_blacklist url_regex -i "/etc/squid/kata_blacklist.txt" acl SSL_ports port 443 563 acl Safe_ports port 80 81 21 20 443 563 70 210 1025-65535 acl Safe_ports port 280 # http-mgmt acl Safe_ports port 488 # gss-http acl Safe_ports port 591 # filemaker acl Safe_ports port 777 # multiling http acl icq_ports port 5190 # ICQ login port acl irc_ports port 6667-7007 # mIRC port http_access deny !Safe_ports http_access deny lan domain_terlarang http_access deny lan kata_blacklist http_access allow lan http_access allow manager localhost http_access deny manager cache_mgr admin.ilkom@unsri.ac.id visible_hostname admin.ilkom.unsri.ac.id httpd_accel_host virtual httpd_accel_port 80 httpd_accel_with_proxy on httpd_accel_uses_host_header on • Simpan file konfigurasi anda dengan cara tekan Esc kemudian anda tekan : wq • Buat dile domain_terlarang.txt #vi /etc/squid/domain_terlarang.txt 17tahun.com www.17tahun.com dll • Simpan file konfigurasi anda dengan cara tekan Esc kemudian anda tekan : wq • Buat file kata_blacklist.txt • #vi /etc/squid/ kata_blacklist.txt sex porno dada dll • Simpan file konfigurasi anda dengan cara tekan Esc kemudian anda tekan : wq • Kemudian aktifkan squidnya dengan perintah #service squid restart Test konfigurasi menggunakan web browser di sisi klient anda dengan ketikkan google.com, kemudian di kolom search enginenya ketikan kata sex, maka akan muncul layar seperti pada gambar dibawah ini